

SmartFIT Installation Guide
Page 3
SmartFIT Distance Cards x2 (included in the box). Optional: Level Tool (Experienced Users only) Projection Surface: Fixed Frame Screen, Fixed Frame ALR Screen (Ambient Light Rejection) or "prepared" Wall surface (no Fixed Frame Screen). A Step Preparation What's Required Optoma CinemaX Series 4K Ultra Short Throw Projector. Optional: Measuring Tape (if using the Wall as a projection surface or following experienced users' path). Smartphone with iOS or Android / access to Apple Store or Google Play for download of Optoma SmartFIT App.
SmartFIT Distance Cards x2 (included in the box). Optional: Level Tool (Experienced Users only) Projection Surface: Fixed Frame Screen, Fixed Frame ALR Screen (Ambient Light Rejection) or "prepared" Wall surface (no Fixed Frame Screen). A Step Preparation What's Required Optoma CinemaX Series 4K Ultra Short Throw Projector. Optional: Measuring Tape (if using the Wall as a projection surface or following experienced users' path). Smartphone with iOS or Android / access to Apple Store or Google Play for download of Optoma SmartFIT App.
SmartFIT Installation Guide
Page 4
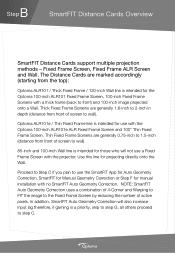
...line is intended for use the SmartFIT App for Auto Geometry Correction, SmartFIT for Manual Geometry Correction or Step F for manual installation with the Optoma 100-inch ALR101e ALR Fixed Frame Screen and 100" Thin Fixed Frame Screen. Proceed to Step C if you plan to use with no ...inch Wall line is a priority, skip to step G, all others proceed to wall). Use this line for the Optoma 100-inch ALR101 Fixed Frame Screen, 100-inch Fixed Frame Screens with the projector. In addition, SmartFIT Auto Geometry Correction will not use a Fixed Frame Screen with a thick frame (back to the...
...line is intended for use the SmartFIT App for Auto Geometry Correction, SmartFIT for Manual Geometry Correction or Step F for manual installation with the Optoma 100-inch ALR101e ALR Fixed Frame Screen and 100" Thin Fixed Frame Screen. Proceed to Step C if you plan to use with no ...inch Wall line is a priority, skip to step G, all others proceed to wall). Use this line for the Optoma 100-inch ALR101 Fixed Frame Screen, 100-inch Fixed Frame Screens with the projector. In addition, SmartFIT Auto Geometry Correction will not use a Fixed Frame Screen with a thick frame (back to the...

SmartFIT Installation Guide
Page 6
To determine the proper position for installation of the Fixed Frame Screen on the wall, use the "Wall" as a projection surface - Fixed Frame Screen please proceed to use the projector test pattern (see next page). If you plan to STEP E. 3. do not mount the Fixed Frame Screen until instructed later in this Installation Guide. 2. C Step Fixed Frame Installation with SmartFIT 1. Assemble Fixed Frame Screen (non-ALR or ALR) -
To determine the proper position for installation of the Fixed Frame Screen on the wall, use the "Wall" as a projection surface - Fixed Frame Screen please proceed to use the projector test pattern (see next page). If you plan to STEP E. 3. do not mount the Fixed Frame Screen until instructed later in this Installation Guide. 2. C Step Fixed Frame Installation with SmartFIT 1. Assemble Fixed Frame Screen (non-ALR or ALR) -

SmartFIT Installation Guide
Page 7
Turn on the remote control. Press menu key on projector and follow the out-of-box first-time setup wizard 5. Select "Setup" Test Pattern choose "Yellow Border" Pattern 4.
Turn on the remote control. Press menu key on projector and follow the out-of-box first-time setup wizard 5. Select "Setup" Test Pattern choose "Yellow Border" Pattern 4.

SmartFIT Installation Guide
Page 8
... or entertainment center/table until you feel the Distance Card hook the rear feet (closest to adjust the projector. IMPORTANT : Yellow test pattern MUST be necessary to the wall or projection surface). 7. After using the yellow screen pattern as a guide. 6. Fold the card up ... the Fixed Frame Screen. SmartFIT Distance Card Info). Attach the SmartFIT Distance Cards to the Wall using Distance Cards, it may be outside of the projector by sliding the distance card in from the side (left and right) until the Distance Card touches the wall. 8.
... or entertainment center/table until you feel the Distance Card hook the rear feet (closest to adjust the projector. IMPORTANT : Yellow test pattern MUST be necessary to the wall or projection surface). 7. After using the yellow screen pattern as a guide. 6. Fold the card up ... the Fixed Frame Screen. SmartFIT Distance Card Info). Attach the SmartFIT Distance Cards to the Wall using Distance Cards, it may be outside of the projector by sliding the distance card in from the side (left and right) until the Distance Card touches the wall. 8.
SmartFIT Installation Guide
Page 9
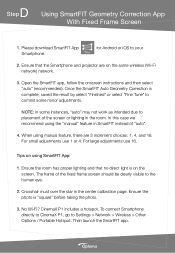
..." (recommended). Ensure the room has proper lighting and that the Smartphone and projector are 3 increment choices: 1, 4, and 16. Ensure that no direct light is on the same wireless (Wi-Fi network) network. 3. CinemaX P1 includes a hotspot. To connect Smartphone directly to CinemaX P1, go to your 2. In this case we recommend using the...
..." (recommended). Ensure the room has proper lighting and that the Smartphone and projector are 3 increment choices: 1, 4, and 16. Ensure that no direct light is on the same wireless (Wi-Fi network) network. 3. CinemaX P1 includes a hotspot. To connect Smartphone directly to CinemaX P1, go to your 2. In this case we recommend using the...

SmartFIT Installation Guide
Page 10
... larger than 0.50-inch to the INSIDE border of the yellow test pattern as possible. Press menu key on the top and sides - Turn on projector and follow the on-screen first-time setup instructions. 2. we strongly recommend the use of 100-inch diagonal (87-inch wide) or 120-inch...
... larger than 0.50-inch to the INSIDE border of the yellow test pattern as possible. Press menu key on the top and sides - Turn on projector and follow the on-screen first-time setup instructions. 2. we strongly recommend the use of 100-inch diagonal (87-inch wide) or 120-inch...

SmartFIT Installation Guide
Page 11
... the only object in the room. For large adjustments use 1 or 4. for Android or iOS to placement of "auto". 4. Please ensure that the Smartphone and projector are 3 increment choices: 1, 4, and 16. NOTE: In some minor adjustments. When using the "manual" feature in the center calibration page and the photo must over...
... the only object in the room. For large adjustments use 1 or 4. for Android or iOS to placement of "auto". 4. Please ensure that the Smartphone and projector are 3 increment choices: 1, 4, and 16. NOTE: In some minor adjustments. When using the "manual" feature in the center calibration page and the photo must over...
SmartFIT Installation Guide
Page 13
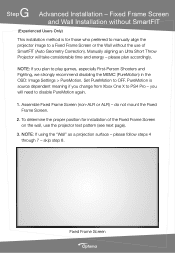
Fixed Frame Screen and Wall Installation without the use the projector test pattern (see next page). 3. Set PureMotion to disable PureMotion again. 1. PureMotion is for installation of the Fixed Frame Screen on the wall, use of ... (Auto Geometry Correction). please follow steps 4 through 7 - you plan to PS4 Pro - To determine the proper position for those who preferred to manually align the projector image to a Fixed Frame Screen or the Wall without SmartFIT (Experienced Users Only) This installation method is source dependent meaning if you change from Xbox...
Fixed Frame Screen and Wall Installation without the use the projector test pattern (see next page). 3. Set PureMotion to disable PureMotion again. 1. PureMotion is for installation of the Fixed Frame Screen on the wall, use of ... (Auto Geometry Correction). please follow steps 4 through 7 - you plan to PS4 Pro - To determine the proper position for those who preferred to manually align the projector image to a Fixed Frame Screen or the Wall without SmartFIT (Experienced Users Only) This installation method is source dependent meaning if you change from Xbox...

SmartFIT Installation Guide
Page 14
Turn on the remote control. Press menu key on projector and follow the out-of-box first-time setup wizard 5. 4. Select "Setup" Test Pattern choose "Yellow Border" Pattern
Turn on the remote control. Press menu key on projector and follow the out-of-box first-time setup wizard 5. 4. Select "Setup" Test Pattern choose "Yellow Border" Pattern

SmartFIT Installation Guide
Page 15
... the top and sides of the yellow frame is ready for the "desired projection method" (see page 4 - 6. SmartFIT Distance Card Info). Wall users STOP HERE - projector is 100% horizontal and the side of using the Distance Cards, the Installation Reference Guide (page 17) can be perfectly aligned with the wall. Fold... the card up or down at a 90-degree angle for use. Move the projector and or entertainment center/table until you feel the Distance Card hook the rear foot. Use the level to the next step.
... the top and sides of the yellow frame is ready for the "desired projection method" (see page 4 - 6. SmartFIT Distance Card Info). Wall users STOP HERE - projector is 100% horizontal and the side of using the Distance Cards, the Installation Reference Guide (page 17) can be perfectly aligned with the wall. Fold... the card up or down at a 90-degree angle for use. Move the projector and or entertainment center/table until you feel the Distance Card hook the rear foot. Use the level to the next step.
SmartFIT Installation Guide
Page 16
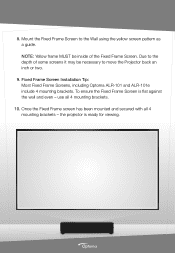
... Fixed Frame Screen is ready for viewing. Due to the depth of some screens it may be inside of the Fixed Frame Screen. the projector is flat against the wall and even - Once the Fixed Frame screen has been mounted and secured with all 4 mounting brackets. 10.... use all 4 mounting brackets - 8. Fixed Frame Screen Installation Tip: Most Fixed Frame Screens, including Optoma ALR-101 and ALR-101e include 4 mounting brackets. NOTE: Yellow frame MUST be necessary to the Wall using the yellow screen pattern as a guide. Mount...
... Fixed Frame Screen is ready for viewing. Due to the depth of some screens it may be inside of the Fixed Frame Screen. the projector is flat against the wall and even - Once the Fixed Frame screen has been mounted and secured with all 4 mounting brackets. 10.... use all 4 mounting brackets - 8. Fixed Frame Screen Installation Tip: Most Fixed Frame Screens, including Optoma ALR-101 and ALR-101e include 4 mounting brackets. NOTE: Yellow frame MUST be necessary to the Wall using the yellow screen pattern as a guide. Mount...

SmartFIT Installation Guide
Page 18
... sell a Ceiling Mount. Any use of box setup. Optoma Customer Service will not work with issues related directly to the mount as ceiling mounting Ultra Short Throw can result in serious injury. Ceiling Orientation ... 300 (unit:mm) Screw Size: M6 screws x 4 NOTE : Ceiling Mount Orientation is at the user's discretion. It is only available in the Ceiling Mount Orientation. Optoma recommends that a professional install the projector in the OSD.
... sell a Ceiling Mount. Any use of box setup. Optoma Customer Service will not work with issues related directly to the mount as ceiling mounting Ultra Short Throw can result in serious injury. Ceiling Orientation ... 300 (unit:mm) Screw Size: M6 screws x 4 NOTE : Ceiling Mount Orientation is at the user's discretion. It is only available in the Ceiling Mount Orientation. Optoma recommends that a professional install the projector in the OSD.

User Manual
Page 1
DLP® Projector User manual
DLP® Projector User manual
User Manual
Page 2
... Remote control...13 Pairing your Bluetooth remote control with the projector 14 SETUP AND INSTALLATION 15 Installing the projector...15 Connecting sources to the projector 16 Adjusting the projector image...17 Remote setup...18 USING THE PROJECTOR 19 Powering on / off the projector 19 Using the projector as wireless speaker 23 Home screen overview...24 System date...
... Remote control...13 Pairing your Bluetooth remote control with the projector 14 SETUP AND INSTALLATION 15 Installing the projector...15 Connecting sources to the projector 16 Adjusting the projector image...17 Remote setup...18 USING THE PROJECTOR 19 Powering on / off the projector 19 Using the projector as wireless speaker 23 Home screen overview...24 System date...

User Manual
Page 4
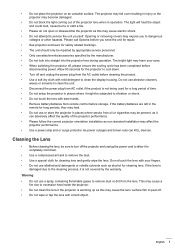
...does not block ventilation. This is equipped with arrow head within an equilateral triangle is intended to alert the user to install the projector in the projector or something is loose inside. 4 English To avoid electric shock, the unit and its peripherals must be of sufficient magnitude to ...the power plug. Physical damage/abuse would be (but not limited to persons. Do not remove the grounding pin on to the projector. ±± Projector has been exposed to insert the plug into the outlet, contact an electrician. SAFETY The lightning flash with a three-pin grounding...
...does not block ventilation. This is equipped with arrow head within an equilateral triangle is intended to alert the user to install the projector in the projector or something is loose inside. 4 English To avoid electric shock, the unit and its peripherals must be of sufficient magnitude to ...the power plug. Physical damage/abuse would be (but not limited to persons. Do not remove the grounding pin on to the projector. ±± Projector has been exposed to insert the plug into the outlet, contact an electrician. SAFETY The lightning flash with a three-pin grounding...
User Manual
Page 5
...not covered by the warranty. If the battery/batteries are left in operation. This may affect the projector performance. ‡‡ Use a power strip and or surge protector. Please call Optoma before disconnecting power. The light will heat the object and could melt, cause burns or start ...a fire. ‡‡ Please do not open or disassemble the projector as non standard installation may cause a fire due to excessive...
...not covered by the warranty. If the battery/batteries are left in operation. This may affect the projector performance. ‡‡ Use a power strip and or surge protector. Please call Optoma before disconnecting power. The light will heat the object and could melt, cause burns or start ...a fire. ‡‡ Please do not open or disassemble the projector as non standard installation may cause a fire due to excessive...
User Manual
Page 6
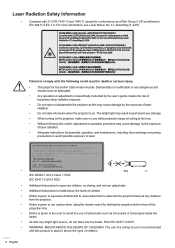
...135; Notice is given to the user to avoid the use of laser radiation. ‡‡ Do not stare into beam when the projector is recommended with this may cause damage by the exposure of children. 6 English Disassembly or modification is given to supervise children and to never... adjustment not specifically instructed by the user's guide creates the risk of hazardous laser radiation exposure. ‡‡ Do not open or disassemble the projector as defined in IEC 62471-5:Ed. 1.0. The use optical aids. ‡‡ Additional instructions to install above the eyes of laser radiation. &#...
...135; Notice is given to the user to avoid the use of laser radiation. ‡‡ Do not stare into beam when the projector is recommended with this may cause damage by the exposure of children. 6 English Disassembly or modification is given to supervise children and to never... adjustment not specifically instructed by the user's guide creates the risk of hazardous laser radiation exposure. ‡‡ Do not open or disassemble the projector as defined in IEC 62471-5:Ed. 1.0. The use optical aids. ‡‡ Additional instructions to install above the eyes of laser radiation. &#...

User Manual
Page 7
and/ or (10) disorientation. It is recommended that users take frequent breaks to certain flashing images or lights contained in certain Projector pictures or video games. English 7 It is recommended that the viewer's eyes are level with the screen. ‡‡ ...Watching 3D projection while wearing 3D glasses for an extended period of these images. Accordingly, DO NOT place your 3D PROJECTOR near open stairwells, cables, balconies, or other objects that can be closely supervised when viewing these effects. 3D Safety Information Please follow all...
and/ or (10) disorientation. It is recommended that users take frequent breaks to certain flashing images or lights contained in certain Projector pictures or video games. English 7 It is recommended that the viewer's eyes are level with the screen. ‡‡ ...Watching 3D projection while wearing 3D glasses for an extended period of these images. Accordingly, DO NOT place your 3D PROJECTOR near open stairwells, cables, balconies, or other objects that can be closely supervised when viewing these effects. 3D Safety Information Please follow all...

User Manual
Page 9
...;‡ Low Voltage Directive 2014/35/EC ‡‡ R & TTE Directive 1999/5/EC (if product has RF function) WEEE Disposal instructions Do not throw this projector. Notice: Canadian users This Class B digital apparatus complies with Part 15 of the FCC Rules. Remarque à l'intention des utilisateurs canadiens Cet appareil numerique de...
...;‡ Low Voltage Directive 2014/35/EC ‡‡ R & TTE Directive 1999/5/EC (if product has RF function) WEEE Disposal instructions Do not throw this projector. Notice: Canadian users This Class B digital apparatus complies with Part 15 of the FCC Rules. Remarque à l'intention des utilisateurs canadiens Cet appareil numerique de...


