

User Manual English
Page 1
Please read this manual thoroughly before making connections and plugging in this manual for purchasing an Onkyo Tuner. Please retain this manual will enable you for future reference. En-14 Appendix Troubleshooting En-22 Specifications En-23 En Following the instructions in the unit. Enjoying Audio Sources...... DAB/FM Tuner T-4030 Instruction Manual Contents Introduction En-2 Connections En-10 Thank you to obtain optimum performance and listening enjoyment from your new Tuner.
Please read this manual thoroughly before making connections and plugging in this manual for purchasing an Onkyo Tuner. Please retain this manual will enable you for future reference. En-14 Appendix Troubleshooting En-22 Specifications En-23 En Following the instructions in the unit. Enjoying Audio Sources...... DAB/FM Tuner T-4030 Instruction Manual Contents Introduction En-2 Connections En-10 Thank you to obtain optimum performance and listening enjoyment from your new Tuner.
User Manual English
Page 2
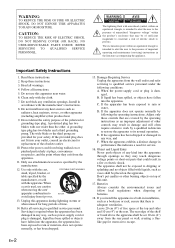
... OUVRIR The lightning flash with liquids, such as power-supply cord or plug is intended to alert the user to the presence of the obsolete outlet. 10. Do not use attachments/accessories specified by the manufacturer, or sold with dry cloth. 7. Important Safety Instructions 1. A grounding type plug has two blades and a third grounding prong. Refer all servicing to rain or...
... OUVRIR The lightning flash with liquids, such as power-supply cord or plug is intended to alert the user to the presence of the obsolete outlet. 10. Do not use attachments/accessories specified by the manufacturer, or sold with dry cloth. 7. Important Safety Instructions 1. A grounding type plug has two blades and a third grounding prong. Refer all servicing to rain or...
User Manual English
Page 3
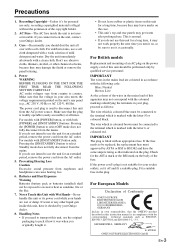
Power WARNING BEFORE PLUGGING IN THE UNIT FOR THE FIRST TIME, READ THE FOLLOWING SECTION CAREFULLY. Make sure that the plug is not suitable for a long time, because they may not work properly the next time you need to use this unit for your Onkyo dealer. 8. For British models Replacement and mounting of an AC plug on the power supply cord of this unit should dust the unit all times. IMPORTANT The...
Power WARNING BEFORE PLUGGING IN THE UNIT FOR THE FIRST TIME, READ THE FOLLOWING SECTION CAREFULLY. Make sure that the plug is not suitable for a long time, because they may not work properly the next time you need to use this unit for your Onkyo dealer. 8. For British models Replacement and mounting of an AC plug on the power supply cord of this unit should dust the unit all times. IMPORTANT The...
User Manual English
Page 4
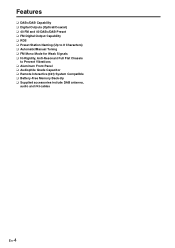
Features ❑ DAB+/DAB Capability ❑ Digital Outputs (Optical/Coaxial) ❑ 40 FM and 40 DAB+/DAB Preset ❑ FM Digital Output Capability ❑ RDS ❑ Preset Station Naming (Up to 8 Characters) ❑ Automatic/Manual Tuning ❑ FM Mono Mode for Weak Signals ❑ Hi-Rigidity, Anti-Resonant Full Flat Chassis to Prevent Vibrations ❑ Aluminum Front Panel ❑ Audiophile Grade Capacitor ❑ Remote Interactive (R) System Compatible ❑ Battery-Free Memory Back-Up ❑ Supplied accessories include DAB antenna, audio and R cables En-4
Features ❑ DAB+/DAB Capability ❑ Digital Outputs (Optical/Coaxial) ❑ 40 FM and 40 DAB+/DAB Preset ❑ FM Digital Output Capability ❑ RDS ❑ Preset Station Naming (Up to 8 Characters) ❑ Automatic/Manual Tuning ❑ FM Mono Mode for Weak Signals ❑ Hi-Rigidity, Anti-Resonant Full Flat Chassis to Prevent Vibrations ❑ Aluminum Front Panel ❑ Audiophile Grade Capacitor ❑ Remote Interactive (R) System Compatible ❑ Battery-Free Memory Back-Up ❑ Supplied accessories include DAB antenna, audio and R cables En-4

User Manual English
Page 5
.../FM Antenna 10 Connecting Your Components 11 Before Making Any Connections 11 Cable and Jacks 11 Connecting to an Amplifier 12 Connecting Onkyo R Components 13 Connecting the Power Cord 13 Turning On and Standby 13 Listening to the Radio 14 Listening to FM Stations 14 Using RDS 17 Listening to DAB Digital Radio 18 Advanced Setup 21 Setting the Display Brightness 21 Changing radio wave intensity 21 Advanced Setup Menu 21 Troubleshooting 22 Power 22 Audio 22 Tuner 22 Remote Controller 22 Specifications...
.../FM Antenna 10 Connecting Your Components 11 Before Making Any Connections 11 Cable and Jacks 11 Connecting to an Amplifier 12 Connecting Onkyo R Components 13 Connecting the Power Cord 13 Turning On and Standby 13 Listening to the Radio 14 Listening to FM Stations 14 Using RDS 17 Listening to DAB Digital Radio 18 Advanced Setup 21 Setting the Display Brightness 21 Changing radio wave intensity 21 Advanced Setup Menu 21 Troubleshooting 22 Power 22 Audio 22 Tuner 22 Remote Controller 22 Specifications...

User Manual English
Page 6
...: Installing the Batteries Remote controller (RC-852T) and two batteries (AAA/R03) Audio cable R cable To use the remote controller for a long time, remove the batteries to prevent damage from leakage or corrosion. DAB antenna * In catalogs and on packaging, the letter at the end of color. Remote control sensor T-4030 30° 30° Approx. 5 m (16 ft.) En-6 Specifications and operation are the same regardless of the product name indicates...
...: Installing the Batteries Remote controller (RC-852T) and two batteries (AAA/R03) Audio cable R cable To use the remote controller for a long time, remove the batteries to prevent damage from leakage or corrosion. DAB antenna * In catalogs and on packaging, the letter at the end of color. Remote control sensor T-4030 30° 30° Approx. 5 m (16 ft.) En-6 Specifications and operation are the same regardless of the product name indicates...

User Manual English
Page 8
...). Display 1 2 For detailed information, see the pages in parentheses. a Tuning indicators • AUTO indicator (14) • Tuned indicator (14) • DAB indicator (18) • FM ST indicator (14) • RDS indicator (17) b Message area En-8 a AUDIO OUTPUT jacks (11, 12) b R REMOTE CONTROL jack (11, 12, 13) c DIGITAL OUT COAXIAL and OPTICAL jacks (11, 12) d DAB/FM ANTENNA jack (10) e POWER CODE 5 See "Connecting Antennas", "Connecting Your Components" for connection (J pages 10 to Know the Tuner-Continued...
...). Display 1 2 For detailed information, see the pages in parentheses. a Tuning indicators • AUTO indicator (14) • Tuned indicator (14) • DAB indicator (18) • FM ST indicator (14) • RDS indicator (17) b Message area En-8 a AUDIO OUTPUT jacks (11, 12) b R REMOTE CONTROL jack (11, 12, 13) c DIGITAL OUT COAXIAL and OPTICAL jacks (11, 12) d DAB/FM ANTENNA jack (10) e POWER CODE 5 See "Connecting Antennas", "Connecting Your Components" for connection (J pages 10 to Know the Tuner-Continued...

User Manual English
Page 10
... fix the DAB antenna into a FM radio station or a DAB station and adjust the position of the DAB/FM antenna to achieve the best possible reception. The tuner won't pick up any radio signals if no antenna is ready for use the tuner. Connecting Antennas This section explains how to tune into position. Connecting the DAB/FM Antenna 1 Screw the supplied DAB/FM antenna's plug onto the DAB/FM ANTENNA jack...
... fix the DAB antenna into a FM radio station or a DAB station and adjust the position of the DAB/FM antenna to achieve the best possible reception. The tuner won't pick up any radio signals if no antenna is ready for use the tuner. Connecting Antennas This section explains how to tune into position. Connecting the DAB/FM Antenna 1 Screw the supplied DAB/FM antenna's plug onto the DAB/FM ANTENNA jack...

User Manual English
Page 11
... audio connections (RCA) carry analog audio. Wrong! Red R To use R (Remote Interactive), you need to connect your Onkyo AV components with power cords and speaker cables. Coaxial digital connections allow you to enjoy digital sound such as PCM. En-11 Cable and Jacks Optical digital audio Coaxial digital audio Analog audio (RCA) Orange Optical digital connections allow you to enjoy digital sound such as possible from the antennas. • Push each plug in the power cord until all the way to make...
... audio connections (RCA) carry analog audio. Wrong! Red R To use R (Remote Interactive), you need to connect your Onkyo AV components with power cords and speaker cables. Coaxial digital connections allow you to enjoy digital sound such as PCM. En-11 Cable and Jacks Optical digital audio Coaxial digital audio Analog audio (RCA) Orange Optical digital connections allow you to enjoy digital sound such as possible from the antennas. • Push each plug in the power cord until all the way to make...
User Manual English
Page 12
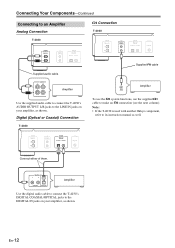
... Onkyo component, refer to make an R connection (see the next column). Connect either of them. Amplifier Use the digital audio cable to connect the T-4030's DIGITAL COAXIAL/OPTICAL jacks to the DIGITAL IN jacks on your amplifier, as shown. Digital (Optical or Coaxial) Connection T-4030 Supplied R cable Amplifier To use the R system functions, use the supplied R cable to its instruction manual as well. En-12 Connecting Your Components-Continued Connecting to an Amplifier Analog Connection R Connection T-4030 T-4030 Supplied audio cable Amplifier Use...
... Onkyo component, refer to make an R connection (see the next column). Connect either of them. Amplifier Use the digital audio cable to connect the T-4030's DIGITAL COAXIAL/OPTICAL jacks to the DIGITAL IN jacks on your amplifier, as shown. Digital (Optical or Coaxial) Connection T-4030 Supplied R cable Amplifier To use the R system functions, use the supplied R cable to its instruction manual as well. En-12 Connecting Your Components-Continued Connecting to an Amplifier Analog Connection R Connection T-4030 T-4030 Supplied audio cable Amplifier Use...
User Manual English
Page 13
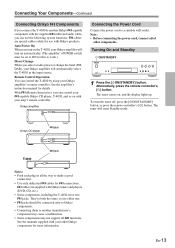
.... Onkyo amplifier Connecting the Power Cord Connect the power cord to make a good connection. • Use only dedicated R cables for use with Onkyo tuners and players (DVD, CD, etc.). • Some components, including the T-4030, have two R jacks. The tuner comes on the T-4030, your other components. R cables are special cables solely for R connections. En-13 Auto Power On When you turn on , and the display lights up. Alternatively, press the remote controller's [k ] button. Onkyo CD player R jack T-4030 R jack Notes: • Push each plug in...
.... Onkyo amplifier Connecting the Power Cord Connect the power cord to make a good connection. • Use only dedicated R cables for use with Onkyo tuners and players (DVD, CD, etc.). • Some components, including the T-4030, have two R jacks. The tuner comes on the T-4030, your other components. R cables are special cables solely for R connections. En-13 Auto Power On When you turn on , and the display lights up. Alternatively, press the remote controller's [k ] button. Onkyo CD player R jack T-4030 R jack Notes: • Push each plug in...
User Manual English
Page 14
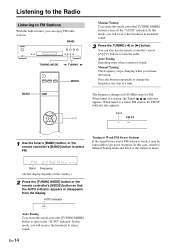
... frequency stops changing when you can also use the remote controller's arrow [D]/[F] buttons to select FM. When tuned to get good reception. Tuning to Weak FM Stereo Stations If the signal from the display. In this mode, you will receive the broadcast in stereo sound. AUTO indicator Auto Tuning To activate this mode, you will receive the broadcast in monaural sound. 3 Press the TUNING [a] or [s] button. You can enjoy FM radio stations. En...
... frequency stops changing when you can also use the remote controller's arrow [D]/[F] buttons to select FM. When tuned to get good reception. Tuning to Weak FM Stereo Stations If the signal from the display. In this mode, you will receive the broadcast in stereo sound. AUTO indicator Auto Tuning To activate this mode, you will receive the broadcast in monaural sound. 3 Press the TUNING [a] or [s] button. You can enjoy FM radio stations. En...
User Manual English
Page 15
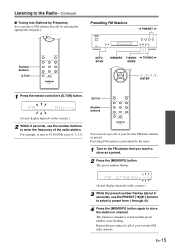
... presets. The preset number flashes. (Actual display depends on the country.) 2 Within 8 seconds, use the PRESET [a]/[s] buttons to select a preset from 1 through 40. 4 Press the [MEMORY] button again to store the station or channel. En-15 Listening to the Radio-Continued ■ Tuning into Stations by Frequency You can store up to 40 of the radio station. Presetting FM Stations PRESET Number buttons D.TUN AUTO SCAN MEMORY TUNING MODE TUNING & , ( , # , 5 , ENTER 1 Press the remote controller's [D.TUN] button. (Actual display...
... presets. The preset number flashes. (Actual display depends on the country.) 2 Within 8 seconds, use the PRESET [a]/[s] buttons to select a preset from 1 through 40. 4 Press the [MEMORY] button again to store the station or channel. En-15 Listening to the Radio-Continued ■ Tuning into Stations by Frequency You can store up to 40 of the radio station. Presetting FM Stations PRESET Number buttons D.TUN AUTO SCAN MEMORY TUNING MODE TUNING & , ( , # , 5 , ENTER 1 Press the remote controller's [D.TUN] button. (Actual display...
User Manual English
Page 16
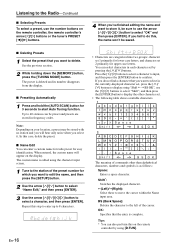
... select a character, and then press [ENTER]. Press the [A]/[S] buttons to select a character to input, and then press the [ENTER] button to start Auto Tuning function. BS (Back Space): Deletes the character to delete. Listening to the Radio-Continued ■ Selecting Presets To select a preset, use the number buttons on the remote controller, the remote controller's arrow [A]/[S] buttons or the tuner's PRESET [a]/[s] buttons. 4 When you've finished editing the name and want to...
... select a character, and then press [ENTER]. Press the [A]/[S] buttons to select a character to input, and then press the [ENTER] button to start Auto Tuning function. BS (Back Space): Deletes the character to delete. Listening to the Radio-Continued ■ Selecting Presets To select a preset, use the number buttons on the remote controller, the remote controller's arrow [A]/[S] buttons or the tuner's PRESET [a]/[s] buttons. 4 When you've finished editing the name and want to...
User Manual English
Page 17
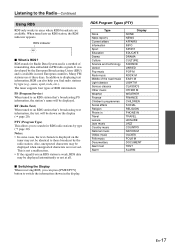
...-17 The tuner supports four types of RDS information: PS (Program Service) When tuned to an RDS station that 's broadcasting text information, the text will be identical to those broadcast by type (e.g., news, sport, rock, etc.). In addition to displaying text information, RDS can also help you can press [PS/RT/PTY] button to switch the information shown in the display. RT (Radio Text...
...-17 The tuner supports four types of RDS information: PS (Program Service) When tuned to an RDS station that 's broadcasting text information, the text will be identical to those broadcast by type (e.g., news, sport, rock, etc.). In addition to displaying text information, RDS can also help you can press [PS/RT/PTY] button to switch the information shown in the display. RT (Radio Text...
User Manual English
Page 18
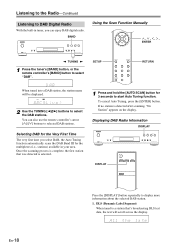
SETUP RETURN When tuned into a DAB station, the station name will scroll across the display. You can enjoy DAB digital radio. If no station is selected. 1 Press and hold the [AUTO SCAN] button for 3 seconds to start Auto Tuning function. BAND Using the Scan Function Manually & , ( , # , 5 , ENTER TUNING 1 Press the tuner's [BAND] button, or the remote controller's [BAND] button to select the DAB stations. Selecting DAB for the Very First Time The very...
SETUP RETURN When tuned into a DAB station, the station name will scroll across the display. You can enjoy DAB digital radio. If no station is selected. 1 Press and hold the [AUTO SCAN] button for 3 seconds to start Auto Tuning function. BAND Using the Scan Function Manually & , ( , # , 5 , ENTER TUNING 1 Press the tuner's [BAND] button, or the remote controller's [BAND] button to select the DAB stations. Selecting DAB for the Very First Time The very...
User Manual English
Page 19
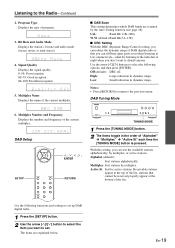
... 80-100: Excellent reception 5. Use the arrow [A]/[S] buttons to select the following functions and settings to set up DAB digital radio. 1 Press the [SETUP] button. 2 Use the arrow [D]/[F] button to select the item you can still hear quiet parts even when listening at low volume levels-ideal for listening to the radio late at the top of program. 3. With this setting, you want to set. Receivable stations appear at night when...
... 80-100: Excellent reception 5. Use the arrow [A]/[S] buttons to select the following functions and settings to set up DAB digital radio. 1 Press the [SETUP] button. 2 Use the arrow [D]/[F] button to select the item you can still hear quiet parts even when listening at low volume levels-ideal for listening to the radio late at the top of program. 3. With this setting, you want to set. Receivable stations appear at night when...

User Manual English
Page 20
... while the tuner waits for radio stations by Type (PTY) PRESET AUTO PS/RT/PTY SCAN You can be shown on the display. The RT information scrolls across the display. Finding Stations by type. 1 Press the [PS/RT/PTY] button twice. will be shown when an operation is not performed 5 seconds after a selection is not received. 2 Use the PRESET [a]/[s] buttons to select the type of program you want...
... while the tuner waits for radio stations by Type (PTY) PRESET AUTO PS/RT/PTY SCAN You can be shown on the display. The RT information scrolls across the display. Finding Stations by type. 1 Press the [PS/RT/PTY] button twice. will be shown when an operation is not performed 5 seconds after a selection is not received. 2 Use the PRESET [a]/[s] buttons to select the type of program you want...

User Manual English
Page 21
... [ENTER]. Default setting: On Notes: • With some sources, the Auto Standby function may activate itself during AutoPreset/Scan, set to receive the strong radio station only. En-21 The Hardware setup menu appears in the display. 4 Use the arrow [A]/[S] buttons to complete the setting. The Hardware setup menu appears in the display. 3 Use the Arrow [A]/[S] buttons to select "Normal" or "Strong". 1 Turn on the power. 2 Press the [SETUP] button on the remote controller to select...
... [ENTER]. Default setting: On Notes: • With some sources, the Auto Standby function may activate itself during AutoPreset/Scan, set to receive the strong radio station only. En-21 The Hardware setup menu appears in the display. 4 Use the arrow [A]/[S] buttons to complete the setting. The Hardware setup menu appears in the display. 3 Use the Arrow [A]/[S] buttons to select "Normal" or "Strong". 1 Turn on the power. 2 Press the [SETUP] button on the remote controller to select...
User Manual English
Page 22
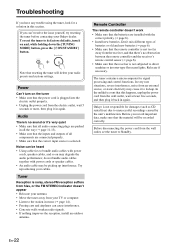
... tuner to its factory defaults, turn on the tuner • Make sure that the power cord is plugged into the electric outlet properly. • Unplug the power cord from the wall outlet, set the tuner to Standby. Audio There's no obstruction between the remote controller and the receiver's remote control sensor (J page 6). • Make sure that the receiver is not subjected to direct sunshine or inverter-type florescent lights. Note that the batteries are connected properly. • Make...
... tuner to its factory defaults, turn on the tuner • Make sure that the power cord is plugged into the electric outlet properly. • Unplug the power cord from the wall outlet, set the tuner to Standby. Audio There's no obstruction between the remote controller and the receiver's remote control sensor (J page 6). • Make sure that the receiver is not subjected to direct sunshine or inverter-type florescent lights. Note that the batteries are connected properly. • Make...
