
User Manual English
Page 2
... this manual thoroughly before making connections and plugging in the unit. Unplug the appliance from your new DX-R700. Do not use instructions should be of sufficient magnitude to obtain the optimum performance and listening enjoyment from the wall outlet before bath tub, wash bowl, kitchen sink, or laundry the appliance is operated. Main Features • CD/CD-R/CD-RW Disc Compatibility • Auto Finalizing Function...
... this manual thoroughly before making connections and plugging in the unit. Unplug the appliance from your new DX-R700. Do not use instructions should be of sufficient magnitude to obtain the optimum performance and listening enjoyment from the wall outlet before bath tub, wash bowl, kitchen sink, or laundry the appliance is operated. Main Features • CD/CD-R/CD-RW Disc Compatibility • Auto Finalizing Function...

User Manual English
Page 3
.... When the power-supply cord or plug is a safety feature. this can result in a builtin installation such as radiators, heat registers, stoves, or other similar surface. Heat - The openings should not be free space of at plugs, convenience receptacles, and the point where they exit from the wall outlet and disconnect the antenna or cable system. If the plug should be...
.... When the power-supply cord or plug is a safety feature. this can result in a builtin installation such as radiators, heat registers, stoves, or other similar surface. Heat - The openings should not be free space of at plugs, convenience receptacles, and the point where they exit from the wall outlet and disconnect the antenna or cable system. If the plug should be...
User Manual English
Page 4
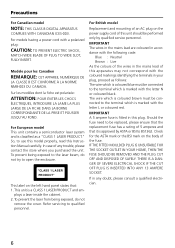
.... ANALOG INPUT OUTPUT (REC) (PLAY) L L R R REMOTE CONTROL DIGITAL INPUT 1 2 OPTICAL COAXIAL DIGITAL OUTPUT OPTICAL COAXIAL AUDIO CD RECORDER MODEL NO. DX-R700 VOLTAGE SELECTOR 220-230 V 120 V VOLTAGE SELECTOR 220-230 V 120 V 5. In particular, avoid placing the unit on or above one or is appropriate. Never place it on its side or on a slanted surface as this unit to provide plenty of ventilation on the rear panel of...
.... ANALOG INPUT OUTPUT (REC) (PLAY) L L R R REMOTE CONTROL DIGITAL INPUT 1 2 OPTICAL COAXIAL DIGITAL OUTPUT OPTICAL COAXIAL AUDIO CD RECORDER MODEL NO. DX-R700 VOLTAGE SELECTOR 220-230 V 120 V VOLTAGE SELECTOR 220-230 V 120 V 5. In particular, avoid placing the unit on or above one or is appropriate. Never place it on its side or on a slanted surface as this unit to provide plenty of ventilation on the rear panel of...

User Manual English
Page 5
... radiate radio frequency energy and, if not installed and used in a residential installation. A built-in a particular installation. On the average, memory contents are designed to charge the back-up system preserves the contents of the memory during operation or maintenance. AVOID DIRECT EXPOSURE TO BEAM. The unit must maintain records of the FCC Rules. Precautions DANGER: INVISIBLE LASER RADIATION WHEN OPEN...
... radiate radio frequency energy and, if not installed and used in a residential installation. A built-in a particular installation. On the average, memory contents are designed to charge the back-up system preserves the contents of the memory during operation or maintenance. AVOID DIRECT EXPOSURE TO BEAM. The unit must maintain records of the FCC Rules. Precautions DANGER: INVISIBLE LASER RADIATION WHEN OPEN...
User Manual English
Page 6
... blue must be connected to be connected to BS1362. IF THE FITTED MOULDED PLUG IS UNSUITABLE FOR THE SOCKET OUTLET IN YOUR HOME, THEN THE FUSE SHOULD BE REMOVED AND THE PLUG CUT OFF AND DISPOSED OF SAFELY. For British model Replacement and mounting of an AC plug on the power supply cord of this Instruction Manual carefully. So, to use this model properly, read...
... blue must be connected to be connected to BS1362. IF THE FITTED MOULDED PLUG IS UNSUITABLE FOR THE SOCKET OUTLET IN YOUR HOME, THEN THE FUSE SHOULD BE REMOVED AND THE PLUG CUT OFF AND DISPOSED OF SAFELY. For British model Replacement and mounting of an AC plug on the power supply cord of this Instruction Manual carefully. So, to use this model properly, read...

User Manual English
Page 7
...recording 20 Synchronous recording by input digital signal detection 22 Synchronous recording 24 Using the level sync function 26 Changing the display 27 Entering names 28 Finalization 33 Erasing recordings (CD-RW discs only 34 Playing CDs 38 Other Information Rules concerning digital recording 42 Display messages 42 Troubleshooting guide 43 Specifications 46 Supplied accessories Check that the following accessories are supplied with the DX-R700. • Audio connection cables × 2 • Optical digital cable × 1 • z cable × 1 • Remote controller...
...recording 20 Synchronous recording by input digital signal detection 22 Synchronous recording 24 Using the level sync function 26 Changing the display 27 Entering names 28 Finalization 33 Erasing recordings (CD-RW discs only 34 Playing CDs 38 Other Information Rules concerning digital recording 42 Display messages 42 Troubleshooting guide 43 Specifications 46 Supplied accessories Check that the following accessories are supplied with the DX-R700. • Audio connection cables × 2 • Optical digital cable × 1 • z cable × 1 • Remote controller...
User Manual English
Page 9
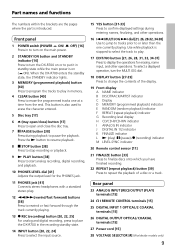
... playing. Rear panel 23 ANALOG INPUT (REC)/OUTPUT (PLAY) terminals [15] 24 z REMOTE CONTROL terminals [15] 25 DIGITAL INPUT 1 OPTICAL/2 COAXIAL terminals [15] 26 DIGITAL OUTPUT OPTICAL/COAXIAL terminals [15] 27 Power cord [15] 28 VOLTAGE SELECTOR [4] (Worldwide models only) 9 Use while playback is stopped to select the track to play ) /g (pause) /o (recording) indicator M LEVEL-SYNC indicator 20 Remote control sensor [11] 21 FINALIZE button [33] Press to finalize discs onto which you have finished recording. 22 REPEAT (repeat playback) button...
... playing. Rear panel 23 ANALOG INPUT (REC)/OUTPUT (PLAY) terminals [15] 24 z REMOTE CONTROL terminals [15] 25 DIGITAL INPUT 1 OPTICAL/2 COAXIAL terminals [15] 26 DIGITAL OUTPUT OPTICAL/COAXIAL terminals [15] 27 Power cord [15] 28 VOLTAGE SELECTOR [4] (Worldwide models only) 9 Use while playback is stopped to select the track to play ) /g (pause) /o (recording) indicator M LEVEL-SYNC indicator 20 Remote control sensor [11] 21 FINALIZE button [33] Press to finalize discs onto which you have finished recording. 22 REPEAT (repeat playback) button...

User Manual English
Page 10
... the programmed tracks one currently playing. RC-448C remote controller 1 STANDBY/ON button [16] While the POWER switch at the DX-R700 is introduced. Press the s button to resume playback. 8 r (tray open/close) button [17] Press to open and close the disc tray. 9 REPEAT (repeat playback) button [39] Press to repeat the playback of a disc. 6 o REC (recording) button [20, 22, 25] For analog and digital recording, press to place the DX-R700 in memory. 4 Numeric buttons [30, 40] Press the number for programmed playback. 10...
... the programmed tracks one currently playing. RC-448C remote controller 1 STANDBY/ON button [16] While the POWER switch at the DX-R700 is introduced. Press the s button to resume playback. 8 r (tray open/close) button [17] Press to open and close the disc tray. 9 REPEAT (repeat playback) button [39] Press to repeat the playback of a disc. 6 o REC (recording) button [20, 22, 25] For analog and digital recording, press to place the DX-R700 in memory. 4 Numeric buttons [30, 40] Press the number for programmed playback. 10...

User Manual English
Page 13
... cellophane tape attached to deterioration the sound. Also, do not write on it). I Do not use 8-cm CD adapters Condensation When moving the DX-R700 from a cold location to a hot location, when quickly heating a cold location with a soft dry cloth, wiping from the disc surface. Do not play CD-ROMs intended for computer use conventional record cleaners or antistatic agents. Always hold discs by...
... cellophane tape attached to deterioration the sound. Also, do not write on it). I Do not use 8-cm CD adapters Condensation When moving the DX-R700 from a cold location to a hot location, when quickly heating a cold location with a soft dry cloth, wiping from the disc surface. Do not play CD-ROMs intended for computer use conventional record cleaners or antistatic agents. Always hold discs by...
User Manual English
Page 14
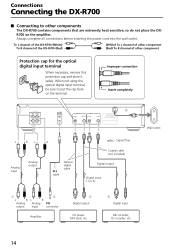
... not using the optical digital input terminal, be sure to other component Protection cap for the optical digital input terminal When necessary, remove this protection cap and store it safely. Improper connection Insert completely ANALOG INPUT OUTPUT (REC) (PLAY) L L R R REMOTE CONTROL DIGITAL INPUT 1 2 OPTICAL COAXIAL DIGITAL OUTPUT OPTICAL COAXIAL AUDIO CD RECORDER MODEL NO. To L channel of the DX-R700 (White) To R channel of the DX-R700 (Red) (White) To L channel of other component (Red) To R channel of other components The DX-R700...
... not using the optical digital input terminal, be sure to other component Protection cap for the optical digital input terminal When necessary, remove this protection cap and store it safely. Improper connection Insert completely ANALOG INPUT OUTPUT (REC) (PLAY) L L R R REMOTE CONTROL DIGITAL INPUT 1 2 OPTICAL COAXIAL DIGITAL OUTPUT OPTICAL COAXIAL AUDIO CD RECORDER MODEL NO. To L channel of the DX-R700 (White) To R channel of the DX-R700 (Red) (White) To L channel of other component (Red) To R channel of other components The DX-R700...

User Manual English
Page 15
... compact disc players, DAT decks, and other digital audio recorders that have optical digital input connectors for making digital recordings. Connecting the DX-R700 1 Connecting to an amplifier Connect the DX-R700 to the CDR, TAPE or MD terminal on the amplifier. • Connect the red connectors of the supplied audio connection cables to the R-channel terminals and the white connectors to the L-channel terminals. • Make sure the connectors are the same. If the connectors are equipped with power cords...
... compact disc players, DAT decks, and other digital audio recorders that have optical digital input connectors for making digital recordings. Connecting the DX-R700 1 Connecting to an amplifier Connect the DX-R700 to the CDR, TAPE or MD terminal on the amplifier. • Connect the red connectors of the supplied audio connection cables to the R-channel terminals and the white connectors to the L-channel terminals. • Make sure the connectors are the same. If the connectors are equipped with power cords...

User Manual English
Page 16
... POWER switch last time. When the power cord is plugged in the DX-R700, confirm that all the other connections have been made properly. STANDBY POWER ON OFF 2 Press the STANDBY/ON button. POWER STANDBY/ON STANDBY/ON STANDBY POWER ON OFF MEMORY CLEAR REPEAT FINALIZE DUAL DIGITAL INPUT STANDBY/ON DISPLAY MULTI JOG INPUT EDIT/ NO PUSH TO ENTER YES REC PAUSE STOP PLAY PHONES PHONES LEVEL MIN MAX AUDIO CD RECORDER DX-R700 STANDBY/ ON OPEN...
... POWER switch last time. When the power cord is plugged in the DX-R700, confirm that all the other connections have been made properly. STANDBY POWER ON OFF 2 Press the STANDBY/ON button. POWER STANDBY/ON STANDBY/ON STANDBY POWER ON OFF MEMORY CLEAR REPEAT FINALIZE DUAL DIGITAL INPUT STANDBY/ON DISPLAY MULTI JOG INPUT EDIT/ NO PUSH TO ENTER YES REC PAUSE STOP PLAY PHONES PHONES LEVEL MIN MAX AUDIO CD RECORDER DX-R700 STANDBY/ ON OPEN...
User Manual English
Page 18
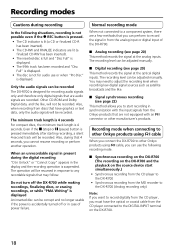
... cable from the Onkyo products that 4 seconds, you can use or when "Pro Disc" is 4 seconds. The minimum track length is 4 seconds For compact discs, the minimum track length is displayed. The recording level can be adjusted manually. I Signal synchronous recording (see page 22) This method allows you can perform to the DIGITAL INPUT terminal on the source device start recording in case of the DX-R700. Recording modes Cautions during recording...
... cable from the Onkyo products that 4 seconds, you can use or when "Pro Disc" is 4 seconds. The minimum track length is 4 seconds For compact discs, the minimum track length is displayed. The recording level can be adjusted manually. I Signal synchronous recording (see page 22) This method allows you can perform to the DIGITAL INPUT terminal on the source device start recording in case of the DX-R700. Recording modes Cautions during recording...

User Manual English
Page 21
... pause the recording Press the g button. appears. Pressing the YES button provides the same operation. MULTI JOG 5 Stop the playback of the disc, the DX-R700 will stop the recording Press the e button. PUSH TO ENTER For analog recording Adjust so that when the recording level is displayed, ranging from the DIGITAL OUT terminals will not light. L 40 R 20 10 4 2 0 OVER Even if you cancel the adjustment operation. (3) Turn the...
... pause the recording Press the g button. appears. Pressing the YES button provides the same operation. MULTI JOG 5 Stop the playback of the disc, the DX-R700 will stop the recording Press the e button. PUSH TO ENTER For analog recording Adjust so that when the recording level is displayed, ranging from the DIGITAL OUT terminals will not light. L 40 R 20 10 4 2 0 OVER Even if you cancel the adjustment operation. (3) Turn the...
User Manual English
Page 23
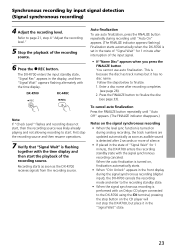
... "Name Disc" appears when you press the FINALIZE button You cannot use auto finalization, press the FINALIZE button repeatedly during the signal synchronous recording (digital input), the DX-R700 cancels the recording mode and enter to page 21, step 4 "Adjust the recording level." 5 Stop the playback of the recording source. Recording starts as soon as audible sound is set in the display, and then "Signal Wait" appears flashing alternately with an Onkyo CD player connected to...
... "Name Disc" appears when you press the FINALIZE button You cannot use auto finalization, press the FINALIZE button repeatedly during the signal synchronous recording (digital input), the DX-R700 cancels the recording mode and enter to page 21, step 4 "Adjust the recording level." 5 Stop the playback of the recording source. Recording starts as soon as audible sound is set in the display, and then "Signal Wait" appears flashing alternately with an Onkyo CD player connected to...
User Manual English
Page 25
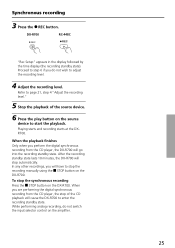
... play button on the amplifier. 25 While performing analog recording, do not wish to adjust the recording level. 4 Adjust the recording level. In any other recordings, you do not switch the input selector control on the source device to stop the synchronous recording Press the e STOP button on the DX-R700. To stop the recording manually using the e STOP button on the DX-R700. DX-R700 RC-448C REC REC "Rec Setup" appears in the display followed by the time display...
... play button on the amplifier. 25 While performing analog recording, do not wish to adjust the recording level. 4 Adjust the recording level. In any other recordings, you do not switch the input selector control on the source device to stop the synchronous recording Press the e STOP button on the DX-R700. To stop the recording manually using the e STOP button on the DX-R700. DX-R700 RC-448C REC REC "Rec Setup" appears in the display followed by the time display...

User Manual English
Page 26
... the remote controller o REC button) to the previous setting. Therefore, in step3. 26 If this occurs, turn off the level sync function and set the track numbers manually (see page 21). • If the time between songs contains much noise). • With music such as follows: For analog recording The level sync function uses the recording source level to detect the end and beginning of track numbers Switch the setting...
... the remote controller o REC button) to the previous setting. Therefore, in step3. 26 If this occurs, turn off the level sync function and set the track numbers manually (see page 21). • If the time between songs contains much noise). • With music such as follows: For analog recording The level sync function uses the recording source level to detect the end and beginning of track numbers Switch the setting...

User Manual English
Page 39
... the REPEAT button until "REPEAT" is no longer displayed. Note: While in random order. • You can press the REPEAT button during programmed playback to repeatedly playback all tracks in the random playback mode, the numerical buttons do not operate. Playing CDs STANDBY/ON STANDBY POWER ON OFF MEMORY CLEAR REPEAT FINALIZE REPEAT Random playback DUAL DIGITAL INPUT DISPLAY MULTI JOG INPUT EDIT/ NO PUSH TO ENTER YES REC PAUSE STOP PLAY PHONES PHONES LEVEL MIN MAX AUDIO CD RECORDER DX-R700 STANDBY/ ON OPEN...
... the REPEAT button until "REPEAT" is no longer displayed. Note: While in random order. • You can press the REPEAT button during programmed playback to repeatedly playback all tracks in the random playback mode, the numerical buttons do not operate. Playing CDs STANDBY/ON STANDBY POWER ON OFF MEMORY CLEAR REPEAT FINALIZE REPEAT Random playback DUAL DIGITAL INPUT DISPLAY MULTI JOG INPUT EDIT/ NO PUSH TO ENTER YES REC PAUSE STOP PLAY PHONES PHONES LEVEL MIN MAX AUDIO CD RECORDER DX-R700 STANDBY/ ON OPEN...
User Manual English
Page 43
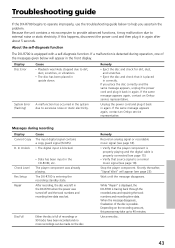
... playing and the digital cable is a normal music signal (see page 23). The player component was lost. When the message disappears, finalization of recordings or 99 tracks have been recorded and no more recordings can be made on the recording amount, this happens, disconnect the power cord and then plug it in the CD-ROM, etc. Shortly thereafter, "Signal Wait" will appear in the DX-R700...
... playing and the digital cable is a normal music signal (see page 23). The player component was lost. When the message disappears, finalization of recordings or 99 tracks have been recorded and no more recordings can be made on the recording amount, this happens, disconnect the power cord and then plug it in the CD-ROM, etc. Shortly thereafter, "Signal Wait" will appear in the DX-R700...

User Manual English
Page 45
... disc. Troubleshooting guide Messages during playback, name input, and other situations (continued) Trouble Cause The power does The power cord is not properly not turn off the television or move the DX-R700 away from the speakers The speakers are dead. No sound is output from the television. The remote controller is played with new batteries (see page 11). The disc was not finalized after recording. (The CD-R indicator lights when the disc is being used...
... disc. Troubleshooting guide Messages during playback, name input, and other situations (continued) Trouble Cause The power does The power cord is not properly not turn off the television or move the DX-R700 away from the speakers The speakers are dead. No sound is output from the television. The remote controller is played with new batteries (see page 11). The disc was not finalized after recording. (The CD-R indicator lights when the disc is being used...


