

T-10 Instruction Manual (English)
Page 10
p. 18, 25 3 Flash p. 29 Flash standby/flash charge p. 50 4 Macro p. 29 5 Self-timer p. 30 6 Exposure compensation p. 30 7 White balance p. 31 8 ISO p. 31 9 Image size p. 32, 33 10 Setup menu p. 5 11 Recording with sound (movies p. 34 12 World time p. 42 13 Compression (still images p. 33 14 Number of storable pictures (still images p. 18 Continuous recording length (movies p. 20 15 Current memory p. 56 16 AF target mark p. 19 17 Camera shake warning 18 Aperture value p. 19 19 Shutter speed p. 19 10 EN Monitor Shooting mode display 1 2 17...
p. 18, 25 3 Flash p. 29 Flash standby/flash charge p. 50 4 Macro p. 29 5 Self-timer p. 30 6 Exposure compensation p. 30 7 White balance p. 31 8 ISO p. 31 9 Image size p. 32, 33 10 Setup menu p. 5 11 Recording with sound (movies p. 34 12 World time p. 42 13 Compression (still images p. 33 14 Number of storable pictures (still images p. 18 Continuous recording length (movies p. 20 15 Current memory p. 56 16 AF target mark p. 19 17 Camera shake warning 18 Aperture value p. 19 19 Shutter speed p. 19 10 EN Monitor Shooting mode display 1 2 17...

T-10 Instruction Manual (English)
Page 12
... are fully charged, and select [NiMH] for [BATTERY TYPE]. [BATTERY TYPE] (p. 41) Turn off the camera before opening the battery/card compartment cover. Do not touch the contact area directly. 12 EN Insert the card straight until it clicks into place. When using NiMH batteries, be sure to close the battery/ card compartment cover. Do not insert any other types of memory card. 1 2 1 Battery/card compartment cover 2 Write-protect switch 3 For...
... are fully charged, and select [NiMH] for [BATTERY TYPE]. [BATTERY TYPE] (p. 41) Turn off the camera before opening the battery/card compartment cover. Do not touch the contact area directly. 12 EN Insert the card straight until it clicks into place. When using NiMH batteries, be sure to close the battery/ card compartment cover. Do not insert any other types of memory card. 1 2 1 Battery/card compartment cover 2 Write-protect switch 3 For...
T-10 Instruction Manual (English)
Page 14
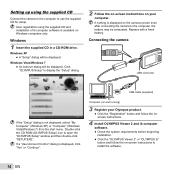
...; Click the "OLYMPUS Viewer 2" or "OLYMPUS ib" button and follow the on the camera screen even after connecting the camera to the computer, the battery may be exhausted. Setting up using the supplied CD and installation of ib computer software is displayed on -screen instructions to install the software. 14 EN If a "User Account Control" dialog is not displayed, select "My Computer" (Windows XP) or "Computer" (Windows Vista/Windows 7) from the start menu. Computer (on...
...; Click the "OLYMPUS Viewer 2" or "OLYMPUS ib" button and follow the on the camera screen even after connecting the camera to the computer, the battery may be exhausted. Setting up using the supplied CD and installation of ib computer software is displayed on -screen instructions to install the software. 14 EN If a "User Account Control" dialog is not displayed, select "My Computer" (Windows XP) or "Computer" (Windows Vista/Windows 7) from the start menu. Computer (on...

T-10 Instruction Manual (English)
Page 15
...-click the CD (OLYMPUS Setup) icon on -screen instructions. ib Operating System Processor RAM Free Hard Drive Space Monitor Settings Graphics Windows XP (Service Pack 2 or later) / Windows Vista / Windows 7 Pentium 4 1.3GHz or better (Pentium D 3.0 GHz or better required for movies) 512MB or more (1GB or more recommended) (1 GB or more required for information on using the software. 5 Install the camera manual. ● Click the "Camera Instruction Manual" button and follow the...
...-click the CD (OLYMPUS Setup) icon on -screen instructions. ib Operating System Processor RAM Free Hard Drive Space Monitor Settings Graphics Windows XP (Service Pack 2 or later) / Windows Vista / Windows 7 Pentium 4 1.3GHz or better (Pentium D 3.0 GHz or better required for movies) 512MB or more (1GB or more recommended) (1 GB or more required for information on using the software. 5 Install the camera manual. ● Click the "Camera Instruction Manual" button and follow the...

T-10 Instruction Manual (English)
Page 16
... on using the software, see online help. 3 Copy the camera manual. ● Click the "Camera Instruction Manual" button to install the software. Operation guide Operation guides displayed at the bottom of the screen indicate that the m button, H button, or zoom buttons should be selected from the language combo box. For information on -screen instructions to open the folder containing the camera manuals. RESET COMPRESSION NORMAL AF MODE FACE/iESP 1 DIGITAL ZOOM OFF 2 ICON GUIDE ON EXIT MENU SET OK SEL. IMAGE SET OK Operation guide OK ERASE/CANCEL MENU 16 EN OLYMPUS...
... on using the software, see online help. 3 Copy the camera manual. ● Click the "Camera Instruction Manual" button to install the software. Operation guide Operation guides displayed at the bottom of the screen indicate that the m button, H button, or zoom buttons should be selected from the language combo box. For information on -screen instructions to open the folder containing the camera manuals. RESET COMPRESSION NORMAL AF MODE FACE/iESP 1 DIGITAL ZOOM OFF 2 ICON GUIDE ON EXIT MENU SET OK SEL. IMAGE SET OK Operation guide OK ERASE/CANCEL MENU 16 EN OLYMPUS...

T-10 Instruction Manual (English)
Page 17
... monitor. 1 Press the n button to turn daylight saving time ([SUMMER]) on the camera. ● The date and time setting screen is displayed when the date and time are saved to save the setting for [Y]. Date, time, time zone, and language The date and time set here are not set [M] (month), [D] (day), [TIME] (hours and minutes), and [Y/M/D] (date order). The menus can be used to change the selected date and time. [X] (Date/time) (p. 41) 5 Use HI to turn on or off. '10.10.26.12:30...
... monitor. 1 Press the n button to turn daylight saving time ([SUMMER]) on the camera. ● The date and time setting screen is displayed when the date and time are saved to save the setting for [Y]. Date, time, time zone, and language The date and time set here are not set [M] (month), [D] (day), [TIME] (hours and minutes), and [Y/M/D] (date order). The menus can be used to change the selected date and time. [X] (Date/time) (p. 41) 5 Use HI to turn on or off. '10.10.26.12:30...

T-10 Instruction Manual (English)
Page 18
... exposure compensation, white balance, etc. "Using the Menu" (p. 4) Vertical grip When holding the camera, take care not to turn off the camera. 2 Hold the camera and compose the shot. 0.0 WB AUTO ISO AUTO 10M 4 # Monitor Horizontal grip Number of other shooting menu functions, such as needed. 1 Press the n button to turn on the camera. [PROGRAM AUTO] indicator P Current shooting mode display PROGRAM AUTO P 0.0 WB AUTO ISO AUTO 10M 4 Press the n button again to cover the flash with the optimum aperture value and shutter speed...
... exposure compensation, white balance, etc. "Using the Menu" (p. 4) Vertical grip When holding the camera, take care not to turn off the camera. 2 Hold the camera and compose the shot. 0.0 WB AUTO ISO AUTO 10M 4 # Monitor Horizontal grip Number of other shooting menu functions, such as needed. 1 Press the n button to turn on the camera. [PROGRAM AUTO] indicator P Current shooting mode display PROGRAM AUTO P 0.0 WB AUTO ISO AUTO 10M 4 Press the n button again to cover the flash with the optimum aperture value and shutter speed...

T-10 Instruction Manual (English)
Page 19
P 2 Use HI to set the shooting mode to display the function menu screen. Try focusing again. AF target mark P Shooting movies [MOVIE] 1 Press the H button to A and then press the H button. [MOVIE] indicator 0.0 WB AUTO 0:34 VGA # Press fully 1/400 F3.1 Image review screen To view images during shooting Pressing the q button enables playback of images. PROGRAM AUTO P 0.0 WB AUTO ISO AUTO 10M 4 Press halfway 1/400 F3.1 Shutter speed Aperture value "Focusing" (p. 52) 4 To take the picture, gently press the shutter button all the way down while being careful...
P 2 Use HI to set the shooting mode to display the function menu screen. Try focusing again. AF target mark P Shooting movies [MOVIE] 1 Press the H button to A and then press the H button. [MOVIE] indicator 0.0 WB AUTO 0:34 VGA # Press fully 1/400 F3.1 Image review screen To view images during shooting Pressing the q button enables playback of images. PROGRAM AUTO P 0.0 WB AUTO ISO AUTO 10M 4 Press halfway 1/400 F3.1 Shutter speed Aperture value "Focusing" (p. 52) 4 To take the picture, gently press the shutter button all the way down while being careful...

T-10 Instruction Manual (English)
Page 28
... $ (FLASH OFF) mode. 1 Set the shooting mode to 10 frames. PANORAMA 3 Press the shutter button to form a panorama using the supplied software. For information on creating panoramas, see the online help for up to ~. The flash (p. 29) is possible for the supplied software. 28 EN Frame subsequent photographs so that can be joined to take the first frame, and then compose the second shot. Creating panoramic images [PANORAMA] Take pictures that...
... $ (FLASH OFF) mode. 1 Set the shooting mode to 10 frames. PANORAMA 3 Press the shutter button to form a panorama using the supplied software. For information on creating panoramas, see the online help for up to ~. The flash (p. 29) is possible for the supplied software. 28 EN Frame subsequent photographs so that can be joined to take the first frame, and then compose the second shot. Creating panoramic images [PANORAMA] Take pictures that...

T-10 Instruction Manual (English)
Page 31
... "International Organization for digital cameras and film, thus codes such as "ISO 100" are used to represent sensitivity. Selecting the ISO sensitivity 1 Select the ISO setting option in higher sensitivity, and images can be taken at fast shutter speeds even under low light conditions. "ISO" is fixed to set . EN 31 Adjusting to a natural color scheme (White balance) For more natural coloring, choose a white balance option suited to the shooting scene...
... "International Organization for digital cameras and film, thus codes such as "ISO 100" are used to represent sensitivity. Selecting the ISO sensitivity 1 Select the ISO setting option in higher sensitivity, and images can be taken at fast shutter speeds even under low light conditions. "ISO" is fixed to set . EN 31 Adjusting to a natural color scheme (White balance) For more natural coloring, choose a white balance option suited to the shooting scene...

T-10 Instruction Manual (English)
Page 39
... printer. Copying pictures to the card [BACKUP] r (Settings 1) X BACKUP Submenu 2 YES NO Application Backs up data. You can transfer and save the image data on using the supplied software. Copying images in the internal memory to a computer without using the menus, see "Using the Menu" (p. 4). Submenu 2 Application YES Completely erases the image data in the internal memory*1 or card (including protected images). Check that no important data is displayed. It takes some time to a computer or when using the supplied software This camera is compatible...
... printer. Copying pictures to the card [BACKUP] r (Settings 1) X BACKUP Submenu 2 YES NO Application Backs up data. You can transfer and save the image data on using the supplied software. Copying images in the internal memory to a computer without using the menus, see "Using the Menu" (p. 4). Submenu 2 Application YES Completely erases the image data in the internal memory*1 or card (including protected images). Check that no important data is displayed. It takes some time to a computer or when using the supplied software This camera is compatible...

T-10 Instruction Manual (English)
Page 40
... P mode when the camera is displayed. ● The camera checks and adjusts the CCD and the image processing function at the same time. For best results, wait at factory shipping, and no adjustment is needed right after taking or viewing pictures before performing pixel mapping. Adjusting the brightness of the camera buttons. To adjust the CCD and the image processing function Press the H button when [START] (Submenu 2) is turned on. 40 EN Setting the operation sound...
... P mode when the camera is displayed. ● The camera checks and adjusts the CCD and the image processing function at the same time. For best results, wait at factory shipping, and no adjustment is needed right after taking or viewing pictures before performing pixel mapping. Adjusting the brightness of the camera buttons. To adjust the CCD and the image processing function Press the H button when [START] (Submenu 2) is turned on. 40 EN Setting the operation sound...

T-10 Instruction Manual (English)
Page 43
...2 Turn on the monitor. "Using the Menu" (p. 4) 1 Display the image to select an image, and press the H button. EN 43 Printing Direct printing (PictBridge*1) By connecting the camera to a PictBridge-compatible printer, you can be printed on the printer, and then connect the printer and camera. To find out if your printer supports PictBridge, refer to the printer's instruction manual. *1 PictBridge is used. USB connector USB cable (supplied) I to start printing. 4 To print another image, use HI to be set [USB CONNECTION] to [PRINT]. The printing modes, paper sizes...
...2 Turn on the monitor. "Using the Menu" (p. 4) 1 Display the image to select an image, and press the H button. EN 43 Printing Direct printing (PictBridge*1) By connecting the camera to a PictBridge-compatible printer, you can be printed on the printer, and then connect the printer and camera. To find out if your printer supports PictBridge, refer to the printer's instruction manual. *1 PictBridge is used. USB connector USB cable (supplied) I to start printing. 4 To print another image, use HI to be set [USB CONNECTION] to [PRINT]. The printing modes, paper sizes...
T-10 Instruction Manual (English)
Page 50
... turns off . "The light is left out of what to do not appear, however, in the final image. Troubleshooting Battery "The camera does not work as intended, or if an error message is displayed on the screen, and you are unsure of the camera for about a day*2, the date and time settings return to the default setting, and must be reset. *2 The time until #(flash charge) stops blinking before taking pictures...
... turns off . "The light is left out of what to do not appear, however, in the final image. Troubleshooting Battery "The camera does not work as intended, or if an error message is displayed on the screen, and you are unsure of the camera for about a day*2, the date and time settings return to the default setting, and must be reset. *2 The time until #(flash charge) stops blinking before taking pictures...

T-10 Instruction Manual (English)
Page 51
... new card. BATTERY EMPTY Battery problem • Insert new batteries. • If using rechargeable batteries, charge the batteries. Release the switch. to the status where the printer can be viewed, the image file is performed. NO PAPER Printer problem Load paper into the printer. PICTURE ERROR Problem with selected image Use photo retouch software, etc. to select [MEMORY POWER OFF MEMORY FORMAT FORMAT], and press the H button. Connection problem Connect the camera and computer NO CONNECTION or printer correctly. JAMMED SETTINGS CHANGED*3 Printer problem Remove...
... new card. BATTERY EMPTY Battery problem • Insert new batteries. • If using rechargeable batteries, charge the batteries. Release the switch. to the status where the printer can be viewed, the image file is performed. NO PAPER Printer problem Load paper into the printer. PICTURE ERROR Problem with selected image Use photo retouch software, etc. to select [MEMORY POWER OFF MEMORY FORMAT FORMAT], and press the H button. Connection problem Connect the camera and computer NO CONNECTION or printer correctly. JAMMED SETTINGS CHANGED*3 Printer problem Remove...

T-10 Instruction Manual (English)
Page 56
... AUTO ISO AUTO 10M 4 # Shooting mode 4/30 Cards compatible with the use ) '10/10/26 12:30 Playback mode Even if [MEMORY FORMAT]/[FORMAT], [ERASE], [SEL. LOCK Checking the image saving location The memory indicator shows whether the internal memory or card is not possible with other cameras or computers. [MEMORY FORMAT]/[FORMAT] (p. 39) 56 EN When disposing of the card, damage the card to prevent the disclosure of larger capacity cards enables you set the switch to enable writing. Use of personal data. SD/SDHC card write-protect switch...
... AUTO ISO AUTO 10M 4 # Shooting mode 4/30 Cards compatible with the use ) '10/10/26 12:30 Playback mode Even if [MEMORY FORMAT]/[FORMAT], [ERASE], [SEL. LOCK Checking the image saving location The memory indicator shows whether the internal memory or card is not possible with other cameras or computers. [MEMORY FORMAT]/[FORMAT] (p. 39) 56 EN When disposing of the card, damage the card to prevent the disclosure of larger capacity cards enables you set the switch to enable writing. Use of personal data. SD/SDHC card write-protect switch...
T-10 Instruction Manual (English)
Page 62
...; A strip of batteries (included in any other device. • Always charge NiMH batteries (included in some areas) before further operation. • Always observe the operating environment restrictions described in the camera's manual. 62 EN Battery Handling Precautions • Olympus NiMH batteries (included in this is not a malfunction. otherwise the image may become vague, resulting in a playback mode failure or damage to help save our planet...
...; A strip of batteries (included in any other device. • Always charge NiMH batteries (included in some areas) before further operation. • Always observe the operating environment restrictions described in the camera's manual. 62 EN Battery Handling Precautions • Olympus NiMH batteries (included in this is not a malfunction. otherwise the image may become vague, resulting in a playback mode failure or damage to help save our planet...

T-10 Instruction Manual (English)
Page 63
...: • Adjust or relocate the receiving antenna. • Increase the distance between the camera and receiver. • Connect the equipment to an outlet on , the user is encouraged to try to the use of any means, electronic or mechanical, including photocopying and recording or the use of copyright owners. Only the OLYMPUS-supplied USB cable should be determined by turning the equipment...
...: • Adjust or relocate the receiving antenna. • Increase the distance between the camera and receiver. • Connect the equipment to an outlet on , the user is encouraged to try to the use of any means, electronic or mechanical, including photocopying and recording or the use of copyright owners. Only the OLYMPUS-supplied USB cable should be determined by turning the equipment...
T-10 Instruction Manual (English)
Page 65
... VARY FROM STATE TO STATE. WHAT TO DO WHEN SERVICE IS NEEDED The customer must transfer any image or other data saved on which Olympus does not place and record serial numbers). 3 A detailed description of Olympus. Representations and warranties made by an expressly authorized officer of the problem. 4 Sample prints, negatives, digital prints (or files on the Product (unless it is...
... VARY FROM STATE TO STATE. WHAT TO DO WHEN SERVICE IS NEEDED The customer must transfer any image or other data saved on which Olympus does not place and record serial numbers). 3 A detailed description of Olympus. Representations and warranties made by an expressly authorized officer of the problem. 4 Sample prints, negatives, digital prints (or files on the Product (unless it is...

T-10 Instruction Manual (English)
Page 69
...)) : Exif 2.2, Digital Print Order Format (DPOF), PRINT Image Matching III, PictBridge Sound with still pictures : Wave format Movie Memory No. SPECIFICATIONS Camera Product type Recording system Still pictures Applicable standards : Digital camera (for shooting and displaying) : Digital recording, JPEG (in .) (excluding protrusions) : 169 g (6.0 oz) (including battery and card) Design and specifications subject to change without notice. Shooting range Monitor : 0.6 m (2.0 ft.) to (W), 1.0 m (3.3 ft.) to (T) (normal) 0.2 m (0.7 ft.) to (W), 0.6 m (2.0 ft.) to (T) (macro mode) 0.05...
...)) : Exif 2.2, Digital Print Order Format (DPOF), PRINT Image Matching III, PictBridge Sound with still pictures : Wave format Movie Memory No. SPECIFICATIONS Camera Product type Recording system Still pictures Applicable standards : Digital camera (for shooting and displaying) : Digital recording, JPEG (in .) (excluding protrusions) : 169 g (6.0 oz) (including battery and card) Design and specifications subject to change without notice. Shooting range Monitor : 0.6 m (2.0 ft.) to (W), 1.0 m (3.3 ft.) to (T) (normal) 0.2 m (0.7 ft.) to (W), 0.6 m (2.0 ft.) to (T) (macro mode) 0.05...


