
FE-290 Instruction Manual (English)
Page 1
... development stages and may differ from the actual product. DIGITAL CAMERA FE-290/X-825 Instruction Manual Quick Start Guide Get started using your camera before taking important photographs. ( In the interest of continually improving products, Olympus reserves the right to update or modify information contained in... this manual. ( The screen and camera illustrations shown in this manual in a safe place for future reference. ( We recommend that you for purchasing an Olympus digital camera. Before you start to use your camera better Appendix ( Thank you take test shots ...
... development stages and may differ from the actual product. DIGITAL CAMERA FE-290/X-825 Instruction Manual Quick Start Guide Get started using your camera before taking important photographs. ( In the interest of continually improving products, Olympus reserves the right to update or modify information contained in... this manual. ( The screen and camera illustrations shown in this manual in a safe place for future reference. ( We recommend that you for purchasing an Olympus digital camera. Before you start to use your camera better Appendix ( Thank you take test shots ...

FE-290 Instruction Manual (English)
Page 2
... by following along with the illustrations. Contents Quick Start Guide P. 3 Button operations Menu operations Printing pictures Using OLYMPUS Master Getting to know your camera more about camera operations and how to take better pictures. P. 27 Learn how to a computer. P. 16 Learn about the menus that control the functions and settings for basic ...
... by following along with the illustrations. Contents Quick Start Guide P. 3 Button operations Menu operations Printing pictures Using OLYMPUS Master Getting to know your camera more about camera operations and how to take better pictures. P. 27 Learn how to a computer. P. 16 Learn about the menus that control the functions and settings for basic ...
FE-290 Instruction Manual (English)
Page 3
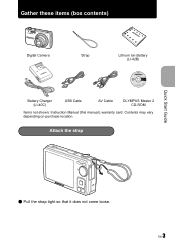
EN 3 Quick Start Guide Gather these items (box contents) Digital Camera Strap Lithium Ion Battery (LI-42B) Battery Charger (LI-40C) USB Cable AV Cable OLYMPUS Master 2 CD-ROM Items not shown: Instruction Manual (this manual), warranty card. Attach the strap Quick Start Guide ( Pull the strap tight so that it does not come loose. Contents may vary depending on purchase location.
EN 3 Quick Start Guide Gather these items (box contents) Digital Camera Strap Lithium Ion Battery (LI-42B) Battery Charger (LI-40C) USB Cable AV Cable OLYMPUS Master 2 CD-ROM Items not shown: Instruction Manual (this manual), warranty card. Attach the strap Quick Start Guide ( Pull the strap tight so that it does not come loose. Contents may vary depending on purchase location.

FE-290 Instruction Manual (English)
Page 4
Power Cable W 3 Lithium Ion Battery Battery 1 Charger 2 AC Wall Outlet Charging Indicator Red light on: Charging Light off: Charging complete (Charging time: Approx. 5 hours) ( Battery comes partially charged. Insert the battery and the xD-Picture Card (optional) into the camera. 2 1 Quick Start Guide 4 EN b. Prepare the camera a. Charge the battery.
Power Cable W 3 Lithium Ion Battery Battery 1 Charger 2 AC Wall Outlet Charging Indicator Red light on: Charging Light off: Charging complete (Charging time: Approx. 5 hours) ( Battery comes partially charged. Insert the battery and the xD-Picture Card (optional) into the camera. 2 1 Quick Start Guide 4 EN b. Prepare the camera a. Charge the battery.

FE-290 Instruction Manual (English)
Page 5
... (scratches, etc.) may produce heat or an explosion. Damage to remove it. Prepare the camera (Insert the battery by putting in the marked side first, with the B marks toward the end of 3 the camera, the C marks toward the center of the arrow. Do not use force. Quick Start Guide... (To remove the card, push the card all the way in the direction of the camera. Contact authorized distributors/service centers. For details on the card, please refer to as "the card"). Notch 4 Battery lock knob (To remove the...
... (scratches, etc.) may produce heat or an explosion. Damage to remove it. Prepare the camera (Insert the battery by putting in the marked side first, with the B marks toward the end of 3 the camera, the C marks toward the center of the arrow. Do not use force. Quick Start Guide... (To remove the card, push the card all the way in the direction of the camera. Contact authorized distributors/service centers. For details on the card, please refer to as "the card"). Notch 4 Battery lock knob (To remove the...
FE-290 Instruction Manual (English)
Page 6
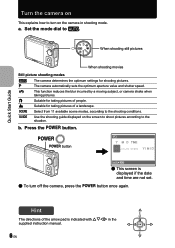
... displayed if the date and time are not set. ( To turn on the camera in the supplied instruction manual. 6 EN O X Y N a. h This function reduces the blur incurred by a moving subject, or camera shake when taking pictures of a landscape. f R Select from 11 available scene... modes, according to the situation. Quick Start Guide Turn the camera on This explains how to turn off the camera, press the o button once again. P The camera automatically sets the optimum aperture value and shutter speed. b. Press the o button. B Suitable for...
... displayed if the date and time are not set. ( To turn on the camera in the supplied instruction manual. 6 EN O X Y N a. h This function reduces the blur incurred by a moving subject, or camera shake when taking pictures of a landscape. f R Select from 11 available scene... modes, according to the situation. Quick Start Guide Turn the camera on This explains how to turn off the camera, press the o button once again. P The camera automatically sets the optimum aperture value and shutter speed. b. Press the o button. B Suitable for...

FE-290 Instruction Manual (English)
Page 9
Shoot. Shutter Button (Press Completely) The card access lamp blinks. Focus. Horizontal grip 1/1000 F2.7 [] HQ 3072×2304 [IN] 4 Vertical grip Quick Start Guide b. c. When the focus and exposure are locked, the green lamp lights up, and the shutter speed and aperture value are displayed. Shutter Button (Press Halfway) Place this mark over your subject. 1/1000 F2.7 [] HQ 3072×2304 [IN] 4 The number of pictures that can be taken is displayed. Hold the camera. Take a picture a. EN 9
Shoot. Shutter Button (Press Completely) The card access lamp blinks. Focus. Horizontal grip 1/1000 F2.7 [] HQ 3072×2304 [IN] 4 Vertical grip Quick Start Guide b. c. When the focus and exposure are locked, the green lamp lights up, and the shutter speed and aperture value are displayed. Shutter Button (Press Halfway) Place this mark over your subject. 1/1000 F2.7 [] HQ 3072×2304 [IN] 4 The number of pictures that can be taken is displayed. Hold the camera. Take a picture a. EN 9

FE-290 Instruction Manual (English)
Page 11
... recording. Try locking the focus again. Press the shutter button again to stop recording. 3 K button (Shooting) Selecting shooting mode/Turning the camera on the camera with the K or q button" (P. 25) EN 11 This function is used to set to h, P, h). Green lamp 1/1000 F2.7... Flash mode 8 b c9 a HQ 3072×2304 4 7 0 Macro mode Button operations 1 o button Power on: Camera turns on in shooting mode when K is pressed with the camera off 2 Shutter button Shooting pictures/movies Shooting still pictures Set the mode dial to a setting other than n, and lightly press...
... recording. Try locking the focus again. Press the shutter button again to stop recording. 3 K button (Shooting) Selecting shooting mode/Turning the camera on the camera with the K or q button" (P. 25) EN 11 This function is used to set to h, P, h). Green lamp 1/1000 F2.7... Flash mode 8 b c9 a HQ 3072×2304 4 7 0 Macro mode Button operations 1 o button Power on: Camera turns on in shooting mode when K is pressed with the camera off 2 Shutter button Shooting pictures/movies Shooting still pictures Set the mode dial to a setting other than n, and lightly press...

FE-290 Instruction Manual (English)
Page 12
... optimal settings. h Shooting pictures using digital image stabilization This function reduces the blur incurred by selecting a scene mode according to the situation Select from the top menu and display the scene selection screen. • By switching to the shooting conditions. f Shooting pictures by a moving subject, or camera shake when taking pictures. M NIGHT...
... optimal settings. h Shooting pictures using digital image stabilization This function reduces the blur incurred by selecting a scene mode according to the situation Select from the top menu and display the scene selection screen. • By switching to the shooting conditions. f Shooting pictures by a moving subject, or camera shake when taking pictures. M NIGHT...

FE-290 Instruction Manual (English)
Page 13
...to another one. • The content set using the mode dial. g "R (movie) Recording movies with the movie. • During audio recording, only the digital zoom can be used to confirm your selection. 8 OF/< button Changing picture brightness (Exposure compensation)/ Printing pictures Shooting mode: Changing picture brightness Press OF/< in... for setting SHOOTING GUIDE 1/3 1 Brightening subject. 2 Shooting into backlight. 3 Blurring background. 4 Adjusting area in focus. 5 Shooting subject in playback mode, connect the camera to the printer, and then press OF/< to print the picture.
...to another one. • The content set using the mode dial. g "R (movie) Recording movies with the movie. • During audio recording, only the digital zoom can be used to confirm your selection. 8 OF/< button Changing picture brightness (Exposure compensation)/ Printing pictures Shooting mode: Changing picture brightness Press OF/< in... for setting SHOOTING GUIDE 1/3 1 Brightening subject. 2 Shooting into backlight. 3 Blurring background. 4 Adjusting area in focus. 5 Shooting subject in playback mode, connect the camera to the printer, and then press OF/< to print the picture.

FE-290 Instruction Manual (English)
Page 16
...are made by following the shooting guide, press m to display the shooting guide screen. Follow these guides to the mode. RESET IMAGE QUALITY CAMERA MENU SETUP EXIT MENU SCENE SILENT MODE SET OK BACK MENU : Moves back one menu. The screen for selecting the menu item is ...Operation guide m button H 16 EN Arrow pad (ONXY) Top menu (Still picture shooting mode) SETUP menu items Menu operations RESET IMAGE QUALITY CAMERA MENU SETUP EXIT MENU SCENE SILENT MODE SET OK SETUP 1 MEMORY FORMAT 2 BACKUP 3 ENGLISH PIXEL MAPPING NO BACK MENU SET OK • Select...
...are made by following the shooting guide, press m to display the shooting guide screen. Follow these guides to the mode. RESET IMAGE QUALITY CAMERA MENU SETUP EXIT MENU SCENE SILENT MODE SET OK BACK MENU : Moves back one menu. The screen for selecting the menu item is ...Operation guide m button H 16 EN Arrow pad (ONXY) Top menu (Still picture shooting mode) SETUP menu items Menu operations RESET IMAGE QUALITY CAMERA MENU SETUP EXIT MENU SCENE SILENT MODE SET OK SETUP 1 MEMORY FORMAT 2 BACKUP 3 ENGLISH PIXEL MAPPING NO BACK MENU SET OK • Select...

FE-290 Instruction Manual (English)
Page 17
... NORMAL LOW LOW LOW SET OK SETUP 1 2 BEEP 3 OFF SHUTTER SOUND LOW VOLUME HIGH BACK MENU SET OK Menu operations EN 17 RESET IMAGE QUALITY CAMERA MENU SETUP 3 Press ON to select [8], and press H. • Unavailable settings cannot be selected. • Press X on the next page. To return to the item...
... NORMAL LOW LOW LOW SET OK SETUP 1 2 BEEP 3 OFF SHUTTER SOUND LOW VOLUME HIGH BACK MENU SET OK Menu operations EN 17 RESET IMAGE QUALITY CAMERA MENU SETUP 3 Press ON to select [8], and press H. • Unavailable settings cannot be selected. • Press X on the next page. To return to the item...

FE-290 Instruction Manual (English)
Page 18
... computer editing such as rotating or adding text to the selected mode. Shooting mode menu K 14 4 CAMERA MENU IMAGE QUALITY 2 CAMERA RESET MENU SETUP SCENE SILENT MODE 5 EXIT MENU SET OK ISO R (still picture) R (movie) PANORAMA* * An Olympus xD-Picture Card is useful for viewing pictures on a wide-screen television. • [PANORAMA] cannot...
... computer editing such as rotating or adding text to the selected mode. Shooting mode menu K 14 4 CAMERA MENU IMAGE QUALITY 2 CAMERA RESET MENU SETUP SCENE SILENT MODE 5 EXIT MENU SET OK ISO R (still picture) R (movie) PANORAMA* * An Olympus xD-Picture Card is useful for viewing pictures on a wide-screen television. • [PANORAMA] cannot...

FE-290 Instruction Manual (English)
Page 19
...at the source of the subject. EN 19 R (movie Recording movies with a fast shutter speed and in low light conditions. Only the digital zoom can be set only when the mode dial is set to f. • By switching to the original when the reset function is taken... 14 P. 14 P. 13 P. 14 P. 18 P. 12 P. 19 P. 19 P. 19 3 f (Scene) Shooting pictures by selecting a scene mode according to the situation" (P. 12) Menu operations 4 CAMERA MENU ISO Changing the ISO sensitivity AUTO 64/100/200/400/ 800 Sensitivity is selected, the optical zoom cannot be changed to record. A low value...
...at the source of the subject. EN 19 R (movie Recording movies with a fast shutter speed and in low light conditions. Only the digital zoom can be set only when the mode dial is set to f. • By switching to the original when the reset function is taken... 14 P. 14 P. 13 P. 14 P. 18 P. 12 P. 19 P. 19 P. 19 3 f (Scene) Shooting pictures by selecting a scene mode according to the situation" (P. 12) Menu operations 4 CAMERA MENU ISO Changing the ISO sensitivity AUTO 64/100/200/400/ 800 Sensitivity is selected, the optical zoom cannot be changed to record. A low value...

FE-290 Instruction Manual (English)
Page 22
... Favorite Registers and plays back your favorite still pictures as new ones in succession. y...Rotating pictures +90° / 0° / -90° Pictures taken with the camera held vertically are displayed vertically. This function lets you turn such pictures so that they are displayed horizontally. Menu operations 22 EN R ...Adding sound to...
... Favorite Registers and plays back your favorite still pictures as new ones in succession. y...Rotating pictures +90° / 0° / -90° Pictures taken with the camera held vertically are displayed vertically. This function lets you turn such pictures so that they are displayed horizontally. Menu operations 22 EN R ...Adding sound to...

FE-290 Instruction Manual (English)
Page 23
... you want to keep. • When erasing pictures in the internal memory, do not insert the card into the camera. • When erasing pictures from the card, insert the card into the camera in MY FAVORITE YES/ NO • Use the arrow pad to select the picture to select [ADD FAVORITE] or...
... you want to keep. • When erasing pictures in the internal memory, do not insert the card into the camera. • When erasing pictures from the card, insert the card into the camera in MY FAVORITE YES/ NO • Use the arrow pad to select the picture to select [ADD FAVORITE] or...
FE-290 Instruction Manual (English)
Page 24
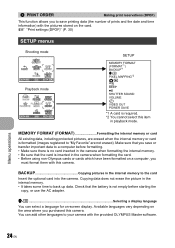
.... Available languages vary depending on a computer, you must format them with this camera. Menu operations 24 EN Check that the battery is inserted in the camera when formatting the card. • Before using non-Olympus cards or cards which have been formatted on the area where you purchased this ...This function allows you to save or transfer important data to a computer before formatting. • Make sure there is no card inserted in the camera when formatting the internal memory. • Be sure that the card is not empty before starting the copy, or use the AC adapter. You...
.... Available languages vary depending on a computer, you must format them with this camera. Menu operations 24 EN Check that the battery is inserted in the camera when formatting the card. • Before using non-Olympus cards or cards which have been formatted on the area where you purchased this ...This function allows you to save or transfer important data to a computer before formatting. • Make sure there is no card inserted in the camera when formatting the internal memory. • Be sure that the card is not empty before starting the copy, or use the AC adapter. You...

FE-290 Instruction Manual (English)
Page 25
... press H. When [START] is not necessary to operate this function frequently. Approximately once a year is not turned on the camera, press o. If you turn on . To turn the camera off during playback SETUP 1 2 BEEP 3 SHUTTER SOUND VOLUME BACK MENU SET OK • Press ON to adjust the volume...BRIGHT/ NORMAL BEEP Adjusting the volume of operation sound when the buttons are pressed OFF (No sound)/ LOW /HIGH 8 Adjusting the volume of camera warning sound OFF (No sound)/ LOW / HIGH SHUTTER SOUND Adjusting the volume of five levels or mute the volume. Select [PIXEL MAPPING]. ...
... press H. When [START] is not necessary to operate this function frequently. Approximately once a year is not turned on the camera, press o. If you turn on . To turn the camera off during playback SETUP 1 2 BEEP 3 SHUTTER SOUND VOLUME BACK MENU SET OK • Press ON to adjust the volume...BRIGHT/ NORMAL BEEP Adjusting the volume of operation sound when the buttons are pressed OFF (No sound)/ LOW /HIGH 8 Adjusting the volume of camera warning sound OFF (No sound)/ LOW / HIGH SHUTTER SOUND Adjusting the volume of five levels or mute the volume. Select [PIXEL MAPPING]. ...

FE-290 Instruction Manual (English)
Page 26
Y M D TIME Y / M / D Y-M-D Hour Minute Date formats (Y-M-D, M-D-Y, D-M-Y) CANCEL MENU Cancels the setting • The first two digits of switching to video input, refer to the TV. Check the video signal type before connecting. Use the arrow pad to select the picture you ...want to the TV's video input (yellow) and audio input (white) terminals. Pressing the zoom lever or other buttons restores the camera from power save mode OFF /ON 26 EN When no operation has been performed for approximately 10 seconds while in shooting mode, the monitor automatically...
Y M D TIME Y / M / D Y-M-D Hour Minute Date formats (Y-M-D, M-D-Y, D-M-Y) CANCEL MENU Cancels the setting • The first two digits of switching to video input, refer to the TV. Check the video signal type before connecting. Use the arrow pad to select the picture you ...want to the TV's video input (yellow) and audio input (white) terminals. Pressing the zoom lever or other buttons restores the camera from power save mode OFF /ON 26 EN When no operation has been performed for approximately 10 seconds while in shooting mode, the monitor automatically...

FE-290 Instruction Manual (English)
Page 27
...the printer you use. STANDARD All printers that support PictBridge have standard print settings. Refer to the printer's instruction manual for connecting digital cameras and printers of different makers and printing out pictures directly. • Available printing modes, paper sizes, etc. What is displayed. ...instruction manual. To find out if your printer is printed using the standard settings of your printer. • For details of the camera and the printer's USB port. Multi-connector USB cable • The [EASY PRINT START] screen is PictBridge? Printing pictures Direct ...
...the printer you use. STANDARD All printers that support PictBridge have standard print settings. Refer to the printer's instruction manual for connecting digital cameras and printers of different makers and printing out pictures directly. • Available printing modes, paper sizes, etc. What is displayed. ...instruction manual. To find out if your printer is printed using the standard settings of your printer. • For details of the camera and the printer's USB port. Multi-connector USB cable • The [EASY PRINT START] screen is PictBridge? Printing pictures Direct ...


