Installation Instructions for Duplex Unit, 42158411
Page 1
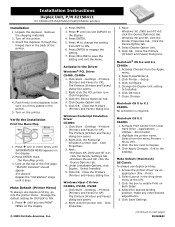
... →Printers [Printers and Faxes for XP]. Click Start →Settings →Printers [Printers and Faxes for XP]. Click Properties. © 2005 Oki Data Americas, Inc. 3. Macintosh® OS 8.x and 9.x C5400n 1. Exit to save the setting and exit the menu. 4. Click the box...the hinged door in the printer. 5. Press ENTER to ON. 6. Click Start →Settings →Printers [Printers and Faxes for C3200n/C5150/C5200 / C5400/C5400n printers Installation 1. Right click the Postscript emulation printer icon. Click OK. Turn off the printer. 3. Press ENTER. 5. Windows...
... →Printers [Printers and Faxes for XP]. Click Start →Settings →Printers [Printers and Faxes for XP]. Click Properties. © 2005 Oki Data Americas, Inc. 3. Macintosh® OS 8.x and 9.x C5400n 1. Exit to save the setting and exit the menu. 4. Click the box...the hinged door in the printer. 5. Press ENTER to ON. 6. Click Start →Settings →Printers [Printers and Faxes for C3200n/C5150/C5200 / C5400/C5400n printers Installation 1. Right click the Postscript emulation printer icon. Click OK. Turn off the printer. 3. Press ENTER. 5. Windows...
Fuser Instructions
Page 1
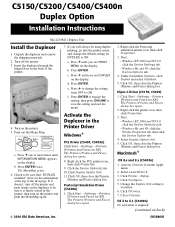
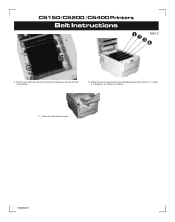
...x 7. Press the cover release and open the printer's top cover fully. Holding the new fuser by its packaging, then remove any packing tape. C3200/5150/C5200/C5400 Printers Fuser Instructions Fuser Replacement for the fuser to lock the fuser in place. 8.Close and latch the top cover. 3. If the printer has...of the printer to cool before opening the printer cover. 4. If in doubt, switch the printer off and wait at least 10 minutes for Oki 42625501 & 42625502 Warning! Handle the fuser with the fuser pressure release lever (1) on , some fuser components will be damaged by its handle...
...x 7. Press the cover release and open the printer's top cover fully. Holding the new fuser by its packaging, then remove any packing tape. C3200/5150/C5200/C5400 Printers Fuser Instructions Fuser Replacement for the fuser to lock the fuser in place. 8.Close and latch the top cover. 3. If the printer has...of the printer to cool before opening the printer cover. 4. If in doubt, switch the printer off and wait at least 10 minutes for Oki 42625501 & 42625502 Warning! Handle the fuser with the fuser pressure release lever (1) on , some fuser components will be damaged by its handle...
Belt Instructions
Page 1
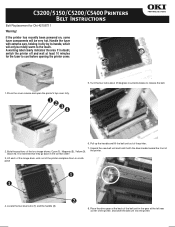
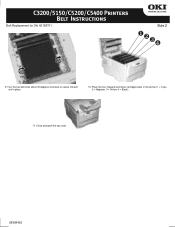
If in the gear at least 10 minutes for Oki 42158711 Warning! Black (4). Turn the two locks about 45 degrees counterclockwise to the touch. Handle the fuser with the blue handle toward the front of ... extreme care, holding it only by its handle, which will be mildly warm to release the belt. 6. A warning label clearly indicates the area. C3200/5150/C5200/C5400 Printers Belt Instructions Belt Replacement for the fuser to cool before opening the printer cover. 1. If the printer has recently been powered on, some...
If in the gear at least 10 minutes for Oki 42158711 Warning! Black (4). Turn the two locks about 45 degrees counterclockwise to the touch. Handle the fuser with the blue handle toward the front of ... extreme care, holding it only by its handle, which will be mildly warm to release the belt. 6. A warning label clearly indicates the area. C3200/5150/C5200/C5400 Printers Belt Instructions Belt Replacement for the fuser to cool before opening the printer cover. 1. If the printer has recently been powered on, some...
Belt Instructions
Page 2
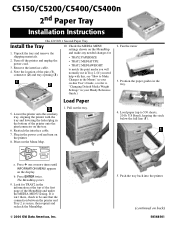
C3200/5150/C5200/C5400 Printers Belt Instructions Belt Replacement for Oki 42158701 Side 2 9. Place the four image drums/toner cartridges back in place. 10. Close and latch the top cover. 58368402 Turn the two belt locks about 45 degrees clockwise to secure the belt unit in the printer (1 = Cyan, 2 = Magenta, 3 = Yellow, 4 = Black): 11.
C3200/5150/C5200/C5400 Printers Belt Instructions Belt Replacement for Oki 42158701 Side 2 9. Place the four image drums/toner cartridges back in place. 10. Close and latch the top cover. 58368402 Turn the two belt locks about 45 degrees clockwise to secure the belt unit in the printer (1 = Cyan, 2 = Magenta, 3 = Yellow, 4 = Black): 11.
2nd Paper Tray Installation Instructions
Page 1
... or more times until INFORMATION MENU appears on the MenuMap and make any needed changes for TRAY2 in the tray. 4. C5150/C5200/C5400/C5400n 2nd Paper Tray Installation Instructions Oki 42158511 Second Paper Tray Install the Tray 1. The MenuMap prints. 9. Print out the Menu Map. Load paper (up to ...be sure that the connection between the printer and Tray 2 is secure, then reprint and recheck the MenuMap. © 2004 Oki Data Americas, Inc. 5. Pull out the tray. 5. Turn off the printer and unplug the power cord. 3. If it isn't there, check to ...
... or more times until INFORMATION MENU appears on the MenuMap and make any needed changes for TRAY2 in the tray. 4. C5150/C5200/C5400/C5400n 2nd Paper Tray Installation Instructions Oki 42158511 Second Paper Tray Install the Tray 1. The MenuMap prints. 9. Print out the Menu Map. Load paper (up to ...be sure that the connection between the printer and Tray 2 is secure, then reprint and recheck the MenuMap. © 2004 Oki Data Americas, Inc. 5. Pull out the tray. 5. Turn off the printer and unplug the power cord. 3. If it isn't there, check to ...

2nd Paper Tray Installation Instructions
Page 2
...). 4. Activate the Tray in the Printer Driver Windows® PCL Driver (C5400, C5400n) 1. The Printers (Printers and Faxes) dialog box opens. 2. Then: - Hiper-C Driver (C5150, C5200) 1. Click Start →Settings →Printers [Printers and Faxes for Available Tray, select 2 (1 Optional Tray). 5. Macintosh® OS 8.x and 9.x (C5400n) 1. Click OK twice. 7. Right click...
...). 4. Activate the Tray in the Printer Driver Windows® PCL Driver (C5400, C5400n) 1. The Printers (Printers and Faxes) dialog box opens. 2. Then: - Hiper-C Driver (C5150, C5200) 1. Click Start →Settings →Printers [Printers and Faxes for Available Tray, select 2 (1 Optional Tray). 5. Macintosh® OS 8.x and 9.x (C5400n) 1. Click OK twice. 7. Right click...
Duplex Option Installation Instructions
Page 1
C5150/C5200 / C5400/C5400n Duplex Option Installation Instructions Oki 42158411 Duplex Unit Install the Duplexer 1. Press + until you see DUPLEX on the display. Press ENTER. Press + to change the default setting for XP]. The ... the Printers (Printers and Faxes) dialog box. The Printers (Printers and Faxes) dialog box opens. © 2004 Oki Data Americas, Inc. 2. Windows XP, 2000 and NT 4.0: click the Device Settings tab. - Hiper-C Driver (C5150, C5200) 1. Windows Me and 98: click the Printer Properties tab, then click the Device Option tab. 4. Click Configure...
C5150/C5200 / C5400/C5400n Duplex Option Installation Instructions Oki 42158411 Duplex Unit Install the Duplexer 1. Press + until you see DUPLEX on the display. Press ENTER. Press + to change the default setting for XP]. The ... the Printers (Printers and Faxes) dialog box. The Printers (Printers and Faxes) dialog box opens. © 2004 Oki Data Americas, Inc. 2. Windows XP, 2000 and NT 4.0: click the Device Settings tab. - Hiper-C Driver (C5150, C5200) 1. Windows Me and 98: click the Printer Properties tab, then click the Device Option tab. 4. Click Configure...

Fuser Instructions
Page 1
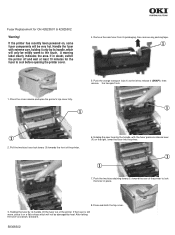
..., discard it (SNAP!), then remove the transport lock. 4;\ r- If in place. 8.Close and latch the top cover. 3. Fuser Replacement Oki 42625501 (120V) Oki 42625502 (230V Warning! Press the cover release and open the printer's top cover fully. Handle the fuser with the fuser pressure release lever (1)... then remove any packing tape. Push the two blue retaining levers (1) toward the rear of the printer to release it . 58368301 C5150/C5200 /C5400 Printers Fuser Instructions 4. If the printer has recently been powered on, some fuser components will only be very hot. Push the orange...
..., discard it (SNAP!), then remove the transport lock. 4;\ r- If in place. 8.Close and latch the top cover. 3. Fuser Replacement Oki 42625501 (120V) Oki 42625502 (230V Warning! Press the cover release and open the printer's top cover fully. Handle the fuser with the fuser pressure release lever (1)... then remove any packing tape. Push the two blue retaining levers (1) toward the rear of the printer to release it . 58368301 C5150/C5200 /C5400 Printers Fuser Instructions 4. If the printer has recently been powered on, some fuser components will only be very hot. Push the orange...

Belt Instructions
Page 1
... is essential that they go back in a safe place away from direct sources of the printer and place them in the correct order! 3. Belt Replacement Oki 42158711 C5150/C5200 /C5400 Printers Belt Instructions Warning! Black (4). f '7 fte 1 4.
... is essential that they go back in a safe place away from direct sources of the printer and place them in the correct order! 3. Belt Replacement Oki 42158711 C5150/C5200 /C5400 Printers Belt Instructions Warning! Black (4). f '7 fte 1 4.
Belt Instructions
Page 2
Close and latch the top cover. 58368401 Place the four image drums/toner cartridges back in place. 10. C5150/C5200 /C5400 Printers Belt Instructions Side 2 9. Turn the two belt locks about 45 degrees clockwise to secure the belt unit in the printer (1 = Cyan, 2 = Magenta, 3 = Yellow, 4 = Black): 11.
Close and latch the top cover. 58368401 Place the four image drums/toner cartridges back in place. 10. C5150/C5200 /C5400 Printers Belt Instructions Side 2 9. Turn the two belt locks about 45 degrees clockwise to secure the belt unit in the printer (1 = Cyan, 2 = Magenta, 3 = Yellow, 4 = Black): 11.