
PrintSuperVision Configuration Guide
Page 4
...(Optional Link 55 Supplies Ordering Calendar 56 Reporting 57 Available Reports 57 Selecting Report Attributes 57 Toner Changes Report 58 Generating a Toner Changes Report 58 Scheduling a Toner Changes Report 59 Schedule Log Report 60 Supplies Usage Report 61 Printed Pages Report 62 Color/...69 Quickly Access a Group of Devices 69 Changing the Device Properties Displayed 70 Searching for a Device 72 Changing Languages 72 Downloading Oki Drivers 73 Print to Remote Locations 74 Creating a Maintenance Log / Managing Supplies Inventory 75 Viewing a Login Log 76 Clearing (Deleting...
...(Optional Link 55 Supplies Ordering Calendar 56 Reporting 57 Available Reports 57 Selecting Report Attributes 57 Toner Changes Report 58 Generating a Toner Changes Report 58 Scheduling a Toner Changes Report 59 Schedule Log Report 60 Supplies Usage Report 61 Printed Pages Report 62 Color/...69 Quickly Access a Group of Devices 69 Changing the Device Properties Displayed 70 Searching for a Device 72 Changing Languages 72 Downloading Oki Drivers 73 Print to Remote Locations 74 Creating a Maintenance Log / Managing Supplies Inventory 75 Viewing a Login Log 76 Clearing (Deleting...

PrintSuperVision Configuration Guide
Page 57
Available Reports • Toner Changes Report (see page 58) • Schedule Log Report (see page 60) • Supplied Usage Report (see page 61) • Printed Pages Report (see page ... and Attributes from the main menu. 2. Reporting PSV can be scheduled to add or delete the device attributes and properties that identify supplies use, predict toner replacement dates, indicate pages printed and export device properties.
Available Reports • Toner Changes Report (see page 58) • Schedule Log Report (see page 60) • Supplied Usage Report (see page 61) • Printed Pages Report (see page ... and Attributes from the main menu. 2. Reporting PSV can be scheduled to add or delete the device attributes and properties that identify supplies use, predict toner replacement dates, indicate pages printed and export device properties.

PrintSuperVision Configuration Guide
Page 58
... a result of changing the cartridge too soon. Select Reports from the main menu and Toner Changes Report from the drop down box. 58 • Reporting Note The Toner Change Report is particularly helpful in the Professional Edition. Click the Save button at the time of the ...screen (not shown in all reports generated. 4. Toner Changes Report The "Toner Changes" Report shows the dates of the last toner cartridge replacement for a group of devices and indicates if there was any toner remaining at the bottom of replacement. 3. Select the desired device attributes...
... a result of changing the cartridge too soon. Select Reports from the main menu and Toner Changes Report from the drop down box. 58 • Reporting Note The Toner Change Report is particularly helpful in the Professional Edition. Click the Save button at the time of the ...screen (not shown in all reports generated. 4. Toner Changes Report The "Toner Changes" Report shows the dates of the last toner cartridge replacement for a group of devices and indicates if there was any toner remaining at the bottom of replacement. 3. Select the desired device attributes...

PrintSuperVision Configuration Guide
Page 59
... links (highlighted in blue). Click the Schedule button. 59 • Reporting Scheduling a Toner Changes Report A Toner Changes report can help you pinpoint toner remaining at on the calendar icons to an individual or group. 1. Indicate either HTML or Excel format and click Show to report on. 2.... and configured to be sent via email to select dates. Select a group of dates or click on a particular date. Additional details for toner replacement are available by various table sizes to display results; Select a report format and the method to make the data more readable. 3.
... links (highlighted in blue). Click the Schedule button. 59 • Reporting Scheduling a Toner Changes Report A Toner Changes report can help you pinpoint toner remaining at on the calendar icons to an individual or group. 1. Indicate either HTML or Excel format and click Show to report on. 2.... and configured to be sent via email to select dates. Select a group of dates or click on a particular date. Additional details for toner replacement are available by various table sizes to display results; Select a report format and the method to make the data more readable. 3.

PrintSuperVision Configuration Guide
Page 60
Schedule Log Report The Schedule Log Report provides an activity status log. 1. Enter a date range and select the desired activity. 60 • Reporting The toner changes report will be generated and sent, indicate email recipients and click Save. Select a starting date and time, select a recurring interval for the report to be generated and sent to the recipient on the dates and times indicated. 2. Click Schedule Logs. 2.
Schedule Log Report The Schedule Log Report provides an activity status log. 1. Enter a date range and select the desired activity. 60 • Reporting The toner changes report will be generated and sent, indicate email recipients and click Save. Select a starting date and time, select a recurring interval for the report to be generated and sent to the recipient on the dates and times indicated. 2. Click Schedule Logs. 2.
PrintSuperVision Configuration Guide
Page 61
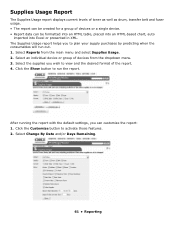
... button to activate those features. 2. Select an individual device or group of the report. 4. Supplies Usage Report The Supplies Usage report displays current levels of toner as well as drum, transfer belt and fuser usage. • The report can be formatted into an HTML table, placed into an HTML-based chart...
... button to activate those features. 2. Select an individual device or group of the report. 4. Supplies Usage Report The Supplies Usage report displays current levels of toner as well as drum, transfer belt and fuser usage. • The report can be formatted into an HTML table, placed into an HTML-based chart...
PrintSuperVision Configuration Guide
Page 69
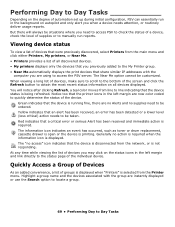
... displays the print devices that the device status is displayed. You will always be ordered. The information icon indicates an event has occurred, such as toner or drum replacement, cassette drawer is open or the device is required. Highlight a group name and the devices associated with the computer you may click...
... displays the print devices that the device status is displayed. You will always be ordered. The information icon indicates an event has occurred, such as toner or drum replacement, cassette drawer is open or the device is required. Highlight a group name and the devices associated with the computer you may click...

OkiLAN 8100 SoftNIC User's Guide
Page 36
Available conditions are: Off line, Consumable Message, Toner Low/ Out, Paper Low/Out, Paper Jam, Cover Open, Stacker Error, Mass Storage Error, Recoverable Error, Service Call Request and Finisher Error. Signature Set up ...
Available conditions are: Off line, Consumable Message, Toner Low/ Out, Paper Low/Out, Paper Jam, Cover Open, Stacker Error, Mass Storage Error, Recoverable Error, Service Call Request and Finisher Error. Signature Set up ...

OkiLAN 8100 SoftNIC User's Guide
Page 45
... Open trap 7: Printer Error trap 8: IPX Trap address 9: IPX Trap net 99: Back to prior menu 1: To Address 1-5 2: Re-send Interval 3: Off-Line 4: Consumable Message 5: Toner Low/Out 6: Paper Low/Out 7: Paper Jam 8: Cover Open 9: Stacker Error 10: Mass Storage Error 11: Recoverable Error 12: Service Call Req. 13: Finisher 99...
... Open trap 7: Printer Error trap 8: IPX Trap address 9: IPX Trap net 99: Back to prior menu 1: To Address 1-5 2: Re-send Interval 3: Off-Line 4: Consumable Message 5: Toner Low/Out 6: Paper Low/Out 7: Paper Jam 8: Cover Open 9: Stacker Error 10: Mass Storage Error 11: Recoverable Error 12: Service Call Req. 13: Finisher 99...

OkiLAN 8100 SoftNIC User's Guide
Page 60
...-10 SMTP-11 SMTP-12 SMTP-13 SMTP-14 [OKI Device Setup][SMTP]-[1- 5]-[Selected condition] [OKI Device Setup][SMTP]-[1- 5]- [Selected condition] [OKI Device Setup][SMTP]-[1- 5]- [Selected condition] [OKI Device Setup][SMTP]-[1- 5]- [Selected condition] [OKI Device Setup][SMTP]-[1- 5]- [Selected condition] [OKI Device Setup][SMTP]-[1- 5]- [Selected condition] [Network Configuration...if this is enabled An E-mail is sent when maintenance is required if this is enabled An E-mail is sent when toner(s) low/ out occurs if this is enabled An E-mail is sent when paper low/out occurs if this is enabled ...
...-10 SMTP-11 SMTP-12 SMTP-13 SMTP-14 [OKI Device Setup][SMTP]-[1- 5]-[Selected condition] [OKI Device Setup][SMTP]-[1- 5]- [Selected condition] [OKI Device Setup][SMTP]-[1- 5]- [Selected condition] [OKI Device Setup][SMTP]-[1- 5]- [Selected condition] [OKI Device Setup][SMTP]-[1- 5]- [Selected condition] [OKI Device Setup][SMTP]-[1- 5]- [Selected condition] [Network Configuration...if this is enabled An E-mail is sent when maintenance is required if this is enabled An E-mail is sent when toner(s) low/ out occurs if this is enabled An E-mail is sent when paper low/out occurs if this is enabled ...
Repack Procedure
Page 1
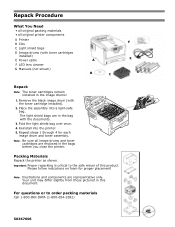
...in the image drums! 1. Please follow indications on foam for each image drum and toner assembly. Fold the light shield bag over once. 4. For questions or to the... What You Need • all original packing materials • all image drums and toner cartridges are enclosed in the bags before you close the printer. Note: Illustrations and components are in the bag... with the toner cartridge installed). 2. Repeat steps 1 through 4 for proper placement! Reinstall into a light-safe bag. Remove...
...in the image drums! 1. Please follow indications on foam for each image drum and toner assembly. Fold the light shield bag over once. 4. For questions or to the... What You Need • all original packing materials • all image drums and toner cartridges are enclosed in the bags before you close the printer. Note: Illustrations and components are in the bag... with the toner cartridge installed). 2. Repeat steps 1 through 4 for proper placement! Reinstall into a light-safe bag. Remove...
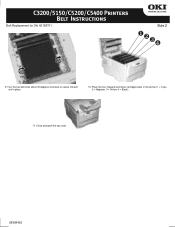
Belt Instructions
Page 2
Close and latch the top cover. 58368402 Turn the two belt locks about 45 degrees clockwise to secure the belt unit in the printer (1 = Cyan, 2 = Magenta, 3 = Yellow, 4 = Black): 11. Place the four image drums/toner cartridges back in place. 10. C3200/5150/C5200/C5400 Printers Belt Instructions Belt Replacement for Oki 42158701 Side 2 9.
Close and latch the top cover. 58368402 Turn the two belt locks about 45 degrees clockwise to secure the belt unit in the printer (1 = Cyan, 2 = Magenta, 3 = Yellow, 4 = Black): 11. Place the four image drums/toner cartridges back in place. 10. C3200/5150/C5200/C5400 Printers Belt Instructions Belt Replacement for Oki 42158701 Side 2 9.
Guide: Handy Reference C5150/C5200 Series (American English)
Page 4
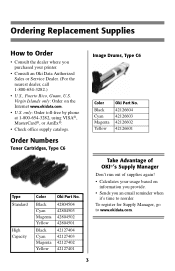
... • Sends you purchased your usage based on the Internet www.okidata.com. • U.S. Order Numbers Toner Cartridges, Type C6 Image Drums, Type C6 Color Black Cyan Magenta Yellow Oki Part No. 42126604 42126603 42126602 42126601 Type Standard High Capacity Color Black Cyan Magenta Yellow Black Cyan Magenta Yellow...;'s Supply Manager Don't run out of supplies again! • Calculates your printer. • Consult an Oki Data Authorized Sales or Service Dealer. (For the nearest dealer, call 1-800-654-3282.) • U.S., Puerto Rico, Guam, U.S. Ordering Replacement Supplies How ...
... • Sends you purchased your usage based on the Internet www.okidata.com. • U.S. Order Numbers Toner Cartridges, Type C6 Image Drums, Type C6 Color Black Cyan Magenta Yellow Oki Part No. 42126604 42126603 42126602 42126601 Type Standard High Capacity Color Black Cyan Magenta Yellow Black Cyan Magenta Yellow...;'s Supply Manager Don't run out of supplies again! • Calculates your printer. • Consult an Oki Data Authorized Sales or Service Dealer. (For the nearest dealer, call 1-800-654-3282.) • U.S., Puerto Rico, Guam, U.S. Ordering Replacement Supplies How ...

Guide: Handy Reference C5150/C5200 Series (American English)
Page 27
Caution! The fuser (behind cyan [C] toner) may be hot. 26 Clearing Media Jams (cont.) Jam 381 OPEN TOP COVER 381: PAPER JAM 1 3 Remove the image drums/ toner cartridges: Caution! To avoid damage to the drums: • Be sure to set the drums on a flat surface. 2 • Do not touch the shiny green area on the bottom of the drums. CMY K • Do not expose the drums to light for more than 5 minutes.
Caution! The fuser (behind cyan [C] toner) may be hot. 26 Clearing Media Jams (cont.) Jam 381 OPEN TOP COVER 381: PAPER JAM 1 3 Remove the image drums/ toner cartridges: Caution! To avoid damage to the drums: • Be sure to set the drums on a flat surface. 2 • Do not touch the shiny green area on the bottom of the drums. CMY K • Do not expose the drums to light for more than 5 minutes.

Guide: Handy Reference C5150/C5200 Series (American English)
Page 36
Changing Toner Cartridges 3 Toner Cartridge Order #s, see page 3 Note: Use only Type C6 Toner. Discard toner cartridges in accordance with local regulations! 35 REPLACE TONER nnn: XXXX* TONER EMPTY * nnn: XXXX = 410: YELLOW 412: CYAN 411: MAGENTA 413: BLACK 1 Power off! 1 = Cyan 2 = Magenta 3 = Yellow 4 = Black 4 Make sure the lever is pulled all the way forward before attempting to remove the toner cartridge! 2 5 Important!
Changing Toner Cartridges 3 Toner Cartridge Order #s, see page 3 Note: Use only Type C6 Toner. Discard toner cartridges in accordance with local regulations! 35 REPLACE TONER nnn: XXXX* TONER EMPTY * nnn: XXXX = 410: YELLOW 412: CYAN 411: MAGENTA 413: BLACK 1 Power off! 1 = Cyan 2 = Magenta 3 = Yellow 4 = Black 4 Make sure the lever is pulled all the way forward before attempting to remove the toner cartridge! 2 5 Important!

Guide: Handy Reference C5150/C5200 Series (American English)
Page 37
Changing Toner Cartridges (cont.) 6 10 7 11 8 12 13 9 Important! The TONER LOW message should disappear from the display. If it still doesn't disappear, reinstall the toner cartridge. 36 If it doesn't, try printing a page.
Changing Toner Cartridges (cont.) 6 10 7 11 8 12 13 9 Important! The TONER LOW message should disappear from the display. If it still doesn't disappear, reinstall the toner cartridge. 36 If it doesn't, try printing a page.

Guide: Handy Reference C5150/C5200 Series (American English)
Page 38
...Do Open the cover. INSTALL ADDITIONAL MEMORY 420: MEMORY OVERFLOW The amount of data in your local service dealer. XXX TONER SENSOR ERROR INSTALL NEW TONER nnn: XXXX TONER EMPTY The toner cartridge indicated (XXX) has run out of the display to indicate that the lever for more common error messages appear... below. Error Messages Some of the more information). 37 What to Do Be sure you have a replacement toner cartridge (see your on the second line of toner. Push the lock lever toward the back of the printer as far as separate groups of pages instead of all ...
...Do Open the cover. INSTALL ADDITIONAL MEMORY 420: MEMORY OVERFLOW The amount of data in your local service dealer. XXX TONER SENSOR ERROR INSTALL NEW TONER nnn: XXXX TONER EMPTY The toner cartridge indicated (XXX) has run out of the display to indicate that the lever for more common error messages appear... below. Error Messages Some of the more information). 37 What to Do Be sure you have a replacement toner cartridge (see your on the second line of toner. Push the lock lever toward the back of the printer as far as separate groups of pages instead of all ...

User's Guide
Page 3
... (MP) Tray 22 Printer Menu 25 How To Make Changes in The Menus 25 Summary of Menu Defaults 28 Printer Menus 32 Replacing Consumables 46 Toner Cartridge Replacement 47 Image Drum Replacement 55 Belt Unit Replacement 64 Fuser Replacement 70 Clearing Paper Jams 75 Troubleshooting 96 LCD messages 96 Problem solving...
... (MP) Tray 22 Printer Menu 25 How To Make Changes in The Menus 25 Summary of Menu Defaults 28 Printer Menus 32 Replacing Consumables 46 Toner Cartridge Replacement 47 Image Drum Replacement 55 Belt Unit Replacement 64 Fuser Replacement 70 Clearing Paper Jams 75 Troubleshooting 96 LCD messages 96 Problem solving...

User's Guide
Page 29
... MENU Item ADJUST DENSITY AJST REGSTRATION C REG FINE AJST M REG FINE AJST Y REG FINE AJST POW SAVE TIME CLRABLE WARNING MANUAL TIMEOUT WAIT TIMEOUT LOW TONER JAM RECOVERY ERROR REPORT LANGUAGE SOFT RESET SPEED TCP/IP NETBEUI IP ADDRESS SET IP ADDRESS SUBNET MASK GATEWAY ADDRESS INITIALIZE NIC? Menu Defaults (continued...
... MENU Item ADJUST DENSITY AJST REGSTRATION C REG FINE AJST M REG FINE AJST Y REG FINE AJST POW SAVE TIME CLRABLE WARNING MANUAL TIMEOUT WAIT TIMEOUT LOW TONER JAM RECOVERY ERROR REPORT LANGUAGE SOFT RESET SPEED TCP/IP NETBEUI IP ADDRESS SET IP ADDRESS SUBNET MASK GATEWAY ADDRESS INITIALIZE NIC? Menu Defaults (continued...

User's Guide
Page 31
Menu Defaults (continued) Note: Menus/Items with a dagger (†) only appear when the appropriate option (e.g., Duplex Unit, Second Paper Tray, etc.) is installed. Menu Item MPT PAGE COUNT COLOR PAGE COUNT MONO PAGE COUNT K DRUM LIFE C DRUM LIFE M DRUM LIFE Y DRUM LIFE BELT LIFE FUSER LIFE K TONER C TONER M TONER Y TONER Default Setting nnnn nnnn nnnn REMAINING nn% REMAINING nn% REMAINING nn% REMAINING nn% REMAINING nn% REMAINING nn% REMAINING nn% REMAINING nn% REMAINING nn% REMAINING nn% Printer Menu • 31
Menu Defaults (continued) Note: Menus/Items with a dagger (†) only appear when the appropriate option (e.g., Duplex Unit, Second Paper Tray, etc.) is installed. Menu Item MPT PAGE COUNT COLOR PAGE COUNT MONO PAGE COUNT K DRUM LIFE C DRUM LIFE M DRUM LIFE Y DRUM LIFE BELT LIFE FUSER LIFE K TONER C TONER M TONER Y TONER Default Setting nnnn nnnn nnnn REMAINING nn% REMAINING nn% REMAINING nn% REMAINING nn% REMAINING nn% REMAINING nn% REMAINING nn% REMAINING nn% REMAINING nn% REMAINING nn% Printer Menu • 31


