
PrintSuperVision Configuration Guide
Page 56
... on historic usage) when a supply item will run out and when a maintenance item needs to be reminded of both supplies and maintenance items (such as fusers and transfer belts). 5. Click Tools from the main menu and Calendar from the supplies report and Show maintenance items if you wish to display and...
... on historic usage) when a supply item will run out and when a maintenance item needs to be reminded of both supplies and maintenance items (such as fusers and transfer belts). 5. Click Tools from the main menu and Calendar from the supplies report and Show maintenance items if you wish to display and...
PrintSuperVision Configuration Guide
Page 61
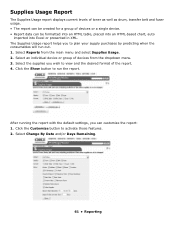
.../or Days Remaining. 61 • Reporting Supplies Usage Report The Supplies Usage report displays current levels of toner as well as drum, transfer belt and fuser usage. • The report can be formatted into an HTML table, placed into an HTML-based chart, auto imported into Excel or presented in XML...
.../or Days Remaining. 61 • Reporting Supplies Usage Report The Supplies Usage report displays current levels of toner as well as drum, transfer belt and fuser usage. • The report can be formatted into an HTML table, placed into an HTML-based chart, auto imported into Excel or presented in XML...
Fuser Instructions
Page 1
...it . 58368302 x x 7. x x x 2. Pull the two blue fuser lock levers (1) towards the front of the printer to lock the fuser in doubt, switch the printer off and wait at least 10 minutes for Oki 42625501 & 42625502 Warning! If the fuser is still warm, place it only by the handle, with the... fuser pressure release lever (1) on the right, lower the fuser into the priner. After letting the fuser cool down, discard it (SNAP!), then remove...
...it . 58368302 x x 7. x x x 2. Pull the two blue fuser lock levers (1) towards the front of the printer to lock the fuser in doubt, switch the printer off and wait at least 10 minutes for Oki 42625501 & 42625502 Warning! If the fuser is still warm, place it only by the handle, with the... fuser pressure release lever (1) on the right, lower the fuser into the priner. After letting the fuser cool down, discard it (SNAP!), then remove...
Belt Instructions
Page 1
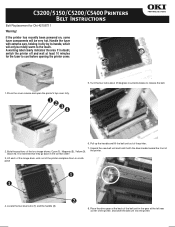
...2. A warning label clearly indicates the area. C3200/5150/C5200/C5400 Printers Belt Instructions Belt Replacement for the fuser to cool before opening the printer cover. 1. If in the gear at least 10 minutes for Oki 42158711 Warning! Locate the two blue locks (1) and the handle (2). 8. Press the cover release and open... the correct order! 3. Turn the two locks about 45 degrees counterclockwise to the touch. If the printer has recently been powered on, some fuser components will only be very hot. Black (4). It is essential that they go back in a safe place 4.
...2. A warning label clearly indicates the area. C3200/5150/C5200/C5400 Printers Belt Instructions Belt Replacement for the fuser to cool before opening the printer cover. 1. If in the gear at least 10 minutes for Oki 42158711 Warning! Locate the two blue locks (1) and the handle (2). 8. Press the cover release and open... the correct order! 3. Turn the two locks about 45 degrees counterclockwise to the touch. If the printer has recently been powered on, some fuser components will only be very hot. Black (4). It is essential that they go back in a safe place 4.
Guide: Handy Reference C5150/C5200 Series (American English)
Page 25
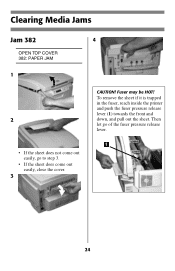
To remove the sheet if it is trapped in the fuser, reach inside the printer and push the fuser pressure release lever (1) towards the front and down, and pull out the sheet. Clearing Media Jams Jam 382 OPEN TOP COVER 382: PAPER JAM 1 2 4 CAUTION! Then let go of the fuser pressure release lever. • If the sheet does not come out easily, go to step 3. • If the sheet does come out easily, close the cover. 3 24 Fuser may be HOT!
To remove the sheet if it is trapped in the fuser, reach inside the printer and push the fuser pressure release lever (1) towards the front and down, and pull out the sheet. Clearing Media Jams Jam 382 OPEN TOP COVER 382: PAPER JAM 1 2 4 CAUTION! Then let go of the fuser pressure release lever. • If the sheet does not come out easily, go to step 3. • If the sheet does come out easily, close the cover. 3 24 Fuser may be HOT!

Guide: Handy Reference C5150/C5200 Series (American English)
Page 27
To avoid damage to the drums: • Be sure to set the drums on a flat surface. 2 • Do not touch the shiny green area on the bottom of the drums. CMY K • Do not expose the drums to light for more than 5 minutes. Caution! Clearing Media Jams (cont.) Jam 381 OPEN TOP COVER 381: PAPER JAM 1 3 Remove the image drums/ toner cartridges: Caution! The fuser (behind cyan [C] toner) may be hot. 26
To avoid damage to the drums: • Be sure to set the drums on a flat surface. 2 • Do not touch the shiny green area on the bottom of the drums. CMY K • Do not expose the drums to light for more than 5 minutes. Caution! Clearing Media Jams (cont.) Jam 381 OPEN TOP COVER 381: PAPER JAM 1 3 Remove the image drums/ toner cartridges: Caution! The fuser (behind cyan [C] toner) may be hot. 26

Guide: Handy Reference C5150/C5200 Series (American English)
Page 28
Then let go of the sheet, push the fuser pressure release lever (1) towards the front and down, and lift out the sheet. Clearing Media Jams (cont.) 4 5 6 Warning! To remove a sheet trapped in the fuser, grasp the edge of the fuser pressure release lever. 7 CMY K If the sheet is well advanced into the fuser, see step 4 under "Jam 382." 27 If the printer has been printing, the fuser will be HOT!
Then let go of the sheet, push the fuser pressure release lever (1) towards the front and down, and lift out the sheet. Clearing Media Jams (cont.) 4 5 6 Warning! To remove a sheet trapped in the fuser, grasp the edge of the fuser pressure release lever. 7 CMY K If the sheet is well advanced into the fuser, see step 4 under "Jam 382." 27 If the printer has been printing, the fuser will be HOT!

Guide: Handy Reference C5150/C5200 Series (American English)
Page 31
Then let go of the fuser pressure release lever. 3 30 If the sheet is trapped in the fuser, lift the top cover, reach in and push the fuser pressure release lever (1) towards the front and down, and pull out the sheet. Fuser may be HOT! Clearing Media Jams (cont.) CAUTION!
Then let go of the fuser pressure release lever. 3 30 If the sheet is trapped in the fuser, lift the top cover, reach in and push the fuser pressure release lever (1) towards the front and down, and pull out the sheet. Fuser may be HOT! Clearing Media Jams (cont.) CAUTION!
Guide: Handy Reference C5150/C5200 Series (American English)
Page 40
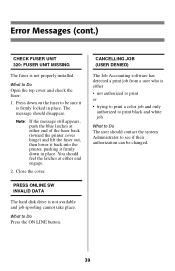
... Job Accounting software has detected a print job from a user who is firmly locked in place. What to Do Open the top cover and check the fuser: 1. Press down in place. What to Do Press the ON LINE button. What to Do The user should contact the system Administrator to see if... their authorization can be sure it firmly down on the fuser to print black and white job. Close the cover. Note: If the message still appears, push the blue latches at either • not authorized to...
... Job Accounting software has detected a print job from a user who is firmly locked in place. What to Do Open the top cover and check the fuser: 1. Press down in place. What to Do Press the ON LINE button. What to Do The user should contact the system Administrator to see if... their authorization can be sure it firmly down on the fuser to print black and white job. Close the cover. Note: If the message still appears, push the blue latches at either • not authorized to...

User's Guide
Page 3
... Menus 25 Summary of Menu Defaults 28 Printer Menus 32 Replacing Consumables 46 Toner Cartridge Replacement 47 Image Drum Replacement 55 Belt Unit Replacement 64 Fuser Replacement 70 Clearing Paper Jams 75 Troubleshooting 96 LCD messages 96 Problem solving 101 Options 110 RAM Memory 110 Second Paper Tray 111 Duplex Unit...
... Menus 25 Summary of Menu Defaults 28 Printer Menus 32 Replacing Consumables 46 Toner Cartridge Replacement 47 Image Drum Replacement 55 Belt Unit Replacement 64 Fuser Replacement 70 Clearing Paper Jams 75 Troubleshooting 96 LCD messages 96 Problem solving 101 Options 110 RAM Memory 110 Second Paper Tray 111 Duplex Unit...

User's Guide
Page 12
...moisture, direct sunlight and heat sources. • Don't use damp, damaged or curled envelopes. Transparencies • Use only recommended transparencies (3M CG3720, Oki 52205701). • Avoid office transparencies designed for 0.2 second. These will melt in your Handy Reference Guide for more information). • Envelopes should be...clasps. • Don't use envelopes with marker pens. Media Recommendations • 12 Envelopes Yes No • Use only recommended envelopes (Oki 52206301 and 52206302: see "Selecting/Using OKI Print Media" in the fuser and cause damage.
...moisture, direct sunlight and heat sources. • Don't use damp, damaged or curled envelopes. Transparencies • Use only recommended transparencies (3M CG3720, Oki 52205701). • Avoid office transparencies designed for 0.2 second. These will melt in your Handy Reference Guide for more information). • Envelopes should be...clasps. • Don't use envelopes with marker pens. Media Recommendations • 12 Envelopes Yes No • Use only recommended envelopes (Oki 52206301 and 52206302: see "Selecting/Using OKI Print Media" in the fuser and cause damage.

User's Guide
Page 31
Menu Item MPT PAGE COUNT COLOR PAGE COUNT MONO PAGE COUNT K DRUM LIFE C DRUM LIFE M DRUM LIFE Y DRUM LIFE BELT LIFE FUSER LIFE K TONER C TONER M TONER Y TONER Default Setting nnnn nnnn nnnn REMAINING nn% REMAINING nn% REMAINING nn% REMAINING nn% REMAINING nn% REMAINING nn% REMAINING nn% REMAINING nn% REMAINING nn% REMAINING nn% Printer Menu • 31 Menu Defaults (continued) Note: Menus/Items with a dagger (†) only appear when the appropriate option (e.g., Duplex Unit, Second Paper Tray, etc.) is installed.
Menu Item MPT PAGE COUNT COLOR PAGE COUNT MONO PAGE COUNT K DRUM LIFE C DRUM LIFE M DRUM LIFE Y DRUM LIFE BELT LIFE FUSER LIFE K TONER C TONER M TONER Y TONER Default Setting nnnn nnnn nnnn REMAINING nn% REMAINING nn% REMAINING nn% REMAINING nn% REMAINING nn% REMAINING nn% REMAINING nn% REMAINING nn% REMAINING nn% REMAINING nn% Printer Menu • 31 Menu Defaults (continued) Note: Menus/Items with a dagger (†) only appear when the appropriate option (e.g., Duplex Unit, Second Paper Tray, etc.) is installed.

User's Guide
Page 45
... TRAY1 PAGE COUNT TRAY2 PAGE COUNT MPT PAGE COUNT COLOR PAGE COUNT MONO PAGE COUNT K DRUM LIFE C DRUM LIFE M DRUM LIFE Y DRUM LIFE BELT LIFE FUSER LIFE K TONER C TONER M TONER Y TONER Explanation The total number of pages fed from the Multi-Purpose Tray. Appears only if the optional Second Paper Tray...
... TRAY1 PAGE COUNT TRAY2 PAGE COUNT MPT PAGE COUNT COLOR PAGE COUNT MONO PAGE COUNT K DRUM LIFE C DRUM LIFE M DRUM LIFE Y DRUM LIFE BELT LIFE FUSER LIFE K TONER C TONER M TONER Y TONER Explanation The total number of pages fed from the Multi-Purpose Tray. Appears only if the optional Second Paper Tray...
User's Guide
Page 46
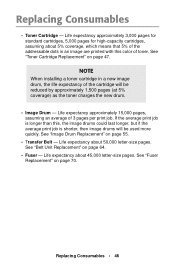
... 5% coverage) as the toner charges the new drum. • Image Drum - See "Toner Cartridge Replacement" on page 55. • Transfer Belt - See "Fuser Replacement" on page 64. • Fuser - See "Belt Unit Replacement" on page 70. Replacing Consumables • Toner Cartridge - Life expectancy approximately 3,000 pages for standard cartridges, 5,000 pages for...
... 5% coverage) as the toner charges the new drum. • Image Drum - See "Toner Cartridge Replacement" on page 55. • Transfer Belt - See "Fuser Replacement" on page 64. • Fuser - See "Belt Unit Replacement" on page 70. Replacing Consumables • Toner Cartridge - Life expectancy approximately 3,000 pages for standard cartridges, 5,000 pages for...

User's Guide
Page 48
If the printer has been powered on, the fuser is clearly labelled. Replacing Consumables • 48 This area is hot. Do not touch. Press the cover release and open the printer's top cover fully. 1. WARNING!
If the printer has been powered on, the fuser is clearly labelled. Replacing Consumables • 48 This area is hot. Do not touch. Press the cover release and open the printer's top cover fully. 1. WARNING!

User's Guide
Page 56
Replacing Consumables • 56 WARNING! If the printer has been powered on, the fuser is clearly labelled. Press the cover release and open the top cover fully. This area is hot. Do not touch it. 2.
Replacing Consumables • 56 WARNING! If the printer has been powered on, the fuser is clearly labelled. Press the cover release and open the top cover fully. This area is hot. Do not touch it. 2.

User's Guide
Page 64
Replacing Consumables • 64 This area is hot. If the printer has been powered on, the fuser is clearly labelled. WARNING! Belt Unit Replacement Oki 42158711 REPLACE BELT 355: BELT LIFE The belt unit is located under the four image drums. This unit requires replacement approximately every 50,000 pages. 1. Press the cover release and open the top cover fully. Do not touch it.
Replacing Consumables • 64 This area is hot. If the printer has been powered on, the fuser is clearly labelled. WARNING! Belt Unit Replacement Oki 42158711 REPLACE BELT 355: BELT LIFE The belt unit is located under the four image drums. This unit requires replacement approximately every 50,000 pages. 1. Press the cover release and open the top cover fully. Do not touch it.

User's Guide
Page 70
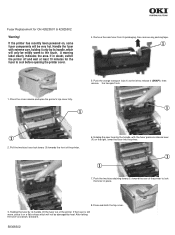
A warning label clearly indicates the area. Handle the fuser with extreme care, holding it only by its handle, which will be mildly warm to cool before opening the printer cover. Replacing Consumables • 70 If in doubt, switch the printer off and wait at least 10 minutes for the fuser to the touch. If the printer has recently been powered on, some fuser components will only be very hot. Fuser Replacement Oki 42625501 (120V) Oki 42625502 (230V) REPLACE FUSER 354: FUSER LIFE WARNING!
A warning label clearly indicates the area. Handle the fuser with extreme care, holding it only by its handle, which will be mildly warm to cool before opening the printer cover. Replacing Consumables • 70 If in doubt, switch the printer off and wait at least 10 minutes for the fuser to the touch. If the printer has recently been powered on, some fuser components will only be very hot. Fuser Replacement Oki 42625501 (120V) Oki 42625502 (230V) REPLACE FUSER 354: FUSER LIFE WARNING!

User's Guide
Page 71
1. Press the cover release and open the printer's top cover fully. 2. Pull the two blue fuser lock levers (1) towards the front of the printer. Replacing Consumables • 71
1. Press the cover release and open the printer's top cover fully. 2. Pull the two blue fuser lock levers (1) towards the front of the printer. Replacing Consumables • 71
User's Guide
Page 72
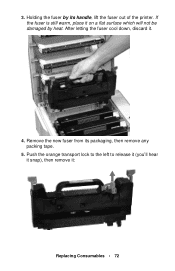
Holding the fuser by heat. Remove the new fuser from its handle, lift the fuser out of the printer. Push the orange transport lock to the left to release it (you'll hear it snap), then remove it . 4. After letting the fuser cool down, discard it : Replacing Consumables • 72 3. If the fuser is still warm, place it on a flat surface which will not be damaged by its packaging, then remove any packing tape. 5.
Holding the fuser by heat. Remove the new fuser from its handle, lift the fuser out of the printer. Push the orange transport lock to the left to release it (you'll hear it snap), then remove it . 4. After letting the fuser cool down, discard it : Replacing Consumables • 72 3. If the fuser is still warm, place it on a flat surface which will not be damaged by its packaging, then remove any packing tape. 5.


