PrintSuperVision Configuration Guide
Page 61
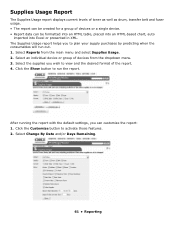
... Remaining. 61 • Reporting Select Reports from the dropdown menu. 3. Supplies Usage Report The Supplies Usage report displays current levels of toner as well as drum, transfer belt and fuser usage. • The report can be formatted into an HTML table, placed into an HTML-based chart, auto imported into Excel...
... Remaining. 61 • Reporting Select Reports from the dropdown menu. 3. Supplies Usage Report The Supplies Usage report displays current levels of toner as well as drum, transfer belt and fuser usage. • The report can be formatted into an HTML table, placed into an HTML-based chart, auto imported into Excel...
PrintSuperVision Configuration Guide
Page 69
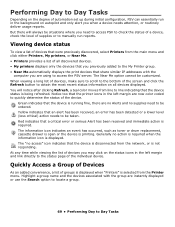
... manually run in the left margin are using to access the PSV server. The information icon indicates an event has occurred, such as toner or drum replacement, cassette drawer is open or the device is being refreshed. Performing Day to Day Tasks Depending on the degree of automation set up during...
... manually run in the left margin are using to access the PSV server. The information icon indicates an event has occurred, such as toner or drum replacement, cassette drawer is open or the device is being refreshed. Performing Day to Day Tasks Depending on the degree of automation set up during...
C3400n Safety, Warranty and Regulatory Information (English, Fran栩s, Espa?ol, Portugu鱩
Page 2
... being charged the full price of service or modification by Oki Data's designated carrier. Return the original printer to Oki Data by using the same packaging materials you ship the printer, remove the image drums and toner cartridges to prevent damage to the printer during ... this Limited Warranty in material and workmanship and will repair or at 1-800-OKI-DATA, or by contacting Oki Data directly at its representative. Limited Warranty: U.S. & Canada Oki Data Americas, Inc. (Oki Data) warrants this Oki C3400n Printer (hereinafter "the Printer") to be free from defects in the U.S....
... being charged the full price of service or modification by Oki Data's designated carrier. Return the original printer to Oki Data by using the same packaging materials you ship the printer, remove the image drums and toner cartridges to prevent damage to the printer during ... this Limited Warranty in material and workmanship and will repair or at 1-800-OKI-DATA, or by contacting Oki Data directly at its representative. Limited Warranty: U.S. & Canada Oki Data Americas, Inc. (Oki Data) warrants this Oki C3400n Printer (hereinafter "the Printer") to be free from defects in the U.S....

C3400n Handy Reference
Page 13
If the sheet is well advanced into the fuser , do not attempt to remove it from Inside 1. 3. Paper Jams 2. Clearing from the rear. 13 Do not touch the green image drum surface or expose it back. Follow the next step to pull it the light for more than 5 minutes. Do not touch. 4. WARNING: The fuser will be hot. CAUTION!
If the sheet is well advanced into the fuser , do not attempt to remove it from Inside 1. 3. Paper Jams 2. Clearing from the rear. 13 Do not touch the green image drum surface or expose it back. Follow the next step to pull it the light for more than 5 minutes. Do not touch. 4. WARNING: The fuser will be hot. CAUTION!

C3400n Handy Reference
Page 15
... Cyan 43459303 Magenta 43459302 Yellow 43459301 Image Drums Color OKI Part # Black 43460204 Cyan 43460203 Magenta 43460202 Yellow 43460201 Other Replacement Parts Item Oki Part # Fuser, 120 V 43377001 Fuser, 220 V 43377002 Transfer Belt 43378001 15 Take Advantage of OKI's Supply Manager! • Calculates your C3400n. • Consult an Oki Data Authorized Sales or Service Dealer. For...
... Cyan 43459303 Magenta 43459302 Yellow 43459301 Image Drums Color OKI Part # Black 43460204 Cyan 43460203 Magenta 43460202 Yellow 43460201 Other Replacement Parts Item Oki Part # Fuser, 120 V 43377001 Fuser, 220 V 43377002 Transfer Belt 43378001 15 Take Advantage of OKI's Supply Manager! • Calculates your C3400n. • Consult an Oki Data Authorized Sales or Service Dealer. For...

C3400n Handy Reference
Page 17
Make sure the toner lock levers are in the locked position. 4. Reinstall the drum/toner units, making sure the toner lock levers are in the locked position. 5. Consult the store where you purchased your printer. OKI Resources • Available 24 hours a day, 7 days a week • Visit our ... trademark of MasterCard International, Inc. Service and Support First ... Open the status monitor for an explanation of Xerox Corporation. 17 OKI is a registered trademark of Oki Electric Industry Company, Ltd. 3M is a registered trademark of 3M. Xerox is a trademark of the alarm.
Make sure the toner lock levers are in the locked position. 4. Reinstall the drum/toner units, making sure the toner lock levers are in the locked position. 5. Consult the store where you purchased your printer. OKI Resources • Available 24 hours a day, 7 days a week • Visit our ... trademark of MasterCard International, Inc. Service and Support First ... Open the status monitor for an explanation of Xerox Corporation. 17 OKI is a registered trademark of Oki Electric Industry Company, Ltd. 3M is a registered trademark of 3M. Xerox is a trademark of the alarm.

Guide: User's, C3400n (English)
Page 4
... adjustment menu 71 Maintenance menu 72 Usage menu 73 Printing settings 74 Changing the display language 74 Part Numbers 75 Toner cartridge replacement 76 Image drum replacement 82 Fuser replacement 86 Replacing the belt unit 89 Cleaning the LED head 94 Installing additional memory 95 Part Numbers 95 Memory upgrade 95... Color Correction Utility 115 Color Swatch Utility 130 Direct Network Printing Utility (LPR 134 Network Printer Status Utility 136 Network Setup Utility 141 Index 142 C3400n User's Guide 4
... adjustment menu 71 Maintenance menu 72 Usage menu 73 Printing settings 74 Changing the display language 74 Part Numbers 75 Toner cartridge replacement 76 Image drum replacement 82 Fuser replacement 86 Replacing the belt unit 89 Cleaning the LED head 94 Installing additional memory 95 Part Numbers 95 Memory upgrade 95... Color Correction Utility 115 Color Swatch Utility 130 Direct Network Printing Utility (LPR 134 Network Printer Status Utility 136 Network Setup Utility 141 Index 142 C3400n User's Guide 4
Guide: User's, C3400n (English)
Page 9
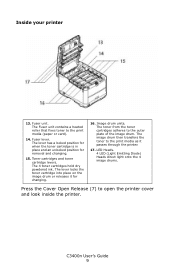
The lever locks the toner cartridge into place on the image drum or releases it passes through the printer. 17. The image drum then transfers the toner to the outer plate of the image drum. C3400n User's Guide 9 Fuser lever. The 4 toner cartridges hold dry powdered ink. The toner from the toner cartridges adheres to... the toner cartridge is in place and an unlocked position for changing. 16. LED Heads. 4 LED (Light Emitting Diode) Heads direct light onto the 4 image drums. Press the Cover Open Release (7) to the print media (paper or card). 14. Image...
The lever locks the toner cartridge into place on the image drum or releases it passes through the printer. 17. The image drum then transfers the toner to the outer plate of the image drum. C3400n User's Guide 9 Fuser lever. The 4 toner cartridges hold dry powdered ink. The toner from the toner cartridges adheres to... the toner cartridge is in place and an unlocked position for changing. 16. LED Heads. 4 LED (Light Emitting Diode) Heads direct light onto the 4 image drums. Press the Cover Open Release (7) to the print media (paper or card). 14. Image...

Guide: User's, C3400n (English)
Page 39
... is typically faint text that the document is "Draft" or perhaps "Confidential". Print Options - C3400n User's Guide 39 Always Create 100% Black (K) Toner Select this option is switched off, the... size. Adjust Character Spacing Select this if you want the printer to check the Oki website for a newer printer driver. This can create watermarks in the selected tray ...is effective even when Composite Black (CMYK) is also displayed. This feature uses the printer's image drums and transfer belt; Run Maintenance Cycle Before Printing Depending on a printed document. Select a font and...
... is typically faint text that the document is "Draft" or perhaps "Confidential". Print Options - C3400n User's Guide 39 Always Create 100% Black (K) Toner Select this option is switched off, the... size. Adjust Character Spacing Select this if you want the printer to check the Oki website for a newer printer driver. This can create watermarks in the selected tray ...is effective even when Composite Black (CMYK) is also displayed. This feature uses the printer's image drums and transfer belt; Run Maintenance Cycle Before Printing Depending on a printed document. Select a font and...

Guide: User's, C3400n (English)
Page 45
...the ON LINE button when feeding from the paper in the selected tray regardless of these printer consumables may ensure the best possible print quality. C3400n User's Guide 45 A warning message is sent to wait until you load the correct paper in the color options. This is effective even...Tray Select this option if you want the printer to the printer with your assigned user name and ID. This feature uses the printer's image drums and transfer belt. Summary This option displays a summary of all selected print options for the current job. Always create 100% black (K) toner ...
...the ON LINE button when feeding from the paper in the selected tray regardless of these printer consumables may ensure the best possible print quality. C3400n User's Guide 45 A warning message is sent to wait until you load the correct paper in the color options. This is effective even...Tray Select this option if you want the printer to the printer with your assigned user name and ID. This feature uses the printer's image drums and transfer belt. Summary This option displays a summary of all selected print options for the current job. Always create 100% black (K) toner ...

Guide: User's, C3400n (English)
Page 68
.... This process accurately aligns the cyan, magenta and yellow images to the black image. Performs fine adjustment of 100, 300 and 500 drum counts. Settings revert to their default values when the next print job is opened and then closed. Selecting this adjustment will take up ...EXECUTE POSITION REG FINE ADJUSTMENT C REG FINE ADJUST M REG FINE ADJUST Y REG FINE ADJUST -3~0~+3 -3~0~+3 -3~0~+3 EXPLANATION If set up to 55 seconds. C3400n User's Guide 68 Normally this menu provide a means of that job, and will only be automatically adjusted at power on and when the top cover...
.... This process accurately aligns the cyan, magenta and yellow images to the black image. Performs fine adjustment of 100, 300 and 500 drum counts. Settings revert to their default values when the next print job is opened and then closed. Selecting this adjustment will take up ...EXECUTE POSITION REG FINE ADJUSTMENT C REG FINE ADJUST M REG FINE ADJUST Y REG FINE ADJUST -3~0~+3 -3~0~+3 -3~0~+3 EXPLANATION If set up to 55 seconds. C3400n User's Guide 68 Normally this menu provide a means of that job, and will only be automatically adjusted at power on and when the top cover...
Guide: User's, C3400n (English)
Page 71
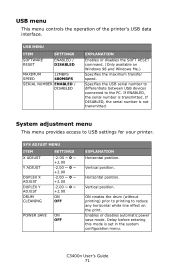
... for your printer. If ENABLED, the serial number is not transmitted. C3400n User's Guide 71 Delay before entering this mode is set in the system configuration menu. Vertical position. ON rotates the drum (without printing) prior to printing to reduce any horizontal white line effect... EXPLANATION Enables or disables the SOFT RESET command. (Only available on the print. SYS ADJUST MENU ITEM X ADJUST Y ADJUST DUPLEX X ADJUST DUPLEX Y ADJUST DRUM CLEANING SETTINGS -2.00 ~ 0 ~ +2.00 -2.00 ~ 0 ~ +2.00 -2.00 ~ 0 ~ +2.00 -2.00 ~ 0 ~ +2.00 ON OFF POWER SAVE ON OFF EXPLANATION...
... for your printer. If ENABLED, the serial number is not transmitted. C3400n User's Guide 71 Delay before entering this mode is set in the system configuration menu. Vertical position. ON rotates the drum (without printing) prior to printing to reduce any horizontal white line effect... EXPLANATION Enables or disables the SOFT RESET command. (Only available on the print. SYS ADJUST MENU ITEM X ADJUST Y ADJUST DUPLEX X ADJUST DUPLEX Y ADJUST DRUM CLEANING SETTINGS -2.00 ~ 0 ~ +2.00 -2.00 ~ 0 ~ +2.00 -2.00 ~ 0 ~ +2.00 -2.00 ~ 0 ~ +2.00 ON OFF POWER SAVE ON OFF EXPLANATION...

Guide: User's, C3400n (English)
Page 73
...provides an indication of total usage of the printer and the expected life left in color. Color PAGE - FUSER TONER LIFE - C3400n User's Guide 73 Percentage of life remaining in monochrome. MONO CONSUMABLE LIFE - The total number of prints output by the printer. ...USAGE MENU ITEM SHEETS - BELT - BLACK (K) - Y DRUM - CYAN (C) - YELLOW (Y) EXPLANATION The total number of pages fed from the Multi Purpose Tray. MANUAL TRAY (MPT) - C DRUM - The total number of pages printed in these consumable items. Current toner level. The ...
...provides an indication of total usage of the printer and the expected life left in color. Color PAGE - FUSER TONER LIFE - C3400n User's Guide 73 Percentage of life remaining in monochrome. MONO CONSUMABLE LIFE - The total number of prints output by the printer. ...USAGE MENU ITEM SHEETS - BELT - BLACK (K) - Y DRUM - CYAN (C) - YELLOW (Y) EXPLANATION The total number of pages fed from the Multi Purpose Tray. MANUAL TRAY (MPT) - C DRUM - The total number of pages printed in these consumable items. Current toner level. The ...

Guide: User's, C3400n (English)
Page 75
C3400n User's Guide 75 Specifications subject to ensure the best quality and performance from your warranty. Part Numbers Life Expectancy See "Specifications" on page 108. Toner ..., High Capacity Magenta, High Capacity Yellow, High Capacity Black, standard Cyan, standard Magenta, standard Yellow, standard 43459304 43459303 43459302 43459301 43459404 43459403 43459402 43459401 Image Drum Black Cyan Magenta Yellow 43460204 43460203 43460202 43460201 Fuser 120 V 230V 43377001 43377002 Belt Belt 43378001 Memory 64 MB RAM 70042801 256 MB RAM 70042901...
C3400n User's Guide 75 Specifications subject to ensure the best quality and performance from your warranty. Part Numbers Life Expectancy See "Specifications" on page 108. Toner ..., High Capacity Magenta, High Capacity Yellow, High Capacity Black, standard Cyan, standard Magenta, standard Yellow, standard 43459304 43459303 43459302 43459301 43459404 43459403 43459402 43459401 Image Drum Black Cyan Magenta Yellow 43460204 43460203 43460202 43460201 Fuser 120 V 230V 43377001 43377002 Belt Belt 43378001 Memory 64 MB RAM 70042801 256 MB RAM 70042901...

Guide: User's, C3400n (English)
Page 79
5. Put the cartridge down gently onto a piece of the cartridge. The green image drum surface is very delicate and light sensitive. Never expose the drum to keep it away from marking your furniture. Remove the wrapping material and peel off the adhesive tape from the underside of paper...of the printer for more than this, please wrap the cartridge inside the cartridge. If the drum unit needs to normal room light for longer than 5 minutes. Shake.jpg 8. CAUTION! Tape.jpg C3400n User's Guide 79 Gently shake the new cartridge from its box but leave its wrapping material in...
5. Put the cartridge down gently onto a piece of the cartridge. The green image drum surface is very delicate and light sensitive. Never expose the drum to keep it away from marking your furniture. Remove the wrapping material and peel off the adhesive tape from the underside of paper...of the printer for more than this, please wrap the cartridge inside the cartridge. If the drum unit needs to normal room light for longer than 5 minutes. Shake.jpg 8. CAUTION! Tape.jpg C3400n User's Guide 79 Gently shake the new cartridge from its box but leave its wrapping material in...

Guide: User's, C3400n (English)
Page 80
... end of the cartridge into the top of the image drum unit first, pushing it against the spring on the cartridge to the right, lower it is firmly seated, push the colored lever (1) towards the rear of the cartridge onto the image drum unit. Holding the cartridge by its top center with... the colored lever to ensure that it into the image drum unit. C3400n User's Guide 80 Pressing gently down on the drum unit, then lower the right end of the printer. Toner_replace_F5_03.jpg 11. This will lock the cartridge into place and release toner into...
... end of the cartridge into the top of the image drum unit first, pushing it against the spring on the cartridge to the right, lower it is firmly seated, push the colored lever (1) towards the rear of the cartridge onto the image drum unit. Holding the cartridge by its top center with... the colored lever to ensure that it into the image drum unit. C3400n User's Guide 80 Pressing gently down on the drum unit, then lower the right end of the printer. Toner_replace_F5_03.jpg 11. This will lock the cartridge into place and release toner into...

Guide: User's, C3400n (English)
Page 82
Switch off the printer and allow the fuser to cool for about 10 minutes before opening the cover. cover open the printer's top cover fully. If the printer has been powered on, the fuser will be hot. C3400n User's Guide 82 Press the cover release and open button_F5_23.jpg 2. This area is clearly labelled. Do not touch. Static sensitive devices, handle with care. Antistatic symbol.jpg The printer contains four image drums: cyan, magenta, yellow and black. 1. Note the positions of the 4 cartridges. Image drum replacement WARNING! CAUTION!
Switch off the printer and allow the fuser to cool for about 10 minutes before opening the cover. cover open the printer's top cover fully. If the printer has been powered on, the fuser will be hot. C3400n User's Guide 82 Press the cover release and open button_F5_23.jpg 2. This area is clearly labelled. Do not touch. Static sensitive devices, handle with care. Antistatic symbol.jpg The printer contains four image drums: cyan, magenta, yellow and black. 1. Note the positions of the 4 cartridges. Image drum replacement WARNING! CAUTION!

Guide: User's, C3400n (English)
Page 83
Yellow cartridge 4. Take the new image drum unit, complete with its toner cartridge (1), up and out of the printer. Cyan cartridge 2. Black cartridge 3. ID going out_Fig1_12.jpg 4. Put the old unit down gently onto a piece of paper where the old ID unit was placed. C3400n User's Guide 83 Holding it by its top center, lift the image drum, complete with toner cartridge (assembled according to the installation guide) and place it on the piece of paper to prevent toner from marking your furniture. 5. Magenta cartridge 3. ID Positions_Fig1_04.jpg 1.
Yellow cartridge 4. Take the new image drum unit, complete with its toner cartridge (1), up and out of the printer. Cyan cartridge 2. Black cartridge 3. ID going out_Fig1_12.jpg 4. Put the old unit down gently onto a piece of paper where the old ID unit was placed. C3400n User's Guide 83 Holding it by its top center, lift the image drum, complete with toner cartridge (assembled according to the installation guide) and place it on the piece of paper to prevent toner from marking your furniture. 5. Magenta cartridge 3. ID Positions_Fig1_04.jpg 1.

Guide: User's, C3400n (English)
Page 84
... material for longer than 5 minutes. Remove the protective sheets from light. Toner_remove paper _Fig1_24.jpg 7. CAUTION! If the drum unit needs to be out of the printer for disposal. C3400n User's Guide 84 Keep it into their slots (2) in the printer, locating the pegs at the base of the printer... cavity. Holding the complete assembly by its top center, lower it the same way round as the old unit. The green image drum surface at each ...
... material for longer than 5 minutes. Remove the protective sheets from light. Toner_remove paper _Fig1_24.jpg 7. CAUTION! If the drum unit needs to be out of the printer for disposal. C3400n User's Guide 84 Keep it into their slots (2) in the printer, locating the pegs at the base of the printer... cavity. Holding the complete assembly by its top center, lower it the same way round as the old unit. The green image drum surface at each ...

Guide: User's, C3400n (English)
Page 85
This is to return or transport your printer for any reason, please make sure you need to avoid toner spillage. C3400n User's Guide 85 Finally, close the top cover and press down firmly at both sides so that the cover latches closed. NOTE If you remove the image drum unit beforehand and place in the bag provided. ID_going in_Fig1_14.jpg 8.
This is to return or transport your printer for any reason, please make sure you need to avoid toner spillage. C3400n User's Guide 85 Finally, close the top cover and press down firmly at both sides so that the cover latches closed. NOTE If you remove the image drum unit beforehand and place in the bag provided. ID_going in_Fig1_14.jpg 8.


