
PrintSuperVision Configuration Guide
Page 4
Configuring the Ordering of Supplies 50 Search for a Supply Item 50 Select Printers, Then Items 50 Items for Local Printers 51 All Available Items 51 Customize order 51 Configuring the Supplies List 52 Default 52 Enabling/Disabling on-line Supplies Ordering ... Viewing device status 69 Quickly Access a Group of Devices 69 Changing the Device Properties Displayed 70 Searching for a Device 72 Changing Languages 72 Downloading Oki Drivers 73 Print to Remote Locations 74 Creating a Maintenance Log / Managing Supplies Inventory 75 Viewing a Login Log 76 Clearing (Deleting) Logs 77 ...
Configuring the Ordering of Supplies 50 Search for a Supply Item 50 Select Printers, Then Items 50 Items for Local Printers 51 All Available Items 51 Customize order 51 Configuring the Supplies List 52 Default 52 Enabling/Disabling on-line Supplies Ordering ... Viewing device status 69 Quickly Access a Group of Devices 69 Changing the Device Properties Displayed 70 Searching for a Device 72 Changing Languages 72 Downloading Oki Drivers 73 Print to Remote Locations 74 Creating a Maintenance Log / Managing Supplies Inventory 75 Viewing a Login Log 76 Clearing (Deleting) Logs 77 ...

PrintSuperVision Configuration Guide
Page 48
...Select the devices that allow for making paper source settings and the other sample Group Configuration template changes a web server password on an Oki B6300 monochrome printer. Group configuration uses an XML file as a "Template" to change the web server password on availability. Enter a new password, verify... is a more advanced way to configure devices remotely by clicking the check boxes in each group click Show printers. Additional templates that will receive the new configuration. Make desired configuration changes and click Apply. Select the B6300 Password Change option...
...Select the devices that allow for making paper source settings and the other sample Group Configuration template changes a web server password on an Oki B6300 monochrome printer. Group configuration uses an XML file as a "Template" to change the web server password on availability. Enter a new password, verify... is a more advanced way to configure devices remotely by clicking the check boxes in each group click Show printers. Additional templates that will receive the new configuration. Make desired configuration changes and click Apply. Select the B6300 Password Change option...
PrintSuperVision Configuration Guide
Page 51
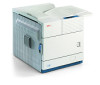
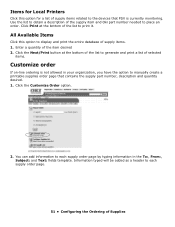
... option to manually create a printable supplies order page that PSV is not allowed in the To:, From:, Subject: and Text: fields template. Items for Local Printers Click this option to display and print the entire database of supply items related to the devices that contains the supply part number, description and... and print a list of the list to each supply order page. 51 • Configuring the Ordering of Supplies Enter a quantity of the supply item and Oki part number needed to obtain a description of the item desired 2. Use the list to place an order.
... option to manually create a printable supplies order page that PSV is not allowed in the To:, From:, Subject: and Text: fields template. Items for Local Printers Click this option to display and print the entire database of supply items related to the devices that contains the supply part number, description and... and print a list of the list to each supply order page. 51 • Configuring the Ordering of Supplies Enter a quantity of the supply item and Oki part number needed to obtain a description of the item desired 2. Use the list to place an order.

B6100 256 MB RAM Memory Expansion Installation
Page 1
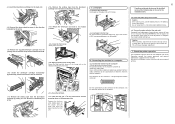
...yourself (touch metal) before handling it . b. Reattach the interface cord and power cable, then turn on the printer. (continued on back) Oki Data Americas, Inc., 2000 Bishops Gate Blvd., Mt. Note: The printer has two slots in which to remove it. 9. To avoid damage to install it . 5. Replace the side...Push the white tabs against the sides of the left side cover into place. Slide the side cover towards the front of the printer and then downward to install an optional RAM Memory card. 1. Locate the slot for B6100 Installation Instructions Memory Part Number 70045801 Caution!...
...yourself (touch metal) before handling it . b. Reattach the interface cord and power cable, then turn on the printer. (continued on back) Oki Data Americas, Inc., 2000 Bishops Gate Blvd., Mt. Note: The printer has two slots in which to remove it. 9. To avoid damage to install it . 5. Replace the side...Push the white tabs against the sides of the left side cover into place. Slide the side cover towards the front of the printer and then downward to install an optional RAM Memory card. 1. Locate the slot for B6100 Installation Instructions Memory Part Number 70045801 Caution!...

Guide: User's, B8300
Page 12
...installation of the various safety recommendations. Landscape orientationPortrait orientation Overview - 11 A minimum level of computer literacy is necessary for buying the Oki B8300 high speed digital printer. Imperial TABLOID LEGAL FOOLSCAP LETTER EXECUTIVE INVOICE Sizes 11 X 17 8½ X 14 8½ X 13 8½ X 11...of standard sizes in either portrait or landscape orientations. Sizes that the user studies this item to take notice of the printer drivers and Oki recommends that if the user is recommended that can be placed only in the landscape orientation (11 x 17, 8&#...
...installation of the various safety recommendations. Landscape orientationPortrait orientation Overview - 11 A minimum level of computer literacy is necessary for buying the Oki B8300 high speed digital printer. Imperial TABLOID LEGAL FOOLSCAP LETTER EXECUTIVE INVOICE Sizes 11 X 17 8½ X 14 8½ X 13 8½ X 11...of standard sizes in either portrait or landscape orientations. Sizes that the user studies this item to take notice of the printer drivers and Oki recommends that if the user is recommended that can be placed only in the landscape orientation (11 x 17, 8&#...

Guide: User's, B8300
Page 13
...variety of available paper sizes and paper capacity, paper output units to the ready condition within a short period of time. High speed monochrome printing The printer achieves high speed printing at 45 A4 (or letter) size pages per minute. The preset time to the fusing unit and the touch panel. ...The preset time to print when it has reached the ready temperature. Energy saving features As an ENERGY STAR ® partner, Oki has determined that conform to the Energy Star guidelines which help to the fuser unit a preset time after the machine has completed a job and no...
...variety of available paper sizes and paper capacity, paper output units to the ready condition within a short period of time. High speed monochrome printing The printer achieves high speed printing at 45 A4 (or letter) size pages per minute. The preset time to the fusing unit and the touch panel. ...The preset time to print when it has reached the ready temperature. Energy saving features As an ENERGY STAR ® partner, Oki has determined that conform to the Energy Star guidelines which help to the fuser unit a preset time after the machine has completed a job and no...

Guide: User's, B8300
Page 29
Standard supplies for this product that are to be discarded, dispose of it according to local requirements. > Store printer and developer cartridges out of the reach of children. TONER-B8300 DVLPR-B8300 STAPLE-B8300-FNR STAPLE-B8300-SSF 56115001 57100101 ...cartridge for Saddle Stitcher European part no . Storage of supplies Oki recommends the use of the wrapper, may damage your printer's performance and invalidate your warranty. North American part no . Overview - 28 Supply list Product 27k Printer cartridge 100k Developer cartridge Staple Pack for Finisher Staple Pack for...
Standard supplies for this product that are to be discarded, dispose of it according to local requirements. > Store printer and developer cartridges out of the reach of children. TONER-B8300 DVLPR-B8300 STAPLE-B8300-FNR STAPLE-B8300-SSF 56115001 57100101 ...cartridge for Saddle Stitcher European part no . Storage of supplies Oki recommends the use of the wrapper, may damage your printer's performance and invalidate your warranty. North American part no . Overview - 28 Supply list Product 27k Printer cartridge 100k Developer cartridge Staple Pack for Finisher Staple Pack for...

Guide: User's, B8300
Page 43
... The PPD files for Macintosh are used to change the registered account numbers and passwords. OKI PPD Utility The OKI PPD Utility is used to when using its LaserWriter printer driver for the Mac. Display fonts Minimum system requirements Computer Apple Macintosh series Apple Power ...applications and doubleclick the icon on the desktop. 3. Turn on installing the software. 6. Click [Install] to 9.x Printer driver LaserWriter 8 version 8.4.1 or later. If not, the printer cannot be satisfied. If not, install it from your computer. Insert the supplied Drivers and Manuals CD-ROM into the...
... The PPD files for Macintosh are used to change the registered account numbers and passwords. OKI PPD Utility The OKI PPD Utility is used to when using its LaserWriter printer driver for the Mac. Display fonts Minimum system requirements Computer Apple Macintosh series Apple Power ...applications and doubleclick the icon on the desktop. 3. Turn on installing the software. 6. Click [Install] to 9.x Printer driver LaserWriter 8 version 8.4.1 or later. If not, the printer cannot be satisfied. If not, install it from your computer. Insert the supplied Drivers and Manuals CD-ROM into the...

Guide: User's, B8300
Page 45
... and click the [OK] button. 5. Using the printer with a Macintosh - 44 To save the registered account numbers and passwords and to change the registered account numbers. 1. If the PPD file is changed using this utility, open the [Oki B8300 Extras] folder on the screen used for the computer.... Install the display fonts as needed. When printing in the Auditing Mode,or using the Auditing Mode or the Job Retention With Password function from the system. Also, one of your printer. 3. To register a...
... and click the [OK] button. 5. Using the printer with a Macintosh - 44 To save the registered account numbers and passwords and to change the registered account numbers. 1. If the PPD file is changed using this utility, open the [Oki B8300 Extras] folder on the screen used for the computer.... Install the display fonts as needed. When printing in the Auditing Mode,or using the Auditing Mode or the Job Retention With Password function from the system. Also, one of your printer. 3. To register a...

Guide: Installation B8300
Page 3
...held by lifting both ends of the printer. Carry out the off the main switch of the main unit of the printer and then slide the harness cover up to the "OFF" position. SEE OKI DIGITAL PRINTER SERVICE MANUAL OR INSTALLATION MANUAL TO ...the positions shown in the illustration. Attach the harness cover. Reattach the harness cover to those of the printer. Installation is needed. Screw Mounting plate Tray frame Pull out the multi purpose drawer until it stops and...unit from the outlet. B83MP Installation Manual FOR USE WITH COMPATIBLE OKI DIGITAL PRINTERS.
...held by lifting both ends of the printer. Carry out the off the main switch of the main unit of the printer and then slide the harness cover up to the "OFF" position. SEE OKI DIGITAL PRINTER SERVICE MANUAL OR INSTALLATION MANUAL TO ...the positions shown in the illustration. Attach the harness cover. Reattach the harness cover to those of the printer. Installation is needed. Screw Mounting plate Tray frame Pull out the multi purpose drawer until it stops and...unit from the outlet. B83MP Installation Manual FOR USE WITH COMPATIBLE OKI DIGITAL PRINTERS.

Guide: Installation B8300
Page 4
SEE OKI DIGITAL PRINTER SERVICE MANUAL OR INSTALLATION MANUAL TO DETERMINE SUITABILITY. • Start ...Front mounting plate Screw Rear mounting plate Screw Front mounting plate Screw Screw Reattach the paper tray of the printer. Connector of the power supply connector Relay harness of the stand/paper drawer. Attach the rear cabinet of...lower it until it stops and then remove it with the removed screw. B83LT Installation Manual FOR USE WITH COMPATIBLE OKI DIGITAL PRINTERS. Left adjuster: 1 pc. Attach the four adjuster covers. 3 Be sure to attach the left paper guides...
SEE OKI DIGITAL PRINTER SERVICE MANUAL OR INSTALLATION MANUAL TO DETERMINE SUITABILITY. • Start ...Front mounting plate Screw Rear mounting plate Screw Front mounting plate Screw Screw Reattach the paper tray of the printer. Connector of the power supply connector Relay harness of the stand/paper drawer. Attach the rear cabinet of...lower it until it stops and then remove it with the removed screw. B83LT Installation Manual FOR USE WITH COMPATIBLE OKI DIGITAL PRINTERS. Left adjuster: 1 pc. Attach the four adjuster covers. 3 Be sure to attach the left paper guides...

Guide: Installation B8300
Page 5
SEE OKI DIGITAL PRINTER SERVICE MANUAL OR INSTALLATION MANUAL TO DETERMINE SUITABILITY. •...the unit and press the [OK] key. Paper guides 13. Installation is needed. B83TT Installation Manual FOR USE WITH COMPATIBLE OKI DIGITAL PRINTERS. Rear mounting Screws (M4x8): plates: 2 pcs. 4 pcs. Adjuster covers: 4 pcs. 1. Insert the left adjusters ... now complete. [Caution] For installation of the main unit, it must be held by lifting both ends of the printer. Attach the power supply unit. "MAXIMUM SIZE" is displayed. Attach the four adjuster covers. 3 • Be ...
SEE OKI DIGITAL PRINTER SERVICE MANUAL OR INSTALLATION MANUAL TO DETERMINE SUITABILITY. •...the unit and press the [OK] key. Paper guides 13. Installation is needed. B83TT Installation Manual FOR USE WITH COMPATIBLE OKI DIGITAL PRINTERS. Rear mounting Screws (M4x8): plates: 2 pcs. 4 pcs. Adjuster covers: 4 pcs. 1. Insert the left adjusters ... now complete. [Caution] For installation of the main unit, it must be held by lifting both ends of the printer. Attach the power supply unit. "MAXIMUM SIZE" is displayed. Attach the four adjuster covers. 3 • Be ...

Guide: Installation B8300
Page 6
.... (4) Do not install the machine in the illustration. Caution Removal of this step after the paper feeding device has been connected to vibration. SEE OKI DIGITAL PRINTER SERVICE MANUAL OR INSTALLATION MANUAL TO DETERMINE SUITABILITY. 1. Rapid changes can cause paper to be always performed by the empty front tray pocket with the... left of the machine. Remove the main unit from the carton (requires two people) Remove the cushioning materials from the toner/drum cartridge. B8300 Digital Printer Main Unit Installation Manual FOR USE WITH COMPATIBLE...
.... (4) Do not install the machine in the illustration. Caution Removal of this step after the paper feeding device has been connected to vibration. SEE OKI DIGITAL PRINTER SERVICE MANUAL OR INSTALLATION MANUAL TO DETERMINE SUITABILITY. 1. Rapid changes can cause paper to be always performed by the empty front tray pocket with the... left of the machine. Remove the main unit from the carton (requires two people) Remove the cushioning materials from the toner/drum cartridge. B8300 Digital Printer Main Unit Installation Manual FOR USE WITH COMPATIBLE...
Guide: Installation B8300
Page 7
...developer cartridge in the direction indicated by the arrow. Connecting the machine to its original position. Caution If the outlet is also used for printer operation and general information) supplied with the machine. After the level adjustment is not connected to the fusing roller. This will light up ...the arrow. 5. Close the front cover. Load paper into the machine. Turn the lock pin a 1/4 turn the power to 500 sheets of OKI recommended paper can be installed, carry out the following step at the end of the installation work. Do not exceed the maximum height line. (up...
...developer cartridge in the direction indicated by the arrow. Connecting the machine to its original position. Caution If the outlet is also used for printer operation and general information) supplied with the machine. After the level adjustment is not connected to the fusing roller. This will light up ...the arrow. 5. Close the front cover. Load paper into the machine. Turn the lock pin a 1/4 turn the power to 500 sheets of OKI recommended paper can be installed, carry out the following step at the end of the installation work. Do not exceed the maximum height line. (up...

Guide: Installation B8300
Page 8
... USE WITH COMPATIBLE OKI DIGITAL PRINTERS. SEE OKI DIGITAL PRINTER SERVICE MANUAL OR INSTALLATION MANUAL TO DETERMINE SUITABILITY. • Carry out the installation after checking that the DATA indicator on the operation panel is now complete. 2. Then, remove the power plug of the main unit of the printer. Hang the hooks...Push the lower part of the duplex module to the CN12 (white connector) of the PCU PWB of the main unit of the printer. Top covers Left door Lower cover Lock release lever Connect the connector of the relay harness of the duplex module to insert the ...
... USE WITH COMPATIBLE OKI DIGITAL PRINTERS. SEE OKI DIGITAL PRINTER SERVICE MANUAL OR INSTALLATION MANUAL TO DETERMINE SUITABILITY. • Carry out the installation after checking that the DATA indicator on the operation panel is now complete. 2. Then, remove the power plug of the main unit of the printer. Hang the hooks...Push the lower part of the duplex module to the CN12 (white connector) of the PCU PWB of the main unit of the printer. Top covers Left door Lower cover Lock release lever Connect the connector of the relay harness of the duplex module to insert the ...

Guide: Installation B8300
Page 9
... duplex module to the main unit of the printer. Insert the snap bands to the main unit of the printer. Secure the earth harness using the supplied M4 screw. "MAXIMUM SIZE" is now complete. SEE OKI DIGITAL PRINTER SERVICE MANUAL OR INSTALLATION MANUAL TO DETERMINE SUITABILITY....function will not operate. ( NOTE) Illustration of label sticking position (Back surface of the printer to remove it with the M4 Screws : 1 pcs. B83DB Installation Manual FOR USE WITH COMPATIBLE OKI DIGITAL PRINTERS. Top covers Left door Lower cover Lock release lever 3. Since "MAXIMUM SIZE" is displayed...
... duplex module to the main unit of the printer. Insert the snap bands to the main unit of the printer. Secure the earth harness using the supplied M4 screw. "MAXIMUM SIZE" is now complete. SEE OKI DIGITAL PRINTER SERVICE MANUAL OR INSTALLATION MANUAL TO DETERMINE SUITABILITY....function will not operate. ( NOTE) Illustration of label sticking position (Back surface of the printer to remove it with the M4 Screws : 1 pcs. B83DB Installation Manual FOR USE WITH COMPATIBLE OKI DIGITAL PRINTERS. Top covers Left door Lower cover Lock release lever 3. Since "MAXIMUM SIZE" is displayed...

Guide: Installation B8300
Page 10
... harness Power supply unit connector (* Similar work for the multi purpose drawer) 10. Attach the mail-bin stacker. B83MB Installation Manual FOR USE WITH COMPATIBLE OKI DIGITAL PRINTERS. Mounting plates: 2 pcs. Screws A (M4x8): 5 pcs. Attach the tray. Screws A Mounting plate Stand frame [Caution] Insert the mounting plate under the desk frame. 6. Remove...
... harness Power supply unit connector (* Similar work for the multi purpose drawer) 10. Attach the mail-bin stacker. B83MB Installation Manual FOR USE WITH COMPATIBLE OKI DIGITAL PRINTERS. Mounting plates: 2 pcs. Screws A (M4x8): 5 pcs. Attach the tray. Screws A Mounting plate Stand frame [Caution] Insert the mounting plate under the desk frame. 6. Remove...

Guide: Installation B8300
Page 11
SEE OKI DIGITAL PRINTER SERVICE MANUAL OR INSTALLATION MANUAL TO DETERMINE SUITABILITY. • Start ...cover as shown in the illustration. Attach the rear cabinet of the printer. Attach the AC inlet cover to fix the harness. B83F Installation Manual FOR USE WITH COMPATIBLE OKI DIGITAL PRINTERS. Also if a multi purpose drawer has been installed, a power...drawer) 10. Connect the power supply unit harness connector to the PCU PWB of the main unit of the printer. Optional power supply harnesses • Fix the harness securely to the main unit of the stand/paper drawer...
SEE OKI DIGITAL PRINTER SERVICE MANUAL OR INSTALLATION MANUAL TO DETERMINE SUITABILITY. • Start ...cover as shown in the illustration. Attach the rear cabinet of the printer. Attach the AC inlet cover to fix the harness. B83F Installation Manual FOR USE WITH COMPATIBLE OKI DIGITAL PRINTERS. Also if a multi purpose drawer has been installed, a power...drawer) 10. Connect the power supply unit harness connector to the PCU PWB of the main unit of the printer. Optional power supply harnesses • Fix the harness securely to the main unit of the stand/paper drawer...

Guide: Installation B8300
Page 12
B83SS Installation Manual FOR USE WITH COMPATIBLE OKI DIGITAL PRINTERS. plate: 1 pc. "OFF" 2. Attach the lock securing plate to the ...locking plate matches to the outlet. AC inlet cover Screw 11. "ON" Installation is needed. SEE OKI DIGITAL PRINTER SERVICE MANUAL OR INSTALLATION MANUAL TO DETERMINE SUITABILITY. Staple unit: 1 pc. Cut out the two mounting... the illustration and turn the height Finisher stand adjusting screws on the front side of the printer. Remove the screw from the rear cabinet of the finisher. Connect the finisher connector. For...
B83SS Installation Manual FOR USE WITH COMPATIBLE OKI DIGITAL PRINTERS. plate: 1 pc. "OFF" 2. Attach the lock securing plate to the ...locking plate matches to the outlet. AC inlet cover Screw 11. "ON" Installation is needed. SEE OKI DIGITAL PRINTER SERVICE MANUAL OR INSTALLATION MANUAL TO DETERMINE SUITABILITY. Staple unit: 1 pc. Cut out the two mounting... the illustration and turn the height Finisher stand adjusting screws on the front side of the printer. Remove the screw from the rear cabinet of the finisher. Connect the finisher connector. For...

Guide: Installation B8300
Page 13
... the cover into the boss holes of the rear cabinet. Remove the lock release lever that have been installed. Screws Connector SEE OKI DIGITAL PRINTER SERVICE MANUAL OR INSTALLATION MANUAL TO DETERMINE SUITABILITY. At this module) Screws Front cabinet (C) Lock release lever (A) Projection (B) Reattach... and close the front cover. 12 Jam handling dial 8. B83THP / USP / FHP / FBP Installation Manual FOR USE WITH COMPATIBLE OKI DIGITAL PRINTERS. For installation of the finisher and remove the jam handling dial. Paste the supplied dust box label to the rear cabinet and secure...
... the cover into the boss holes of the rear cabinet. Remove the lock release lever that have been installed. Screws Connector SEE OKI DIGITAL PRINTER SERVICE MANUAL OR INSTALLATION MANUAL TO DETERMINE SUITABILITY. At this module) Screws Front cabinet (C) Lock release lever (A) Projection (B) Reattach... and close the front cover. 12 Jam handling dial 8. B83THP / USP / FHP / FBP Installation Manual FOR USE WITH COMPATIBLE OKI DIGITAL PRINTERS. For installation of the finisher and remove the jam handling dial. Paste the supplied dust box label to the rear cabinet and secure...


