
Booklet: B6100 Warranty, Regulatory, and Safety Information
Page 3
...8226; Parts and supplies identification • Consumer relations Material Safety Data Sheet MSDS#58358601 Product Identification and Use B6100 Black Toner, P/N 52113701 For more information, contact Oki Data at the highest (16 mg/m3) exposure level. When in powder form, it can answer your questions...under conditions of your problem more respirable than 1% by weight) CAS#: Not available Chromium/azo dye complex (less than commercially available OKI toner, and would not be functionally suitable for the lowest (1 mg/ m3) exposure level (i.e. the level most organic materials in a...
...8226; Parts and supplies identification • Consumer relations Material Safety Data Sheet MSDS#58358601 Product Identification and Use B6100 Black Toner, P/N 52113701 For more information, contact Oki Data at the highest (16 mg/m3) exposure level. When in powder form, it can answer your questions...under conditions of your problem more respirable than 1% by weight) CAS#: Not available Chromium/azo dye complex (less than commercially available OKI toner, and would not be functionally suitable for the lowest (1 mg/ m3) exposure level (i.e. the level most organic materials in a...
Booklet: B6100 Warranty, Regulatory, and Safety Information
Page 4
...listed OSHA: No components are a few basic precautions you to drink. Precautions for similar materials and ingredients. Never give anything by : Oki Data Americas, Inc. Flush eyes with plenty of cool water and soap. If necessary, seek medical attention. Preparation Date of material into...176;F to 95°F (5°C to remove. For large spills, use rubber gloves and safety goggles during cleanup. Emergency First Aid Procedures Toner swallowed (ingested). Toner gets in a cool room, under 104°F (40°C). Laurel, NJ 08054-4620 Tel: (856) 235-2600 FAX: (856)...
...listed OSHA: No components are a few basic precautions you to drink. Precautions for similar materials and ingredients. Never give anything by : Oki Data Americas, Inc. Flush eyes with plenty of cool water and soap. If necessary, seek medical attention. Preparation Date of material into...176;F to 95°F (5°C to remove. For large spills, use rubber gloves and safety goggles during cleanup. Emergency First Aid Procedures Toner swallowed (ingested). Toner gets in a cool room, under 104°F (40°C). Laurel, NJ 08054-4620 Tel: (856) 235-2600 FAX: (856)...
Guide: Installation (B6100)
Page 6
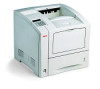
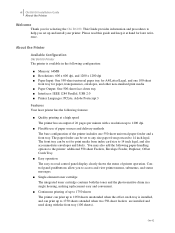
...Control panel pushbuttons allow you to access and view printer menus, submenus, and status messages. ■ Single-element toner cartridge The integrated toner cartridge contains both the toner and the photosensitive drum in a single housing, making replacement easy and convenient. ■ Continuous printing of up to... at a high speed The printer has an output of the printer includes one 100-sheet front tray for later reference. vi Oki B6100 Installation Guide About the Printer Welcome Thank you for print media from postcard to 14 inch legal. This Guide provides information and ...
...Control panel pushbuttons allow you to access and view printer menus, submenus, and status messages. ■ Single-element toner cartridge The integrated toner cartridge contains both the toner and the photosensitive drum in a single housing, making replacement easy and convenient. ■ Continuous printing of up to... at a high speed The printer has an output of the printer includes one 100-sheet front tray for later reference. vi Oki B6100 Installation Guide About the Printer Welcome Thank you for print media from postcard to 14 inch legal. This Guide provides information and ...
Guide: Installation (B6100)
Page 10
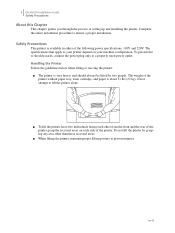
... lift the printer by two people. The weight of setting up and installing the printer. 2 Oki B6100 Installation Guide Safety Precautions About this Chapter This chapter guides you through the process of the printer without paper tray, toner cartridge, and paper is about 51 lbs (23 kg). Safety Precautions This printer is available...
... lift the printer by two people. The weight of setting up and installing the printer. 2 Oki B6100 Installation Guide Safety Precautions About this Chapter This chapter guides you through the process of the printer without paper tray, toner cartridge, and paper is about 51 lbs (23 kg). Safety Precautions This printer is available...
Guide: Installation (B6100)
Page 14
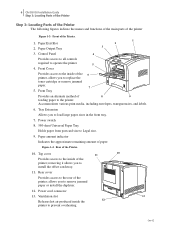
... 9. Figure 1-4: Rear of the printer; Rear cover Provides access to the rear of the Printer. 10. Power cord connector 13. 6 Oki B6100 Installation Guide Step 3: Locating Parts of the Printer Step 3: Locating Parts of the Printer The following figures indicate the names and functions of ...indicator Indicates the approximate remaining amount of the Printer. 1. Top cover 10 11 Provides access to the inside the 12 printer to replace the toner cartridge or remove jammed paper. 7 5. Front Cover Provides access to the inside of 8 9 feeding paper to remove jammed paper or ...
... 9. Figure 1-4: Rear of the printer; Rear cover Provides access to the rear of the Printer. 10. Power cord connector 13. 6 Oki B6100 Installation Guide Step 3: Locating Parts of the Printer Step 3: Locating Parts of the Printer The following figures indicate the names and functions of ...indicator Indicates the approximate remaining amount of the Printer. 1. Top cover 10 11 Provides access to the inside the 12 printer to replace the toner cartridge or remove jammed paper. 7 5. Front Cover Provides access to the inside of 8 9 feeding paper to remove jammed paper or ...

Guide: Installation (B6100)
Page 15
Print Cartridge Integrated cartridge contains the toner and the photosensitive drum. 15. Rear Cover Provides access to the interior of the printer. Figure 1-7: Control Panel. 18. LCD Display Shows error messages and other status mes- 18 sages; Oki B6100 Installation Guide 7 Step 3: Locating Parts of the Printer ...paper. Allows you need to remove the print cartridge to install the 17 optional duplexer or remove jammed paper. Fuser 16 Fixes toner onto the paper. 17. Front Cover Provides access to the interior of the Printer (Rear). 16. Figure 1-5: Internal Parts...
Print Cartridge Integrated cartridge contains the toner and the photosensitive drum. 15. Rear Cover Provides access to the interior of the printer. Figure 1-7: Control Panel. 18. LCD Display Shows error messages and other status mes- 18 sages; Oki B6100 Installation Guide 7 Step 3: Locating Parts of the Printer ...paper. Allows you need to remove the print cartridge to install the 17 optional duplexer or remove jammed paper. Fuser 16 Fixes toner onto the paper. 17. Front Cover Provides access to the interior of the Printer (Rear). 16. Figure 1-5: Internal Parts...
Guide: Installation (B6100)
Page 16
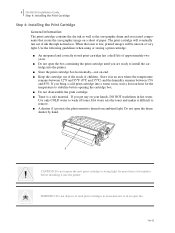
... temperature to stabilize before installing it difficult to remove. ■ A shutter (1) protects the photosensitive drum from ambient light. When the toner is a safe material. WARNING! Use the following guidelines when using or storing a print cartridge: ■ An unopened and correctly stored... the cartridge box. ■ Do not disassemble the print cartridge. ■ Toner is low, printed images will eventually run out of paper. If you are ready to wash off toner. 8 Oki B6100 Installation Guide Step 4: Installing the Print Cartridge Step 4: Installing the Print Cartridge...
... temperature to stabilize before installing it difficult to remove. ■ A shutter (1) protects the photosensitive drum from ambient light. When the toner is a safe material. WARNING! Use the following guidelines when using or storing a print cartridge: ■ An unopened and correctly stored... the cartridge box. ■ Do not disassemble the print cartridge. ■ Toner is low, printed images will eventually run out of paper. If you are ready to wash off toner. 8 Oki B6100 Installation Guide Step 4: Installing the Print Cartridge Step 4: Installing the Print Cartridge...
Guide: Installation (B6100)
Page 18
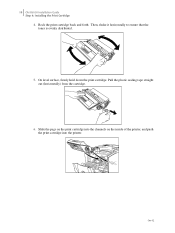
On level surface, firmly hold down the print cartridge. Pull the plastic sealing tape straight out (horizontally) from the cartridge. 6. Rock the print cartridge back and forth. Slide the pegs on the print cartridge into the channels on the inside of the printer, and push the print cartridge into the printer. Then, shake it horizontally to ensure that the toner is evenly distributed. 5. Oct 02 10 Oki B6100 Installation Guide Step 4: Installing the Print Cartridge 4.
On level surface, firmly hold down the print cartridge. Pull the plastic sealing tape straight out (horizontally) from the cartridge. 6. Rock the print cartridge back and forth. Slide the pegs on the print cartridge into the channels on the inside of the printer, and push the print cartridge into the printer. Then, shake it horizontally to ensure that the toner is evenly distributed. 5. Oct 02 10 Oki B6100 Installation Guide Step 4: Installing the Print Cartridge 4.

Guide: Installation (B6100)
Page 58
... Toner Life Quality Menu Resolution Toner Saver Print Density Functions Reset Printer Print Summary Print Test Print Fonts Figure 1-3: Printer Menu Structure. Your printer driver settings will override any settings from the printer menu or printer front panel. The following figure shows the structure of the control panel main menus and submenus. 8 Oki B6100...
... Toner Life Quality Menu Resolution Toner Saver Print Density Functions Reset Printer Print Summary Print Test Print Fonts Figure 1-3: Printer Menu Structure. Your printer driver settings will override any settings from the printer menu or printer front panel. The following figure shows the structure of the control panel main menus and submenus. 8 Oki B6100...

Guide: Installation (B6100)
Page 62
... Message Line 2 of display Paper Out Tray 1 Paper Out Tray 2 Paper Out Tray 3 Output Tray Full Offset Tray Full Toner Low Maintenance Req Possible Cause There is no paper in Tray 1. 4 Oki B6100 Installation Guide Warning Messages and Error Messages Warning Messages The following table lists warning messages, possible causes, and the actions...
... Message Line 2 of display Paper Out Tray 1 Paper Out Tray 2 Paper Out Tray 3 Output Tray Full Offset Tray Full Toner Low Maintenance Req Possible Cause There is no paper in Tray 1. 4 Oki B6100 Installation Guide Warning Messages and Error Messages Warning Messages The following table lists warning messages, possible causes, and the actions...

Guide: Installation (B6100)
Page 63
Oki B6100 Installation Guide 5 Warning Messages and Error Messages Error Messages The table below lists error messages, the possible causes of each error. E5 COVER OPEN Close .... Check paper size specifications and load paper that meets specifications. TRAY E7 JAM DUPLEX Remove Paper There is not Start supported by the printer. J3 TONER CART. TRAY 1 MISSING Insert Tray Tray 1 is open . OUTPUT TRAY FULL Remove Paper OFFSET TRAY FULL Remove Paper The output tray is empty. Action Remove...
Oki B6100 Installation Guide 5 Warning Messages and Error Messages Error Messages The table below lists error messages, the possible causes of each error. E5 COVER OPEN Close .... Check paper size specifications and load paper that meets specifications. TRAY E7 JAM DUPLEX Remove Paper There is not Start supported by the printer. J3 TONER CART. TRAY 1 MISSING Insert Tray Tray 1 is open . OUTPUT TRAY FULL Remove Paper OFFSET TRAY FULL Remove Paper The output tray is empty. Action Remove...

B6100 User's Guide
Page 12
...to access and view printer menus, submenus, and status messages. ■ Single-element print cartridge The integrated print cartridge contains both the toner and the photosensitive drum in the printer driver after the option is installed. You may also add the following features: ■ Quality ... Offset Catch Tray. ■ Easy operation The easy-to-read control panel display clearly shows the status of printer operation. xii Oki B6100 User Guide About the Printer About the Printer The printer uses a data modulated laser beam and conventional dry-ink xerographic processes to produce...
...to access and view printer menus, submenus, and status messages. ■ Single-element print cartridge The integrated print cartridge contains both the toner and the photosensitive drum in the printer driver after the option is installed. You may also add the following features: ■ Quality ... Offset Catch Tray. ■ Easy operation The easy-to-read control panel display clearly shows the status of printer operation. xii Oki B6100 User Guide About the Printer About the Printer The printer uses a data modulated laser beam and conventional dry-ink xerographic processes to produce...

B6100 User's Guide
Page 16
... the Printer Follow the guidelines below when lifting or moving the printer: ■ The printer is about 51 lbs (23 kg). Oct 02 1-2 Oki B6100 User Guide Safety Precautions About this Chapter This chapter reviews the contents of the printer packaging, explains the parts of the printer, and describes the... space and environment requirements of the following power specifications: 110V and 220V. The weight of the printer without paper tray, toner cartridge, and paper is very heavy, and should always be lifted by grasping any area other from the front and the rear of the ...
... the Printer Follow the guidelines below when lifting or moving the printer: ■ The printer is about 51 lbs (23 kg). Oct 02 1-2 Oki B6100 User Guide Safety Precautions About this Chapter This chapter reviews the contents of the printer packaging, explains the parts of the printer, and describes the... space and environment requirements of the following power specifications: 110V and 220V. The weight of the printer without paper tray, toner cartridge, and paper is very heavy, and should always be lifted by grasping any area other from the front and the rear of the ...

B6100 User's Guide
Page 20
...4 Provides access to all controls required to Legal size. 9. Accommodates various print media, including envelopes, transparencies, and labels. 6. 1-6 Oki B6100 User Guide Parts of the Printer Parts of the Printer The following figures indicate the names and functions of the main parts of the printer... amount of the Printer. 1. Paper Exit Slot 2. Rear cover Provides access to the rear of 8 9 feeding paper to replace the toner cartridge or remove jammed paper. 7 5. Front Tray Provides an alternate method of the printer; Tray Extension Allows you to the printer....
...4 Provides access to all controls required to Legal size. 9. Accommodates various print media, including envelopes, transparencies, and labels. 6. 1-6 Oki B6100 User Guide Parts of the Printer Parts of the Printer The following figures indicate the names and functions of the main parts of the printer... amount of the Printer. 1. Paper Exit Slot 2. Rear cover Provides access to the rear of 8 9 feeding paper to replace the toner cartridge or remove jammed paper. 7 5. Front Tray Provides an alternate method of the printer; Tray Extension Allows you to the printer....

B6100 User's Guide
Page 21
Front Cover Provides access to the interior of the printer. CAUTION: The fuser becomes very hot while the printer is operating. Fuser Fixes toner onto the paper. 17. Rear Cover Provides access to replace the print cartridge or remove jammed paper. If you need to remove the print ... turn the power off and wait at least 10 minutes before removing the print cartridge and touching the fuser. Print Cartridge Integrated cartridge contains the toner and the photosensitive drum. 15. Oki B6100 User Guide 1-7 Parts of the Printer Figure 1-5: Internal Parts of the Printer (Rear). 16 16.
Front Cover Provides access to the interior of the printer. CAUTION: The fuser becomes very hot while the printer is operating. Fuser Fixes toner onto the paper. 17. Rear Cover Provides access to replace the print cartridge or remove jammed paper. If you need to remove the print ... turn the power off and wait at least 10 minutes before removing the print cartridge and touching the fuser. Print Cartridge Integrated cartridge contains the toner and the photosensitive drum. 15. Oki B6100 User Guide 1-7 Parts of the Printer Figure 1-5: Internal Parts of the Printer (Rear). 16 16.

B6100 User's Guide
Page 24
1-10 Oki B6100 User Guide Paper Path Paper Path The following figure shows the path that paper travels through Steps 2 and 3. 5. After passing through the duplexer, if installed, ... paper emerges onto the output tray (5), or the offset output tray, if installed (4). 4 5 1 3 2 1 1 1 1 Figure 1-9: Paper Path. ◆ ◆ ◆ Oct 02 The fuser fixes the toner permanently on the paper (3). 4. The image is initially fed from the photosensitive drum onto the paper (2). 3.
1-10 Oki B6100 User Guide Paper Path Paper Path The following figure shows the path that paper travels through Steps 2 and 3. 5. After passing through the duplexer, if installed, ... paper emerges onto the output tray (5), or the offset output tray, if installed (4). 4 5 1 3 2 1 1 1 1 Figure 1-9: Paper Path. ◆ ◆ ◆ Oct 02 The fuser fixes the toner permanently on the paper (3). 4. The image is initially fed from the photosensitive drum onto the paper (2). 3.

B6100 User's Guide
Page 54
... Factory Defaults Display Language Powersaver Wait Timeout Job Timeout Jam Recovery Hex Print Reset Toner Life Quality Menu Resolution Toner Saver Print Density Functions Reset Printer Print Summary Print Test Print Fonts Figure 1-3: Printer Menu Structure. Oct 02 3-8 Oki B6100 User Guide Menu Structure Menu Structure NOTE: Settings in your software application will override...
... Factory Defaults Display Language Powersaver Wait Timeout Job Timeout Jam Recovery Hex Print Reset Toner Life Quality Menu Resolution Toner Saver Print Density Functions Reset Printer Print Summary Print Test Print Fonts Figure 1-3: Printer Menu Structure. Oct 02 3-8 Oki B6100 User Guide Menu Structure Menu Structure NOTE: Settings in your software application will override...

B6100 User's Guide
Page 64
...or decrease the time limit (in seconds) for PostScript jobs. Reset Toner Life Press SELECT to increase or decrease each digit of the five-digit number. 2. Press NEXT or PREVIOUS to toggle between ON and OFF. 2. 3-18 Oki B6100 User Guide System Menu Job Timeout 0 This submenu allows you to... turn jam Off recovery on or off. 1. Press SELECT after changing the last digit to save this setting. Press NEXT or PREVIOUS to reset the toner page count. Hex Print Off On...
...or decrease the time limit (in seconds) for PostScript jobs. Reset Toner Life Press SELECT to increase or decrease each digit of the five-digit number. 2. Press NEXT or PREVIOUS to toggle between ON and OFF. 2. 3-18 Oki B6100 User Guide System Menu Job Timeout 0 This submenu allows you to... turn jam Off recovery on or off. 1. Press SELECT after changing the last digit to save this setting. Press NEXT or PREVIOUS to reset the toner page count. Hex Print Off On...

B6100 User's Guide
Page 65
... move through the available toner settings. 2. Oct 02 The Quality Menu provides access to the printer settings that are related to enter a submenu. 6. Press SELECT to choose and save this setting. Press the SELECT button to be lighter or darker. Use the procedures in your printer driver. Oki B6100 User Guide 3-19 Quality...
... move through the available toner settings. 2. Oct 02 The Quality Menu provides access to the printer settings that are related to enter a submenu. 6. Press SELECT to choose and save this setting. Press the SELECT button to be lighter or darker. Use the procedures in your printer driver. Oki B6100 User Guide 3-19 Quality...

B6100 User's Guide
Page 67
... current Media Size, Media Type, and Level for Tray 2. 1. Press SELECT to view a specific setting. Toner Press SELECT to view the status of the face down tray. 1. Oki B6100 User Guide 3-21 Status Menu Status Menu NOTE: Settings in your printer driver. Use the following table to ...on the control panel. 2. Use the procedures in your software application will override any settings in the following procedure to view the status of the toner cartridge. ◆ ◆ ◆ Oct 02 Press NEXT or PREVIOUS to scroll through the media size, media type, and level settings for...
... current Media Size, Media Type, and Level for Tray 2. 1. Press SELECT to view a specific setting. Toner Press SELECT to view the status of the face down tray. 1. Oki B6100 User Guide 3-21 Status Menu Status Menu NOTE: Settings in your printer driver. Use the following table to ...on the control panel. 2. Use the procedures in your software application will override any settings in the following procedure to view the status of the toner cartridge. ◆ ◆ ◆ Oct 02 Press NEXT or PREVIOUS to scroll through the media size, media type, and level settings for...


