
PrintSuperVision Configuration Guide
Page 4
Configuring the Ordering of Supplies 50 Search for a Supply Item 50 Select Printers, Then Items 50 Items for Local Printers 51 All Available Items 51 Customize order 51 Configuring the Supplies List 52 Default 52 Enabling/Disabling on-line Supplies Ordering ... Viewing device status 69 Quickly Access a Group of Devices 69 Changing the Device Properties Displayed 70 Searching for a Device 72 Changing Languages 72 Downloading Oki Drivers 73 Print to Remote Locations 74 Creating a Maintenance Log / Managing Supplies Inventory 75 Viewing a Login Log 76 Clearing (Deleting) Logs 77 ...
Configuring the Ordering of Supplies 50 Search for a Supply Item 50 Select Printers, Then Items 50 Items for Local Printers 51 All Available Items 51 Customize order 51 Configuring the Supplies List 52 Default 52 Enabling/Disabling on-line Supplies Ordering ... Viewing device status 69 Quickly Access a Group of Devices 69 Changing the Device Properties Displayed 70 Searching for a Device 72 Changing Languages 72 Downloading Oki Drivers 73 Print to Remote Locations 74 Creating a Maintenance Log / Managing Supplies Inventory 75 Viewing a Login Log 76 Clearing (Deleting) Logs 77 ...

PrintSuperVision Configuration Guide
Page 48
... menu and click Group Config from the drop down box. 2. The other to change the web server password on a specific Oki monochrome printer. Select the Target Group of devices. Group Configuration Only available in the PSV Enterprise edition, Group Configuration is a more advanced ...up the configuration of a group of devices in the Select column. Select the B6300 Password Change option from Oki Printing Solutions based on an Oki B6300 monochrome printer. Additional templates that will receive the configuration by using the parameters from one used for group configuration to ...
... menu and click Group Config from the drop down box. 2. The other to change the web server password on a specific Oki monochrome printer. Select the Target Group of devices. Group Configuration Only available in the PSV Enterprise edition, Group Configuration is a more advanced ...up the configuration of a group of devices in the Select column. Select the B6300 Password Change option from Oki Printing Solutions based on an Oki B6300 monochrome printer. Additional templates that will receive the configuration by using the parameters from one used for group configuration to ...
PrintSuperVision Configuration Guide
Page 51
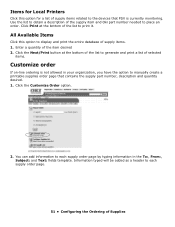
All Available Items Click this option for Local Printers Click this option to display and print the entire database of supply items. 1. Click Print at the bottom of the list to generate and print a ... Supplies Click the Customize Order option. 2. Enter a quantity of the list to print it. Use the list to obtain a description of the supply item and Oki part number needed to each supply order page by typing information in your organization, you have the option to manually create a printable supplies order page...
All Available Items Click this option for Local Printers Click this option to display and print the entire database of supply items. 1. Click Print at the bottom of the list to generate and print a ... Supplies Click the Customize Order option. 2. Enter a quantity of the list to print it. Use the list to obtain a description of the supply item and Oki part number needed to each supply order page by typing information in your organization, you have the option to manually create a printable supplies order page...
Installation Instructions: Second Paper Tray (500 Sheets)
Page 2
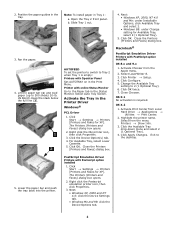
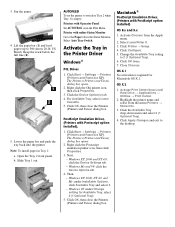
... NT 4.0: click the Device Settings tab. • Windows Me and 98: click the Device Options tab. 2 Open the Tray 2 front panel. The Printers (Printers and Faxes) dialog box opens. 2. Next: • Windows XP, 2000, NT 4.0 and Me: under Installable Options, click Available Tray and select 2.... Windows 98: under Change setting for XP]. Select LaserWriter 8. 3. OS X.2 1. US Bond). Select Auto Tray Switch. Right click the Oki printer icon, then click Properties. 3. Click OK twice. 7. Click the Available Tray drop-down menu and select 2 (1 Optional Tray). 4. PostScript Emulation Driver...
... NT 4.0: click the Device Settings tab. • Windows Me and 98: click the Device Options tab. 2 Open the Tray 2 front panel. The Printers (Printers and Faxes) dialog box opens. 2. Next: • Windows XP, 2000, NT 4.0 and Me: under Installable Options, click Available Tray and select 2.... Windows 98: under Change setting for XP]. Select LaserWriter 8. 3. OS X.2 1. US Bond). Select Auto Tray Switch. Right click the Oki printer icon, then click Properties. 3. Click OK twice. 7. Click the Available Tray drop-down menu and select 2 (1 Optional Tray). 4. PostScript Emulation Driver...
2nd Paper Tray Installation
Page 1
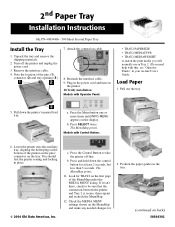
...needed changes for at least 2 seconds, but less than 5 seconds. Unpack the tray and remove the shipping materials. 2. Press and hold down the printer's manual feed tray. Check the MEDIA MENU settings shown on the first page of the pins (1), connector (2) and tray opening (3). 7. Remove the... interface cable. 4. b. Position the paper guides in place. © 2004 Oki Data Americas, Inc. You should feel the printer seating and locking in the tray. (continued on -line User's Guide. Plug in the power cord and turn on the...
...needed changes for at least 2 seconds, but less than 5 seconds. Unpack the tray and remove the shipping materials. 2. Press and hold down the printer's manual feed tray. Check the MEDIA MENU settings shown on the first page of the pins (1), connector (2) and tray opening (3). 7. Remove the... interface cable. 4. b. Position the paper guides in place. © 2004 Oki Data Americas, Inc. You should feel the printer seating and locking in the tray. (continued on -line User's Guide. Plug in the power cord and turn on the...
2nd Paper Tray Installation
Page 2
... paper bar and push the tray back into the printer. b. Slide Tray 1 out. Click Start → Settings → Printers [Printers and Faxes for XP]. Change the Available Tray setting to the desktop. Click Start → Settings → Printers [Printers and Faxes for XP]. Right click the Oki printer icon, then click Properties. 3. Next: - Macintosh® PostScript Emulation...
... paper bar and push the tray back into the printer. b. Slide Tray 1 out. Click Start → Settings → Printers [Printers and Faxes for XP]. Change the Available Tray setting to the desktop. Click Start → Settings → Printers [Printers and Faxes for XP]. Right click the Oki printer icon, then click Properties. 3. Next: - Macintosh® PostScript Emulation...
B4400/B4500/B4550/B4600 Safety, Warranty and Regulatory Booklet
Page 5
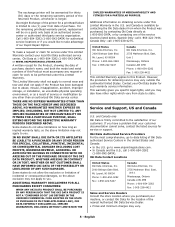
...have other than an authorized Oki Data service center. Contact your machine, or contact Oki Data for service or support. Mt. Laurel, NJ 08054 Phone: 1-800-654-3282 Fax: 1-856-222-5247 Canada Oki Data Americas, Inc. 2735 Matheson Blvd. The exchange printer will be on obtaining service... under this Limited Warranty in the United States and Canada: • In the U.S. Oki Data Contact Locations United States Oki Data Americas, Inc. 2000 Bishops Gate Blvd....
...have other than an authorized Oki Data service center. Contact your machine, or contact Oki Data for service or support. Mt. Laurel, NJ 08054 Phone: 1-800-654-3282 Fax: 1-856-222-5247 Canada Oki Data Americas, Inc. 2735 Matheson Blvd. The exchange printer will be on obtaining service... under this Limited Warranty in the United States and Canada: • In the U.S. Oki Data Contact Locations United States Oki Data Americas, Inc. 2000 Bishops Gate Blvd....

B4400 4500 4550 4600 User Guide (English)
Page 7
Your new printer is designed with a range of print media. Introduction Congratulations on a wide range of advanced features to give you crisp black and white pages at high speed on purchasing this OKI monochrome page printer. C4400/4500/4550/4600 User's Guide 7
Your new printer is designed with a range of print media. Introduction Congratulations on a wide range of advanced features to give you crisp black and white pages at high speed on purchasing this OKI monochrome page printer. C4400/4500/4550/4600 User's Guide 7
B4400 4500 4550 4600 User Guide (English)
Page 20
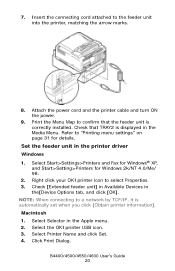
... Selector in the[Device Options tab, and click [OK]. B4400/4500/4550/4600 User's Guide 20 Right click your OKI printer icon to the feeder unit into the printer, matching the arrow marks. Select the OKI printer USB icon. 3. Set the feeder unit in the Media Menu. Print the Menu Map to a network by TCP...
... Selector in the[Device Options tab, and click [OK]. B4400/4500/4550/4600 User's Guide 20 Right click your OKI printer icon to the feeder unit into the printer, matching the arrow marks. Select the OKI printer USB icon. 3. Set the feeder unit in the Media Menu. Print the Menu Map to a network by TCP...
B4400 4500 4550 4600 User Guide (English)
Page 23
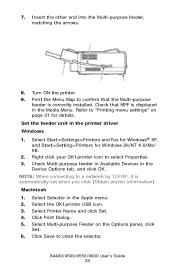
...menu settings" on the Options panel, click Set. 6. Check Multi-purpose feeder in Available Devices in the Apple menu. 2. Select the OKI printer USB icon. 3. B4400/4500/4550/4600 User's Guide 23 Set the feeder unit in the Media Menu. Check that the Multi-purpose feeder... is correctly installed. Right click your OKI printer icon to a network by TCP/IP, it is displayed in the printer driver Windows 1. Select Printer Name and click Set. 4. Fig1_33.jpg 8. Select Multi-purpose Feeder on page 31 for Windows...
...menu settings" on the Options panel, click Set. 6. Check Multi-purpose feeder in Available Devices in the Apple menu. 2. Select the OKI printer USB icon. 3. B4400/4500/4550/4600 User's Guide 23 Set the feeder unit in the Media Menu. Check that the Multi-purpose feeder... is correctly installed. Right click your OKI printer icon to a network by TCP/IP, it is displayed in the printer driver Windows 1. Select Printer Name and click Set. 4. Fig1_33.jpg 8. Select Multi-purpose Feeder on page 31 for Windows...

B4400 4500 4550 4600 User Guide (English)
Page 48
... connector on a network. in Windows. ⇓ Set the IP Address, etc. in the printer. ⇓ Install the printer driver and OKI LPR Utilities from the Printer Software CD-ROM supplied with the printer. Turn off the printer and Computer. 2. Setup Flow Turn ON the printer and computer. ⇓ Set the IP address, etc. Setup for 5 seconds. 3. Turn...
... connector on a network. in Windows. ⇓ Set the IP Address, etc. in the printer. ⇓ Install the printer driver and OKI LPR Utilities from the Printer Software CD-ROM supplied with the printer. Turn off the printer and Computer. 2. Setup Flow Turn ON the printer and computer. ⇓ Set the IP address, etc. Setup for 5 seconds. 3. Turn...
B4400 4500 4550 4600 User Guide (English)
Page 50
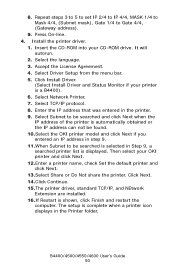
... IP address that was entered in Step 9, a searched printer list is a B4400). 6. Then select your OKI printer and click Next. 12.Enter a printer name, check Set the default printer and click Next. 13.Select Share or Do Not share the printer. Select Network Printer. 7. B4400/4500/4550/4600 User's Guide 50 Repeat ... to be searched is selected in the printer. 9. Select the language. 3. Select Subnet to be searched and click Next when the IP address of the printer is automatically obtained or the IP address can not be found. 10.Select the OKI printer model and click Next if you entered ...
... IP address that was entered in Step 9, a searched printer list is a B4400). 6. Then select your OKI printer and click Next. 12.Enter a printer name, check Set the default printer and click Next. 13.Select Share or Do Not share the printer. Select Network Printer. 7. B4400/4500/4550/4600 User's Guide 50 Repeat ... to be searched is selected in the printer. 9. Select the language. 3. Select Subnet to be searched and click Next when the IP address of the printer is automatically obtained or the IP address can not be found. 10.Select the OKI printer model and click Next if you entered ...
B4400 4500 4550 4600 User Guide (English)
Page 51
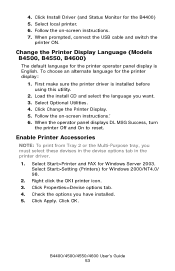
... instructions and select Delete. Click Apply. Uninstalling the printer driver 1. Select Start>Setting (Printers) for Windows Server 2003. Select Start>Printer and FAX for Windows 2000/NT4.0/98. 2. Click OK. Select Start>Control Panel>Printers. Select Start>Printer and FAX for Windows 2000/NT4.0/ 98. 2. Right click the OKI printer icon. 3. B4400/4500/4550/4600 User's Guide...
... instructions and select Delete. Click Apply. Uninstalling the printer driver 1. Select Start>Setting (Printers) for Windows Server 2003. Select Start>Printer and FAX for Windows 2000/NT4.0/98. 2. Click OK. Select Start>Control Panel>Printers. Select Start>Printer and FAX for Windows 2000/NT4.0/ 98. 2. Right click the OKI printer icon. 3. B4400/4500/4550/4600 User's Guide...
B4400 4500 4550 4600 User Guide (English)
Page 53
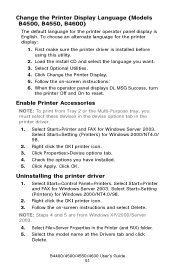
... the install CD and select the language you want. 3. Select Optional Utilities. 4. Select Start>Setting (Printers) for the B4400) 5. Right click the OKI printer icon. 3. Change the Printer Display Language (Models B4500, B4550, B4600) The default language for the printer operator panel display is installed before using this utility. 2. Click Properties>Devise options tab. 4. When...
... the install CD and select the language you want. 3. Select Optional Utilities. 4. Select Start>Setting (Printers) for the B4400) 5. Right click the OKI printer icon. 3. Change the Printer Display Language (Models B4500, B4550, B4600) The default language for the printer operator panel display is installed before using this utility. 2. Click Properties>Devise options tab. 4. When...
B4400 4500 4550 4600 User Guide (English)
Page 56
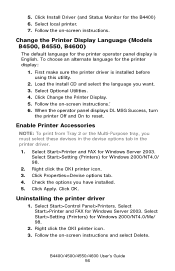
..., B4600) The default language for the printer display: 1. Right click the OKI printer icon. 3. Click Properties>Devise options tab. 4. Click Apply. Select Start>Control Panel>Printers. Right click the OKI printer icon. 3. To choose an alternate language for the printer operator panel display is installed before using this utility. 2. Click Change the Printer Display. 5. When the operator panel...
..., B4600) The default language for the printer display: 1. Right click the OKI printer icon. 3. Click Properties>Devise options tab. 4. Click Apply. Select Start>Control Panel>Printers. Right click the OKI printer icon. 3. To choose an alternate language for the printer operator panel display is installed before using this utility. 2. Click Change the Printer Display. 5. When the operator panel...

B4400 4500 4550 4600 User Guide (English)
Page 58
... connector (1) of the Macintosh. Turn ON the printer. 2. Setup for Macintosh With USB Connection Requirements: A Macintosh computer Rev 8.1 to 9.2.2 and Mac OSX. Click the OKI CD-ROM icon. 4. You will need a USB 2.0 cable. 1. Turn off the Macintosh and the printer. Insert the CD in the CD-ROM drive.... 3. Insert a USB cable into the USB interface connector of the printer. 3. B4400/4500/4550/4600 User's Guide 58...
... connector (1) of the Macintosh. Turn ON the printer. 2. Setup for Macintosh With USB Connection Requirements: A Macintosh computer Rev 8.1 to 9.2.2 and Mac OSX. Click the OKI CD-ROM icon. 4. You will need a USB 2.0 cable. 1. Turn off the Macintosh and the printer. Insert the CD in the CD-ROM drive.... 3. Insert a USB cable into the USB interface connector of the printer. 3. B4400/4500/4550/4600 User's Guide 58...

B4400 4500 4550 4600 User Guide (English)
Page 59
Double-click Installer for Mac OS. 6. Select your printer. 12. 5. Click the Oki Printer icon. 11. A Desktop Printer icon is displayed on the Apple Menu. 10. Close Chooser. Select a printer: 9. Select the language. 7. Accept the license agreement. 8. Open the Chooser on the desktop. Follow the on-screen instructions. B4400/4500/4550/4600 User's Guide 59
Double-click Installer for Mac OS. 6. Select your printer. 12. 5. Click the Oki Printer icon. 11. A Desktop Printer icon is displayed on the Apple Menu. 10. Close Chooser. Select a printer: 9. Select the language. 7. Accept the license agreement. 8. Open the Chooser on the desktop. Follow the on-screen instructions. B4400/4500/4550/4600 User's Guide 59

B4400 4500 4550 4600 User Guide (English)
Page 62
... 9. Press Item+ or Item- Input the administrator name and click OK. 5. Click Add (Add the printer, for Mac OS X. 4. Close the Printer Setting Utility. Press Value+ or Value- Install the Printer Driver: 1. NOTE: Proceed to install. Press the Item+ or Item- Press the Select to set IP ... the hard disk select Applications>Utilities folder, and double-click Printer Setting Utility. (For Mac OS X 10.2 or earlier, select the Print Center. 2. Select OKI TCP/IP. 5. Select the printer name and click Add. 6. Make sure that the printer name is shown in the Macintosh CD-ROM drive. 2.
... 9. Press Item+ or Item- Input the administrator name and click OK. 5. Click Add (Add the printer, for Mac OS X. 4. Close the Printer Setting Utility. Press Value+ or Value- Install the Printer Driver: 1. NOTE: Proceed to install. Press the Item+ or Item- Press the Select to set IP ... the hard disk select Applications>Utilities folder, and double-click Printer Setting Utility. (For Mac OS X 10.2 or earlier, select the Print Center. 2. Select OKI TCP/IP. 5. Select the printer name and click Add. 6. Make sure that the printer name is shown in the Macintosh CD-ROM drive. 2.

B4400 4500 4550 4600 User Guide (English)
Page 63
... OS X 10.3 or earlier. 9. Select Views>Network Port Setting. (Network Port in Printer Types, and select a printer name to install. Close the Printer Setting Utility. Bonjour (Rendezvous) Protocol 1. Start the Macintosh. 3. Choose System Environment>Network. 4. Make sure Internal Ethernet is "OKI B4500n" plus the last 6 digits of the MAC address. 10. Open the Driver...
... OS X 10.3 or earlier. 9. Select Views>Network Port Setting. (Network Port in Printer Types, and select a printer name to install. Close the Printer Setting Utility. Bonjour (Rendezvous) Protocol 1. Start the Macintosh. 3. Choose System Environment>Network. 4. Make sure Internal Ethernet is "OKI B4500n" plus the last 6 digits of the MAC address. 10. Open the Driver...

B4400 4500 4550 4600 User Guide (English)
Page 64
... is not supplied with the printer. S M Printer State tab.jpg 1 2. Turn ON the printer. 2. Open the Driver folder. 5. B4400/4500/4550/4600 User's Guide 64 Input administrator's name and click OK. Setup for Mac OS X in the CD-ROM ... USB Connection Requirements: A Macintosh computer Rev 8.1 to 9.2.2 and Mac OSX. You will need a USB 2.0 cable. 1. Insert a USB cable into the USB interface connector of the printer. 3. Setup 1. Insert the other end of the cable into the USB interface connector (1) of the Macintosh. Click the...
... is not supplied with the printer. S M Printer State tab.jpg 1 2. Turn ON the printer. 2. Open the Driver folder. 5. B4400/4500/4550/4600 User's Guide 64 Input administrator's name and click OK. Setup for Mac OS X in the CD-ROM ... USB Connection Requirements: A Macintosh computer Rev 8.1 to 9.2.2 and Mac OSX. You will need a USB 2.0 cable. 1. Insert a USB cable into the USB interface connector of the printer. 3. Setup 1. Insert the other end of the cable into the USB interface connector (1) of the Macintosh. Click the...


