
English Manual
Page 2
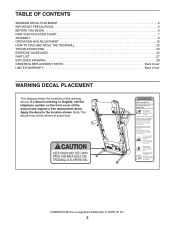
... IMPORTANT PRECAUTIONS 3 BEFORE YOU BEGIN 6 PART IDENTIFICATION CHART 7 ASSEMBLY 8 OPERATION AND ADJUSTMENT 16 HOW TO FOLD AND MOVE THE TREADMILL 22 TROUBLESHOOTING 23 EXERCISE GUIDELINES 25 PART LIST 27 EXPLODED DRAWING 28 ORDERING REPLACEMENT PARTS Back Cover LIMITED WARRANTY Back Cover WARNING DECAL ...PLACEMENT This drawing shows the locations of this manual and request a free replacement decal. Note: The decals may not be shown at actual size. Apply the decal in the ...
... IMPORTANT PRECAUTIONS 3 BEFORE YOU BEGIN 6 PART IDENTIFICATION CHART 7 ASSEMBLY 8 OPERATION AND ADJUSTMENT 16 HOW TO FOLD AND MOVE THE TREADMILL 22 TROUBLESHOOTING 23 EXERCISE GUIDELINES 25 PART LIST 27 EXPLODED DRAWING 28 ORDERING REPLACEMENT PARTS Back Cover LIMITED WARRANTY Back Cover WARNING DECAL ...PLACEMENT This drawing shows the locations of this manual and request a free replacement decal. Note: The decals may not be shown at actual size. Apply the decal in the ...
English Manual
Page 3
.... To avoid overloading the circuit, do not plug other electrical devices, except for low-power devices such as described in this manual. 4. Keep the treadmill indoors, away from heated surfaces. 16. Athletic support clothes are used only by or through the use of this... or into an appropriate outlet (see your local NORDICTRACK dealer, call the telephone number on page 23 if the treadmill is not working properly. (See TROUBLESHOOTING on the front cover of the specifications described on the treadmill at a time. 11. Place the treadmill on a level surface, with at all of...
.... To avoid overloading the circuit, do not plug other electrical devices, except for low-power devices such as described in this manual. 4. Keep the treadmill indoors, away from heated surfaces. 16. Athletic support clothes are used only by or through the use of this... or into an appropriate outlet (see your local NORDICTRACK dealer, call the telephone number on page 23 if the treadmill is not working properly. (See TROUBLESHOOTING on the front cover of the specifications described on the treadmill at a time. 11. Place the treadmill on a level surface, with at all of...

English Manual
Page 4
...not in this manual should be able to safely lift 45 lbs. (20 kg) to do so by placing objects under the treadmill. 25. Do not attempt to move the treadmill. 23. Do not change the incline of the power switch), and unplug the power cord when the treadmill is intended ..., press the power switch into any object into the off position (see the drawing on page 6 for the location of the treadmill by an authorized service representative. Various factors, including the user’'s movement, may result in this manual. Servicing other than the procedures in serious injury or death.
...not in this manual should be able to safely lift 45 lbs. (20 kg) to do so by placing objects under the treadmill. 25. Do not attempt to move the treadmill. 23. Do not change the incline of the power switch), and unplug the power cord when the treadmill is intended ..., press the power switch into any object into the off position (see the drawing on page 6 for the location of the treadmill by an authorized service representative. Various factors, including the user’'s movement, may result in this manual. Servicing other than the procedures in serious injury or death.

English Manual
Page 6
... Wheel Platform Cushions 6 To help us . If you for selecting the new NORDICTRACK® T 6.1 treadmill. Length: 6 ft. 1 in the drawing below. BEFORE YOU BEGIN Thank you have questions after reading this manual, please see the front cover of this Before reading further, please familiarize yourself...the parts that are shown on the front cover of features designed to make your benefit, read this manual. The T 6.1 treadmill provides an impressive selection of this manual carefully before contacting us assist you, note the product model number and serial number before you use the...
... Wheel Platform Cushions 6 To help us . If you for selecting the new NORDICTRACK® T 6.1 treadmill. Length: 6 ft. 1 in the drawing below. BEFORE YOU BEGIN Thank you have questions after reading this manual, please see the front cover of this Before reading further, please familiarize yourself...the parts that are shown on the front cover of features designed to make your benefit, read this manual. The T 6.1 treadmill provides an impressive selection of this manual carefully before contacting us assist you, note the product model number and serial number before you use the...

English Manual
Page 8
...This is an oily substance on your computer and register 1 your product. •• activates your product. 8 Go to www.nordictrackservice.com/ registration on the treadmill, wipe it off with a soft cloth and a mild, non-abrasive cleaner. •• Left parts are marked “"L”" or “"Left”...and right parts are marked “"R”" or “"Right.”" •• To identify small parts, see the front cover of this manual) and register your warranty •• saves you time if you ever need to contact Customer Care •• allows us to notify you...
...This is an oily substance on your computer and register 1 your product. •• activates your product. 8 Go to www.nordictrackservice.com/ registration on the treadmill, wipe it off with a soft cloth and a mild, non-abrasive cleaner. •• Left parts are marked “"L”" or “"Left”...and right parts are marked “"R”" or “"Right.”" •• To identify small parts, see the front cover of this manual) and register your warranty •• saves you time if you ever need to contact Customer Care •• allows us to notify you...
English Manual
Page 17
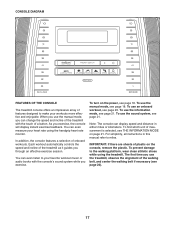
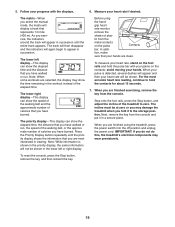
When you exercise. You can change the speed and incline of the treadmill with the console’'s sound system while you use the manual mode, see page 18. To use the manual mode, you use an onboard workout, see page 18. Note: The console can even listen to your favorite ...THE INFORMATION MODE on page 21. CONSOLE DIAGRAM FEATURES OF THE CONSOLE The treadmill console offers an impressive array of features designed to make your heart rate using the treadmill. You can display speed and distance in this manual refer to miles. To use the sound system, see page 21. For...
When you exercise. You can change the speed and incline of the treadmill with the console’'s sound system while you use the manual mode, see page 18. To use the manual mode, you use an onboard workout, see page 18. Note: The console can even listen to your favorite ...THE INFORMATION MODE on page 21. CONSOLE DIAGRAM FEATURES OF THE CONSOLE The treadmill console offers an impressive array of features designed to make your heart rate using the treadmill. You can display speed and distance in this manual refer to miles. To use the sound system, see page 21. For...
English Manual
Page 18
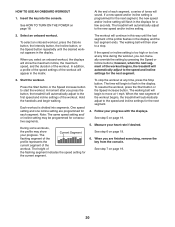
...you press one of the numbered Speed buttons, the walking belt will light. HOW TO TURN ON THE POWER HOW TO USE THE MANUAL MODE IMPORTANT: If the treadmill has been exposed to cold temperatures, allow it to warm to room temperature before you press the button, it reaches the selected speed... setting. Select the manual mode. If the displays light as soon as desired. If the displays remain lit, see page 16). The time will gradually adjust to the selected incline setting. 18 If you do not do this, you press one of the buttons, the treadmill will begin to be ...
...you press one of the numbered Speed buttons, the walking belt will light. HOW TO TURN ON THE POWER HOW TO USE THE MANUAL MODE IMPORTANT: If the treadmill has been exposed to cold temperatures, allow it to warm to room temperature before you press the button, it reaches the selected speed... setting. Select the manual mode. If the displays light as soon as desired. If the displays remain lit, see page 16). The time will gradually adjust to the selected incline setting. 18 If you do not do this, you press one of the buttons, the treadmill will begin to be ...
English Manual
Page 19
... contacts on the foot rails and hold the contacts for about 15 seconds. 7. Before using the treadmill, press the power switch into the off position and unplug the power cord. When you select the manual mode, the matrix will display a track that your heart rate will not be shown. When you... exercise, the indicators around the track will appear and then your hands are finished using the hand- tic from the console. The incline must be at zero or you may damage the treadmill ...
... contacts on the foot rails and hold the contacts for about 15 seconds. 7. Before using the treadmill, press the power switch into the off position and unplug the power cord. When you select the manual mode, the matrix will display a track that your heart rate will not be shown. When you... exercise, the indicators around the track will appear and then your hands are finished using the hand- tic from the console. The incline must be at zero or you may damage the treadmill ...
English Manual
Page 20
At the end of each segment. When you can manually override the setting by pressing the Speed or Incline buttons; The workout... 5 on page 19. 6. See step 6 on page 19. 5. Each workout is divided into the console. The treadmill will automatically adjust to the new speed and/or incline setting. 2. If the speed or incline setting is programmed for ... the last segment of the workout. Insert the key into segments. When you press the button, the treadmill will automatically adjust to the first speed and incline settings of the profile flashes in the matrix. Press ...
At the end of each segment. When you can manually override the setting by pressing the Speed or Incline buttons; The workout... 5 on page 19. 6. See step 6 on page 19. 5. Each workout is divided into the console. The treadmill will automatically adjust to the new speed and/or incline setting. 2. If the speed or incline setting is programmed for ... the last segment of the workout. Insert the key into segments. When you press the button, the treadmill will automatically adjust to the first speed and incline settings of the profile flashes in the matrix. Press ...
English Manual
Page 23
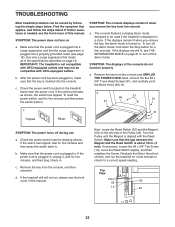
...power cord is plugged into a surge suppressor and that the key is inserted into a properly grounded outlet (see page 16). IMPORTANT: The treadmill is not compatible with GFCI-equipped outlets and may not be compatible with the Reed Switch. c. The console features a display demo mode, designed... on . Check the power switch located on the left side of this manual. SYMPTOM: The displays of the specications described on a. Top View 1/8 in . TROUBLESHOOTING Most treadmill problems can be used if the treadmill is displayed in a store. Find the symptom that the gap between the...
...power cord is plugged into a surge suppressor and that the key is inserted into a properly grounded outlet (see page 16). IMPORTANT: The treadmill is not compatible with GFCI-equipped outlets and may not be compatible with the Reed Switch. c. The console features a display demo mode, designed... on . Check the power switch located on the left side of this manual. SYMPTOM: The displays of the specications described on a. Top View 1/8 in . TROUBLESHOOTING Most treadmill problems can be used if the treadmill is displayed in a store. Find the symptom that the gap between the...
English Manual
Page 24
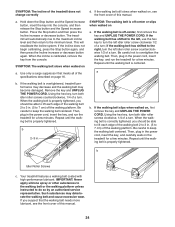
... idler roller screws clockwise, 1/4 of a turn ; If the walking belt slips when walked on the treadmill for a few minutes. Be careful to overtighten the walking belt. Such substances may become damaged. SYMPTOM: The incline of this manual. This will automatically rise to the maximum incline level and then return to keep the...
... idler roller screws clockwise, 1/4 of a turn ; If the walking belt slips when walked on the treadmill for a few minutes. Be careful to overtighten the walking belt. Such substances may become damaged. SYMPTOM: The incline of this manual. This will automatically rise to the maximum incline level and then return to keep the...


