

English Manual
Page 1
.... 8 a.m.-4 p.m. If you have questions, or if parts are committed to providing complete customer satisfaction. MST ON THE WEB: www.nordictrackservice.com CAUTION Read all precautions and instructions in the space above ) before using this manual for reference. USER'S MANUAL Visit our website at www.nordictrack.com new products, prizes, fitness tips, and...
.... 8 a.m.-4 p.m. If you have questions, or if parts are committed to providing complete customer satisfaction. MST ON THE WEB: www.nordictrackservice.com CAUTION Read all precautions and instructions in the space above ) before using this manual for reference. USER'S MANUAL Visit our website at www.nordictrack.com new products, prizes, fitness tips, and...

English Manual
Page 2
TABLE OF CONTENTS IMPORTANT PRECAUTIONS 3 BEFORE YOU BEGIN 4 ASSEMBLY 5 HOW TO OPERATE THE STEPPER 9 TROUBLESHOOTING AND MAINTENANCE 17 EXERCISE GUIDELINES 18 PART LIST 21 EXPLODED DRAWING 23 ORDERING REPLACEMENT PARTS Back Cover LIMITED WARRANTY Back Cover NordicTrack® is a registered trademark of ICON IP, Inc. 2
TABLE OF CONTENTS IMPORTANT PRECAUTIONS 3 BEFORE YOU BEGIN 4 ASSEMBLY 5 HOW TO OPERATE THE STEPPER 9 TROUBLESHOOTING AND MAINTENANCE 17 EXERCISE GUIDELINES 18 PART LIST 21 EXPLODED DRAWING 23 ORDERING REPLACEMENT PARTS Back Cover LIMITED WARRANTY Back Cover NordicTrack® is a registered trademark of ICON IP, Inc. 2

English Manual
Page 3
... children under the age of 12 and pets away from moisture and dust. 5. The stepper should not be used by or through the use of this manual and all parts regularly. Inspect and properly tighten all warnings on a level surface. Keep your back. 4. Read all...mounting, dismounting, or using the stepper. Place the stepper on your stepper before using your stepper. Cover the floor beneath the stepper to ensure that all users of the stepper are adequately informed of heart rate readings. Replace any worn parts immediately. 6. The stepper is intended only as described in...
... children under the age of 12 and pets away from moisture and dust. 5. The stepper should not be used by or through the use of this manual and all parts regularly. Inspect and properly tighten all warnings on a level surface. Keep your back. 4. Read all...mounting, dismounting, or using the stepper. Place the stepper on your stepper before using your stepper. Cover the floor beneath the stepper to ensure that all users of the stepper are adequately informed of heart rate readings. Replace any worn parts immediately. 6. The stepper is intended only as described in...
English Manual
Page 4
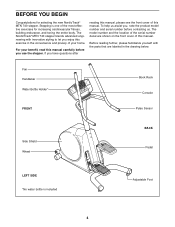
... convenience and privacy of the most effective exercises for selecting the new NordicTrack® MTN 740 stepper. To help us assist you, note the product model number and serial number before you use the stepper. Fan Handlebar Water Bottle Holder* FRONT Book Rack Console Pulse Sensor ...YOU BEGIN Congratulations for increasing cardiovascular fitness, building endurance, and toning the entire body. If you enjoy this manual. The NordicTrack® MTN 740 stepper blends advanced engineering with the parts that are shown on the front cover of this exercise in the drawing below.
... convenience and privacy of the most effective exercises for selecting the new NordicTrack® MTN 740 stepper. To help us assist you, note the product model number and serial number before you use the stepper. Fan Handlebar Water Bottle Holder* FRONT Book Rack Console Pulse Sensor ...YOU BEGIN Congratulations for increasing cardiovascular fitness, building endurance, and toning the entire body. If you enjoy this manual. The NordicTrack® MTN 740 stepper blends advanced engineering with the parts that are shown on the front cover of this exercise in the drawing below.
English Manual
Page 5
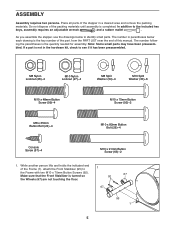
...the quantity needed for assembly. In addition to 1 the Frame with two M10 x 75mm Button Screws (92). Note: Some small parts may have been preassembled. Make sure that the Front Stabilizer is completed. ASSEMBLY Assembly requires two persons. While another person lifts and holds... Screw (57)-4 M10 x 91mm Button Screw (63)-2 1. Place all parts of this manual. As you assemble the stepper, use the drawings below each drawing is the key number of the part, from the PART LIST near the end of the stepper in parentheses below to see if it has been preassembled. The number...
...the quantity needed for assembly. In addition to 1 the Frame with two M10 x 75mm Button Screws (92). Note: Some small parts may have been preassembled. Make sure that the Front Stabilizer is completed. ASSEMBLY Assembly requires two persons. While another person lifts and holds... Screw (57)-4 M10 x 91mm Button Screw (63)-2 1. Place all parts of this manual. As you assemble the stepper, use the drawings below each drawing is the key number of the part, from the PART LIST near the end of the stepper in parentheses below to see if it has been preassembled. The number...
English Manual
Page 7
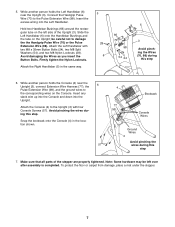
... the same way. 5 28 6 66 70 98 54 24 5 3 Avoid pinching the Wires (70, 98) during this step. Make sure that all parts of the Upright (3). Slide the Left Handlebar (6) onto the Handlebar Bushings and the tube on the left over after assembly is completed. be left side...), two M8 Split Washers (54), and two M8 Nylon Locknuts (28). 5. To protect the floor or carpet from damage, place a mat under the stepper. 7 While another person holds the Console (4) near the Upright (3), Connect the Handgrip Pulse Wire (70) to the corresponding wires on the Console. Avoid ...
... the same way. 5 28 6 66 70 98 54 24 5 3 Avoid pinching the Wires (70, 98) during this step. Make sure that all parts of the Upright (3). Slide the Left Handlebar (6) onto the Handlebar Bushings and the tube on the left over after assembly is completed. be left side...), two M8 Split Washers (54), and two M8 Nylon Locknuts (28). 5. To protect the floor or carpet from damage, place a mat under the stepper. 7 While another person holds the Console (4) near the Upright (3), Connect the Handgrip Pulse Wire (70) to the corresponding wires on the Console. Avoid ...

English Manual
Page 17
...13). Slide the Reed Switch slightly closer to the inset drawing). TROUBLESHOOTING AND MAINTENANCE Inspect and tighten all parts of mild, non-abrasive detergent. Carefully slide the Right Side Shield (8) off the stepper. Reattach the three M4 x 38mm Screws (64) and the two M4 x 25mm Screws (65).... the Reed Switch (56) should be cleaned with each step. Carefully slide the Right Side Shield (8) back onto the stepper. HOW TO LEVEL THE STEPPER If the stepper rocks slightly during use, turn one or both of the Feet (15) under the Stabilizer (2) until the console displays ...
...13). Slide the Reed Switch slightly closer to the inset drawing). TROUBLESHOOTING AND MAINTENANCE Inspect and tighten all parts of mild, non-abrasive detergent. Carefully slide the Right Side Shield (8) off the stepper. Reattach the three M4 x 38mm Screws (64) and the two M4 x 25mm Screws (65).... the Reed Switch (56) should be cleaned with each step. Carefully slide the Right Side Shield (8) back onto the stepper. HOW TO LEVEL THE STEPPER If the stepper rocks slightly during use, turn one or both of the Feet (15) under the Stabilizer (2) until the console displays ...
English Manual
Page 18
... condition, complete three workouts each week, if desired. During the first few minutes of stretching. The pulse sensor is to make exercise a regular and enjoyable part of time. EXERCISE INTENSITY Whether your goal is to strengthen your "training zone." Training Zone Exercise-Exercise for aerobic exercise. Remember, the key to success...
... condition, complete three workouts each week, if desired. During the first few minutes of stretching. The pulse sensor is to make exercise a regular and enjoyable part of time. EXERCISE INTENSITY Whether your goal is to strengthen your "training zone." Training Zone Exercise-Exercise for aerobic exercise. Remember, the key to success...

English Manual
Page 21
... Belt Gear Magnet Rear Axle Mount M5 x 16mm Screw Bumper Spring Pulley M6 Washer Adjustment Cable Wire Harness/Adjustment Motor Belt/Spring Assembly Key No. PART LIST-Model No.
... Belt Gear Magnet Rear Axle Mount M5 x 16mm Screw Bumper Spring Pulley M6 Washer Adjustment Cable Wire Harness/Adjustment Motor Belt/Spring Assembly Key No. PART LIST-Model No.
English Manual
Page 22
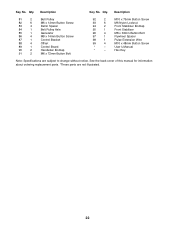
... Endcap M6 x 72mm Button Bolt 92 2 93 6 94 2 95 1 96 4 97 1 98 1 99 4 * - * - See the back cover of this manual for information about ordering replacement parts. *These parts are subject to change without notice. Qty. Key No. Description Key No.
... Endcap M6 x 72mm Button Bolt 92 2 93 6 94 2 95 1 96 4 97 1 98 1 99 4 * - * - See the back cover of this manual for information about ordering replacement parts. *These parts are subject to change without notice. Qty. Key No. Description Key No.

English Manual
Page 24
... WARRANTY ICON Health & Fitness, Inc. (ICON) warrants this manual) • the key number and description of the replacement part(s) (see the PART LIST and the EXPLODED DRAWING near the end of or in its authorized service centers. You may not apply to provide the following...period of whatsoever nature. If the product is shipped to a service center, freight charges to the original purchaser. ORDERING REPLACEMENT PARTS To order replacement parts, please see the front cover of incidental or consequential damages. This warranty extends only to and from defects in workmanship and ...
... WARRANTY ICON Health & Fitness, Inc. (ICON) warrants this manual) • the key number and description of the replacement part(s) (see the PART LIST and the EXPLODED DRAWING near the end of or in its authorized service centers. You may not apply to provide the following...period of whatsoever nature. If the product is shipped to a service center, freight charges to the original purchaser. ORDERING REPLACEMENT PARTS To order replacement parts, please see the front cover of incidental or consequential damages. This warranty extends only to and from defects in workmanship and ...


