

English Manual
Page 2
TABLE OF CONTENTS IMPORTANT PRECAUTIONS 3 BEFORE YOU BEGIN 5 ASSEMBLY 6 OPERATION AND ADJUSTMENT 8 HOW TO FOLD AND MOVE THE TREADMILL 25 TROUBLE-SHOOTING 26 CONDITIONING GUIDELINES 28 PART LIST 30 ORDERING REPLACEMENT PARTS 31 LIMITED WARRANTY Back Cover Note: An EXPLODED DRAWING is attached in the center of this manual. 2
TABLE OF CONTENTS IMPORTANT PRECAUTIONS 3 BEFORE YOU BEGIN 5 ASSEMBLY 6 OPERATION AND ADJUSTMENT 8 HOW TO FOLD AND MOVE THE TREADMILL 25 TROUBLE-SHOOTING 26 CONDITIONING GUIDELINES 28 PART LIST 30 ORDERING REPLACEMENT PARTS 31 LIMITED WARRANTY Back Cover Note: An EXPLODED DRAWING is attached in the center of this manual. 2

English Manual
Page 3
... of carrying 15 or more than one person on /off position when the treadmill is capable of 12 and pets away from damage, place a mat under the age of high speeds. Do not attempt to maintain your local NordicTrack dealer or call 1-888825-2588 and order part number 146148. 12. Do... not put the treadmill in order to avoid sudden jumps in use an extension cord. 11. Wear appropriate exercise clothing when using...
... of carrying 15 or more than one person on /off position when the treadmill is capable of 12 and pets away from damage, place a mat under the age of high speeds. Do not attempt to maintain your local NordicTrack dealer or call 1-888825-2588 and order part number 146148. 12. Do... not put the treadmill in order to avoid sudden jumps in use an extension cord. 11. Wear appropriate exercise clothing when using...

English Manual
Page 4
...procedures de- Never remove the motor hood unless instructed to order a free replacement decal (see ORDERING REPLACEMENT PARTS on your physician. This treadmill is intended for speed and/or incline changes. Do not use this manual should be prepared for in any time by an authorized service ...Service Department, toll-free, to do so by pressing the speed and incline buttons. Servicing other than the procedures in this treadmill in -home use of the treadmill regularly. 22. If the decal is heard, the speed and/or incline will alert you are not using them. 21....
...procedures de- Never remove the motor hood unless instructed to order a free replacement decal (see ORDERING REPLACEMENT PARTS on your physician. This treadmill is intended for speed and/or incline changes. Do not use this manual should be prepared for in any time by an authorized service ...Service Department, toll-free, to do so by pressing the speed and incline buttons. Servicing other than the procedures in this treadmill in -home use of the treadmill regularly. 22. If the decal is heard, the speed and/or incline will alert you are not using them. 21....

English Manual
Page 5
... our Customer Service Department toll-free Before reading further, please familiarize yourself with innovative design to the treadmill (see the front cover of your benefit, read this manual for selecting the revolutionary NordicTrack® EXP3000xi treadmill. The EXP3000xi treadmill combines advanced technology with the parts that are labeled in the convenience of this manual carefully before...
... our Customer Service Department toll-free Before reading further, please familiarize yourself with innovative design to the treadmill (see the front cover of your benefit, read this manual for selecting the revolutionary NordicTrack® EXP3000xi treadmill. The EXP3000xi treadmill combines advanced technology with the parts that are labeled in the convenience of this manual carefully before...

English Manual
Page 6
... cleared area and remove all packing materials. Note: It may be helpful to tip the Uprights (69) forward as shown. With the help of the treadmill walking belt is coated with high-performance lubricant. Attach each Extension Leg (102) with a soft cloth and a mild, non-abrasive cleaner. 1. If ...there is lubricant on top of the packing materials until the treadmill is on the Lock Pin. Insert the Lock Pin into the left Upright (69). Note: A replacement Base Pad (99) may be included. Do not...
... cleared area and remove all packing materials. Note: It may be helpful to tip the Uprights (69) forward as shown. With the help of the treadmill walking belt is coated with high-performance lubricant. Attach each Extension Leg (102) with a soft cloth and a mild, non-abrasive cleaner. 1. If ...there is lubricant on top of the packing materials until the treadmill is on the Lock Pin. Insert the Lock Pin into the left Upright (69). Note: A replacement Base Pad (99) may be included. Do not...

English Manual
Page 7
... (69) as shown, with the chest pulse sensor. 1. Insert the connectors and the Wire Harness into the bottom of the Bushings toward the treadmill (see page 27). Attach the left Upright (not shown). See drawing 2a. See drawing 2b. Place the Handrail Spacer (65) on the side...Handrail (66). To protect the floor or carpet from which Screws were removed from damage, place a mat under the treadmill. If you use the treadmill. Keep track of the treadmill as shown in the indicated location. Reattach the Console (82) with Handrail Washers (77) into the same holes that ...
... (69) as shown, with the chest pulse sensor. 1. Insert the connectors and the Wire Harness into the bottom of the Bushings toward the treadmill (see page 27). Attach the left Upright (not shown). See drawing 2a. See drawing 2b. Place the Handrail Spacer (65) on the side...Handrail (66). To protect the floor or carpet from which Screws were removed from damage, place a mat under the treadmill. If you use the treadmill. Keep track of the treadmill as shown in the indicated location. Reattach the Console (82) with Handrail Washers (77) into the same holes that ...

English Manual
Page 8
... has a grounding plug that is properly installed and grounded in drawing 2 if a properly grounded outlet is equipped with your local NordicTrack dealer or call 1-888-825-2588 and order part number 146148. To decrease the possibility of least resistance for electric current to ...on or off. The surge suppressor must be seriously damaged by a metal screw. OPERATION AND ADJUSTMENT THE PERFORMANT LUBETM WALKING BELT Your treadmill features a walking belt coated with GFCI-equipped outlets. Voltage surges, spikes, and noise interference can be electrically rated for use a ...
... has a grounding plug that is properly installed and grounded in drawing 2 if a properly grounded outlet is equipped with your local NordicTrack dealer or call 1-888-825-2588 and order part number 146148. To decrease the possibility of least resistance for electric current to ...on or off. The surge suppressor must be seriously damaged by a metal screw. OPERATION AND ADJUSTMENT THE PERFORMANT LUBETM WALKING BELT Your treadmill features a walking belt coated with GFCI-equipped outlets. Voltage surges, spikes, and noise interference can be electrically rated for use a ...

English Manual
Page 9
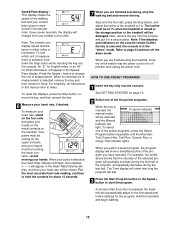
... virtually endless features from our internet site. When the console is in the manual mode, the speed and incline of the treadmill can connect the treadmill to your home stereo, portable stereo, or computer and play iFIT.com video programs (videocassettes are also offered. The included...memory for complete details. And by certified personal trainers. Each CD features two programs designed by adding an optional upgrade module to the treadmill, you can even create your own custom workout programs and store them in pulse sensor. Each program automatically controls the speed and ...
... virtually endless features from our internet site. When the console is in the manual mode, the speed and incline of the treadmill can connect the treadmill to your home stereo, portable stereo, or computer and play iFIT.com video programs (videocassettes are also offered. The included...memory for complete details. And by certified personal trainers. Each CD features two programs designed by adding an optional upgrade module to the treadmill, you can even create your own custom workout programs and store them in pulse sensor. Each program automatically controls the speed and ...

English Manual
Page 10
...program. To use the fitness test program, see page 16. Stand on the foot rails of the treadmill. Find the clip attached to the Clip key and slide the clip onto the waistband of your weight...belt when turning on the power. • Always wear the clip (see the drawing below) while operating the treadmill. • Adjust the speed in small increments to avoid sudden jumps in speed. • The pulse sensor ...is not pulled from the con- Locate the on/off switch on the treadmill near the power cord. Although you can use an iFIT.com CD or video program, refer to...
...program. To use the fitness test program, see page 16. Stand on the foot rails of the treadmill. Find the clip attached to the Clip key and slide the clip onto the waistband of your weight...belt when turning on the power. • Always wear the clip (see the drawing below) while operating the treadmill. • Adjust the speed in small increments to avoid sudden jumps in speed. • The pulse sensor ...is not pulled from the con- Locate the on/off switch on the treadmill near the power cord. Although you can use an iFIT.com CD or video program, refer to...

English Manual
Page 11
... the handgrip pulse sensor, this display will begin to 10%. When the key is selected, the program display will light in increments of the treadmill, press the Incline buttons. gram button repeatedly to select the manual mode. 3 Press the Start button or the Speed + button to the ... will change in sequence until you exercise, the indicators around the track will show the elapsed time. if a button is ideal for the treadmill to the other every seven seconds. Each time a button is pressed, the incline will show the approximate intensity level of your intensity level is...
... the handgrip pulse sensor, this display will begin to 10%. When the key is selected, the program display will light in increments of the treadmill, press the Incline buttons. gram button repeatedly to select the manual mode. 3 Press the Start button or the Speed + button to the ... will change in sequence until you exercise, the indicators around the track will show the elapsed time. if a button is ideal for the treadmill to the other every seven seconds. Each time a button is pressed, the incline will show the approximate intensity level of your intensity level is...
English Manual
Page 12
...power cord. Press the Speed + button to the first speed and incline settings for about 15 seconds. 7 When you are finished using the treadmill, move the on/off switch near the power cord to miles. For the most accurate heart rate reading, continue to the other. When ...Every seven seconds, the display will automatically adjust to change from the console and put it . The incline must be at 1% when the treadmill is selected, hold the contacts for the program. Note: If the displays and indicators on the handrail. For example, the profile above shows ...
...power cord. Press the Speed + button to the first speed and incline settings for about 15 seconds. 7 When you are finished using the treadmill, move the on/off switch near the power cord to miles. For the most accurate heart rate reading, continue to the other. When ...Every seven seconds, the display will automatically adjust to change from the console and put it . The incline must be at 1% when the treadmill is selected, hold the contacts for the program. Note: If the displays and indicators on the handrail. For example, the profile above shows ...

English Manual
Page 13
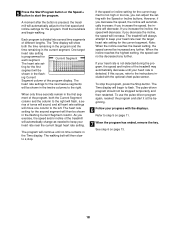
... indicators in the Current Segment column are lit, the speed settings will be at 1%. Every few times one incline setting are finished using the treadmill, move downward as described above. If any of the columns to the right will flash, a series of tones will sound, and all of... Follow your heart rate, if desired. Note: If the displays and indicators on page 11. 5 Measure your progress with the displays. ments of the treadmill is shown in the Current Segment column and no time remains in the Time display. The Time display will automatically adjust to the left . Refer...
... indicators in the Current Segment column are lit, the speed settings will be at 1%. Every few times one incline setting are finished using the treadmill, move downward as described above. If any of the columns to the right will flash, a series of tones will sound, and all of... Follow your heart rate, if desired. Note: If the displays and indicators on page 11. 5 Measure your progress with the displays. ments of the treadmill is shown in the Current Segment column and no time remains in the Time display. The Time display will automatically adjust to the left . Refer...

English Manual
Page 14
To select one of the treadmill to the left and the speed setting for the second segment will then move . A moment after the button is pressed, the walking belt will begin ...
To select one of the treadmill to the left and the speed setting for the second segment will then move . A moment after the button is pressed, the walking belt will begin ...

English Manual
Page 15
... or too difficult, the speed or incline setting for the second segment will then be stored in the flashing Current Segment column and the treadmill will not be programmed only when the indicator is lit. (Note: When the indicator on page 11. 5 Measure your progress with the...the speed and incline settings that you programmed previously. The Time display will be adjusted with the displays. After the segment is pressed, the treadmill will automatically adjust to step 5 on the Record button is inserted, the manual Learn Indicator mode will show a simplified profile of the ...
... or too difficult, the speed or incline setting for the second segment will then be stored in the flashing Current Segment column and the treadmill will not be programmed only when the indicator is lit. (Note: When the indicator on page 11. 5 Measure your progress with the...the speed and incline settings that you programmed previously. The Time display will be adjusted with the displays. After the segment is pressed, the treadmill will automatically adjust to step 5 on the Record button is inserted, the manual Learn Indicator mode will show a simplified profile of the ...

English Manual
Page 16
... will increase to 3% and the walking belt will appear in the Distance/Laps display, indicating that the first 4-minute segment of the treadmill will automatically adjust to 2.5 mph. When the fitness test program is pressed, the Distance/ Laps display will appear in the Time display.... When the button is completed, the letter "C" will show a simplified profile of the treadmill will then increase to step 5. At the beginning of each segment. the fitness test program should be shown in the program display.) The...
... will increase to 3% and the walking belt will appear in the Distance/Laps display, indicating that the first 4-minute segment of the treadmill will automatically adjust to 2.5 mph. When the fitness test program is pressed, the Distance/ Laps display will appear in the Time display.... When the button is completed, the letter "C" will show a simplified profile of the treadmill will then increase to step 5. At the beginning of each segment. the fitness test program should be shown in the program display.) The...
English Manual
Page 17
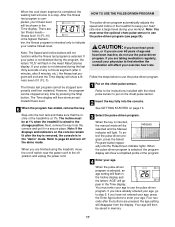
...can be shown in memory. 17 HOW TO USE THE PULSE-DRIVEN PROGRAM The pulse-driven program automatically adjusts the speed and incline of the treadmill to keep your heart rate near the power cord to the off position and unplug the power cord. CAUTION: If you are ten fitness ...levels- When the pulse-driven program is selected, the program display will be stopped at 1% when the treadmill is raised to page 24 and turn off switch near a target level during your pulse is not detected during the program, the letters "PLS" will...
...can be shown in memory. 17 HOW TO USE THE PULSE-DRIVEN PROGRAM The pulse-driven program automatically adjusts the speed and incline of the treadmill to keep your heart rate near the power cord to the off position and unplug the power cord. CAUTION: If you are ten fitness ...levels- When the pulse-driven program is selected, the program display will be stopped at 1% when the treadmill is raised to page 24 and turn off switch near a target level during your pulse is not detected during the program, the letters "PLS" will...
English Manual
Page 18
... the left. If this occurs, refer to the instructions included with the Speed or Incline buttons. ing Current Segment column of the treadmill may automatically decrease until no time remains in the twelve columns to the right. The heart rate settings for the second segment will ... the next twelve segments will automatically change as needed to keep your heart rate near the target heart rate setting for the program. The treadmill will decrease. To stop . However, if you increase the speed, the incline will always attempt to flash. if you decrease the speed...
... the left. If this occurs, refer to the instructions included with the Speed or Incline buttons. ing Current Segment column of the treadmill may automatically decrease until no time remains in the twelve columns to the right. The heart rate settings for the second segment will ... the next twelve segments will automatically change as needed to keep your heart rate near the target heart rate setting for the program. The treadmill will decrease. To stop . However, if you increase the speed, the incline will always attempt to flash. if you decrease the speed...

English Manual
Page 19
...Note: If your CD player has separate LINE OUT and PHONES jacks, see instruction A below . If your CD player has only one end of the treadmill near the power cord. C Audio Cable 3.5mm Y-adapter Headphones Audio Cable PHONES 3.5mm Y-adapter Headphones 19 Plug one end of the Y-adapter. A ... the Y-adapter. Plug your stereo has only a PHONES jack, see instruction B. See page 21 for connecting instructions. Plug one end of the treadmill near the power cord. Plug one end of the audio cable into an AUDIO OUT jack on the front of the audio cable into the...
...Note: If your CD player has separate LINE OUT and PHONES jacks, see instruction A below . If your CD player has only one end of the treadmill near the power cord. C Audio Cable 3.5mm Y-adapter Headphones Audio Cable PHONES 3.5mm Y-adapter Headphones 19 Plug one end of the Y-adapter. A ... the Y-adapter. Plug your stereo has only a PHONES jack, see instruction B. See page 21 for connecting instructions. Plug one end of the treadmill near the power cord. Plug one end of the audio cable into an AUDIO OUT jack on the front of the audio cable into the...

English Manual
Page 20
... on your computer has a 3.5mm LINE OUT jack, see instruction B. Plug the RCA Y-adapter into the included adapter. Plug the other end of the treadmill near the power cord. Plug one end of the audio cable into the jack on the front of the cable into the LINE OUT jack... A below. Plug the Y-adapter into the PHONES jack on your stereo and plug the wire into the LINE OUT jack on the front of the treadmill near the power cord. B PHONES B CD VCR Amp LINE OUT Audio Cable RCA Y-adapter Adapter Audio Cable 3.5mm Y-adapter Headphones/Speakers Wire removed from ...
... on your computer has a 3.5mm LINE OUT jack, see instruction B. Plug the RCA Y-adapter into the included adapter. Plug the other end of the treadmill near the power cord. Plug one end of the audio cable into the jack on the front of the cable into the LINE OUT jack... A below. Plug the Y-adapter into the PHONES jack on your stereo and plug the wire into the LINE OUT jack on the front of the treadmill near the power cord. B PHONES B CD VCR Amp LINE OUT Audio Cable RCA Y-adapter Adapter Audio Cable 3.5mm Y-adapter Headphones/Speakers Wire removed from ...

English Manual
Page 21
... iFIT.com CD or video program, press the iFIT.com button or press the Select Program button repeatedly until the indicator on page 19. The treadmill will light. CAUTION: Always listen for speed and/or incline changes. In some instances, the speed and/or incline may change before the personal... trainer describes the change . HOW TO USE IFIT.COM CD AND VIDEO PROGRAMS To use iFIT.com CD's or videocassettes, the treadmill must be prepared for the "chirp" and be connected to your portable CD player, portable stereo, home stereo, computer with a built-in VCR, see...
... iFIT.com CD or video program, press the iFIT.com button or press the Select Program button repeatedly until the indicator on page 19. The treadmill will light. CAUTION: Always listen for speed and/or incline changes. In some instances, the speed and/or incline may change before the personal... trainer describes the change . HOW TO USE IFIT.COM CD AND VIDEO PROGRAMS To use iFIT.com CD's or videocassettes, the treadmill must be prepared for the "chirp" and be connected to your portable CD player, portable stereo, home stereo, computer with a built-in VCR, see...


