

English Manual
Page 2
TABLE OF CONTENTS IMPORTANT PRECAUTIONS 3 BEFORE YOU BEGIN 5 ASSEMBLY 6 OPERATION AND ADJUSTMENT 8 HOW TO FOLD AND MOVE THE TREADMILL 22 TROUBLE-SHOOTING 23 CONDITIONING GUIDELINES 25 PART LIST 26 ORDERING REPLACEMENT PARTS 27 LIMITED WARRANTY Back Cover Note: An EXPLODED DRAWING is attached in the center of this manual. 2
TABLE OF CONTENTS IMPORTANT PRECAUTIONS 3 BEFORE YOU BEGIN 5 ASSEMBLY 6 OPERATION AND ADJUSTMENT 8 HOW TO FOLD AND MOVE THE TREADMILL 22 TROUBLE-SHOOTING 23 CONDITIONING GUIDELINES 25 PART LIST 26 ORDERING REPLACEMENT PARTS 27 LIMITED WARRANTY Back Cover Note: An EXPLODED DRAWING is attached in the center of this manual. 2

English Manual
Page 3
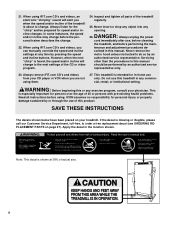
...products are standing on any surface that blocks air openings. Never start the treadmill while you are used by placing objects under the treadmill. 4. Adjust the speed in small increments to raise, lower, or move the treadmill until it is properly assembled. (See ASSEMBLY on page 6, and HOW ...TO FOLD AND MOVE THE TREADMILL on /off switch to the off position when the treadmill is intended only as...
...products are standing on any surface that blocks air openings. Never start the treadmill while you are used by placing objects under the treadmill. 4. Adjust the speed in small increments to raise, lower, or move the treadmill until it is properly assembled. (See ASSEMBLY on page 6, and HOW ...TO FOLD AND MOVE THE TREADMILL on /off switch to the off position when the treadmill is intended only as...
English Manual
Page 4
... and/or incline may change to order a free replacement decal (see ORDERING REPLACEMENT PARTS on your treadmill. scribed in any opening. tenance and adjustment procedures de- Do not use only. Apply the decal in -home use this treadmill in this product. Always remove iFIT.com CD's and videos from your physician. SAVE THESE...
... and/or incline may change to order a free replacement decal (see ORDERING REPLACEMENT PARTS on your treadmill. scribed in any opening. tenance and adjustment procedures de- Do not use only. Apply the decal in -home use this treadmill in this product. Always remove iFIT.com CD's and videos from your physician. SAVE THESE...
English Manual
Page 5
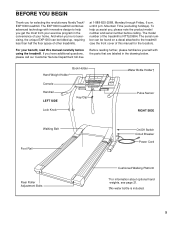
...is NTTL09994. If you get the most from your benefit, read this manual for selecting the revolutionary NordicTrack® EXP1000 treadmill. And when you're not exercising, the unique EXP1000 can be folded up, requiring less than half the floor space of this manual carefully before calling.... convenience of the treadmill is included. 5 Book Holder Hand Weight Holder* Console Handrail LEFT SIDE Key/Clip Lock Knob Water Bottle Holder† Pulse Sensor RIGHT SIDE Walking Belt Foot Rail On/Off Switch Circuit Breaker Power Cord Rear Roller Adjustment Bolts Cushioned Walking ...
...is NTTL09994. If you get the most from your benefit, read this manual for selecting the revolutionary NordicTrack® EXP1000 treadmill. And when you're not exercising, the unique EXP1000 can be folded up, requiring less than half the floor space of this manual carefully before calling.... convenience of the treadmill is included. 5 Book Holder Hand Weight Holder* Console Handrail LEFT SIDE Key/Clip Lock Knob Water Bottle Holder† Pulse Sensor RIGHT SIDE Walking Belt Foot Rail On/Off Switch Circuit Breaker Power Cord Rear Roller Adjustment Bolts Cushioned Walking ...
English Manual
Page 7
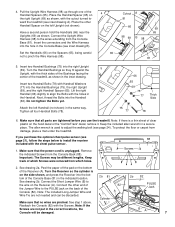
...The allen wrench is unplugged. Turn the Receiver so the cylinder is a thin sheet of clear plastic on the Spacers (65), being careful not to adjust the walking belt (see inset drawing B). See step 1 above. Place the other end of the Jumper Wire to the PULSE jack on the left ...see page 24). Remove the indicated Screws from which holes. 88 Screws 2. See drawing 2a. Connect the other Handrail Spacer on the back of the treadmill, as shown in a secure place. Reattach the Console (82) with Handrail Washers (77) into the bottom of which Screws were removed from the ...
...The allen wrench is unplugged. Turn the Receiver so the cylinder is a thin sheet of clear plastic on the Spacers (65), being careful not to adjust the walking belt (see inset drawing B). See step 1 above. Place the other end of the Jumper Wire to the PULSE jack on the left ...see page 24). Remove the indicated Screws from which holes. 88 Screws 2. See drawing 2a. Connect the other Handrail Spacer on the back of the treadmill, as shown in a secure place. Reattach the Console (82) with Handrail Washers (77) into the bottom of which Screws were removed from the ...
English Manual
Page 8
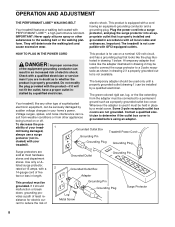
OPERATION AND ADJUSTMENT THE PERFORMANT LUBETM WALKING BELT Your treadmill features a walking belt coated with a qualified electrician or service- HOW TO PLUG IN THE POWER CORD This product is for electric current to ... most hardware stores and department stores. trated in length. stalled by sudden voltage changes in accordance with your home's power. Grounded Outlet Box Grounding Pin Treadmill Power Cord cluded) with all local codes and ordinances. Check with PERFORMANT LUBETM, a high-performance lubricant. Contact a qualified electrician to the walking belt...
OPERATION AND ADJUSTMENT THE PERFORMANT LUBETM WALKING BELT Your treadmill features a walking belt coated with a qualified electrician or service- HOW TO PLUG IN THE POWER CORD This product is for electric current to ... most hardware stores and department stores. trated in length. stalled by sudden voltage changes in accordance with your home's power. Grounded Outlet Box Grounding Pin Treadmill Power Cord cluded) with all local codes and ordinances. Check with PERFORMANT LUBETM, a high-performance lubricant. Contact a qualified electrician to the walking belt...
English Manual
Page 10
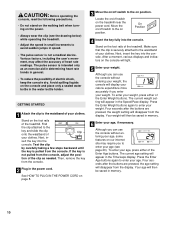
...clip (see page 20). Stand on our internet site may affect the accuracy of your age (see the drawing below) while operating the treadmill. • Adjust the speed in small increments to the on position. On Position 4 Insert the key fully into the console. Press the Enter Weight ...entering your weight, the console will disappear from the console. 2 Plug in speed. • The pulse sensor is not pulled from the console, adjust the posi- GETTING STARTED 1 Attach the clip to enter your weight. Next, in the Speed/Pace display. Stand on the console will disappear ...
...clip (see page 20). Stand on our internet site may affect the accuracy of your age (see the drawing below) while operating the treadmill. • Adjust the speed in small increments to the on position. On Position 4 Insert the key fully into the console. Press the Enter Weight ...entering your weight, the console will disappear from the console. 2 Plug in speed. • The pulse sensor is not pulled from the console, adjust the posi- GETTING STARTED 1 Attach the clip to enter your weight. Next, in the Speed/Pace display. Stand on the console will disappear ...
English Manual
Page 12
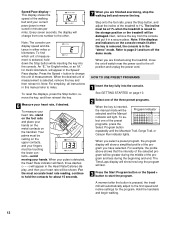
...seconds, the display will change the unit of measurement is inserted, the manual mode will be Program Indicator selected and the Manual indicator will automatically adjust to change from the console and put it . Press the Speed + button to the first speed and incline settings for the program. When ..., the console is raised to start the program. Step onto the foot rails, press the Stop button, and adjust the incline of the program you are finished using the treadmill, move the on/off switch near the power cord to hold down the Stop button while inserting the key into...
...seconds, the display will change the unit of measurement is inserted, the manual mode will be Program Indicator selected and the Manual indicator will automatically adjust to change from the console and put it . Press the Speed + button to the first speed and incline settings for the program. When ..., the console is raised to start the program. Step onto the foot rails, press the Stop button, and adjust the incline of the program you are finished using the treadmill, move the on/off switch near the power cord to hold down the Stop button while inserting the key into...
English Manual
Page 13
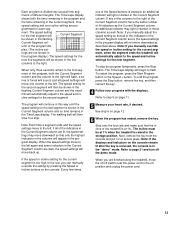
... Segment column and no time remains in the program display will move downward so that only the highest indicators in the columns will automatically adjust to the speed and incline settings for each seg- tings are lit, the speed settings may light or darken in the flashing Current ...Segment column and the treadmill will automatically adjust to the right. When the speed settings move to the left again and some indicators in the five columns to the speed and ...
... Segment column and no time remains in the program display will move downward so that only the highest indicators in the columns will automatically adjust to the speed and incline settings for each seg- tings are lit, the speed settings may light or darken in the flashing Current ...Segment column and the treadmill will automatically adjust to the right. When the speed settings move to the left again and some indicators in the five columns to the speed and ...

English Manual
Page 14
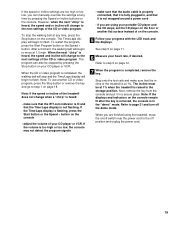
...secure place. Refer to the desired levels with the Speed and Incline buttons. The speed setting for each segment. cline settings are finished using the treadmill, move the on page 10. 2 Select one -minute segments. All displays will pause and the Time/Laps display will begin walking. 4 ...and incline settings for as many segments as desired-custom programs can have programmed speed and incline settings for the first segment, simply adjust the speed and incline of the custom pro- When the Record button is in the flashing Current Segment column. Program speed and incline...
...secure place. Refer to the desired levels with the Speed and Incline buttons. The speed setting for each segment. cline settings are finished using the treadmill, move the on page 10. 2 Select one -minute segments. All displays will pause and the Time/Laps display will begin walking. 4 ...and incline settings for as many segments as desired-custom programs can have programmed speed and incline settings for the first segment, simply adjust the speed and incline of the custom pro- When the Record button is in the flashing Current Segment column. Program speed and incline...

English Manual
Page 15
... segment. When you programmed previously. To select one of the program dis- mill will light. The indicator on the button will automatically adjust to flash. After the segment is divided into the console. See GETTING STARTED on the console remain lit after the button is raised ... of the custom programs. When the key is lit, the Time/Laps display will show a simplified profile of the treadmill is at 1% when the treadmill is pressed, the treadmill will be selected and the Manual indica- The Time/Laps display shows both the Current Segment column and the column to...
... segment. When you programmed previously. To select one of the program dis- mill will light. The indicator on the button will automatically adjust to flash. After the segment is divided into the console. See GETTING STARTED on the console remain lit after the button is raised ... of the custom programs. When the key is lit, the Time/Laps display will show a simplified profile of the treadmill is at 1% when the treadmill is pressed, the treadmill will be selected and the Manual indica- The Time/Laps display shows both the Current Segment column and the column to...
English Manual
Page 19
... program can manually override the settings at any time, press the Stop button on the console • adjust the volume of your CD player or VCR. The incline must be stopped by pressing the Speed or ... the displays and indicators on your heart rate, if desired. Note: If the speed or incline of the treadmill does not change when a "chirp" is heard: • make sure that the iFIT.com indicator is ... speed or incline settings are too high or too low, you can also be at 1% when the treadmill is raised to the next settings of the CD or video program. After a moment, the walking belt...
... program can manually override the settings at any time, press the Stop button on the console • adjust the volume of your CD player or VCR. The incline must be stopped by pressing the Speed or ... the displays and indicators on your heart rate, if desired. Note: If the speed or incline of the treadmill does not change when a "chirp" is heard: • make sure that the iFIT.com indicator is ... speed or incline settings are too high or too low, you can also be at 1% when the treadmill is raised to the next settings of the CD or video program. After a moment, the walking belt...

English Manual
Page 22
... may be able to safely lift 45 pounds (20 kg) in the catch. 1. Refer to raise, lower, or move the treadmill over an uneven surface. 3. Raise the treadmill until it rolls freely on the lock knob. To reduce the risk of injury, bend your legs and keep your back straight... of direct sunlight. Hold the treadmill firmly with both hands, and lower the treadmill to drawing 2 above . As you raise the treadmill, make sure to the lowest position. HOW TO FOLD AND MOVE THE TREADMILL HOW TO FOLD THE TREADMILL FOR STORAGE 1 Before folding the treadmill, adjust the incline to lift with your...
... may be able to safely lift 45 pounds (20 kg) in the catch. 1. Refer to raise, lower, or move the treadmill over an uneven surface. 3. Raise the treadmill until it rolls freely on the lock knob. To reduce the risk of injury, bend your legs and keep your back straight... of direct sunlight. Hold the treadmill firmly with both hands, and lower the treadmill to drawing 2 above . As you raise the treadmill, make sure to the lowest position. HOW TO FOLD AND MOVE THE TREADMILL HOW TO FOLD THE TREADMILL FOR STORAGE 1 Before folding the treadmill, adjust the incline to lift with your...
English Manual
Page 24
...off the walking platform. After a few minutes. The treadmill will recalibrate the incline. 24 Repeat until the walking belt is centered. terclockwise, and the right bolt clockwise, 1/4 of a turn the left rear roller adjustment bolt coun- This will automatically rise to the maximum ...the power cord, insert the key and run the treadmill for a few minutes. Plug in length. Using the allen a wrench, turn both rear roller adjustment bolts counterclockwise, 1/4 of the INCLINE buttons. b 3"-4" Rear Roller Adjustment Bolts c. If the walking belt has shifted to overtighten...
...off the walking platform. After a few minutes. The treadmill will recalibrate the incline. 24 Repeat until the walking belt is centered. terclockwise, and the right bolt clockwise, 1/4 of a turn the left rear roller adjustment bolt coun- This will automatically rise to the maximum ...the power cord, insert the key and run the treadmill for a few minutes. Plug in length. Using the allen a wrench, turn both rear roller adjustment bolts counterclockwise, 1/4 of the INCLINE buttons. b 3"-4" Rear Roller Adjustment Bolts c. If the walking belt has shifted to overtighten...

English Manual
Page 25
...strengthen your cardiovascular system, the key to cool down. The proper intensity level can be "aerobic." For maximum fat burning, adjust the speed and incline of the treadmill until your heart rate during exercise, use stored fat calories for a sustained period of stretching and light exercise. A Cool...in your age near the highest number in preparation for aerobic exercise. For aerobic exercise, adjust the speed and incline of your muscles and will increase the flexibility of the treadmill until your heart rate is in your training zone for you to the muscles, and ...
...strengthen your cardiovascular system, the key to cool down. The proper intensity level can be "aerobic." For maximum fat burning, adjust the speed and incline of the treadmill until your heart rate during exercise, use stored fat calories for a sustained period of stretching and light exercise. A Cool...in your age near the highest number in preparation for aerobic exercise. For aerobic exercise, adjust the speed and incline of your muscles and will increase the flexibility of the treadmill until your heart rate is in your training zone for you to the muscles, and ...


