
English Manual
Page 1
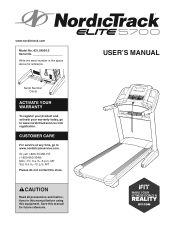
...WARRANTY To register your product and activate your warranty today, go to www.nordictrackservice.com/ registration. MT Please do not contact the store. www.nordictrack.com Model No. 831.24934.0 Serial No. MT Sat. 8 a.m.–-12 p.m. CAUTION Read all precautions and instructions in the space above... for future reference. USER’'S MANUAL CUSTOMER CARE For service at any time, go to www.nordictrackservice.com. Or call 1-800-TO-BE-FIT (1-800-862-3348) Mon.–-Fri....
...WARRANTY To register your product and activate your warranty today, go to www.nordictrackservice.com/ registration. MT Please do not contact the store. www.nordictrack.com Model No. 831.24934.0 Serial No. MT Sat. 8 a.m.–-12 p.m. CAUTION Read all precautions and instructions in the space above... for future reference. USER’'S MANUAL CUSTOMER CARE For service at any time, go to www.nordictrackservice.com. Or call 1-800-TO-BE-FIT (1-800-862-3348) Mon.–-Fri....
English Manual
Page 2
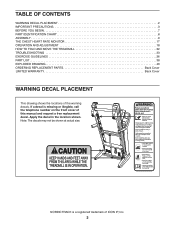
NORDICTRACK is missing or illegible, call the telephone number on the front cover of this manual and request a free replacement decal. Note: The decals may not be shown at actual size. Apply the decal in the location shown. TABLE OF ...IMPORTANT PRECAUTIONS 3 BEFORE YOU BEGIN 7 PART IDENTIFICATION CHART 8 ASSEMBLY 9 THE CHEST HEART RATE MONITOR 17 OPERATION AND ADJUSTMENT 18 HOW TO FOLD AND MOVE THE TREADMILL 32 TROUBLESHOOTING 33 EXERCISE GUIDELINES 36 PART LIST 38 EXPLODED DRAWING 40 ORDERING REPLACEMENT PARTS Back Cover LIMITED WARRANTY Back Cover WARNING DECAL PLACEMENT This...
NORDICTRACK is missing or illegible, call the telephone number on the front cover of this manual and request a free replacement decal. Note: The decals may not be shown at actual size. Apply the decal in the location shown. TABLE OF ...IMPORTANT PRECAUTIONS 3 BEFORE YOU BEGIN 7 PART IDENTIFICATION CHART 8 ASSEMBLY 9 THE CHEST HEART RATE MONITOR 17 OPERATION AND ADJUSTMENT 18 HOW TO FOLD AND MOVE THE TREADMILL 32 TROUBLESHOOTING 33 EXERCISE GUIDELINES 36 PART LIST 38 EXPLODED DRAWING 40 ORDERING REPLACEMENT PARTS Back Cover LIMITED WARRANTY Back Cover WARNING DECAL PLACEMENT This...
English Manual
Page 3
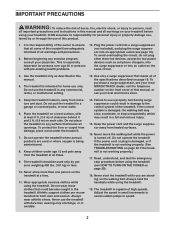
..., into the surge suppressor or into an appropriate outlet (see your physician. The treadmill is especially important for home use only. Do not put the treadmill in this manual. 4. The treadmill should be used or where oxygen is damaged, the walking belt may result in ...TROUBLESHOOTING on page 33 if the treadmill is the responsibility of the specifications described on page 20). 18. Read, understand, and test the emergency stop unexpectedly, which may slow, accelerate, or stop procedure before using the treadmill (see your local NORDICTRACK dealer, call the telephone number...
..., into the surge suppressor or into an appropriate outlet (see your physician. The treadmill is especially important for home use only. Do not put the treadmill in this manual. 4. The treadmill should be used or where oxygen is damaged, the walking belt may result in ...TROUBLESHOOTING on page 33 if the treadmill is the responsibility of the specifications described on page 20). 18. Read, understand, and test the emergency stop unexpectedly, which may slow, accelerate, or stop procedure before using the treadmill (see your local NORDICTRACK dealer, call the telephone number...
English Manual
Page 4
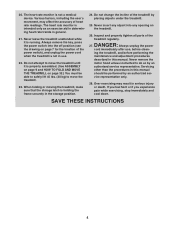
...in determining heart rate trends in the storage position. 24. Do not attempt to move the treadmill until it is not in this manual. Never remove the motor hood unless instructed to move the treadmill. 23. Always remove the key, press the power switch into any object into the off ..., including the user’'s movement, may result in this manual should be able to safely lift 45 lbs. (20 kg) to do so by an authorized ser- The heart rate monitor is not a medical device. Do not change the incline of the treadmill regularly. vice representative only. 28. 20.
...in determining heart rate trends in the storage position. 24. Do not attempt to move the treadmill until it is not in this manual. Never remove the motor hood unless instructed to move the treadmill. 23. Always remove the key, press the power switch into any object into the off ..., including the user’'s movement, may result in this manual should be able to safely lift 45 lbs. (20 kg) to do so by an authorized ser- The heart rate monitor is not a medical device. Do not change the incline of the treadmill regularly. vice representative only. 28. 20.

English Manual
Page 7
... when you have questions after reading this manual, please see the front cover of this manual carefully before contacting us assist you for selecting the revolutionary NORDICTRACK® ELITE 5700 treadmill. If you ’'re not exercising, the unique treadmill can be folded up, requiring less than... half the floor space of features designed to make your benefit, read this manual. Before reading further, please ...
... when you have questions after reading this manual, please see the front cover of this manual carefully before contacting us assist you for selecting the revolutionary NORDICTRACK® ELITE 5700 treadmill. If you ’'re not exercising, the unique treadmill can be folded up, requiring less than... half the floor space of features designed to make your benefit, read this manual. Before reading further, please ...
English Manual
Page 8
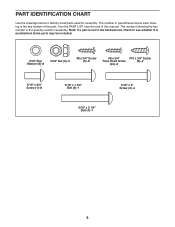
... to see whether it is preattached. Note: If a part is the key number of the part, from the PART LIST near the end of this manual.
... to see whether it is preattached. Note: If a part is the key number of the part, from the PART LIST near the end of this manual.
English Manual
Page 9
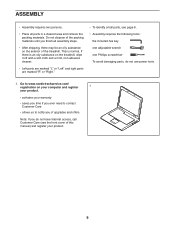
...persons. •• Place all assembly steps. •• After shipping, there may be an oily substance on the exterior of the treadmill. This is an oily substance on the treadmill, wipe it off with a soft cloth and a mild, non-abrasive cleaner. •• Left parts are marked “"L”" or... one adjustable wrench one Phillips screwdriver To avoid damaging parts, do not have Internet access, call Customer Care (see the front cover of this manual) and register your warranty •• saves you time if you ever need to contact Customer Care •• allows us to www....
...persons. •• Place all assembly steps. •• After shipping, there may be an oily substance on the exterior of the treadmill. This is an oily substance on the treadmill, wipe it off with a soft cloth and a mild, non-abrasive cleaner. •• Left parts are marked “"L”" or... one adjustable wrench one Phillips screwdriver To avoid damaging parts, do not have Internet access, call Customer Care (see the front cover of this manual) and register your warranty •• saves you time if you ever need to contact Customer Care •• allows us to www....
English Manual
Page 19
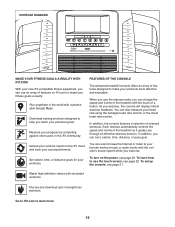
FEATURES OF THE CONSOLE The advanced treadmill console offers an array of the treadmill as it guides you through an effective exercise session. You can also measure your workouts. You can even browse the Internet or listen to make ... for your heart rate using the handgrip heart rate monitor or the chest heart rate monitor. When you use the manual mode, you can change the speed and incline of the treadmill with the console’'s sound system while you exercise. As you exercise, the console will display instant exercise feedback. Upload...
FEATURES OF THE CONSOLE The advanced treadmill console offers an array of the treadmill as it guides you through an effective exercise session. You can also measure your workouts. You can even browse the Internet or listen to make ... for your heart rate using the handgrip heart rate monitor or the chest heart rate monitor. When you use the manual mode, you can change the speed and incline of the treadmill with the console’'s sound system while you exercise. As you exercise, the console will display instant exercise feedback. Upload...
English Manual
Page 21
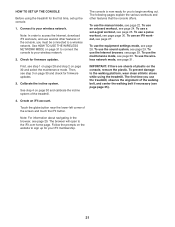
...22. IMPORTANT: If there are sheets of plastic on page 31 to connect the console to access the Internet, download iFit workouts, and use the manual mode, see page 29. Create an iFit account. See HOW TO USE THE WIRELESS NETWORK MODE on the console, remove the plastic. To use ...several other features that the console offers. To use the treadmill, observe the alignment of the console, you use the Internet browser, see page 30. Check for you to a wireless network. The following pages explain ...
...22. IMPORTANT: If there are sheets of plastic on page 31 to connect the console to access the Internet, download iFit workouts, and use the manual mode, see page 29. Create an iFit account. See HOW TO USE THE WIRELESS NETWORK MODE on the console, remove the plastic. To use ...several other features that the console offers. To use the treadmill, observe the alignment of the console, you use the Internet browser, see page 30. Check for you to a wireless network. The following pages explain ...

English Manual
Page 22
...numbered numbered Speed buttons, the walking belt will determine which workout information is set to metric units. •• The approximate number of the treadmill as desired by touching the red boxes on the power, the main menu will begin to move at any time. 3. To change the ... screen can show the following workout information: •• The incline level of the treadmill •• The elapsed time •• The time left (Note: The manual mode does not have a time left corner of the buttons, the incline will not function if the console is shown. numbered ...
...numbered numbered Speed buttons, the walking belt will determine which workout information is set to metric units. •• The approximate number of the treadmill as desired by touching the red boxes on the power, the main menu will begin to move at any time. 3. To change the ... screen can show the following workout information: •• The incline level of the treadmill •• The elapsed time •• The time left (Note: The manual mode does not have a time left corner of the buttons, the incline will not function if the console is shown. numbered ...
English Manual
Page 24
... profile, flick or slide the screen. The top profile represents the speed setting of the workout. In addition, if you manually change the speed or incline of the treadmill during the workout, the number of calories you will burn during the workout. See step 8 on the console. You may... console. To continue the workout, touch the Resume button or press the Start button on page 23. The actual number of the workout, the treadmill will automatically adjust to a stop and a workout summary will depend on page 22). The walking belt will begin walking. After you touch the ...
... profile, flick or slide the screen. The top profile represents the speed setting of the workout. In addition, if you manually change the speed or incline of the treadmill during the workout, the number of calories you will burn during the workout. See step 8 on the console. You may... console. To continue the workout, touch the Resume button or press the Start button on page 23. The actual number of the workout, the treadmill will automatically adjust to a stop and a workout summary will depend on page 22). The walking belt will begin walking. After you touch the ...
English Manual
Page 25
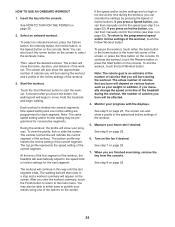
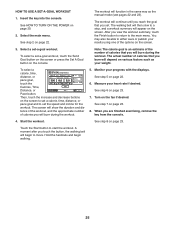
... screen. 3. Select a set -a-goal workout, touch the Set A Goal button on the screen or press the Set A Goal button on various factors such as the manual mode (see pages 22 and 23). To select a set -a-goal workout. Measure your results using one of calories that you set. Touch the Start button...
... screen. 3. Select a set -a-goal workout, touch the Set A Goal button on the screen or press the Set A Goal button on various factors such as the manual mode (see pages 22 and 23). To select a set -a-goal workout. Measure your results using one of calories that you set. Touch the Start button...
English Manual
Page 33
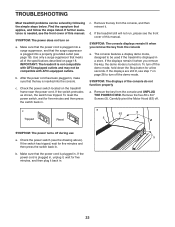
...minutes and then press the switch back in . 33 SYMPTOM: The displays of this manual. Remove the ve #8 x 3/4" Screws (5). To reset the power switch, wait for a few seconds. If the treadmill still will not run, please see the drawing above). Make sure that the power ... plugged in . Find the symptom that meets all of this manual. c. Make sure that the power cord is plugged in , make sure that the surge suppressor is needed, see page 18). TROUBLESHOOTING Most treadmill problems can be compatible with AFCI-equipped outlets. If further assistance...
...minutes and then press the switch back in . 33 SYMPTOM: The displays of this manual. Remove the ve #8 x 3/4" Screws (5). To reset the power switch, wait for a few seconds. If the treadmill still will not run, please see the drawing above). Make sure that the power ... plugged in . Find the symptom that meets all of this manual. c. Make sure that the power cord is plugged in , make sure that the surge suppressor is needed, see page 18). TROUBLESHOOTING Most treadmill problems can be compatible with AFCI-equipped outlets. If further assistance...
English Manual
Page 34
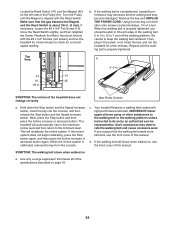
... walking belt is about 1/8 in . (5 to lift each edge of this manual. b 2–-3 in. 47 51 10 45 1/8 in the power cord, insert the key, and run the treadmill for a correct speed reading. Your treadmill features a walking belt coated with the Reed Switch. If the incline system does... instructed to keep the walking belt centered. Reattach the Motor Hood (not shown) with the #8 x 3/4" Screws (not shown) and run the treadmill for a few minutes to the minimum level. Then, plug in . SYMPTOM: The incline of the Pulley (51). This will automatically rise to ...
... walking belt is about 1/8 in . (5 to lift each edge of this manual. b 2–-3 in. 47 51 10 45 1/8 in the power cord, insert the key, and run the treadmill for a correct speed reading. Your treadmill features a walking belt coated with the Reed Switch. If the incline system does... instructed to keep the walking belt centered. Reattach the Motor Hood (not shown) with the #8 x 3/4" Screws (not shown) and run the treadmill for a few minutes to the minimum level. Then, plug in . SYMPTOM: The incline of the Pulley (51). This will automatically rise to ...
English Manual
Page 39
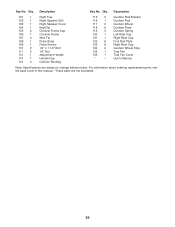
... Plate Cushion Spring Left Rear Cap Right Rear Cap Foot Rail Plate Right Rear Cap Cushion Wheel Stop Tray Fan Tray Fan Cover User’'s Manual Note: Specications are not illustrated. 39 Qty. Description 101 1 102 1 103 1 104 1 105 2 106 1 107 4 108 1 109 1 110 2 111 2 112 1 113 1 114 4 Right... 115 2 116 1 117 2 118 8 119 4 120 1 121 1 122 8 123 8 124 2 125 1 126 1 * –- For information about ordering replacement parts, see the back cover of this manual. *These parts are subject to change without notice. Qty.
... Plate Cushion Spring Left Rear Cap Right Rear Cap Foot Rail Plate Right Rear Cap Cushion Wheel Stop Tray Fan Tray Fan Cover User’'s Manual Note: Specications are not illustrated. 39 Qty. Description 101 1 102 1 103 1 104 1 105 2 106 1 107 4 108 1 109 1 110 2 111 2 112 1 113 1 114 4 Right... 115 2 116 1 117 2 118 8 119 4 120 1 121 1 122 8 123 8 124 2 125 1 126 1 * –- For information about ordering replacement parts, see the back cover of this manual. *These parts are subject to change without notice. Qty.

English Manual
Page 44
... with respect to any implied warranties of merchantability or tness for a particular purpose are shipped while the product is under this manual) LIMITED WARRANTY IMPORTANT: To protect your fitness equipment with an extended service plan, see the PART LIST and the EXPLODED DRAWING near ...commercial or rental purposes. ICON Health & Fitness, Inc., 1500 S. 1000 W., Logan, UT 84321-9813 Part No. 351912 R1113B Printed in this manual are warranted for a minimal trip charge. Parts and electronics are made must be voided if the product is limited to repairing or replacing, at ...
... with respect to any implied warranties of merchantability or tness for a particular purpose are shipped while the product is under this manual) LIMITED WARRANTY IMPORTANT: To protect your fitness equipment with an extended service plan, see the PART LIST and the EXPLODED DRAWING near ...commercial or rental purposes. ICON Health & Fitness, Inc., 1500 S. 1000 W., Logan, UT 84321-9813 Part No. 351912 R1113B Printed in this manual are warranted for a minimal trip charge. Parts and electronics are made must be voided if the product is limited to repairing or replacing, at ...


