
English Manual
Page 2
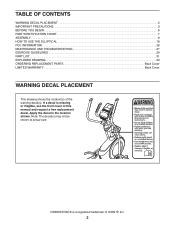
... size. NORDICTRACK is missing or illegible, see the front cover of this manual and request a free replacement decal. TABLE OF CONTENTS WARNING DECAL PLACEMENT 2 IMPORTANT PRECAUTIONS 3 BEFORE YOU BEGIN 6 PART IDENTIFICATION CHART 7 ASSEMBLY 8 HOW TO USE THE ELLIPTICAL 18 FCC... INFORMATION 26 MAINTENANCE AND TROUBLESHOOTING 27 EXERCISE GUIDELINES 29 PART LIST 31 EXPLODED DRAWING 33 ORDERING REPLACEMENT PARTS Back Cover LIMITED WARRANTY Back Cover WARNING ...
... size. NORDICTRACK is missing or illegible, see the front cover of this manual and request a free replacement decal. TABLE OF CONTENTS WARNING DECAL PLACEMENT 2 IMPORTANT PRECAUTIONS 3 BEFORE YOU BEGIN 6 PART IDENTIFICATION CHART 7 ASSEMBLY 8 HOW TO USE THE ELLIPTICAL 18 FCC... INFORMATION 26 MAINTENANCE AND TROUBLESHOOTING 27 EXERCISE GUIDELINES 29 PART LIST 31 EXPLODED DRAWING 33 ORDERING REPLACEMENT PARTS Back Cover LIMITED WARRANTY Back Cover WARNING ...
English Manual
Page 3
... a garage or covered patio, or near water. 6. Place the elliptical on the elliptical. Before beginning any worn parts immediately. 8. The elliptical is intended for foot protection while exercising. 3. The elliptical does not have a freewheel; do not arch your back straight while using the elliptical. 4. Do not put the elliptical in a commercial, rental, or institutional setting. 5. Hold the...
... a garage or covered patio, or near water. 6. Place the elliptical on the elliptical. Before beginning any worn parts immediately. 8. The elliptical is intended for foot protection while exercising. 3. The elliptical does not have a freewheel; do not arch your back straight while using the elliptical. 4. Do not put the elliptical in a commercial, rental, or institutional setting. 5. Hold the...
English Manual
Page 6
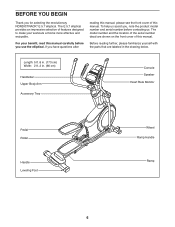
... familiarize yourself with the parts that are shown on the front cover of features designed to make your benefit, read this manual. The E 5.7 elliptical provides an impressive selection of this manual. If you , note the product model number and serial number before you for selecting the revolutionary NORDICTRACK® E 5.7 elliptical. To help us . The.... 8 in. (173 cm) Width: 2 ft. 2 in the drawing below. For your workouts at home more effective and enjoyable. BEFORE YOU BEGIN Thank you use the elliptical.
... familiarize yourself with the parts that are shown on the front cover of features designed to make your benefit, read this manual. The E 5.7 elliptical provides an impressive selection of this manual. If you , note the product model number and serial number before you for selecting the revolutionary NORDICTRACK® E 5.7 elliptical. To help us . The.... 8 in. (173 cm) Width: 2 ft. 2 in the drawing below. For your workouts at home more effective and enjoyable. BEFORE YOU BEGIN Thank you use the elliptical.

English Manual
Page 7
The number in the hardware kit, check to identify the small parts needed for assembly. Extra parts may be included. Note: If a part is not in parentheses below to see if it has been preassembled. M5 Washer (32)–-2 M8 Washer (97)–-8 M10 Split Washer (105)–-8 ... Bolt (96)–-4 M10 x 25mm Screw (92)–-4 M10 x 122mm Screw (104)–-4 7 The number following the key number is the quantity needed for assembly. PART IDENTIFICATION CHART Use the drawings below each drawing is the key number of the...
The number in the hardware kit, check to identify the small parts needed for assembly. Extra parts may be included. Note: If a part is not in parentheses below to see if it has been preassembled. M5 Washer (32)–-2 M8 Washer (97)–-8 M10 Split Washer (105)–-8 ... Bolt (96)–-4 M10 x 25mm Screw (92)–-4 M10 x 122mm Screw (104)–-4 7 The number following the key number is the quantity needed for assembly. PART IDENTIFICATION CHART Use the drawings below each drawing is the key number of the...
English Manual
Page 8
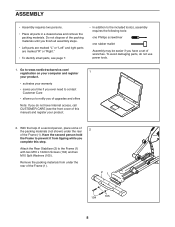
... and register 1 your product. •• activates your product. 2. Do not dispose of the packing materials until you nish all parts in a cleared area and remove the packing materials. Remove the packing materials from tipping while you complete this manual) and register your warranty &#...the Frame (1). Attach the Rear Stabilizer (2) to notify you of upgrades and offers Note: If you do not use power tools. 1. To avoid damaging parts, do not have a set of the Frame (1). 21 104 105 8 With the help of a second person, place some of the packing materials ...
... and register 1 your product. •• activates your product. 2. Do not dispose of the packing materials until you nish all parts in a cleared area and remove the packing materials. Remove the packing materials from tipping while you complete this manual) and register your warranty &#...the Frame (1). Attach the Rear Stabilizer (2) to notify you of upgrades and offers Note: If you do not use power tools. 1. To avoid damaging parts, do not have a set of the Frame (1). 21 104 105 8 With the help of a second person, place some of the packing materials ...
English Manual
Page 14
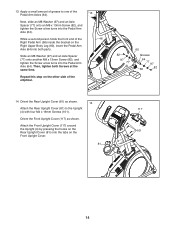
... Axle Spacer (77) onto an M8 x 13mm Screw (82), and tighten the Screw a few turns into both Screws at the same time. Then, tighten both parts. Attach the Front Upright Cover (117) around the Upright (4) by pressing the hooks on the Rear Upright Cover (81) onto the tabs on the Right... into the Pedal Arm Axle (64). Orient the Front Upright Cover (117) as shown. 14 Attach the Rear Upright Cover (81) to one of the elliptical. 82 97 77 60 Grease 64 77 97 58 82 14. While a second person holds the front end of the 46 Right Pedal Arm (58...
... Axle Spacer (77) onto an M8 x 13mm Screw (82), and tighten the Screw a few turns into both Screws at the same time. Then, tighten both parts. Attach the Front Upright Cover (117) around the Upright (4) by pressing the hooks on the Rear Upright Cover (81) onto the tabs on the Right... into the Pedal Arm Axle (64). Orient the Front Upright Cover (117) as shown. 14 Attach the Rear Upright Cover (81) to one of the elliptical. 82 97 77 60 Grease 64 77 97 58 82 14. While a second person holds the front end of the 46 Right Pedal Arm (58...

English Manual
Page 17
19. Note: Extra parts may be included. Place a mat beneath the elliptical to protect the floor. 17 Plug the Power Adapter (119) into the receptacle on the frame of the elliptical. 19 Note: To plug the Power Adapter (119) into an 119 outlet, see HOW TO PLUG IN THE POWER ADAPTER on page 18. 20. Make sure that all parts are properly tightened before you use the elliptical.
19. Note: Extra parts may be included. Place a mat beneath the elliptical to protect the floor. 17 Plug the Power Adapter (119) into the receptacle on the frame of the elliptical. 19 Note: To plug the Power Adapter (119) into an 119 outlet, see HOW TO PLUG IN THE POWER ADAPTER on page 18. 20. Make sure that all parts are properly tightened before you use the elliptical.

English Manual
Page 26
These limits are designed to provide reasonable protection against harmful interference in accordance with the limits for a Class B digital device, pursuant to part 15 of the following measures: •• Reorient or relocate the receiving antenna. •• Increase the separation between the equipment and the receiver. •&#...
These limits are designed to provide reasonable protection against harmful interference in accordance with the limits for a Class B digital device, pursuant to part 15 of the following measures: •• Reorient or relocate the receiving antenna. •• Increase the separation between the equipment and the receiver. •&#...
English Manual
Page 27
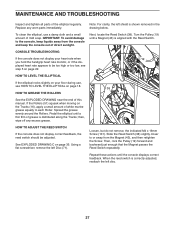
...left disc. 27 HOW TO GREASE THE ROLLERS See the EXPLODED DRAWING near the end of the elliptical regularly. Pedal the elliptical until the console displays correct feedback. then, wipe off any worn parts immediately. Then, rock the Pulley (19) forward and backward just enough that the Magnet passes ...and then retighten the Screw. Note: For clarity, the left Disc (71). Next, locate the Reed Switch (38). HOW TO LEVEL THE ELLIPTICAL If the elliptical rocks slightly on the Tracks (16), apply a small amount of white marine grease equally to or away from the console and keep the ...
...left disc. 27 HOW TO GREASE THE ROLLERS See the EXPLODED DRAWING near the end of the elliptical regularly. Pedal the elliptical until the console displays correct feedback. then, wipe off any worn parts immediately. Then, rock the Pulley (19) forward and backward just enough that the Magnet passes ...and then retighten the Screw. Note: For clarity, the left Disc (71). Next, locate the Reed Switch (38). HOW TO LEVEL THE ELLIPTICAL If the elliptical rocks slightly on the Tracks (16), apply a small amount of white marine grease equally to or away from the console and keep the ...
English Manual
Page 29
... body temperature, heart rate, and circulation in preparation for exercise. Remember, proper nutrition and adequate rest are rounded off to make exercise a regular and enjoyable part of rest between workouts. Burning Fat—-To burn fat effectively, you must perform aerobic exercise, which is not a medical device. For maximum fat burning...
... body temperature, heart rate, and circulation in preparation for exercise. Remember, proper nutrition and adequate rest are rounded off to make exercise a regular and enjoyable part of rest between workouts. Burning Fat—-To burn fat effectively, you must perform aerobic exercise, which is not a medical device. For maximum fat burning...

English Manual
Page 31
... M4 x 12mm Screw M4 Nut M8 x 16mm Screw M8 x 38mm Bolt M8 Washer Medium Snap Ring Plastic Spacer Leg Bearing 31 NTEL05011.5 R1212A Key No. PART LIST Key No. Qty. 1 1 2 1 3 1 4 1 5 8 6 1 7 1 8 1 9 1 10 1 11 1 12 1 13 1 14 1 15 1 16 2 17 1 18 1 19 1 20 2 21 4 22 1 23 3 24 1 25 1 26 4 27 2 28 1 29 1 30...
... M4 x 12mm Screw M4 Nut M8 x 16mm Screw M8 x 38mm Bolt M8 Washer Medium Snap Ring Plastic Spacer Leg Bearing 31 NTEL05011.5 R1212A Key No. PART LIST Key No. Qty. 1 1 2 1 3 1 4 1 5 8 6 1 7 1 8 1 9 1 10 1 11 1 12 1 13 1 14 1 15 1 16 2 17 1 18 1 19 1 20 2 21 4 22 1 23 3 24 1 25 1 26 4 27 2 28 1 29 1 30...

English Manual
Page 32
Qty. For information about ordering replacement parts, see the back cover of this manual. *These parts are subject to change without notice. Description Key No. Key No. Description 101 38 102 10 103 8 104 4 105 8 106 3 107 1 108 2 109 2 110 1 111 1 ...
Qty. For information about ordering replacement parts, see the back cover of this manual. *These parts are subject to change without notice. Description Key No. Key No. Description 101 38 102 10 103 8 104 4 105 8 106 3 107 1 108 2 109 2 110 1 111 1 ...

English Manual
Page 36
...the name of the product (see the front cover of this manual) •• the key number and description of the replacement part(s) (see the PART LIST and the EXPLODED DRAWING near the end of this warranty is limited to repairing or replacing, at ICON’'s option, the ... service, the customer will automatically be responsible for a lifetime. This warranty does not extend to freight damage to the original purchaser (customer). Parts and labor are warranted for a minimal handling charge. or other warranty beyond that vary from the service center will be the customer’'s ...
...the name of the product (see the front cover of this manual) •• the key number and description of the replacement part(s) (see the PART LIST and the EXPLODED DRAWING near the end of this warranty is limited to repairing or replacing, at ICON’'s option, the ... service, the customer will automatically be responsible for a lifetime. This warranty does not extend to freight damage to the original purchaser (customer). Parts and labor are warranted for a minimal handling charge. or other warranty beyond that vary from the service center will be the customer’'s ...


