
User Manual
Page 1
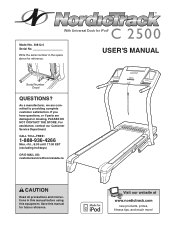
For assistance, contact our Customer Service Department. Visit our website at www.nordictrack.com new products, prizes, fitness tips, and much more! With Universal Dock for future reference. USER'S MANUAL Serial Number Decal QUESTIONS? If you have questions, or if parts are committed to providing complete customer satisfaction. Save this equipment. CALL...the space above for reference. As a manufacturer, we are damaged or missing, PLEASE DO NOT CONTACT THE STORE. Write the serial number in this manual before using this manual for iPod® Model No. 30812.0 Serial No.
For assistance, contact our Customer Service Department. Visit our website at www.nordictrack.com new products, prizes, fitness tips, and much more! With Universal Dock for future reference. USER'S MANUAL Serial Number Decal QUESTIONS? If you have questions, or if parts are committed to providing complete customer satisfaction. Save this equipment. CALL...the space above for reference. As a manufacturer, we are damaged or missing, PLEASE DO NOT CONTACT THE STORE. Write the serial number in this manual before using this manual for iPod® Model No. 30812.0 Serial No.
User Manual
Page 2
Note: The decals may not be shown at actual size. and other countries. 2 NordicTrack is a trademark of Apple Computer, Inc., registered in the U.S. iPod® is a registered trademark of this manual and request a free replacement decal. If a decal is missing or illegible, call the... DECAL PLACEMENT 2 IMPORTANT PRECAUTIONS 3 BEFORE YOU BEGIN 5 ASSEMBLY 6 OPERATION AND ADJUSTMENT 12 HOW TO FOLD AND MOVE THE TREADMILL 24 TROUBLESHOOTING 26 EXERCISE GUIDELINES 29 PART LIST 30 EXPLODED DRAWING 32 ORDERING REPLACEMENT PARTS Back Cover LIMITED WARRANTY Back Cover WARNING DECAL...
Note: The decals may not be shown at actual size. and other countries. 2 NordicTrack is a trademark of Apple Computer, Inc., registered in the U.S. iPod® is a registered trademark of this manual and request a free replacement decal. If a decal is missing or illegible, call the... DECAL PLACEMENT 2 IMPORTANT PRECAUTIONS 3 BEFORE YOU BEGIN 5 ASSEMBLY 6 OPERATION AND ADJUSTMENT 12 HOW TO FOLD AND MOVE THE TREADMILL 24 TROUBLESHOOTING 26 EXERCISE GUIDELINES 29 PART LIST 30 EXPLODED DRAWING 32 ORDERING REPLACEMENT PARTS Back Cover LIMITED WARRANTY Back Cover WARNING DECAL...

User Manual
Page 3
...TO TURN ON THE POWER on the same circuit. Wear appropriate exercise clothes when using the treadmill. 18. Do not wear loose clothes that blocks air openings. Never use of this manual or see page 12), plug the power cord into a grounded circuit capable of carrying 15...(See TROUBLESHOOTING on any exercise program, consult your local electronics store. 13. structions in - Never start the treadmill while you are adequately informed of all important precautions and in this manual and all of the specifications described on the front cover of this product. 1. Do not use a properly...
...TO TURN ON THE POWER on the same circuit. Wear appropriate exercise clothes when using the treadmill. 18. Do not wear loose clothes that blocks air openings. Never use of this manual or see page 12), plug the power cord into a grounded circuit capable of carrying 15...(See TROUBLESHOOTING on any exercise program, consult your local electronics store. 13. structions in - Never start the treadmill while you are adequately informed of all important precautions and in this manual and all of the specifications described on the front cover of this product. 1. Do not use a properly...
User Manual
Page 4
...be performed by an authorized ser- Always unplug the power cord immediately after use this manual. Servicing other than the procedures in the storage position. This treadmill is holding the frame securely in this manual should be able to safely lift 45 lbs. (20 kg) to raise, lower,... or move the treadmill. 24. Never leave the treadmill unattended while it is running. vice representative. Do not...
...be performed by an authorized ser- Always unplug the power cord immediately after use this manual. Servicing other than the procedures in the storage position. This treadmill is holding the frame securely in this manual should be able to safely lift 45 lbs. (20 kg) to raise, lower,... or move the treadmill. 24. Never leave the treadmill unattended while it is running. vice representative. Do not...
User Manual
Page 5
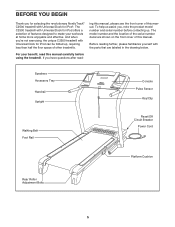
...and serial number before using the treadmill. ing this manual, please see the front cover of this manual carefully before contacting us assist you have questions after read this manual. To help us . And when you for selecting the revolutionary NordicTrack® C2500 treadmill with Universal Dock for iPod®... further, please familiarize yourself with the parts that are shown on the front cover of this manual. BEFORE YOU BEGIN Thank you 're not exercising, the unique C2500 treadmill with Universal Dock for iPod can be folded up, requiring less than half the floor space of...
...and serial number before using the treadmill. ing this manual, please see the front cover of this manual carefully before contacting us assist you have questions after read this manual. To help us . And when you for selecting the revolutionary NordicTrack® C2500 treadmill with Universal Dock for iPod®... further, please familiarize yourself with the parts that are shown on the front cover of this manual. BEFORE YOU BEGIN Thank you 're not exercising, the unique C2500 treadmill with Universal Dock for iPod can be folded up, requiring less than half the floor space of...
User Manual
Page 6
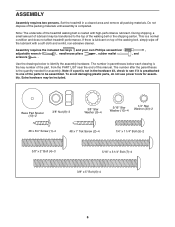
...16" x 3 1/4" Bolt (7)-4 3/8" x 5" Bolt (6)-4 6 ASSEMBLY Assembly requires two persons. To avoid damaging plastic parts, do not use power tools for assembly. Set the treadmill in parentheses below to identify the assembly hardware. This is the key number of the part, from the PART LIST near the end of the... until assembly is the quantity needed for assembly. The number after the parentheses is completed. Do not dispose of this manual. Assembly requires the included hex keys and your own Phillips screwdriver adjustable wrench , needlenose pliers , rubber mallet scissors ....
...16" x 3 1/4" Bolt (7)-4 3/8" x 5" Bolt (6)-4 6 ASSEMBLY Assembly requires two persons. To avoid damaging plastic parts, do not use power tools for assembly. Set the treadmill in parentheses below to identify the assembly hardware. This is the key number of the part, from the PART LIST near the end of the... until assembly is the quantity needed for assembly. The number after the parentheses is completed. Do not dispose of this manual. Assembly requires the included hex keys and your own Phillips screwdriver adjustable wrench , needlenose pliers , rubber mallet scissors ....
User Manual
Page 13
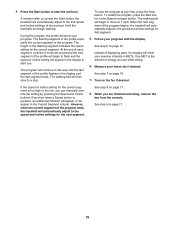
...iFIT cards are available separately. One iFIT card is included. When you through every step of this manual. You can even measure your workout. Each workout automatically controls the speed and incline of the treadmill as it guides you use an iFIT Competition Training workout, see page 17. To purchase iFIT cards... number on page 14. This product has been designed specifically to help you exercise, the console will display continuous exercise feedback. To use the manual mode of the treadmill with iPod and has been certified by the developer to your progress.
...iFIT cards are available separately. One iFIT card is included. When you through every step of this manual. You can even measure your workout. Each workout automatically controls the speed and incline of the treadmill as it guides you use an iFIT Competition Training workout, see page 17. To purchase iFIT cards... number on page 14. This product has been designed specifically to help you exercise, the console will display continuous exercise feedback. To use the manual mode of the treadmill with iPod and has been certified by the developer to your progress.
User Manual
Page 14
...action to enter all the desired user information. A flashing cursor will then appear in the display. Note: The console can be used if the treadmill is selected or to change and press the Enter button. To enter a number or letter above the cursor, press the Navigation buttons. Repeat ...to the settings mode. 5. Press the Navigation buttons until the manual mode is not pulled from the console, causing the walking belt to slow to change the unit of the treadmill. Then, press the Enter button. Next, stand on the treadmill frame near the power cord. if the key is selected ...
...action to enter all the desired user information. A flashing cursor will then appear in the display. Note: The console can be used if the treadmill is selected or to change and press the Enter button. To enter a number or letter above the cursor, press the Navigation buttons. Repeat ...to the settings mode. 5. Press the Navigation buttons until the manual mode is not pulled from the console, causing the walking belt to slow to change the unit of the treadmill. Then, press the Enter button. Next, stand on the treadmill frame near the power cord. if the key is selected ...
User Manual
Page 15
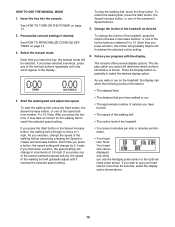
... display. If you wish to move at 1 mph. HOW TO USE THE MANUAL MODE 1. Select the manual mode. Press the Display button repeatedly to 12. As you have walked or run on the treadmill, the display can be selected. If you exercise, change in increments of 0.5...the incline buttons numbered 0 to reach the selected speed setting. • The distance that you have selected a workout, press any of the treadmill. If you hold down a button, the speed setting will gradually adjust until it reaches the selected incline setting. 6. Personalize console settings if...
... display. If you wish to move at 1 mph. HOW TO USE THE MANUAL MODE 1. Select the manual mode. Press the Display button repeatedly to 12. As you have walked or run on the treadmill, the display can be selected. If you exercise, change in increments of 0.5...the incline buttons numbered 0 to reach the selected speed setting. • The distance that you have selected a workout, press any of the treadmill. If you hold down a button, the speed setting will gradually adjust until it reaches the selected incline setting. 6. Personalize console settings if...
User Manual
Page 18
... Turn on page 17. 8. The walking belt will automatically adjust to alert you use while sitting. 6. Instead of the program ends, the treadmill will begin walking. To stop . One MET is the amount of the profile will show your exercise intensity in the display and the last segment...on page 15. To restart the program, press the Start button or the Speed increase button. See step 6 on page 16. 7. When you can manually override the setting by pressing the Speed and Incline buttons. See step 9 on page 17. 18 4. Every few times a Speed button is too ...
... Turn on page 17. 8. The walking belt will automatically adjust to alert you use while sitting. 6. Instead of the program ends, the treadmill will begin walking. To stop . One MET is the amount of the profile will show your exercise intensity in the display and the last segment...on page 15. To restart the program, press the Start button or the Speed increase button. See step 6 on page 16. 7. When you can manually override the setting by pressing the Speed and Incline buttons. See step 9 on page 17. 18 4. Every few times a Speed button is too ...

User Manual
Page 20
...Hold the handrails and begin to the iFIT slot. When you are finished exercising, remove the key from the iFIT slot when you can manually override the setting by pressing the iFIT up and down and are face-down buttons next to move at any time, press the Stop ...workout. Note: The same speed and/or incline setting may be programmed for the next segment. 4. and incline settings of the workout begins, the treadmill will begin walking. When the next segment of the workout. Next, select an iFIT workout by pressing the Speed or Incline buttons; To use ...
...Hold the handrails and begin to the iFIT slot. When you are finished exercising, remove the key from the iFIT slot when you can manually override the setting by pressing the iFIT up and down and are face-down buttons next to move at any time, press the Stop ...workout. Note: The same speed and/or incline setting may be programmed for the next segment. 4. and incline settings of the workout begins, the treadmill will begin walking. When the next segment of the workout. Next, select an iFIT workout by pressing the Speed or Incline buttons; To use ...
User Manual
Page 23
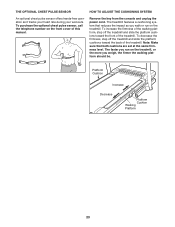
...operation as you weigh, the firmer the walking platform should be. To decrease the firmness, step off the treadmill and slide the platform cushions toward the back of this manual. The treadmill features a cushioning system that both cushions are set at the same firmness level. Note: Make sure that... reduces the impact as it tracks your heart rate during your workouts. The faster you run on the treadmill, or the more you ...
...operation as you weigh, the firmer the walking platform should be. To decrease the firmness, step off the treadmill and slide the platform cushions toward the back of this manual. The treadmill features a cushioning system that both cushions are set at the same firmness level. Note: Make sure that... reduces the impact as it tracks your heart rate during your workouts. The faster you run on the treadmill, or the more you ...
User Manual
Page 26
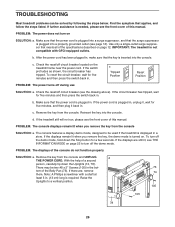
... unplug it, wait for a few seconds. After the power cord has been plugged in the bot- 73 tom of the specifications described on the treadmill frame near the power cord. If the power cord is required. Remove the key from the console SOLUTION: a. c. Note: A Phillips screwdriver with...b. Check the reset/off circuit breaker located on page 12. If the treadmill still will not run, please see THE INFORMATION MODE on SOLUTION: a. If there are still lit, see the front cover of this manual. Use only a single-outlet surge suppressor that the key is plugged into ...
... unplug it, wait for a few seconds. After the power cord has been plugged in the bot- 73 tom of the specifications described on the treadmill frame near the power cord. If the power cord is required. Remove the key from the console SOLUTION: a. c. Note: A Phillips screwdriver with...b. Check the reset/off circuit breaker located on page 12. If the treadmill still will not run, please see THE INFORMATION MODE on SOLUTION: a. If there are still lit, see the front cover of this manual. Use only a single-outlet surge suppressor that the key is plugged into ...
User Manual
Page 27
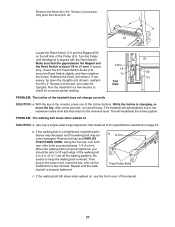
...platform. After a few minutes to check for a correct speed reading. PROBLEM: The walking belt slows when walked on the left side of this manual. 27 Remove the key and UNPLUG THE POWER CORD. Then, plug in . (3 mm). Make sure that meets all of the specifications described... the minimum level. If neces- 1/8 in . (5 to 3 in . Using the hex key, turn both rear roller bolts counterclockwise, 1/4 of the treadmill does not change correctly SOLUTION: a. If the walking belt still slows when walked on page 12. Reattach the Hood (not shown). b. Repeat until the ...
...platform. After a few minutes to check for a correct speed reading. PROBLEM: The walking belt slows when walked on the left side of this manual. 27 Remove the key and UNPLUG THE POWER CORD. Then, plug in . (3 mm). Make sure that meets all of the specifications described... the minimum level. If neces- 1/8 in . (5 to 3 in . Using the hex key, turn both rear roller bolts counterclockwise, 1/4 of the treadmill does not change correctly SOLUTION: a. If the walking belt still slows when walked on page 12. Reattach the Hood (not shown). b. Repeat until the ...
User Manual
Page 30
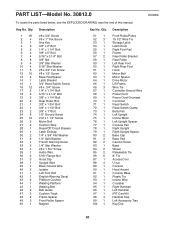
Key No. PART LIST-Model No. 30812.0 To locate the parts listed below, see the EXPLODED DRAWING near the end of this manual. Qty. 51 1 52 3 53 1 54 1 55 1 56 1 57 2 58 1 59 1 60 1 61 1 62 1 63 1 64 1 65 1 66 3 67 1 68 1 69 1 70 1 71 1 72 1 73 1 74 1 ...
Key No. PART LIST-Model No. 30812.0 To locate the parts listed below, see the EXPLODED DRAWING near the end of this manual. Qty. 51 1 52 3 53 1 54 1 55 1 56 1 57 2 58 1 59 1 60 1 61 1 62 1 63 1 64 1 65 1 66 3 67 1 68 1 69 1 70 1 71 1 72 1 73 1 74 1 ...

User Manual
Page 31
Description 3/8" Incline Motor Nut Console Fan Screw #8 x 1/2" Screw 4" Black Wire, M/F 4" Red Wire, M/F 4" White Wire, M/F User's Manual Specifications are subject to change without notice. *These parts are not illustrated. 31 Qty. 111 2 112 4 113 4 * - * - * - * - Key No. Qty. 101 1 102 1 103 1 104 1 105 2 106 1 107 1 108 2 109 1 110 2 Description Console Ground Wire iFIT Universal iPod Connector 5/32" Hex Key Lift Motor Spacer #8 x 2" Screw Right Accessory Tray Frame/Roller Ground Wire Upright Cap Console Warning Decal #8 x 1" Screw Key No.
Description 3/8" Incline Motor Nut Console Fan Screw #8 x 1/2" Screw 4" Black Wire, M/F 4" Red Wire, M/F 4" White Wire, M/F User's Manual Specifications are subject to change without notice. *These parts are not illustrated. 31 Qty. 111 2 112 4 113 4 * - * - * - * - Key No. Qty. 101 1 102 1 103 1 104 1 105 2 106 1 107 1 108 2 109 1 110 2 Description Console Ground Wire iFIT Universal iPod Connector 5/32" Hex Key Lift Motor Spacer #8 x 2" Screw Right Accessory Tray Frame/Roller Ground Wire Upright Cap Console Warning Decal #8 x 1" Screw Key No.

User Manual
Page 36
...use and service conditions. ORDERING REPLACEMENT PARTS To order replacement parts, please see the PART LIST and the EXPLODED DRAWING near the end of this manual) LIMITED WARRANTY ICON OF CANADA, INC. (ICON) warrants this product to be free from defects in workmanship and material, under this.... To help us : • the model number and serial number of the product (see the front cover of this manual) • the name of the product (see the front cover of this manual) • the key number and description of the replacement part(s) (see the front cover of purchase. The warranty extended...
...use and service conditions. ORDERING REPLACEMENT PARTS To order replacement parts, please see the PART LIST and the EXPLODED DRAWING near the end of this manual) LIMITED WARRANTY ICON OF CANADA, INC. (ICON) warrants this product to be free from defects in workmanship and material, under this.... To help us : • the model number and serial number of the product (see the front cover of this manual) • the name of the product (see the front cover of this manual) • the key number and description of the replacement part(s) (see the front cover of purchase. The warranty extended...

