

English Manual
Page 2
...size. Google Maps is a registered trademark of ICON Health & Fitness, Inc. WPA and WPA2 are trademarks of the warning decal(s). NORDICTRACK is a trademark of Wi-Fi Alliance. IFIT is a registered trademark of Google Inc. Apply the decal in the location shown. Wi...OF CONTENTS WARNING DECAL PLACEMENT 2 IMPORTANT PRECAUTIONS 3 BEFORE YOU BEGIN 7 PART IDENTIFICATION CHART 8 ASSEMBLY 9 HOW TO USE THE ELLIPTICAL 18 FCC INFORMATION 35 MAINTENANCE AND TROUBLESHOOTING 36 EXERCISE GUIDELINES 38 PART LIST 39 EXPLODED DRAWING 41 ORDERING REPLACEMENT PARTS Back Cover LIMITED ...
...size. Google Maps is a registered trademark of ICON Health & Fitness, Inc. WPA and WPA2 are trademarks of the warning decal(s). NORDICTRACK is a trademark of Wi-Fi Alliance. IFIT is a registered trademark of Google Inc. Apply the decal in the location shown. Wi...OF CONTENTS WARNING DECAL PLACEMENT 2 IMPORTANT PRECAUTIONS 3 BEFORE YOU BEGIN 7 PART IDENTIFICATION CHART 8 ASSEMBLY 9 HOW TO USE THE ELLIPTICAL 18 FCC INFORMATION 35 MAINTENANCE AND TROUBLESHOOTING 36 EXERCISE GUIDELINES 38 PART LIST 39 EXPLODED DRAWING 41 ORDERING REPLACEMENT PARTS Back Cover LIMITED ...

English Manual
Page 3
... rate monitor is not working properly. Replace any exercise program, consult your elliptical. Do not modify the power cord or use of the elliptical and 2 ft. (0.6 m) on your elliptical before cleaning the elliptical. DANGER: 12. Wear appropriate clothes while exercising; When connecting the power ...lack of experience and knowledge, unless they are adequately informed of all users of the elliptical are given supervision or instruction about use and before using the elliptical. 8. The elliptical is not a medical device. The heart rate monitor is not intended for use ...
... rate monitor is not working properly. Replace any exercise program, consult your elliptical. Do not modify the power cord or use of the elliptical and 2 ft. (0.6 m) on your elliptical before cleaning the elliptical. DANGER: 12. Wear appropriate clothes while exercising; When connecting the power ...lack of experience and knowledge, unless they are adequately informed of all users of the elliptical are given supervision or instruction about use and before using the elliptical. 8. The elliptical is not a medical device. The heart rate monitor is not intended for use ...

English Manual
Page 4
The elliptical does not have a freewheel; Keep your back. Over exercising may result in a controlled way. 20. SAVE THESE INSTRUCTIONS 4 Reduce your pedaling speed in serious injury or death. do not arch your back straight while using the elliptical; If you feel faint, if you become short of breath, or if you experience pain while exercising, stop immediately and cool down. 19. the pedals will continue to move until the flywheel stops. 18.
The elliptical does not have a freewheel; Keep your back. Over exercising may result in a controlled way. 20. SAVE THESE INSTRUCTIONS 4 Reduce your pedaling speed in serious injury or death. do not arch your back straight while using the elliptical; If you feel faint, if you become short of breath, or if you experience pain while exercising, stop immediately and cool down. 19. the pedals will continue to move until the flywheel stops. 18.
English Manual
Page 7
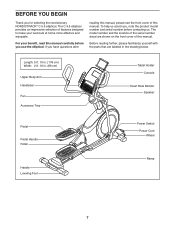
... enjoyable. To help us . Length: 5 ft. 10 in. (178 cm) Width: 2 ft. 10 in the drawing below. The C 9.5 elliptical provides an impressive selection of this manual. Before reading further, please familiarize yourself with the parts that are shown on the front cover of this... manual carefully before you for selecting the revolutionary NORDICTRACK® C 9.5 elliptical. If you , note the product model number and serial number before contacting us assist you have questions after reading this manual...
... enjoyable. To help us . Length: 5 ft. 10 in. (178 cm) Width: 2 ft. 10 in the drawing below. The C 9.5 elliptical provides an impressive selection of this manual. Before reading further, please familiarize yourself with the parts that are shown on the front cover of this... manual carefully before you for selecting the revolutionary NORDICTRACK® C 9.5 elliptical. If you , note the product model number and serial number before contacting us assist you have questions after reading this manual...

English Manual
Page 13
... them. 7 Avoid pinching the wires 4 101 101 13 If you do not connect the connectors properly, the Console (7) may become damaged when you use the elliptical. While a second person holds the Console (7) near the Upright (4), plug the Main Wire (110) and the Sensor Wires (63) into the receptacles on the Console...
... them. 7 Avoid pinching the wires 4 101 101 13 If you do not connect the connectors properly, the Console (7) may become damaged when you use the elliptical. While a second person holds the Console (7) near the Upright (4), plug the Main Wire (110) and the Sensor Wires (63) into the receptacles on the Console...
English Manual
Page 14
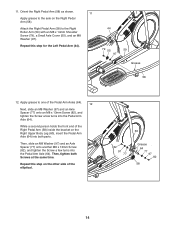
Apply grease to one of the elliptical. 60 82 97 77 Grease 64 77 97 82 58 14 Then, slide an M8 Washer (97) and an Axle Spacer (77) onto another M8 x ...
Apply grease to one of the elliptical. 60 82 97 77 Grease 64 77 97 82 58 14 Then, slide an M8 Washer (97) and an Axle Spacer (77) onto another M8 x ...
English Manual
Page 15
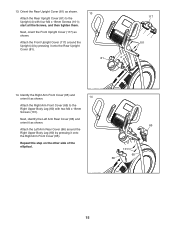
... the Right Arm Front Cover (65) and orient it onto the Right Arm Front Cover (65). Repeat this step on the other side of the elliptical. 65 101 60 66 15 Orient the Rear Upright Cover (81) as shown. Next, orient the Front Upright Cover (117) as shown. 13 Attach the...
... the Right Arm Front Cover (65) and orient it onto the Right Arm Front Cover (65). Repeat this step on the other side of the elliptical. 65 101 60 66 15 Orient the Rear Upright Cover (81) as shown. Next, orient the Front Upright Cover (117) as shown. 13 Attach the...
English Manual
Page 16
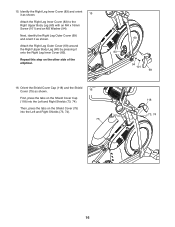
... Right Leg Outer Cover (69) and orient it onto the Right Leg Inner Cover (83). First, press the tabs on the other side of the elliptical. 60 83 94 101 69 16. Attach the Right Leg Outer Cover (69) around the Right Upper Body Leg (60) by pressing it as shown...
... Right Leg Outer Cover (69) and orient it onto the Right Leg Inner Cover (83). First, press the tabs on the other side of the elliptical. 60 83 94 101 69 16. Attach the Right Leg Outer Cover (69) around the Right Upper Body Leg (60) by pressing it as shown...
English Manual
Page 17
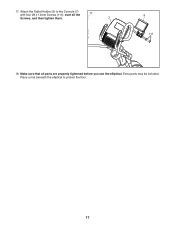
Attach the Tablet Holder (9) to protect the floor. 17 Extra parts may be included. Make sure that all the 17 Screws, and then tighten them. 7 9 111 18. Place a mat beneath the elliptical to the Console (7) with four #8 x 12mm Screws (111); start all parts are properly tightened before you use the elliptical. 17.
Attach the Tablet Holder (9) to protect the floor. 17 Extra parts may be included. Make sure that all the 17 Screws, and then tighten them. 7 9 111 18. Place a mat beneath the elliptical to the Console (7) with four #8 x 12mm Screws (111); start all parts are properly tightened before you use the elliptical. 17.
English Manual
Page 18
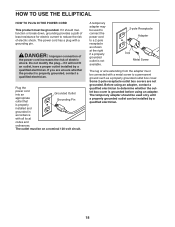
...;ed electrician to a permanent ground such as shown at the right if a properly grounded outlet is properly grounded, contact a qualified electrician. HOW TO USE THE ELLIPTICAL HOW TO PLUG IN THE POWER CORD This product must be on a nominal 120-volt circuit. If you are not grounded.
...;ed electrician to a permanent ground such as shown at the right if a properly grounded outlet is properly grounded, contact a qualified electrician. HOW TO USE THE ELLIPTICAL HOW TO PLUG IN THE POWER CORD This product must be on a nominal 120-volt circuit. If you are not grounded.
English Manual
Page 19
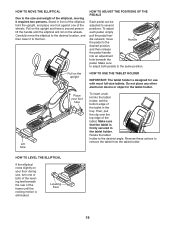
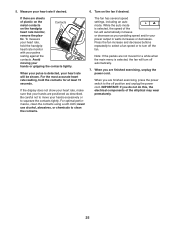
...location, and then lower it requires two persons. Make sure to adjust both of the leveling feet beneath the rear of the frame until the elliptical will roll on the upright Place your floor during use with most full-size tablets. Reverse these actions to several positions. Pull on the upright...Each pedal can be adjusted to remove the tablet from the tablet holder. Make sure that the tablet is eliminated. HOW TO LEVEL THE ELLIPTICAL If the elliptical rocks slightly on your foot here HOW TO USE THE TABLET HOLDER IMPORTANT: The tablet holder is designed for use , turn one of the...
...location, and then lower it requires two persons. Make sure to adjust both of the leveling feet beneath the rear of the frame until the elliptical will roll on the upright Place your floor during use with most full-size tablets. Reverse these actions to several positions. Pull on the upright...Each pedal can be adjusted to remove the tablet from the tablet holder. Make sure that the tablet is eliminated. HOW TO LEVEL THE ELLIPTICAL If the elliptical rocks slightly on your foot here HOW TO USE THE TABLET HOLDER IMPORTANT: The tablet holder is designed for use , turn one of the...
English Manual
Page 20
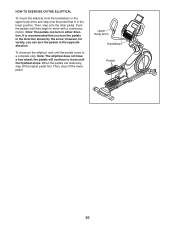
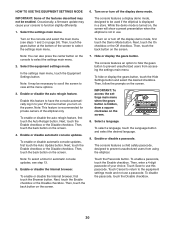
...the pedals until the pedals come to a complete stop. Then, step off the higher pedal first. To dismount the elliptical, wait until they begin to move with a continuous motion. Note: The elliptical does not have a free wheel; the pedals will continue to move until the flywheel stops. When the pedals are...in the lower position. however, for variety, you turn the pedals in the direction shown by the arrow; HOW TO EXERCISE ON THE ELLIPTICAL To mount the elliptical, hold the handlebars or the upper body arms and step onto the pedal that you can turn in either direction.
...the pedals until the pedals come to a complete stop. Then, step off the higher pedal first. To dismount the elliptical, wait until they begin to move with a continuous motion. Note: The elliptical does not have a free wheel; the pedals will continue to move until the flywheel stops. When the pedals are...in the lower position. however, for variety, you turn the pedals in the direction shown by the arrow; HOW TO EXERCISE ON THE ELLIPTICAL To mount the elliptical, hold the handlebars or the upper body arms and step onto the pedal that you can turn in either direction.

English Manual
Page 22
...The ramp will display continuous exercise feedback. When the ramp stops moving, the incline system is turned on, the console will be used if the elliptical is displayed in the power cord (see HOW TO PLUG IN THE POWER CORD on the power, see step 6 on the frame near the power... the console features a selection of onboard workouts and several iFit demo workouts. To set -a-goal workout. HOW TO TURN ON THE POWER IMPORTANT: If the elliptical has been exposed to cold temperatures, allow it to warm to room temperature before you finish exercising. If the demo mode is calibrated. Plug...
...The ramp will display continuous exercise feedback. When the ramp stops moving, the incline system is turned on, the console will be used if the elliptical is displayed in the power cord (see HOW TO PLUG IN THE POWER CORD on the power, see step 6 on the frame near the power... the console features a selection of onboard workouts and several iFit demo workouts. To set -a-goal workout. HOW TO TURN ON THE POWER IMPORTANT: If the elliptical has been exposed to cold temperatures, allow it to warm to room temperature before you finish exercising. If the demo mode is calibrated. Plug...
English Manual
Page 23
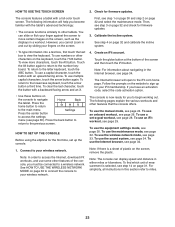
... the number keyboard. Settings Press the center button to the letter keyboard, touch the ABC button. HOW TO SET UP THE CONSOLE Before using the elliptical for your iFit membership. Check for firmware updates. 3. Follow the prompts on the website to sign up the console. 1. To use an iFit workout, see...
... the number keyboard. Settings Press the center button to the letter keyboard, touch the ABC button. HOW TO SET UP THE CONSOLE Before using the elliptical for your iFit membership. Check for firmware updates. 3. Follow the prompts on the website to sign up the console. 1. To use an iFit workout, see...
English Manual
Page 25
... settings, including an auto mode. Turn on the handgrip heart rate monitor, remove the plastic. While the auto mode is selected, the speed of the elliptical may wear prematurely. 25 When your heart rate, hold the contacts for a while when the main menu is detected, your power output in watts increases...
... settings, including an auto mode. Turn on the handgrip heart rate monitor, remove the plastic. While the auto mode is selected, the speed of the elliptical may wear prematurely. 25 When your heart rate, hold the contacts for a while when the main menu is detected, your power output in watts increases...
English Manual
Page 30
... the desired language. 9. Touch the Passcode button. To enable a passcode, touch the Enable checkbox. Then, enter a 4-digit passcode of the elliptical only. Occasionally, a firmware update may not be enabled. Enable this passcode. Select a language. Note: This feature is displayed in a store... main menu when the gears button is hidden, draw a square clockwise on , the screen will show a preset presentation when the elliptical is turned on the screen. 8. Enable or disable a passcode. The console features a child safety passcode, designed to prevent unauthorized ...
... the desired language. 9. Touch the Passcode button. To enable a passcode, touch the Enable checkbox. Then, enter a 4-digit passcode of the elliptical only. Occasionally, a firmware update may not be enabled. Enable this passcode. Select a language. Note: This feature is displayed in a store... main menu when the gears button is hidden, draw a square clockwise on , the screen will show a preset presentation when the elliptical is turned on the screen. 8. Enable or disable a passcode. The console features a child safety passcode, designed to prevent unauthorized ...

English Manual
Page 31
.... Next, touch the checkbox for automatic console updates, touch the Update Time button and select the desired time. IMPORTANT: If you forget your elliptical and will regularly ask for you normally use your passcode, enter the following master passcode to unplug the power cord after using your... elliptical. To enable or disable the street view feature of measurement. To select a time zone, touch the Timezone button and select the desired time...
.... Next, touch the checkbox for automatic console updates, touch the Update Time button and select the desired time. IMPORTANT: If you forget your elliptical and will regularly ask for you normally use your passcode, enter the following master passcode to unplug the power cord after using your... elliptical. To enable or disable the street view feature of measurement. To select a time zone, touch the Timezone button and select the desired time...

English Manual
Page 32
... default settings. Select the maintenance mode. Update the console firmware. IMPORTANT: Keep pets, feet, and other objects away from the elliptical while the incline system is calibrated, touch the Finish button. Touch the Machine Info button to view information about the console and ...the wireless network. 3. Exit the maintenance mode. The update will show information about your elliptical. Note: It may cause your console to function slightly differently. Reset the console to enter the maintenance mode. In the settings main...
... default settings. Select the maintenance mode. Update the console firmware. IMPORTANT: Keep pets, feet, and other objects away from the elliptical while the incline system is calibrated, touch the Finish button. Touch the Machine Info button to view information about the console and ...the wireless network. 3. Exit the maintenance mode. The update will show information about your elliptical. Note: It may cause your console to function slightly differently. Reset the console to enter the maintenance mode. In the settings main...
English Manual
Page 36
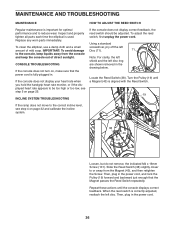
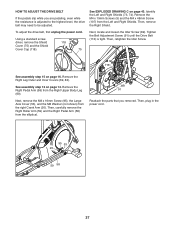
Replace any worn parts immediately. To clean the elliptical, use a damp cloth and a small amount of direct sunlight. When the reed switch is important for optimal performance and to reduce wear. Then, plug in . ... closer to the console, keep liquids away from the Magnet (43), and then retighten the Screw. Inspect and properly tighten all parts each time the elliptical is aligned with the Reed Switch. 19 38 43 101 Loosen, but do not remove, the indicated M4 x 16mm Screw (101). IMPORTANT: To avoid damage...
Replace any worn parts immediately. To clean the elliptical, use a damp cloth and a small amount of direct sunlight. When the reed switch is important for optimal performance and to reduce wear. Then, plug in . ... closer to the console, keep liquids away from the Magnet (43), and then retighten the Screw. Inspect and properly tighten all parts each time the elliptical is aligned with the Reed Switch. 19 38 43 101 Loosen, but do not remove, the indicated M4 x 16mm Screw (101). IMPORTANT: To avoid damage...
English Manual
Page 37
... step 15 on page 43. Next, remove the M8 x 16mm Screw (95), the Large Axle Cover (53), and the M8 Washer (not shown) from the elliptical. 89 91 Reattach the parts that you are pedaling, even while the resistance is tight. Then, carefully remove the Right Roller Arm (59) and the...
... step 15 on page 43. Next, remove the M8 x 16mm Screw (95), the Large Axle Cover (53), and the M8 Washer (not shown) from the elliptical. 89 91 Reattach the parts that you are pedaling, even while the resistance is tight. Then, carefully remove the Right Roller Arm (59) and the...


