
English Manual
Page 2
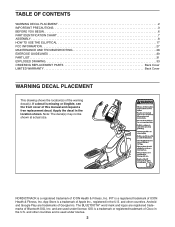
... trademark or registered trademark of Apple Inc., registered in the location shown. IOS is used under license. 2 and other countries. NORDICTRACK is a trademark of Cisco in the U.S. Android and Google Play are trademarks of Bluetooth SIG, Inc. Note: The decal(s) may... 2 IMPORTANT PRECAUTIONS 3 BEFORE YOU BEGIN 6 PART IDENTIFICATION CHART 7 ASSEMBLY 8 HOW TO USE THE ELLIPTICAL 17 FCC INFORMATION 27 MAINTENANCE AND TROUBLESHOOTING 28 EXERCISE GUIDELINES 30 PART LIST 31 EXPLODED DRAWING 33 ORDERING REPLACEMENT PARTS Back Cover LIMITED WARRANTY Back Cover WARNING DECAL ...
... trademark or registered trademark of Apple Inc., registered in the location shown. IOS is used under license. 2 and other countries. NORDICTRACK is a trademark of Cisco in the U.S. Android and Google Play are trademarks of Bluetooth SIG, Inc. Note: The decal(s) may... 2 IMPORTANT PRECAUTIONS 3 BEFORE YOU BEGIN 6 PART IDENTIFICATION CHART 7 ASSEMBLY 8 HOW TO USE THE ELLIPTICAL 17 FCC INFORMATION 27 MAINTENANCE AND TROUBLESHOOTING 28 EXERCISE GUIDELINES 30 PART LIST 31 EXPLODED DRAWING 33 ORDERING REPLACEMENT PARTS Back Cover LIMITED WARRANTY Back Cover WARNING DECAL ...

English Manual
Page 3
...the power switch to the off position when the elliptical is not working properly. do not wear loose clothes that all users of the elliptical are given supervision or instruction about use only. Inspect and properly tighten all parts each side. Various factors may affect the accuracy... of the elliptical and 2 ft. (0.6 m) on your physician. It is used by...
...the power switch to the off position when the elliptical is not working properly. do not wear loose clothes that all users of the elliptical are given supervision or instruction about use only. Inspect and properly tighten all parts each side. Various factors may affect the accuracy... of the elliptical and 2 ft. (0.6 m) on your physician. It is used by...
English Manual
Page 6
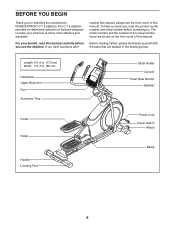
... with the parts that are shown on the front cover of features designed to make your benefit, read this manual. Length: 5 ft. 8 in. (173 cm) Width: 2 ft. 2 in the drawing below. For your workouts at home more effective and enjoyable. The C 7.5 elliptical provides an ... of this manual carefully before contacting us assist you for selecting the revolutionary NORDICTRACK® C 7.5 elliptical. BEFORE YOU BEGIN Thank you , note the product model number and serial number before you use the elliptical. The model number and the location of the serial number decal are labeled...
... with the parts that are shown on the front cover of features designed to make your benefit, read this manual. Length: 5 ft. 8 in. (173 cm) Width: 2 ft. 2 in the drawing below. For your workouts at home more effective and enjoyable. The C 7.5 elliptical provides an ... of this manual carefully before contacting us assist you for selecting the revolutionary NORDICTRACK® C 7.5 elliptical. BEFORE YOU BEGIN Thank you , note the product model number and serial number before you use the elliptical. The model number and the location of the serial number decal are labeled...

English Manual
Page 7
...122mm Screw (104)-4 7 The number in the hardware kit, check to identify the small parts needed for assembly. Note: If a part is not in parentheses below to see if it has been preassembled. PART IDENTIFICATION CHART Use the drawings below each drawing is the quantity needed for assembly. The number... following the key number is the key number of the part, from the PART LIST near the ...
...122mm Screw (104)-4 7 The number in the hardware kit, check to identify the small parts needed for assembly. Note: If a part is not in parentheses below to see if it has been preassembled. PART IDENTIFICATION CHART Use the drawings below each drawing is the quantity needed for assembly. The number... following the key number is the key number of the part, from the PART LIST near the ...
English Manual
Page 8
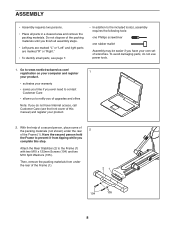
... power tools. 1. ASSEMBLY • Assembly requires two persons. • Place all assembly steps. • Left parts are marked "L" or "Left" and right parts are marked "R" or "Right." • To identify small parts, see page 7. • In addition to the included tool(s), assembly requires the following tools: one Phillips screwdriver .../ registration on your computer and register 1 your product. • activates your warranty • saves you time if you finish all parts in a cleared area and remove the packing materials. Do not dispose of wrenches. To avoid damaging...
... power tools. 1. ASSEMBLY • Assembly requires two persons. • Place all assembly steps. • Left parts are marked "L" or "Left" and right parts are marked "R" or "Right." • To identify small parts, see page 7. • In addition to the included tool(s), assembly requires the following tools: one Phillips screwdriver .../ registration on your computer and register 1 your product. • activates your warranty • saves you time if you finish all parts in a cleared area and remove the packing materials. Do not dispose of wrenches. To avoid damaging...
English Manual
Page 13
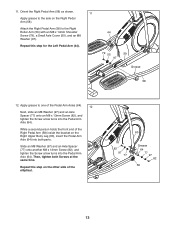
Repeat this step on the other side of the elliptical. 60 82 97 77 Grease 64 77 97 82 58 13 Slide an M8 Washer (97) and an Axle Spacer (77) onto another M8 x 13mm ... Axle Spacer (77) onto an M8 x 13mm Screw (82), and tighten the Screw a few turns into both Screws at the same time. Then, tighten both parts. Repeat this step for the Left Pedal Arm (44). 44 79 55 97 59 Grease 58 12. Apply grease to one of the Right Pedal...
Repeat this step on the other side of the elliptical. 60 82 97 77 Grease 64 77 97 82 58 13 Slide an M8 Washer (97) and an Axle Spacer (77) onto another M8 x 13mm ... Axle Spacer (77) onto an M8 x 13mm Screw (82), and tighten the Screw a few turns into both Screws at the same time. Then, tighten both parts. Repeat this step for the Left Pedal Arm (44). 44 79 55 97 59 Grease 58 12. Apply grease to one of the Right Pedal...

English Manual
Page 16
Extra parts may be included. Place a mat beneath the elliptical to the Console (7) with four #8 x 12mm Screws (111); start all parts are properly tightened before you use the elliptical. Make sure that all the 18 Screws, and then tighten them. 9 7 111 19. Attach the Tablet Holder (9) to protect the floor. 16 18.
Extra parts may be included. Place a mat beneath the elliptical to the Console (7) with four #8 x 12mm Screws (111); start all parts are properly tightened before you use the elliptical. Make sure that all the 18 Screws, and then tighten them. 9 7 111 19. Attach the Tablet Holder (9) to protect the floor. 16 18.

English Manual
Page 27
...calibrates. FCC CAUTION: To assure continued compliance, use only shielded interface cables when connecting to follow the instructions shown in the lower part of the display will appear in the display. Navigate the settings mode. Make sure to computer or peripheral devices. To adjust ...receiving antenna. • Increase the separation between the equipment and the receiver. • Connect the equipment into an outlet on the elliptical. 4. Press the increase button next to the Enter button repeatedly to exit the settings mode. Changes or modifications not expressly approved by...
...calibrates. FCC CAUTION: To assure continued compliance, use only shielded interface cables when connecting to follow the instructions shown in the lower part of the display will appear in the display. Navigate the settings mode. Make sure to computer or peripheral devices. To adjust ...receiving antenna. • Increase the separation between the equipment and the receiver. • Connect the equipment into an outlet on the elliptical. 4. Press the increase button next to the Enter button repeatedly to exit the settings mode. Changes or modifications not expressly approved by...
English Manual
Page 28
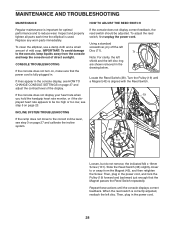
... MAINTENANCE AND TROUBLESHOOTING MAINTENANCE Regular maintenance is correctly adjusted, reattach the left disc ring are shown removed in the drawing below. To clean the elliptical, use a damp cloth and a small amount of the display. Repeat these actions until a Magnet (43) is aligned with the Reed ...Turn the Pulley (19) until the console displays correct feedback. Locate the Reed Switch (38). Inspect and properly tighten all parts each time the elliptical is fully plugged in the power cord. 28 CONSOLE TROUBLESHOOTING If the console does not turn on page 27 and calibrate the...
... MAINTENANCE AND TROUBLESHOOTING MAINTENANCE Regular maintenance is correctly adjusted, reattach the left disc ring are shown removed in the drawing below. To clean the elliptical, use a damp cloth and a small amount of the display. Repeat these actions until a Magnet (43) is aligned with the Reed ...Turn the Pulley (19) until the console displays correct feedback. Locate the Reed Switch (38). Inspect and properly tighten all parts each time the elliptical is fully plugged in the power cord. 28 CONSOLE TROUBLESHOOTING If the console does not turn on page 27 and calibrate the...
English Manual
Page 29
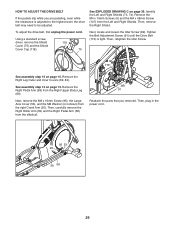
.... Identify the Left and Right Shields (73, 74). Next, locate and loosen the Idler Screw (89). Remove the Right Pedal Arm (58) from the elliptical. 89 91 Reattach the parts that you are pedaling, even while the resistance is tight. Then, plug in the power cord. 95 53 20 59 58 29
.... Identify the Left and Right Shields (73, 74). Next, locate and loosen the Idler Screw (89). Remove the Right Pedal Arm (58) from the elliptical. 89 91 Reattach the parts that you are pedaling, even while the resistance is tight. Then, plug in the power cord. 95 53 20 59 58 29

English Manual
Page 30
... middle number is the heart rate for exercise. During the first few minutes of exercise does your body begin to make exercise a regular and enjoyable part of oxygen for successful results. EXERCISE GUIDELINES WARNING: Before beginning this or any exercise program, consult your physician. Remember, proper nutrition and adequate rest are...
... middle number is the heart rate for exercise. During the first few minutes of exercise does your body begin to make exercise a regular and enjoyable part of oxygen for successful results. EXERCISE GUIDELINES WARNING: Before beginning this or any exercise program, consult your physician. Remember, proper nutrition and adequate rest are...

English Manual
Page 31
... Ring Sleeve Magnet Left Pedal Arm Left Roller Arm Left Upper Body Leg Left Upper Body Arm Hairpin Cotter Pin Pedal M10 Locknut Model No. PART LIST Key No.
... Ring Sleeve Magnet Left Pedal Arm Left Roller Arm Left Upper Body Leg Left Upper Body Arm Hairpin Cotter Pin Pedal M10 Locknut Model No. PART LIST Key No.

English Manual
Page 32
... Wire Resistance Motor Wire Blue Wire Green Wire White Wire Note: Specifications are not illustrated. 32 Description Key No. Qty. For information about ordering replacement parts, see the back cover of this manual. *These...
... Wire Resistance Motor Wire Blue Wire Green Wire White Wire Note: Specifications are not illustrated. 32 Description Key No. Qty. For information about ordering replacement parts, see the back cover of this manual. *These...

English Manual
Page 36
...) • the name of the product (see the front cover of this manual) • the key number and description of the replacement part(s) (see page 5. Labor is warranted for the lifetime of any implied warranties of merchantability or fitness for a minimal handling charge. No...Inc. (ICON) warrants this product to repairing or replacing, at ICON's option, the product through one (1) year from the date of purchase. Parts are made must be responsible for a particular purpose are limited in connection with respect to state. This warranty extends only to the customer. Some...
...) • the name of the product (see the front cover of this manual) • the key number and description of the replacement part(s) (see page 5. Labor is warranted for the lifetime of any implied warranties of merchantability or fitness for a minimal handling charge. No...Inc. (ICON) warrants this product to repairing or replacing, at ICON's option, the product through one (1) year from the date of purchase. Parts are made must be responsible for a particular purpose are limited in connection with respect to state. This warranty extends only to the customer. Some...


