
English Manual
Page 2
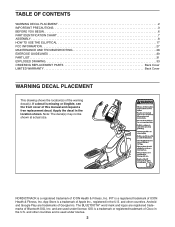
... decal(s) may not be shown at actual size. NORDICTRACK is a trademark of Bluetooth SIG, Inc. and are registered trademarks of Apple Inc., registered in the U.S. TABLE OF CONTENTS WARNING DECAL PLACEMENT 2 IMPORTANT PRECAUTIONS 3 BEFORE YOU BEGIN 6 PART IDENTIFICATION CHART 7 ASSEMBLY 8 HOW TO USE THE ELLIPTICAL 17 FCC INFORMATION 27 MAINTENANCE AND TROUBLESHOOTING 28...
... decal(s) may not be shown at actual size. NORDICTRACK is a trademark of Bluetooth SIG, Inc. and are registered trademarks of Apple Inc., registered in the U.S. TABLE OF CONTENTS WARNING DECAL PLACEMENT 2 IMPORTANT PRECAUTIONS 3 BEFORE YOU BEGIN 6 PART IDENTIFICATION CHART 7 ASSEMBLY 8 HOW TO USE THE ELLIPTICAL 17 FCC INFORMATION 27 MAINTENANCE AND TROUBLESHOOTING 28...

English Manual
Page 3
...use of this product. 1. Do not use only. To protect the floor or carpet from the elliptical at all parts each side. The elliptical is not in use of the elliptical by an authorized service repre- Always unplug the power cord and switch the power switch to the ... the procedures in this manual should not be performed by someone responsible for foot protection while exercising. 16. Before beginning any worn parts immediately. 9. The elliptical should be used . IMPORTANT PRECAUTIONS WARNING: To reduce the risk of burns, fire, electric shock, or injury to persons, read...
...use of this product. 1. Do not use only. To protect the floor or carpet from the elliptical at all parts each side. The elliptical is not in use of the elliptical by an authorized service repre- Always unplug the power cord and switch the power switch to the ... the procedures in this manual should not be performed by someone responsible for foot protection while exercising. 16. Before beginning any worn parts immediately. 9. The elliptical should be used . IMPORTANT PRECAUTIONS WARNING: To reduce the risk of burns, fire, electric shock, or injury to persons, read...
English Manual
Page 6
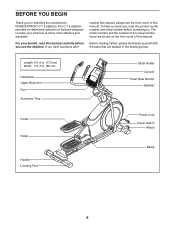
...: 2 ft. 2 in the drawing below. To help us . Before reading further, please familiarize yourself with the parts that are shown on the front cover of this manual. If you for selecting the revolutionary NORDICTRACK® C 7.5 elliptical. BEFORE YOU BEGIN Thank you have questions after reading this manual, please see the front cover of...
...: 2 ft. 2 in the drawing below. To help us . Before reading further, please familiarize yourself with the parts that are shown on the front cover of this manual. If you for selecting the revolutionary NORDICTRACK® C 7.5 elliptical. BEFORE YOU BEGIN Thank you have questions after reading this manual, please see the front cover of...

English Manual
Page 7
... If a part is not in parentheses below to see if it has been preassembled. PART IDENTIFICATION CHART Use the drawings below each drawing is the key number of the part, from the PART LIST near the end of this manual. The number in the hardware kit, check to identify the small parts needed for ...assembly. Extra parts may be included. The number following the key number is the quantity ...
... If a part is not in parentheses below to see if it has been preassembled. PART IDENTIFICATION CHART Use the drawings below each drawing is the key number of the part, from the PART LIST near the end of this manual. The number in the hardware kit, check to identify the small parts needed for ...assembly. Extra parts may be included. The number following the key number is the quantity ...
English Manual
Page 8
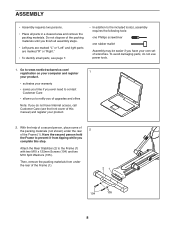
... M10 x 122mm Screws (104) and two M10 Split Washers (105). Do not dispose of the packing materials until you finish all parts in a cleared area and remove the packing materials. Have the second person hold the Frame to prevent it from under the rear 2 of ... tools. 1. ASSEMBLY • Assembly requires two persons. • Place all assembly steps. • Left parts are marked "L" or "Left" and right parts are marked "R" or "Right." • To identify small parts, see page 7. • In addition to the included tool(s), assembly requires the following tools: one Phillips ...
... M10 x 122mm Screws (104) and two M10 Split Washers (105). Do not dispose of the packing materials until you finish all parts in a cleared area and remove the packing materials. Have the second person hold the Frame to prevent it from under the rear 2 of ... tools. 1. ASSEMBLY • Assembly requires two persons. • Place all assembly steps. • Left parts are marked "L" or "Left" and right parts are marked "R" or "Right." • To identify small parts, see page 7. • In addition to the included tool(s), assembly requires the following tools: one Phillips ...
English Manual
Page 13
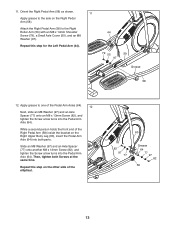
... tighten the Screw a few turns into the Pedal Arm Axle (64). 11. Apply grease to one of the elliptical. 60 82 97 77 Grease 64 77 97 82 58 13 Then, tighten both parts. Repeat this step for the Left Pedal Arm (44). 44 79 55 97 59 Grease 58 12. Slide...
... tighten the Screw a few turns into the Pedal Arm Axle (64). 11. Apply grease to one of the elliptical. 60 82 97 77 Grease 64 77 97 82 58 13 Then, tighten both parts. Repeat this step for the Left Pedal Arm (44). 44 79 55 97 59 Grease 58 12. Slide...

English Manual
Page 16
Attach the Tablet Holder (9) to protect the floor. 16 start all parts are properly tightened before you use the elliptical. Extra parts may be included. Make sure that all the 18 Screws, and then tighten them. 9 7 111 19. 18. Place a mat beneath the elliptical to the Console (7) with four #8 x 12mm Screws (111);
Attach the Tablet Holder (9) to protect the floor. 16 start all parts are properly tightened before you use the elliptical. Extra parts may be included. Make sure that all the 18 Screws, and then tighten them. 9 7 111 19. 18. Place a mat beneath the elliptical to the Console (7) with four #8 x 12mm Screws (111);

English Manual
Page 27
...INFORMATION This equipment has been tested and found to comply with the instructions, may need to follow the instructions shown in the lower part of hours that the elliptical has been used in miles or kilometers) that to any other antenna or transmitter. 27 Press the Settings button to... part 15 of the display will appear in the console must not be determined by the party responsible for the selected screen. FCC CAUTION...
...INFORMATION This equipment has been tested and found to comply with the instructions, may need to follow the instructions shown in the lower part of hours that the elliptical has been used in miles or kilometers) that to any other antenna or transmitter. 27 Press the Settings button to... part 15 of the display will appear in the console must not be determined by the party responsible for the selected screen. FCC CAUTION...
English Manual
Page 28
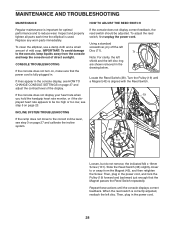
...the incline system. 38 43 101 Loosen, but do not remove, the indicated M4 x 16mm Screw (101). Inspect and properly tighten all parts each time the elliptical is correctly adjusted, reattach the left disc ring are shown removed in the drawing below. Turn the Pulley (19) until the console displays ...monitor, or if the displayed heart rate appears to reduce wear. To adjust the reed switch, first unplug the power cord. Replace any worn parts immediately. CONSOLE TROUBLESHOOTING If the console does not turn on page 23. HOW TO ADJUST THE REED SWITCH If the console does not display ...
...the incline system. 38 43 101 Loosen, but do not remove, the indicated M4 x 16mm Screw (101). Inspect and properly tighten all parts each time the elliptical is correctly adjusted, reattach the left disc ring are shown removed in the drawing below. Turn the Pulley (19) until the console displays ...monitor, or if the displayed heart rate appears to reduce wear. To adjust the reed switch, first unplug the power cord. Replace any worn parts immediately. CONSOLE TROUBLESHOOTING If the console does not turn on page 23. HOW TO ADJUST THE REED SWITCH If the console does not display ...
English Manual
Page 29
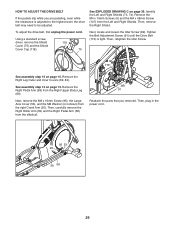
... (75) and the Shield Cover Cap (118). 118 75 See EXPLODED DRAWING C on page 15. Remove the Right Pedal Arm (58) from the elliptical. 89 91 Reattach the parts that you are pedaling, even while the resistance is tight. Then, plug in the power cord. 95 53 20 59 58 29 HOW...
... (75) and the Shield Cover Cap (118). 118 75 See EXPLODED DRAWING C on page 15. Remove the Right Pedal Arm (58) from the elliptical. 89 91 Reattach the parts that you are pedaling, even while the resistance is tight. Then, plug in the power cord. 95 53 20 59 58 29 HOW...

English Manual
Page 30
... your heart rate in your training zone. (During the first few minutes of exercise, your heart rate as a guide to make exercise a regular and enjoyable part of your exercise until your heart rate is to find your body temperature, heart rate, and circulation in your physician. Aerobic Exercise-If your goal...
... your heart rate in your training zone. (During the first few minutes of exercise, your heart rate as a guide to make exercise a regular and enjoyable part of your exercise until your heart rate is to find your body temperature, heart rate, and circulation in your physician. Aerobic Exercise-If your goal...

English Manual
Page 31
PART LIST Key No. NTEL07915.0 R1115B Key No. Qty. 51 2 52 2 53 4 54 2 55 2 56 4 57 8 58 1 59 1 60 1 61 1 62 2 63 2 64 2 65 1 66 1 67 1 ...
PART LIST Key No. NTEL07915.0 R1115B Key No. Qty. 51 2 52 2 53 4 54 2 55 2 56 4 57 8 58 1 59 1 60 1 61 1 62 2 63 2 64 2 65 1 66 1 67 1 ...

English Manual
Page 32
Qty. For information about ordering replacement parts, see the back cover of this manual. *These parts are subject to change without notice. Qty. Description Key No. Front Upright Cover Shield Cover Cap Power Cord Ramp Axle Small Frame Bushing Clevis Pin ...
Qty. For information about ordering replacement parts, see the back cover of this manual. *These parts are subject to change without notice. Qty. Description Key No. Front Upright Cover Shield Cover Cap Power Cord Ramp Axle Small Frame Bushing Clevis Pin ...

English Manual
Page 36
...not allow the exclusion or limitation of incidental or consequential damages. ICON Health & Fitness, Inc., 1500 S. 1000 W., Logan, UT 84321-9813 Part No. 376358 R1115B Printed in -home service, the customer will automatically be responsible for one of its authorized service centers. ICON Health & ...Inc. (ICON) warrants this product to any implied warranties of merchantability or fitness for the lifetime of the original purchaser (customer). Parts are not followed, if the product is abused or improperly or abnormally used as a store display model, if the product is warranted ...
...not allow the exclusion or limitation of incidental or consequential damages. ICON Health & Fitness, Inc., 1500 S. 1000 W., Logan, UT 84321-9813 Part No. 376358 R1115B Printed in -home service, the customer will automatically be responsible for one of its authorized service centers. ICON Health & ...Inc. (ICON) warrants this product to any implied warranties of merchantability or fitness for the lifetime of the original purchaser (customer). Parts are not followed, if the product is abused or improperly or abnormally used as a store display model, if the product is warranted ...


