

English Manual
Page 1
... reference. Or call 1-800-TO-BE-FIT (1-800-862-3348) Mon.–-Fri. 6 a.m.–-6 p.m. Save this equipment. USER’'S MANUAL Serial Number Decal ACTIVATE YOUR WARRANTY To register your product and activate your warranty today, go to www.nordictrackservice.com/ registration. MT Sat. 8 a.m.–-4 p.m. ...CUSTOMER CARE For service at any time, go to www.nordictrackservice.com. www.nordictrack.com Model No. 831.24924.1 Serial No. MT Please do not contact the store.
... reference. Or call 1-800-TO-BE-FIT (1-800-862-3348) Mon.–-Fri. 6 a.m.–-6 p.m. Save this equipment. USER’'S MANUAL Serial Number Decal ACTIVATE YOUR WARRANTY To register your product and activate your warranty today, go to www.nordictrackservice.com/ registration. MT Sat. 8 a.m.–-4 p.m. ...CUSTOMER CARE For service at any time, go to www.nordictrackservice.com. www.nordictrack.com Model No. 831.24924.1 Serial No. MT Please do not contact the store.

English Manual
Page 2
...BEGIN 6 PART IDENTIFICATION CHART 7 ASSEMBLY 8 THE CHEST HEART RATE MONITOR 13 OPERATION AND ADJUSTMENT 14 HOW TO FOLD AND MOVE THE TREADMILL 28 TROUBLESHOOTING 29 EXERCISE GUIDELINES 31 PART LIST 34 EXPLODED DRAWING 36 ORDERING REPLACEMENT PARTS Back Cover LIMITED WARRANTY Back Cover WARNING DECAL ...PLACEMENT This drawing shows the locations of this manual and request a free replacement decal. Note: The decals may not be shown at actual size. If a decal is a registered trademark of ICON IP, Inc. 2 NORDICTRACK is missing or illegible, call the telephone number on...
...BEGIN 6 PART IDENTIFICATION CHART 7 ASSEMBLY 8 THE CHEST HEART RATE MONITOR 13 OPERATION AND ADJUSTMENT 14 HOW TO FOLD AND MOVE THE TREADMILL 28 TROUBLESHOOTING 29 EXERCISE GUIDELINES 31 PART LIST 34 EXPLODED DRAWING 36 ORDERING REPLACEMENT PARTS Back Cover LIMITED WARRANTY Back Cover WARNING DECAL ...PLACEMENT This drawing shows the locations of this manual and request a free replacement decal. Note: The decals may not be shown at actual size. If a decal is a registered trademark of ICON IP, Inc. 2 NORDICTRACK is missing or illegible, call the telephone number on...

English Manual
Page 3
...surge suppressor into an outlet on each side. Do not use of this product. 1. Do not put the treadmill in this manual. 4. To protect the floor or carpet from the treadmill at a time. 11. Do not wear loose clothes that could result in damage to the control system of... specifications described on any surface that all users of this treadmill are standing on the treadmill at all times. 9. Athletic support clothes are used only by or through the use the treadmill in any exercise program, consult your local NORDICTRACK dealer, call the telephone number on page 16). 18....
...surge suppressor into an outlet on each side. Do not use of this product. 1. Do not put the treadmill in this manual. 4. To protect the floor or carpet from the treadmill at a time. 11. Do not wear loose clothes that could result in damage to the control system of... specifications described on any surface that all users of this treadmill are standing on the treadmill at all times. 9. Athletic support clothes are used only by or through the use the treadmill in any exercise program, consult your local NORDICTRACK dealer, call the telephone number on page 16). 18....

English Manual
Page 4
...Always remove the key, press the power switch into any opening on the treadmill. 26. Do not change the incline of heart rate readings. ing the treadmill, and before clean- Servicing other than the procedures in this manual should be able to safely lift 45 lbs. (20 kg) to move...trends in use , before performing the maintenance and adjustment procedures described in this manual. If you feel faint or if you experience pain while exercising, stop immediately and cool down. When folding or moving the treadmill, make sure that the storage latch is not in general. 21. Over...
...Always remove the key, press the power switch into any opening on the treadmill. 26. Do not change the incline of heart rate readings. ing the treadmill, and before clean- Servicing other than the procedures in this manual should be able to safely lift 45 lbs. (20 kg) to move...trends in use , before performing the maintenance and adjustment procedures described in this manual. If you feel faint or if you experience pain while exercising, stop immediately and cool down. When folding or moving the treadmill, make sure that the storage latch is not in general. 21. Over...

English Manual
Page 6
... assist you, please note the product model number and serial number before using the treadmill. The C 1750 PRO treadmill offers an impressive selection of features designed to make your benet, read this manual. Before reading further, please review the drawing below and familiarize yourself with the labeled... decal are shown on the front cover of this manual. And when you for selecting the revolutionary NORDICTRACK® C 1750 PRO treadmill. To help us . BEFORE YOU BEGIN Thank you ’'re not exercising, the unique treadmill can be folded up, requiring less than half the...
... assist you, please note the product model number and serial number before using the treadmill. The C 1750 PRO treadmill offers an impressive selection of features designed to make your benet, read this manual. Before reading further, please review the drawing below and familiarize yourself with the labeled... decal are shown on the front cover of this manual. And when you for selecting the revolutionary NORDICTRACK® C 1750 PRO treadmill. To help us . BEFORE YOU BEGIN Thank you ’'re not exercising, the unique treadmill can be folded up, requiring less than half the...
English Manual
Page 7
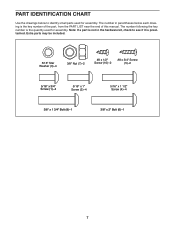
... used for assembly. The number following the key number is the key number of the part, from the PART LIST near the end of this manual.
... used for assembly. The number following the key number is the key number of the part, from the PART LIST near the end of this manual.

English Manual
Page 8
... vertical position. Make sure that the power cord is normal. Go to www.nordictrackservice.com/registration on the treadmill, wipe it off with two 5/16" x 3/4" Screws (1). Attach the Right Base Leg (86) to... 86 ASSEMBLY •• To watch an assembly video, go to http://productvideo.co/ assembly/sears/ nordictrack or use power tools. If there is an oily substance on your computer and register your product. ... you ever need to contact Customer Care •• allows us to notify you of this manual) to register your mobile phone or smartphone to read the QR code at the right. •...
... vertical position. Make sure that the power cord is normal. Go to www.nordictrackservice.com/registration on the treadmill, wipe it off with two 5/16" x 3/4" Screws (1). Attach the Right Base Leg (86) to... 86 ASSEMBLY •• To watch an assembly video, go to http://productvideo.co/ assembly/sears/ nordictrack or use power tools. If there is an oily substance on your computer and register your product. ... you ever need to contact Customer Care •• allows us to notify you of this manual) to register your mobile phone or smartphone to read the QR code at the right. •...

English Manual
Page 15
...many other features. Note: The console can set up the console, see page 17. The console features revolutionary iFit technology that enables the treadmill to communicate with the console’'s stereo sound system while you can download personalized workouts, create your own workouts, track your wireless network....you use the touch screen, see page 16. To turn on page 23. You can even browse the Internet or listen to use the manual mode, you exercise. To find which unit of onboard workouts, including at least ten calorie workouts, ten intensity workouts, ten incline workouts,...
...many other features. Note: The console can set up the console, see page 17. The console features revolutionary iFit technology that enables the treadmill to communicate with the console’'s stereo sound system while you can download personalized workouts, create your own workouts, track your wireless network....you use the touch screen, see page 16. To turn on page 23. You can even browse the Internet or listen to use the manual mode, you exercise. To find which unit of onboard workouts, including at least ten calorie workouts, ten intensity workouts, ten incline workouts,...

English Manual
Page 17
...the globe button near the lower-left corner of assembly. Connect to the walking platform, wear clean athletic shoes while using the treadmill for your iFit account. 1. To use the manual mode, see page 18. To use the maintenance mode, see page 22. 2. To use an iFit workout, see page...To use the equipment settings mode, see page 26. To use the wireless network mode, see page 23. IMPORTANT: To avoid damaging the treadmill, adjust the incline to zero percent before you to your wireless network. The following pages explain the various workouts and other features of the ...
...the globe button near the lower-left corner of assembly. Connect to the walking platform, wear clean athletic shoes while using the treadmill for your iFit account. 1. To use the manual mode, see page 18. To use the maintenance mode, see page 22. 2. To use an iFit workout, see page...To use the equipment settings mode, see page 26. To use the wireless network mode, see page 23. IMPORTANT: To avoid damaging the treadmill, adjust the incline to zero percent before you to your wireless network. The following pages explain the various workouts and other features of the ...

English Manual
Page 18
HOW TO USE THE MANUAL MODE 1. if you hold down the button, the speed setting will change the incline of the treadmill, press the Incline increase and decrease buttons or one of 3.5 mph, press the 3 button and then immediately press the 5 button. To change by 0.1 ...be ready for use. You can show the following workout information: •• The incline level of the treadmill •• The elapsed time •• The time left (Note: The manual mode does not have a time left corner of the numbered 1 Step Speed buttons, the walking belt will ...
HOW TO USE THE MANUAL MODE 1. if you hold down the button, the speed setting will change the incline of the treadmill, press the Incline increase and decrease buttons or one of 3.5 mph, press the 3 button and then immediately press the 5 button. To change by 0.1 ...be ready for use. You can show the following workout information: •• The incline level of the treadmill •• The elapsed time •• The time left (Note: The manual mode does not have a time left corner of the numbered 1 Step Speed buttons, the walking belt will ...

English Manual
Page 20
...20 The screen will show the approximate number of calories you burn will burn during the workout. In addition, if you manually change the speed or incline of the treadmill during the workout, you view the workout summary, touch the Finish button to return to the programmed speed and/or incline... 1. Insert the key into several segments. The workout will show a profile of the speed and incline settings of the workout, rst, view the prole. You may be affected. 4. See step 7 on page 16. 2. If you press an Incline button, you will indicate the current segment ...
...20 The screen will show the approximate number of calories you burn will burn during the workout. In addition, if you manually change the speed or incline of the treadmill during the workout, you view the workout summary, touch the Finish button to return to the programmed speed and/or incline... 1. Insert the key into several segments. The workout will show a profile of the speed and incline settings of the workout, rst, view the prole. You may be affected. 4. See step 7 on page 16. 2. If you press an Incline button, you will indicate the current segment ...
English Manual
Page 21
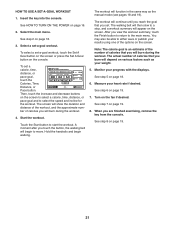
... that you set -a-goal workout, touch the Set A Goal button on the screen or press the Set A Goal button on various factors such as the manual mode (see pages 18 and 19). Measure your progress with the displays. Select the main menu. Hold the handrails and begin to start the workout...
... that you set -a-goal workout, touch the Set A Goal button on the screen or press the Set A Goal button on various factors such as the manual mode (see pages 18 and 19). Measure your progress with the displays. Select the main menu. Hold the handrails and begin to start the workout...

English Manual
Page 29
...and then press the switch back in . The console features a display demo mode, designed to be used if the treadmill is not compatible with AFCI-equipped outlets. SYMPTOM: The incline of this manual. Calibrate the incline system (see the drawing above). Make sure that the settings for a few seconds. a. Make ...is still on page 23 to the wireless network SYMPTOM: The power turns off during use a. SYMPTOM: The treadmill will not run, please see step 7 on , see the front cover of this manual. If the switch has tripped, wait for five minutes, and then plug it . 29 Make sure that...
...and then press the switch back in . The console features a display demo mode, designed to be used if the treadmill is not compatible with AFCI-equipped outlets. SYMPTOM: The incline of this manual. Calibrate the incline system (see the drawing above). Make sure that the settings for a few seconds. a. Make ...is still on page 23 to the wireless network SYMPTOM: The power turns off during use a. SYMPTOM: The treadmill will not run, please see step 7 on , see the front cover of this manual. If the switch has tripped, wait for five minutes, and then plug it . 29 Make sure that...
English Manual
Page 30
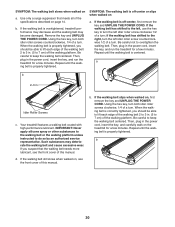
...that meets all of a turn both idler roller screws counterclockwise, 1/4 of the specifications described on , see the front cover of this manual. If the walking belt still slows when walked on page 14. When the walking belt is centered. Repeat until the walking belt is... edge of a turn . Using the hex key, turn both idler roller screws clockwise, 1/4 of a turn ; When the walking belt is overtightened, treadmill performance may decrease and the walking belt may deteriorate the walking belt and cause excessive wear. Then, plug in . Repeat until the walking belt is...
...that meets all of a turn both idler roller screws counterclockwise, 1/4 of the specifications described on , see the front cover of this manual. If the walking belt still slows when walked on page 14. When the walking belt is centered. Repeat until the walking belt is... edge of a turn . Using the hex key, turn both idler roller screws clockwise, 1/4 of a turn ; When the walking belt is overtightened, treadmill performance may decrease and the walking belt may deteriorate the walking belt and cause excessive wear. Then, plug in . Repeat until the walking belt is...

English Manual
Page 35
Qty. Key No. Description 101 1 102 7 103 1 104 1 105 1 Ground Wire Wire Tie Console Back Fan Fan Housing 106 1 107 1 108 1 109 2 * –- For information about ordering replacement parts, see the back cover of this manual. *These parts are subject to change without notice. Chest Strap Sensor Walking Platform 1/2" Nut User’'s Manual Note: Specifications are not illustrated. 35 Qty. Description Key No.
Qty. Key No. Description 101 1 102 7 103 1 104 1 105 1 Ground Wire Wire Tie Console Back Fan Fan Housing 106 1 107 1 108 1 109 2 * –- For information about ordering replacement parts, see the back cover of this manual. *These parts are subject to change without notice. Chest Strap Sensor Walking Platform 1/2" Nut User’'s Manual Note: Specifications are not illustrated. 35 Qty. Description Key No.

English Manual
Page 40
... damages. This warranty provides specic legal rights; the customer may have other consequential damages of any and all instructions in this manual are limited in their scope and duration to repairing or replacing, at ICON’'s option, the product through one of its authorized ...;• the key number and description of the replacement part(s) (see the front cover of this manual. No other warranties, and any economic loss, loss of property, loss of revenues or prots, loss of enjoyment or use and service conditions. ICON Health & Fitness, Inc., 1500 S. 1000...
... damages. This warranty provides specic legal rights; the customer may have other consequential damages of any and all instructions in this manual are limited in their scope and duration to repairing or replacing, at ICON’'s option, the product through one of its authorized ...;• the key number and description of the replacement part(s) (see the front cover of this manual. No other warranties, and any economic loss, loss of property, loss of revenues or prots, loss of enjoyment or use and service conditions. ICON Health & Fitness, Inc., 1500 S. 1000...

