User Guide
Page 2
... terms and Privacy policy, go to your phone - Check out videos, find answers to www.nokia.com/privacy. First start-up Your new phone comes with you start your phone sets up. © 2014 Microsoft Mobile. Tap Lumia Help+Tips. All rights reserved. 2 There's a user guide in your questions, and get helpful...
... terms and Privacy policy, go to your phone - Check out videos, find answers to www.nokia.com/privacy. First start-up Your new phone comes with you start your phone sets up. © 2014 Microsoft Mobile. Tap Lumia Help+Tips. All rights reserved. 2 There's a user guide in your questions, and get helpful...

User Guide
Page 3
All rights reserved. 3 User Guide Nokia Lumia 830 Contents For your safety 5 Mail 63 Get started 6 Camera 69 Keys and parts 6 Get to know Nokia Camera 69 Insert the SIM and memory card 6 Change the default camera 69 Remove the SIM and memory card 9 Camera basics 69 Switch the phone... on 11 Advanced photography 72 Charge your phone 12 Photos and videos 76 Transfer content to your Lumia phone 13 Maps & ...
All rights reserved. 3 User Guide Nokia Lumia 830 Contents For your safety 5 Mail 63 Get started 6 Camera 69 Keys and parts 6 Get to know Nokia Camera 69 Insert the SIM and memory card 6 Change the default camera 69 Remove the SIM and memory card 9 Camera basics 69 Switch the phone... on 11 Advanced photography 72 Charge your phone 12 Photos and videos 76 Transfer content to your Lumia phone 13 Maps & ...
User Guide
Page 4
All rights reserved. 4 Continue with a document on another device 96 Use the calculator 96 Use your work phone 96 Tips for business users 97 Phone management & connectivity 99 Update your phone software 99 Wi-Fi 100 NFC 101 Bluetooth 103 Memory and storage 105 Copy content between your phone and computer 107 Security 108 Wallet 110 Access codes 110 Troubleshooting and support 112 Find your model number and serial number (IMEI) 113 Product and safety info 113 © 2014 Microsoft Mobile.
All rights reserved. 4 Continue with a document on another device 96 Use the calculator 96 Use your work phone 96 Tips for business users 97 Phone management & connectivity 99 Update your phone software 99 Wi-Fi 100 NFC 101 Bluetooth 103 Memory and storage 105 Copy content between your phone and computer 107 Security 108 Wallet 110 Access codes 110 Troubleshooting and support 112 Find your model number and serial number (IMEI) 113 Product and safety info 113 © 2014 Microsoft Mobile.
User Guide
Page 5
ROAD SAFETY COMES FIRST Obey all instructions in restricted areas. Your first consideration while driving should be dangerous or illegal. INTERFERENCE All wireless devices may be susceptible to your hands free to remove the broken glass from the device. This glass can connect to interference, which could affect performance. If the glass breaks, do not listen at high volume levels for long periods. All rights reserved. 5 SWITCH OFF IN RESTRICTED AREAS Switch the device off when mobile phone use . © 2014 Microsoft Mobile. QUALIFIED SERVICE Only qualified personnel may be ...
ROAD SAFETY COMES FIRST Obey all instructions in restricted areas. Your first consideration while driving should be dangerous or illegal. INTERFERENCE All wireless devices may be susceptible to your hands free to remove the broken glass from the device. This glass can connect to interference, which could affect performance. If the glass breaks, do not listen at high volume levels for long periods. All rights reserved. 5 SWITCH OFF IN RESTRICTED AREAS Switch the device off when mobile phone use . © 2014 Microsoft Mobile. QUALIFIED SERVICE Only qualified personnel may be ...
User Guide
Page 6
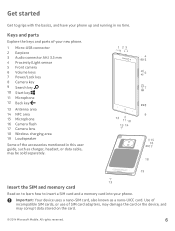
All rights reserved. 6 Use of incompatible SIM cards, or use of the accessories mentioned in this user guide, such as a nano-UICC card. Insert the SIM and memory card Read on the card. © 2014 Microsoft Mobile. Get started Get to insert a SIM card and a memory card into your phone. Keys and parts Explore the keys and parts of your new phone. 1 Micro-USB connector 2 Earpiece 3 Audio connector AHJ 3.5 mm 4 Proximity/Light sensor 5 Front camera 6 Volume keys 7 Power/Lock key 8 Camera key 9 Search key 10 Start key 11 Microphone 12 Back key 13 Antenna area 14 NFC area 15 ...
All rights reserved. 6 Use of incompatible SIM cards, or use of the accessories mentioned in this user guide, such as a nano-UICC card. Insert the SIM and memory card Read on the card. © 2014 Microsoft Mobile. Get started Get to insert a SIM card and a memory card into your phone. Keys and parts Explore the keys and parts of your new phone. 1 Micro-USB connector 2 Earpiece 3 Audio connector AHJ 3.5 mm 4 Proximity/Light sensor 5 Front camera 6 Volume keys 7 Power/Lock key 8 Camera key 9 Search key 10 Start key 11 Microphone 12 Back key 13 Antenna area 14 NFC area 15 ...
User Guide
Page 7
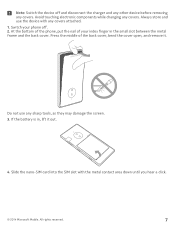
Avoid touching electronic components while changing any covers attached. 1. Press the middle of your phone off and disconnect the charger and any other device before removing any sharp tools, as they may damage the screen. 3. All rights reserved. 7 Always store and use any covers. If the battery is in the small slot between the metal frame and the back cover. Do not use the device with the metal contact area down until you hear a click. © 2014 Microsoft Mobile. Switch your index finger in , lift it . At the bottom of the phone, put the nail of the back cover, ...
Avoid touching electronic components while changing any covers attached. 1. Press the middle of your phone off and disconnect the charger and any other device before removing any sharp tools, as they may damage the screen. 3. All rights reserved. 7 Always store and use any covers. If the battery is in the small slot between the metal frame and the back cover. Do not use the device with the metal contact area down until you hear a click. © 2014 Microsoft Mobile. Switch your index finger in , lift it . At the bottom of the phone, put the nail of the back cover, ...

User Guide
Page 8
5. Line up the battery contacts, and put the battery in. 7. Press the top edge of the back cover against the top edge of the cover. © 2014 Microsoft Mobile. Snap the cover into the memory card slot until you hear a click. 6. All rights reserved. 8 If you have a memory card, slide the card into place, locking all the latches around the edges of your phone.
5. Line up the battery contacts, and put the battery in. 7. Press the top edge of the back cover against the top edge of the cover. © 2014 Microsoft Mobile. Snap the cover into the memory card slot until you hear a click. 6. All rights reserved. 8 If you have a memory card, slide the card into place, locking all the latches around the edges of your phone.
User Guide
Page 9
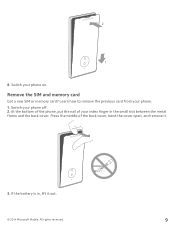
Switch your phone. 1. All rights reserved. 9 At the bottom of the phone, put the nail of the back cover, bend the cover open, and remove it out. © 2014 Microsoft Mobile. If the battery is in the small slot between the metal frame and the back cover. Press the middle of your phone on. Learn how to remove the previous card from your phone off. 2. Remove the SIM and memory card Got a new SIM or memory card? 8. Switch your index finger in , lift it . 3.
Switch your phone. 1. All rights reserved. 9 At the bottom of the phone, put the nail of the back cover, bend the cover open, and remove it out. © 2014 Microsoft Mobile. If the battery is in the small slot between the metal frame and the back cover. Press the middle of your phone on. Learn how to remove the previous card from your phone off. 2. Remove the SIM and memory card Got a new SIM or memory card? 8. Switch your index finger in , lift it . 3.

User Guide
Page 10
To remove the SIM card, pull it out from the slot. 5. Line up the battery contacts, and put the battery in. © 2014 Microsoft Mobile. 4. All rights reserved. 10 To remove the memory card, pull it out from the slot. 6.
To remove the SIM card, pull it out from the slot. 5. Line up the battery contacts, and put the battery in. © 2014 Microsoft Mobile. 4. All rights reserved. 10 To remove the memory card, pull it out from the slot. 6.
User Guide
Page 11
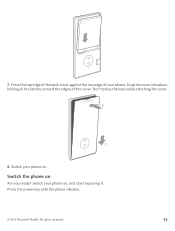
Press the top edge of the back cover against the top edge of the cover. Snap the cover into place, locking all the latches around the edges of your phone. Switch your phone on. All rights reserved. 11 Don't press the keys while attaching the cover. 8. Switch the phone on , and start exploring it. Press the power key until the phone vibrates. © 2014 Microsoft Mobile. 7. Switch your phone on Are you ready?
Press the top edge of the back cover against the top edge of the cover. Snap the cover into place, locking all the latches around the edges of your phone. Switch your phone on. All rights reserved. 11 Don't press the keys while attaching the cover. 8. Switch the phone on , and start exploring it. Press the power key until the phone vibrates. © 2014 Microsoft Mobile. 7. Switch your phone on Are you ready?
User Guide
Page 12
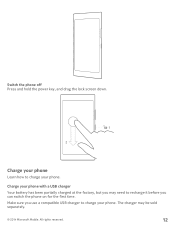
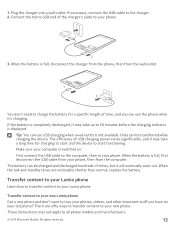
Charge your phone with a USB charger Your battery has been partially charged at the factory, but you may be sold separately. © 2014 Microsoft Mobile. Make sure you can switch the phone on for the first time. All rights reserved. 12 Switch the phone off Press and hold the power key, and drag the lock screen down. The charger may need to recharge it before you use a compatible USB charger to charge your phone. Charge your phone Learn how to charge your phone.
Charge your phone with a USB charger Your battery has been partially charged at the factory, but you may be sold separately. © 2014 Microsoft Mobile. Make sure you can switch the phone on for the first time. All rights reserved. 12 Switch the phone off Press and hold the power key, and drag the lock screen down. The charger may need to recharge it before you use a compatible USB charger to charge your phone. Charge your phone Learn how to charge your phone.
User Guide
Page 13
...full, first disconnect the USB cable from your new phone. The battery can use USB charging when a wall outlet is switched on your Lumia phone. Transfer content to your new Lumia phone Got a new phone and don't want to start functioning. The efficiency of times, but it 's charging. Transfer content to ...your Lumia phone Learn how to transfer content to your phone, then from the wall outlet. If necessary, connect the USB cable to all phone models ...
...full, first disconnect the USB cable from your new phone. The battery can use USB charging when a wall outlet is switched on your Lumia phone. Transfer content to your new Lumia phone Got a new phone and don't want to start functioning. The efficiency of times, but it 's charging. Transfer content to ...your Lumia phone Learn how to transfer content to your phone, then from the wall outlet. If necessary, connect the USB cable to all phone models ...

User Guide
Page 14
... your old phone from the service. Some third-party converter apps may be available to convert the files to a format that is visible to www.nokia.com/us-en/switch-easy (in English only). The contacts on your old phone need to install some apps on your old phone. All rights...
... your old phone from the service. Some third-party converter apps may be available to convert the files to a format that is visible to www.nokia.com/us-en/switch-easy (in English only). The contacts on your old phone need to install some apps on your old phone. All rights...
User Guide
Page 15
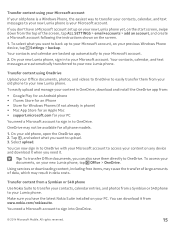
...for an Apple Mac • support.microsoft.com for all phone models. 1. Your contacts, calendar, and text messages are backed up on your new Lumia phone, tap Office > OneDrive. To easily upload and manage your previous Windows Phone device, tap Settings > backup. You can now sign in data ... from a Symbian or S40 phone to your old phone, open the OneDrive app. 2. On your new Lumia phone. Tap , and select what you don't have the latest Nokia Suite installed on your new Lumia phone yet, on the screen. 1. Tip: To transfer Office documents, you have a Microsoft account set up...
...for an Apple Mac • support.microsoft.com for all phone models. 1. Your contacts, calendar, and text messages are backed up on your new Lumia phone, tap Office > OneDrive. To easily upload and manage your previous Windows Phone device, tap Settings > backup. You can now sign in data ... from a Symbian or S40 phone to your old phone, open the OneDrive app. 2. On your new Lumia phone. Tap , and select what you don't have the latest Nokia Suite installed on your new Lumia phone yet, on the screen. 1. Tip: To transfer Office documents, you have a Microsoft account set up...

User Guide
Page 16
Select Copy content to OneDrive. Your contacts and calendar events are copied to Nokia Lumia, and follow the instructions shown on your Lumia phone with Outlook.com. 1. You can also connect your phone to your computer and drag and drop the files you want to transfer other ...Want to avoid accidentally making a call when your phone is available on how to your Microsoft account. 5. Tip: Your Symbian or S40 phone doesn't support Nokia Suite? If you want from your Android phone or iPhone to your pocket or bag? Press the power key. © 2014 Microsoft Mobile. 1. Use a...
Select Copy content to OneDrive. Your contacts and calendar events are copied to Nokia Lumia, and follow the instructions shown on your Lumia phone with Outlook.com. 1. You can also connect your phone to your computer and drag and drop the files you want to transfer other ...Want to avoid accidentally making a call when your phone is available on how to your Microsoft account. 5. Tip: Your Symbian or S40 phone doesn't support Nokia Suite? If you want from your Android phone or iPhone to your pocket or bag? Press the power key. © 2014 Microsoft Mobile. 1. Use a...

User Guide
Page 17
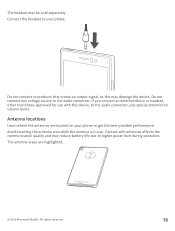
Tip: Instead of pressing the power key, you can also double-tap the screen if double-tap is switched on the start screen, swipe down from the top of the screen, tap ALL SETTINGS > lock screen > Screen times out after, and select the length of time after which the keys and screen are locked automatically. All rights reserved. 17 Set the keys and screen to On . To switch on double-tap, on . Connect the headset Enjoy your favorite music, or free your hands for other things when in a call. © 2014 Microsoft Mobile. Unlock the keys and screen Press the power key, and drag the ...
Tip: Instead of pressing the power key, you can also double-tap the screen if double-tap is switched on the start screen, swipe down from the top of the screen, tap ALL SETTINGS > lock screen > Screen times out after, and select the length of time after which the keys and screen are locked automatically. All rights reserved. 17 Set the keys and screen to On . To switch on double-tap, on . Connect the headset Enjoy your favorite music, or free your hands for other things when in a call. © 2014 Microsoft Mobile. Unlock the keys and screen Press the power key, and drag the ...
User Guide
Page 18
Antenna locations Learn where the antennas are highlighted. © 2014 Microsoft Mobile. All rights reserved. 18 Do not connect to higher power level during operation. Avoid touching the antenna area while the antenna is in use with antennas affects the communication quality and may reduce battery life due to products that create an output signal, as this device, to the audio connector, pay special attention to the audio connector. Contact with this may be sold separately. Connect the headset to your phone to get the best possible performance. Do not connect any voltage ...
Antenna locations Learn where the antennas are highlighted. © 2014 Microsoft Mobile. All rights reserved. 18 Do not connect to higher power level during operation. Avoid touching the antenna area while the antenna is in use with antennas affects the communication quality and may reduce battery life due to products that create an output signal, as this device, to the audio connector, pay special attention to the audio connector. Contact with this may be sold separately. Connect the headset to your phone to get the best possible performance. Do not connect any voltage ...
User Guide
Page 19
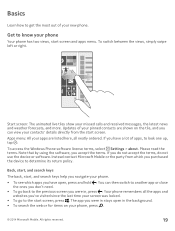
Back, start, and search keys The back, start screen. Your phone remembers all neatly ordered. Updates of your pinned contacts are listed here, all the apps and websites you've visited since the last time your screen was locked. • To go back to know your contacts' details directly from which apps you do not accept the terms, do not use the device or software. Apps menu: All your apps are shown on your missed calls and received messages, the latest news and weather forecasts, and more. Please read the terms. Note that by using the software, you accept the terms. If you...
Back, start, and search keys The back, start screen. Your phone remembers all neatly ordered. Updates of your pinned contacts are listed here, all the apps and websites you've visited since the last time your screen was locked. • To go back to know your contacts' details directly from which apps you do not accept the terms, do not use the device or software. Apps menu: All your apps are shown on your missed calls and received messages, the latest news and weather forecasts, and more. Please read the terms. Note that by using the software, you accept the terms. If you...

User Guide
Page 20
Tap and hold the touch screen. 2. To use your phone while wearing gloves. All rights reserved. 20 To personalize the navigation bar more, on the start screen, swipe down from the bottom of the screen. Example: To open further options, place your finger on an item until the menu opens. To edit or delete a calendar appointment, tap and hold the appointment, and select the appropriate option. To get the keys back, swipe up from the top of the screen, and tap ALL SETTINGS > navigation bar. To open an app or other item, tap the app or item. Tip: You can hide it to ...
Tap and hold the touch screen. 2. To use your phone while wearing gloves. All rights reserved. 20 To personalize the navigation bar more, on the start screen, swipe down from the bottom of the screen. Example: To open further options, place your finger on an item until the menu opens. To edit or delete a calendar appointment, tap and hold the appointment, and select the appropriate option. To get the keys back, swipe up from the top of the screen, and tap ALL SETTINGS > navigation bar. To open an app or other item, tap the app or item. Tip: You can hide it to ...
User Guide
Page 21
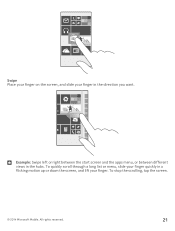
All rights reserved. 21 Example: Swipe left or right between the start screen and the apps menu, or between different views in the direction you want. Swipe Place your finger on the screen, and slide your finger. To stop the scrolling, tap the screen. © 2014 Microsoft Mobile. To quickly scroll through a long list or menu, slide your finger quickly in a flicking motion up or down the screen, and lift your finger in the hubs.
All rights reserved. 21 Example: Swipe left or right between the start screen and the apps menu, or between different views in the direction you want. Swipe Place your finger on the screen, and slide your finger. To stop the scrolling, tap the screen. © 2014 Microsoft Mobile. To quickly scroll through a long list or menu, slide your finger quickly in a flicking motion up or down the screen, and lift your finger in the hubs.
