User Guide
Page 2
... locations 12 Internet connections 38 Switch the phone on or off 12 Internet 40 Create your accounts 13 Windows Live ID 15 Messaging & mail 41 Nokia account 15 Messages 41 Copy contacts from your old phone 15 Mail 44 Lock or unlock the keys and screen 16 Headset 17 Camera 46...
... locations 12 Internet connections 38 Switch the phone on or off 12 Internet 40 Create your accounts 13 Windows Live ID 15 Messaging & mail 41 Nokia account 15 Messages 41 Copy contacts from your old phone 15 Mail 44 Lock or unlock the keys and screen 16 Headset 17 Camera 46...

User Guide
Page 3
Entertainment 53 Music and videos 53 Nokia Music 55 Marketplace 55 Games 57 Maps & navigation 59 Positioning and location services 59 Bing Maps 59 Drive 63 Office 65 Clock 65 Calendar 66 ...
Entertainment 53 Music and videos 53 Nokia Music 55 Marketplace 55 Games 57 Maps & navigation 59 Positioning and location services 59 Bing Maps 59 Drive 63 Office 65 Clock 65 Calendar 66 ...
User Guide
Page 4
... the device off when cell phone use with this product. Do not connect incompatible products. This glass can break if the device is replaced by Nokia for example, in aircraft, in restricted areas. Your first consideration while driving should be susceptible to operate the vehicle while driving. GLASS PARTS The device...
... the device off when cell phone use with this product. Do not connect incompatible products. This glass can break if the device is replaced by Nokia for example, in aircraft, in restricted areas. Your first consideration while driving should be susceptible to operate the vehicle while driving. GLASS PARTS The device...

User Guide
Page 5
Safety 5 PROTECT YOUR HEARING Listen to a headset at a moderate level, and do not hold the device near your ear when the loudspeaker is in use.
Safety 5 PROTECT YOUR HEARING Listen to a headset at a moderate level, and do not hold the device near your ear when the loudspeaker is in use.
User Guide
Page 6
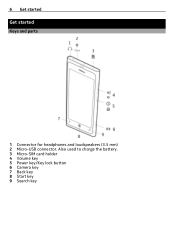
6 Get started Get started Keys and parts 1 Connector for headphones and loudspeakers (3.5 mm) 2 Micro-USB connector. Also used to charge the battery. 3 Micro-SIM card holder 4 Volume key 5 Power key/Key lock button 6 Camera key 7 Back key 8 Start key 9 Search key
6 Get started Get started Keys and parts 1 Connector for headphones and loudspeakers (3.5 mm) 2 Micro-USB connector. Also used to charge the battery. 3 Micro-SIM card holder 4 Volume key 5 Power key/Key lock button 6 Camera key 7 Back key 8 Start key 9 Search key

User Guide
Page 7
Your phone remembers all the apps and websites you to navigate your phone. Control your phone with your screen was locked. Get started 7 10 Camera flash 11 Camera lens 12 Microphone 13 Loudspeaker If there is protective tape on the camera lens, remove the tape. Switch between open apps Press and hold , and say a voice command. Start key Go to the previous screen Press . Back key Return to the start , and search keys help you have visited since the last time your voice Press and hold , swipe left or right, and select the desired app. Back, start, and search keys The back, ...
Your phone remembers all the apps and websites you to navigate your phone. Control your phone with your screen was locked. Get started 7 10 Camera flash 11 Camera lens 12 Microphone 13 Loudspeaker If there is protective tape on the camera lens, remove the tape. Switch between open apps Press and hold , and say a voice command. Start key Go to the previous screen Press . Back key Return to the start , and search keys help you have visited since the last time your voice Press and hold , swipe left or right, and select the desired app. Back, start, and search keys The back, ...
User Guide
Page 8
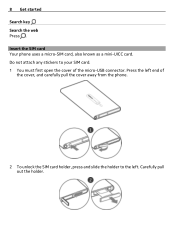
Insert the SIM card Your phone uses a micro-SIM card, also known as a mini-UICC card. Do not attach any stickers to the left. 8 Get started Search key Search the web Press . Carefully pull out the holder. Press the left end of the cover, and carefully pull the cover away from the phone. 2 To unlock the SIM card holder, press and slide the holder to your SIM card. 1 You must first open the cover of the micro-USB connector.
Insert the SIM card Your phone uses a micro-SIM card, also known as a mini-UICC card. Do not attach any stickers to the left. 8 Get started Search key Search the web Press . Carefully pull out the holder. Press the left end of the cover, and carefully pull the cover away from the phone. 2 To unlock the SIM card holder, press and slide the holder to your SIM card. 1 You must first open the cover of the micro-USB connector.
User Guide
Page 9
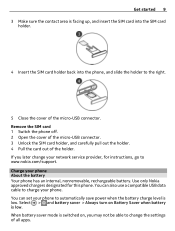
... chargers designated for instructions, go to www.nokia.com/support. You can set your phone to change your phone About the battery Your phone has an internal, nonremovable, rechargeable battery. Get started 9 3 Make ...
... chargers designated for instructions, go to www.nokia.com/support. You can set your phone to change your phone About the battery Your phone has an internal, nonremovable, rechargeable battery. Get started 9 3 Make ...

User Guide
Page 10
To replace the battery, take the device to remove the battery from the wall outlet. Important: Only qualified personnel or an authorized service facility should replace the battery. Unauthorized battery replacement may also offer a battery replacement service. If the phone indicates a low charge, do not need to your phone. 2 When the battery is charging. You do the following: Charge from a wall outlet 1 First connect the USB cable to the charger, and the charger to the wall outlet, then connect the USB cable to recharge it is full, disconnect the charger from the phone, ...
To replace the battery, take the device to remove the battery from the wall outlet. Important: Only qualified personnel or an authorized service facility should replace the battery. Unauthorized battery replacement may also offer a battery replacement service. If the phone indicates a low charge, do not need to your phone. 2 When the battery is charging. You do the following: Charge from a wall outlet 1 First connect the USB cable to the charger, and the charger to the wall outlet, then connect the USB cable to recharge it is full, disconnect the charger from the phone, ...
User Guide
Page 11
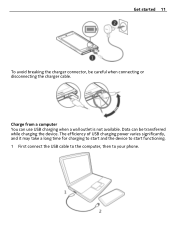
The efficiency of USB charging power varies significantly, and it may take a long time for charging to start and the device to start functioning. 1 First connect the USB cable to the computer, then to your phone. Get started 11 To avoid breaking the charger connector, be transferred while charging the device. Data can use USB charging when a wall outlet is not available. Charge from a computer You can be careful when connecting or disconnecting the charger cable.
The efficiency of USB charging power varies significantly, and it may take a long time for charging to start and the device to start functioning. 1 First connect the USB cable to the computer, then to your phone. Get started 11 To avoid breaking the charger connector, be transferred while charging the device. Data can use USB charging when a wall outlet is not available. Charge from a computer You can be careful when connecting or disconnecting the charger cable.
User Guide
Page 12
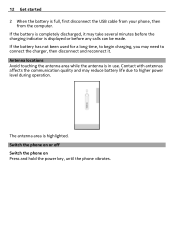
12 Get started 2 When the battery is in use. Antenna locations Avoid touching the antenna area while the antenna is full, first disconnect the USB cable from your phone, then from the computer. The antenna area is displayed or before the charging indicator is highlighted. Switch the phone on or off Switch the phone on Press and hold the power key, until the phone vibrates. Contact with antennas affects the communication quality and may need to higher power level during operation. If the battery is completely discharged, it . If the battery has not been used for a long time, to...
12 Get started 2 When the battery is in use. Antenna locations Avoid touching the antenna area while the antenna is full, first disconnect the USB cable from your phone, then from the computer. The antenna area is displayed or before the charging indicator is highlighted. Switch the phone on or off Switch the phone on Press and hold the power key, until the phone vibrates. Contact with antennas affects the communication quality and may need to higher power level during operation. If the battery is completely discharged, it . If the battery has not been used for a long time, to...
User Guide
Page 13
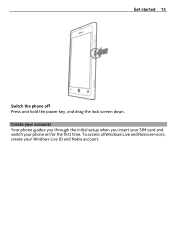
Create your accounts Your phone guides you through the initial setup when you insert your SIM card and switch your Windows Live ID and Nokia account. To access all Windows Live and Nokia services, create your phone on for the first time. Get started 13 Switch the phone off Press and hold the power key, and drag the lock screen down.
Create your accounts Your phone guides you through the initial setup when you insert your SIM card and switch your Windows Live ID and Nokia account. To access all Windows Live and Nokia services, create your phone on for the first time. Get started 13 Switch the phone off Press and hold the power key, and drag the lock screen down.
User Guide
Page 14
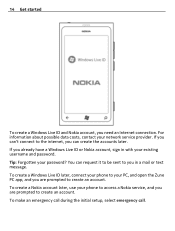
...existing username and password. For information about possible data costs, contact your password? If you are prompted to create an account. To create a Nokia account later, use your PC, and open the Zune PC app, and you can create the accounts later. To make an emergency call ...initial setup, select emergency call. To create a Windows Live ID later, connect your phone to your phone to access a Nokia service, and you already have a Windows Live ID or Nokia account, sign in a mail or text message. Tip: Forgotten your network service provider. You can 't connect to you ...
...existing username and password. For information about possible data costs, contact your password? If you are prompted to create an account. To create a Nokia account later, use your PC, and open the Zune PC app, and you can create the accounts later. To make an emergency call ...initial setup, select emergency call. To create a Windows Live ID later, connect your phone to your phone to access a Nokia service, and you already have a Windows Live ID or Nokia account, sign in a mail or text message. Tip: Forgotten your network service provider. You can 't connect to you ...
User Guide
Page 15
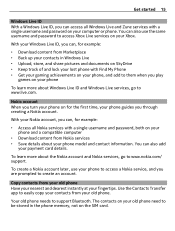
... model and contact information. You can also add your phone to access Xbox Live services on your fingertips. To create a Nokia account later, use the same username and password to access a Nokia service, and you can , for the first time, your old phone. Use the Contacts Transfer app to create an account.... With your Nokia account, you are prompted to easily copy your contacts from Marketplace • Back up your computer or phone. With your Windows Live ID, you can , ...
... model and contact information. You can also add your phone to access Xbox Live services on your fingertips. To create a Nokia account later, use the same username and password to access a Nokia service, and you can , for the first time, your old phone. Use the Contacts Transfer app to create an account.... With your Nokia account, you are prompted to easily copy your contacts from Marketplace • Back up your computer or phone. With your Windows Live ID, you can , ...
User Guide
Page 16
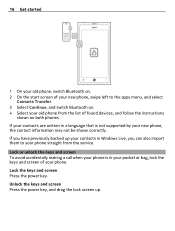
Lock the keys and screen Press the power key. Lock or unlock the keys and screen To avoid accidentally making a call when your phone is not supported by your phone straight from the list of found devices, and follow the instructions shown on . 4 Select your phone. 16 Get started 1 On your old phone, switch Bluetooth on. 2 On the start screen of your new phone, swipe left to your new phone, the contact information may not be shown correctly. If you have previously backed up . Unlock the keys and screen Press the power key, and drag the lock screen up your contacts in your ...
Lock the keys and screen Press the power key. Lock or unlock the keys and screen To avoid accidentally making a call when your phone is not supported by your phone straight from the list of found devices, and follow the instructions shown on . 4 Select your phone. 16 Get started 1 On your old phone, switch Bluetooth on. 2 On the start screen of your new phone, swipe left to your new phone, the contact information may not be shown correctly. If you have previously backed up . Unlock the keys and screen Press the power key, and drag the lock screen up your contacts in your ...

User Guide
Page 17
... audio connector, pay special attention to your phone. The built-in loudspeaker allows you connect an external device or headset, other than those approved by Nokia for use with this may damage the device. If you to speak and listen from a short distance without having to hold the phone to volume...
... audio connector, pay special attention to your phone. The built-in loudspeaker allows you connect an external device or headset, other than those approved by Nokia for use with this may damage the device. If you to speak and listen from a short distance without having to hold the phone to volume...
User Guide
Page 18
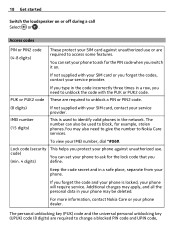
...phone against unauthorized use . The personal unblocking key (PUK) code and the universal personal unblocking key (UPUK) code (8 digits) are required to Nokia Care services. The number can set your phone to ask for the lock code that you forget the code and your service provider. If not...(4-8 digits) These protect your phone will require service. To view your phone dealer. code) You can set your phone. For more information, contact Nokia Care or your IMEI number, dial *#06#. PUK or PUK2 code If you type in the code incorrectly three times in a safe place, separate...
...phone against unauthorized use . The personal unblocking key (PUK) code and the universal personal unblocking key (UPUK) code (8 digits) are required to Nokia Care services. The number can set your phone to ask for the lock code that you forget the code and your service provider. If not...(4-8 digits) These protect your phone will require service. To view your phone dealer. code) You can set your phone. For more information, contact Nokia Care or your IMEI number, dial *#06#. PUK or PUK2 code If you type in the code incorrectly three times in a safe place, separate...
User Guide
Page 19
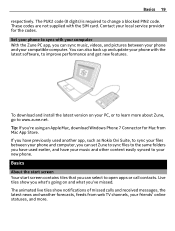
... supplied with the latest software, to your phone with the SIM card. If you have previously used earlier, and have used another app, such as Nokia Ovi Suite, to sync your files between your phone and computer, you can set Zune to sync files to open apps or call contacts. Contact...
... supplied with the latest software, to your phone with the SIM card. If you have previously used earlier, and have used another app, such as Nokia Ovi Suite, to sync your files between your phone and computer, you can set Zune to sync files to open apps or call contacts. Contact...

User Guide
Page 20
Pin contacts, apps, music, pictures, feeds, mailboxes, and other favorites, so they're always with further options Place your phone, tap or tap and hold to personalize. Open an app or other sharp object on an item, until the menu opens. Never use your finger on the touch screen. When you pin contacts, their updates are displayed on the start screen. Important: Avoid scratching the touch screen. 20 Basics The start screen. Tap and hold the touch screen. Touch screen actions To use an actual pen, pencil, or other screen element Tap the app or element. Tip: To ...
Pin contacts, apps, music, pictures, feeds, mailboxes, and other favorites, so they're always with further options Place your phone, tap or tap and hold to personalize. Open an app or other sharp object on an item, until the menu opens. Never use your finger on the touch screen. When you pin contacts, their updates are displayed on the start screen. Important: Avoid scratching the touch screen. 20 Basics The start screen. Tap and hold the touch screen. Touch screen actions To use an actual pen, pencil, or other screen element Tap the app or element. Tip: To ...

User Guide
Page 21
Basics 21 Example: To edit or delete a calendar appointment, tap and hold to drag an item Place your finger on the screen, and steadily slide your finger across the screen. Swipe Place a finger on the item for a second or two, and slide your finger in the desired direction. Tap and hold the appointment, and select the appropriate option.
Basics 21 Example: To edit or delete a calendar appointment, tap and hold to drag an item Place your finger on the screen, and steadily slide your finger across the screen. Swipe Place a finger on the item for a second or two, and slide your finger in the desired direction. Tap and hold the appointment, and select the appropriate option.
