
Nokia C6-01 User Guide in English
Page 2
... or pictures from your old device 15 Device set-up 16 Use the in-device user guide 16 Install Nokia Ovi Suite on your PC 16 Explore Nokia's Ovi internet services 18 Ovi by Nokia 18 About Ovi Mail 18 About Ovi Maps 18 About Ovi Store 19 Basic use 19 Touch screen...
... or pictures from your old device 15 Device set-up 16 Use the in-device user guide 16 Install Nokia Ovi Suite on your PC 16 Explore Nokia's Ovi internet services 18 Ovi by Nokia 18 About Ovi Mail 18 About Ovi Maps 18 About Ovi Store 19 Basic use 19 Touch screen...
Nokia C6-01 User Guide in English
Page 3
Contents 3 Send your contact information using My Add an event to your device Card 48 calendar 60 Create a contact group 48 Send a message to a group of Camera 60 people 48 About Camera 60 Contacts stored on the SIM card 49 Take a picture 60 Messaging Save location information to your 49 pictures and videos 61 About Messaging 49 Take a picture in the dark 61 Send a message 49 Picture tips 62 Send an audio message 50 Record a video 62 Receive messages 50 Send a picture 62 View a conversation Listen to a text message Change language 51 51 Your pictures and ...
Contents 3 Send your contact information using My Add an event to your device Card 48 calendar 60 Create a contact group 48 Send a message to a group of Camera 60 people 48 About Camera 60 Contacts stored on the SIM card 49 Take a picture 60 Messaging Save location information to your 49 pictures and videos 61 About Messaging 49 Take a picture in the dark 61 Send a message 49 Picture tips 62 Send an audio message 50 Record a video 62 Receive messages 50 Send a picture 62 View a conversation Listen to a text message Change language 51 51 Your pictures and ...
Nokia C6-01 User Guide in English
Page 4
4 Contents Office 88 Quickoffice 88 Read PDF documents 88 Make a calculation 89 Write notes 89 Translate words from one language to another 89 Open or create zip files 90 Connectivity 90 Internet connections 90 Wi-Fi 91 Bluetooth 92 USB data cable 95 Close a network connection 96 Store your files on a remote drive 97 Unreadable characters while browsing the web 107 Prepare your device for recycling 107 Green tips 107 Save energy 107 Recycle 108 Product and safety information 108 Index 115 Device management 98 Keep your device software and ...
4 Contents Office 88 Quickoffice 88 Read PDF documents 88 Make a calculation 89 Write notes 89 Translate words from one language to another 89 Open or create zip files 90 Connectivity 90 Internet connections 90 Wi-Fi 91 Bluetooth 92 USB data cable 95 Close a network connection 96 Store your files on a remote drive 97 Unreadable characters while browsing the web 107 Prepare your device for recycling 107 Green tips 107 Save energy 107 Recycle 108 Product and safety information 108 Index 115 Device management 98 Keep your device software and ...
Nokia C6-01 User Guide in English
Page 5
Not following them may cause interference or danger, for further information. QUALIFIED SERVICE Only qualified personnel may be susceptible to remove the broken glass from the device. KEEP YOUR DEVICE DRY Your device is dropped on a hard surface or receives a substantial impact. This glass can break if the device is not water-resistant. If the glass breaks, do not hold the device near medical equipment, fuel, chemicals, or blasting areas. Read the complete user guide for example, in use is in aircraft, near your hands free to a headset at a moderate level, and do not touch ...
Not following them may cause interference or danger, for further information. QUALIFIED SERVICE Only qualified personnel may be susceptible to remove the broken glass from the device. KEEP YOUR DEVICE DRY Your device is dropped on a hard surface or receives a substantial impact. This glass can break if the device is not water-resistant. If the glass breaks, do not hold the device near medical equipment, fuel, chemicals, or blasting areas. Read the complete user guide for example, in use is in aircraft, near your hands free to a headset at a moderate level, and do not touch ...
Nokia C6-01 User Guide in English
Page 6
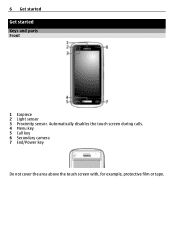
6 Get started Get started Keys and parts Front 1 Earpiece 2 Light sensor 3 Proximity sensor. Automatically disables the touch screen during calls. 4 Menu key 5 Call key 6 Secondary camera 7 End/Power key Do not cover the area above the touch screen with, for example, protective film or tape.
6 Get started Get started Keys and parts Front 1 Earpiece 2 Light sensor 3 Proximity sensor. Automatically disables the touch screen during calls. 4 Menu key 5 Call key 6 Secondary camera 7 End/Power key Do not cover the area above the touch screen with, for example, protective film or tape.
Nokia C6-01 User Guide in English
Page 7
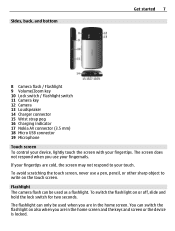
.../Zoom key 10 Lock switch / Flashlight switch 11 Camera key 12 Camera 13 Loudspeaker 14 Charger connector 15 Wrist strap peg 16 Charging indicator 17 Nokia AV connector (3.5 mm) 18 Micro USB connector 19 Microphone Touch screen To control your device, lightly touch the screen with your touch. To avoid scratching...
.../Zoom key 10 Lock switch / Flashlight switch 11 Camera key 12 Camera 13 Loudspeaker 14 Charger connector 15 Wrist strap peg 16 Charging indicator 17 Nokia AV connector (3.5 mm) 18 Micro USB connector 19 Microphone Touch screen To control your device, lightly touch the screen with your touch. To avoid scratching...
Nokia C6-01 User Guide in English
Page 8
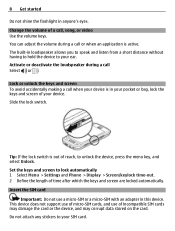
Change the volume of incompatible SIM cards may damage the card or the device, and may corrupt data stored on the card. Lock or unlock the keys and screen To avoid accidentally making a call or when an application is active. Insert the SIM card Important: Do not use of a call Select or . Set the keys and screen to your SIM card. Slide the lock switch. 8 Get started Do not shine the flashlight in loudspeaker allows you to speak and listen from a short distance without having to hold the device to your ear. The built-in anyone's eyes. Do not attach any stickers to lock ...
Change the volume of incompatible SIM cards may damage the card or the device, and may corrupt data stored on the card. Lock or unlock the keys and screen To avoid accidentally making a call or when an application is active. Insert the SIM card Important: Do not use of a call Select or . Set the keys and screen to your SIM card. Slide the lock switch. 8 Get started Do not shine the flashlight in loudspeaker allows you to speak and listen from a short distance without having to hold the device to your ear. The built-in anyone's eyes. Do not attach any stickers to lock ...
Nokia C6-01 User Guide in English
Page 9
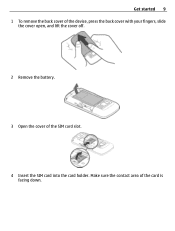
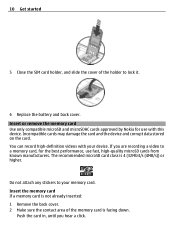
Get started 9 1 To remove the back cover of the device, press the back cover with your fingers, slide the cover open, and lift the cover off. 2 Remove the battery. 3 Open the cover of the card is facing down. Make sure the contact area of the SIM card slot. 4 Insert the SIM card into the card holder.
Get started 9 1 To remove the back cover of the device, press the back cover with your fingers, slide the cover open, and lift the cover off. 2 Remove the battery. 3 Open the cover of the card is facing down. Make sure the contact area of the SIM card slot. 4 Insert the SIM card into the card holder.
Nokia C6-01 User Guide in English
Page 10
... and the device and corrupt data stored on the card. Insert or remove the memory card Use only compatible microSD and microSDHC cards approved by Nokia for the best performance, use with your memory card. 10 Get started 5 Close the SIM card holder, and slide the cover of the memory card...
... and the device and corrupt data stored on the card. Insert or remove the memory card Use only compatible microSD and microSDHC cards approved by Nokia for the best performance, use with your memory card. 10 Get started 5 Close the SIM card holder, and slide the cover of the memory card...
Nokia C6-01 User Guide in English
Page 11
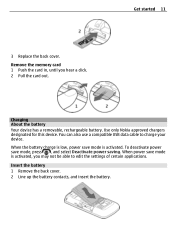
... to edit the settings of certain applications. Insert the battery 1 Remove the back cover. 2 Line up the battery contacts, and insert the battery. Use only Nokia approved chargers designated for this device. When the battery charge is low, power save mode is activated, you hear a click. 2 Pull the card out.
... to edit the settings of certain applications. Insert the battery 1 Remove the back cover. 2 Line up the battery contacts, and insert the battery. Use only Nokia approved chargers designated for this device. When the battery charge is low, power save mode is activated, you hear a click. 2 Pull the card out.
Nokia C6-01 User Guide in English
Page 12
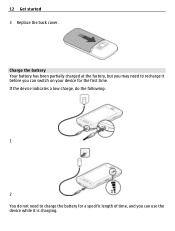
If the device indicates a low charge, do the following: 1 2 You do not need to charge the battery for the first time. 12 Get started 3 Replace the back cover. Charge the battery Your battery has been partially charged at the factory, but you can use the device while it before you can switch on your device for a specific length of time, and you may need to recharge it is charging.
If the device indicates a low charge, do the following: 1 2 You do not need to charge the battery for the first time. 12 Get started 3 Replace the back cover. Charge the battery Your battery has been partially charged at the factory, but you can use the device while it before you can switch on your device for a specific length of time, and you may need to recharge it is charging.
Nokia C6-01 User Guide in English
Page 13
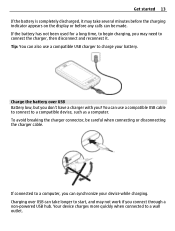
You can be careful when connecting or disconnecting the charger cable. To avoid breaking the charger connector, be made. If connected to a computer, you ? Charge the battery over USB can take longer to start, and may take several minutes before the charging indicator appears on the display or before any calls can use a compatible USB charger to connect the charger, then disconnect and reconnect it may not work if you connect through a non-powered USB hub. Your device charges more quickly when connected to a compatible device, such as a computer. If the battery has not ...
You can be careful when connecting or disconnecting the charger cable. To avoid breaking the charger connector, be made. If connected to a computer, you ? Charge the battery over USB can take longer to start, and may take several minutes before the charging indicator appears on the display or before any calls can use a compatible USB charger to connect the charger, then disconnect and reconnect it may not work if you connect through a non-powered USB hub. Your device charges more quickly when connected to a compatible device, such as a computer. If the battery has not ...
Nokia C6-01 User Guide in English
Page 14
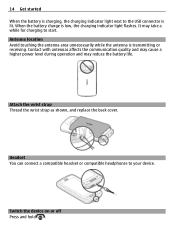
Switch the device on or off Press and hold . Headset You can connect a compatible headset or compatible headphones to your device. Attach the wrist strap Thread the wrist strap as shown, and replace the back cover. Contact with antennas affects the communication quality and may cause a higher power level during operation and may take a while for charging to start. 14 Get started When the battery is charging, the charging indicator light next to the USB connector is transmitting or receiving. Antenna location Avoid touching the antenna area unnecessarily while the antenna is ...
Switch the device on or off Press and hold . Headset You can connect a compatible headset or compatible headphones to your device. Attach the wrist strap Thread the wrist strap as shown, and replace the back cover. Contact with antennas affects the communication quality and may cause a higher power level during operation and may take a while for charging to start. 14 Get started When the battery is charging, the charging indicator light next to the USB connector is transmitting or receiving. Antenna location Avoid touching the antenna area unnecessarily while the antenna is ...
Nokia C6-01 User Guide in English
Page 15
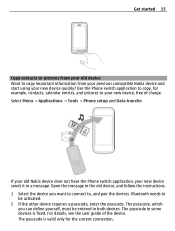
... > Phone setup and Data transfer. Bluetooth needs to , and pair the devices. Get started 15 Copy contacts or pictures from your previous compatible Nokia device and start using your new device quickly? The passcode in the old device, and follow the instructions. 1 Select the device you can define... yourself, must be activated. 2 If the other device requires a passcode, enter the passcode. If your old Nokia device does not have the Phone switch application, your new device sends it in both devices. The passcode is fixed. Use the Phone switch ...
... > Phone setup and Data transfer. Bluetooth needs to , and pair the devices. Get started 15 Copy contacts or pictures from your previous compatible Nokia device and start using your new device quickly? The passcode in the old device, and follow the instructions. 1 Select the device you can define... yourself, must be activated. 2 If the other device requires a passcode, enter the passcode. If your old Nokia device does not have the Phone switch application, your new device sends it in both devices. The passcode is fixed. Use the Phone switch ...
Nokia C6-01 User Guide in English
Page 16
... be at the end of your device with your computer. If you can also select Menu > Applications > Tools > Phone setup. 16 Install Nokia Ovi Suite on your device, and keep it in sync with the latest software, and download maps. Switch between home screens, swipe left or... right, and select the desired application. Download the latest version of Nokia Ovi Suite from your previous Nokia device • Customize your device, by changing the ringing tone and visual theme • Set up To define some basic ...
... be at the end of your device with your computer. If you can also select Menu > Applications > Tools > Phone setup. 16 Install Nokia Ovi Suite on your device, and keep it in sync with the latest software, and download maps. Switch between home screens, swipe left or... right, and select the desired application. Download the latest version of Nokia Ovi Suite from your previous Nokia device • Customize your device, by changing the ringing tone and visual theme • Set up To define some basic ...
Nokia C6-01 User Guide in English
Page 17
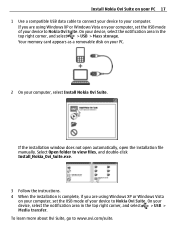
... is complete, if you are using Windows XP or Windows Vista on your computer, set the USB mode of your device to Nokia Ovi Suite. On your computer, select Install Nokia Ovi Suite. If you are using Windows XP or Windows Vista on your computer, set the USB mode of your device... to Nokia Ovi Suite. Install Nokia Ovi Suite on your PC 17 1 Use a compatible USB data cable to connect your device to www.ovi.com/suite. On your device, select the ...
... is complete, if you are using Windows XP or Windows Vista on your computer, set the USB mode of your device to Nokia Ovi Suite. On your computer, select Install Nokia Ovi Suite. If you are using Windows XP or Windows Vista on your computer, set the USB mode of your device... to Nokia Ovi Suite. Install Nokia Ovi Suite on your PC 17 1 Use a compatible USB data cable to connect your device to www.ovi.com/suite. On your device, select the ...
Nokia C6-01 User Guide in English
Page 18
..., applications, videos, and ringing tones to your device • Find your friends. The anti-spam protection helps keep your cellular phone or computer. To access Nokia's Ovi services, go to www.ovi.com, and register your PC. You can also get to where you can also use it on your own... Nokia account. You can find new places and services, and stay in order, and the virus protection increases security. The available services may need to www....
..., applications, videos, and ringing tones to your device • Find your friends. The anti-spam protection helps keep your cellular phone or computer. To access Nokia's Ovi services, go to www.ovi.com, and register your PC. You can also get to where you can also use it on your own... Nokia account. You can find new places and services, and stay in order, and the virus protection increases security. The available services may need to www....

Nokia C6-01 User Guide in English
Page 19
Ovi Store offers content that is activated. Basic use 19 About Ovi Store With Ovi Store, you can download mobile games, applications, videos, pictures, themes, and ringing tones to send an image or delete an alarm, tap and hold the item. For example, to your network service provider. Access functions quickly Tap and hold the image or alarm, and from the popup menu, select the appropriate option. Open an application or other screen element Tap the application or element. A pop-up menu with available options opens. others you tap and hold the home screen, editing mode is ...
Ovi Store offers content that is activated. Basic use 19 About Ovi Store With Ovi Store, you can download mobile games, applications, videos, pictures, themes, and ringing tones to send an image or delete an alarm, tap and hold the item. For example, to your network service provider. Access functions quickly Tap and hold the image or alarm, and from the popup menu, select the appropriate option. Open an application or other screen element Tap the application or element. A pop-up menu with available options opens. others you tap and hold the home screen, editing mode is ...
Nokia C6-01 User Guide in English
Page 20
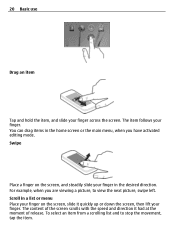
The item follows your finger across the screen. You can drag items in the desired direction. To select an item from a scrolling list and to view the next picture, swipe left. Swipe Place a finger on the screen, slide it had at the moment of the screen scrolls with the speed and direction it quickly up or down the screen, then lift your finger in the home screen or the main menu, when you are viewing a picture, to stop the movement, tap the item. 20 Basic use Drag an item Tap and hold the item, and slide your finger. Scroll in a list or menu Place your finger on the ...
The item follows your finger across the screen. You can drag items in the desired direction. To select an item from a scrolling list and to view the next picture, swipe left. Swipe Place a finger on the screen, slide it had at the moment of the screen scrolls with the speed and direction it quickly up or down the screen, then lift your finger in the home screen or the main menu, when you are viewing a picture, to stop the movement, tap the item. 20 Basic use Drag an item Tap and hold the item, and slide your finger. Scroll in a list or menu Place your finger on the ...
Nokia C6-01 User Guide in English
Page 21
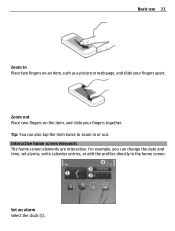
Interactive home screen elements The home screen elements are interactive. For example, you can also tap the item twice to zoom in the home screen. Set an alarm Select the clock (1). Basic use 21 Zoom in Place two fingers on the item, and slide your fingers apart. Tip: You can change the date and time, set alarms, write calendar entries, or edit the profiles directly in or out. Zoom out Place two fingers on an item, such as a picture or web page, and slide your fingers together.
Interactive home screen elements The home screen elements are interactive. For example, you can also tap the item twice to zoom in the home screen. Set an alarm Select the clock (1). Basic use 21 Zoom in Place two fingers on the item, and slide your fingers apart. Tip: You can change the date and time, set alarms, write calendar entries, or edit the profiles directly in or out. Zoom out Place two fingers on an item, such as a picture or web page, and slide your fingers together.
