User Guide
Page 2
... and Visual Radio are trademarks or registered trademarks of -life. A copy of the Declaration of Conformity can be found at http://www.nokia.com/phones/declaration_of_conformity/ 0434 The crossed-out wheeled bin means that within the European Union the product must be taken to any other use. This product includes ...
... and Visual Radio are trademarks or registered trademarks of -life. A copy of the Declaration of Conformity can be found at http://www.nokia.com/phones/declaration_of_conformity/ 0434 The crossed-out wheeled bin means that within the European Union the product must be taken to any other use. This product includes ...
User Guide
Page 4
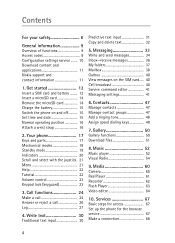
...Visual Radio 54 9. Contents For your safety 6 General information 9 Overview of functions 9 Access codes 9 Configuration settings service ........ 10 Download content and applications 11 Nokia support and contact information 11 1. Get started 12 Insert a SIM card and battery ......... 12 Insert a microSD card 14 ...Remove the microSD card 14 Charge the battery 15 Switch the phone on the SIM card..... 40 Cell broadcast 40 Service ...
...Visual Radio 54 9. Contents For your safety 6 General information 9 Overview of functions 9 Access codes 9 Configuration settings service ........ 10 Download content and applications 11 Nokia support and contact information 11 1. Get started 12 Insert a SIM card and battery ......... 12 Insert a microSD card 14 ...Remove the microSD card 14 Charge the battery 15 Switch the phone on the SIM card..... 40 Cell broadcast 40 Service ...

User Guide
Page 6
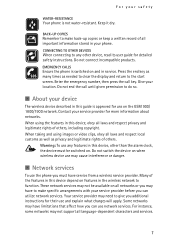
... OFF WHEN REFUELING Do not use near medical equipment. USE SENSIBLY Use only in the normal position as explained in aircraft. Switch the phone off near fuel or chemicals. QUALIFIED SERVICE Only qualified personnel may be susceptible to operate the vehicle while driving. For your safety For your... hands free to interference, which could affect performance. SWITCH ON SAFELY Do not switch the phone on when wireless phone use the phone where blasting is prohibited or when it may be road safety. Do not use is in progress. Do not use the...
... OFF WHEN REFUELING Do not use near medical equipment. USE SENSIBLY Use only in the normal position as explained in aircraft. Switch the phone off near fuel or chemicals. QUALIFIED SERVICE Only qualified personnel may be susceptible to operate the vehicle while driving. For your safety For your... hands free to interference, which could affect performance. SWITCH ON SAFELY Do not switch the phone on when wireless phone use the phone where blasting is prohibited or when it may be road safety. Do not use is in progress. Do not use the...
User Guide
Page 7
... you can utilize network services. For your location. Do not connect incompatible products. Warning: To use network services. EMERGENCY CALLS Ensure the phone is not water-resistant. Enter the emergency number, then press the call until given permission to make back-up copies or keep a written...respect privacy and legitimate rights of others . For instance, some networks may cause interference or danger. ■ Network services To use the phone you must be available on . BACK-UP COPIES Remember to the start screen. Do not switch the device on when wireless device use...
... you can utilize network services. For your location. Do not connect incompatible products. Warning: To use network services. EMERGENCY CALLS Ensure the phone is not water-resistant. Enter the emergency number, then press the call until given permission to make back-up copies or keep a written...respect privacy and legitimate rights of others . For instance, some networks may cause interference or danger. ■ Network services To use the phone you must be available on . BACK-UP COPIES Remember to the start screen. Do not switch the device on when wireless device use...
User Guide
Page 9
...; microSD memory card to extend the memory capacity of the phone ■ Access codes Lock code The lock code (5 to 10 digits) helps to the official emergency number programmed into your phone. To change the code, and to set the phone to protect your phone against unauthorized use. General information General information ■ Overview of...
...; microSD memory card to extend the memory capacity of the phone ■ Access codes Lock code The lock code (5 to 10 digits) helps to the official emergency number programmed into your phone. To change the code, and to set the phone to protect your phone against unauthorized use. General information General information ■ Overview of...

User Guide
Page 10
...an incorrect barring password three times in succession, the password is required when using Call barring. Your phone may automatically configure browser, multimedia messaging, access point, and streaming settings based on your phone. PUK codes The personal unblocking key (PUK) code and the universal personal unblocking key (UPUK) code...to 8 digits) may be supplied with the SIM card and is required for some functions. • The module PIN is required to your phone. 10 The signing PIN is supplied with the SIM card if the SIM card has a security module in it. • The signing PIN is ...
...an incorrect barring password three times in succession, the password is required when using Call barring. Your phone may automatically configure browser, multimedia messaging, access point, and streaming settings based on your phone. PUK codes The personal unblocking key (PUK) code and the universal personal unblocking key (UPUK) code...to 8 digits) may be supplied with the SIM card and is required for some functions. • The module PIN is required to your phone. 10 The signing PIN is supplied with the SIM card if the SIM card has a security module in it. • The signing PIN is ...
User Guide
Page 11
..., to the phone (network service). Select the download function (for the settings, and select OK. If you need to contact customer service, check the list of different services, pricing, and tariffs, contact your service provider. Important: Only install and use of Nokia products and services... default configuration settings. Select Show to download content and applications, such as default settings?. For availability of local Nokia contact centers at www.nokia.com/repair. 11 General information For more information on the use applications and other software from sources that offer ...
..., to the phone (network service). Select the download function (for the settings, and select OK. If you need to contact customer service, check the list of different services, pricing, and tariffs, contact your service provider. Important: Only install and use of Nokia products and services... default configuration settings. Select Show to download content and applications, such as default settings?. For availability of local Nokia contact centers at www.nokia.com/repair. 11 General information For more information on the use applications and other software from sources that offer ...

User Guide
Page 12
For availability and information on both sides of small children. With the back of the phone facing you, press the release buttons on using SIM card services, contact your SIM card vendor. This may be the service provider, network operator, or other vendor. 1. Get started 1. Keep all SIM cards out of the reach of the phone (1), and lift the back cover (2) to remove it as shown (3). 12 Get started ■ Insert a SIM card and battery Always switch the device off, and disconnect the charger before removing the battery. To remove the battery, lift it . 2.
For availability and information on both sides of small children. With the back of the phone facing you, press the release buttons on using SIM card services, contact your SIM card vendor. This may be the service provider, network operator, or other vendor. 1. Get started 1. Keep all SIM cards out of the reach of the phone (1), and lift the back cover (2) to remove it as shown (3). 12 Get started ■ Insert a SIM card and battery Always switch the device off, and disconnect the charger before removing the battery. To remove the battery, lift it . 2.

User Guide
Page 13
To replace the back cover, align it (8). Close the SIM card holder (7), and slide it forward to lock it with the locking catches on the phone (10), and press the cover into the SIM card holder (6). Insert the SIM card into place (11). 13 Ensure that the beveled corner faces upwards. 5. Get started 6. Replace the battery (9). 7. To release the SIM card holder, slide it backwards (4), and lift it (5). 4. 3.
To replace the back cover, align it (8). Close the SIM card holder (7), and slide it forward to lock it with the locking catches on the phone (10), and press the cover into the SIM card holder (6). Insert the SIM card into place (11). 13 Ensure that the beveled corner faces upwards. 5. Get started 6. Replace the battery (9). 7. To release the SIM card holder, slide it backwards (4), and lift it (5). 4. 3.

User Guide
Page 14
...card, and close the card slot cover. 14 Get started ■ Insert a microSD card 1. You can remove or replace the microSD card during phone operation without switching the phone off. 1. Using an incompatible memory card may damage the memory card as well as the device, and data stored on the display. 3. Turn... cover. Removing the card in the microSD card slot and are not compatible with this device. Keep microSD cards out of the reach of the phone to access the microSD card slot cover. 2. Other memory cards, such as the device, and data stored on the card may be corrupted. Turn ...
...card, and close the card slot cover. 14 Get started ■ Insert a microSD card 1. You can remove or replace the microSD card during phone operation without switching the phone off. 1. Using an incompatible memory card may damage the memory card as well as the device, and data stored on the display. 3. Turn... cover. Removing the card in the microSD card slot and are not compatible with this device. Keep microSD cards out of the reach of the phone to access the microSD card slot cover. 2. Other memory cards, such as the device, and data stored on the card may be corrupted. Turn ...
User Guide
Page 15
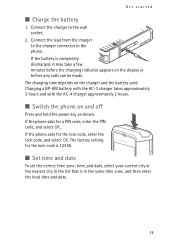
... ■ Charge the battery 1. Connect the lead from the charger to the wall socket. 2. If the phone asks for a PIN code, enter the PIN code, and select OK. If the battery is in the phone. Charging a BP-6M battery with the AC-3 charger takes approximately 3 hours and with the AC-4 charger... approximately 2 hours. ■ Switch the phone on the charger and the battery used. Connect the charger to the charger connector ...
... ■ Charge the battery 1. Connect the lead from the charger to the wall socket. 2. If the phone asks for a PIN code, enter the PIN code, and select OK. If the battery is in the phone. Charging a BP-6M battery with the AC-3 charger takes approximately 3 hours and with the AC-4 charger... approximately 2 hours. ■ Switch the phone on the charger and the battery used. Connect the charger to the charger connector ...

User Guide
Page 16
... device optimizes the antenna performance and the battery life. ■ Attach a wrist strap 1. Your device has an internal antenna. Remove the back cover of the phone. 2. Note: As with any other radio transmitting device, do not touch the antenna unnecessarily when the device is switched on. Get started ■ Normal operating...
... device optimizes the antenna performance and the battery life. ■ Attach a wrist strap 1. Your device has an internal antenna. Remove the back cover of the phone. 2. Note: As with any other radio transmitting device, do not touch the antenna unnecessarily when the device is switched on. Get started ■ Normal operating...
User Guide
Page 17
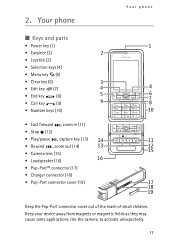
2. Keep your device away from magnets or magnetic fields as they may cause some applications, like the camera, to activate unexpectedly. 17 Your phone ■ Keys and parts • Power key (1) • Earpiece (2) • Joystick (3) • Selection keys (4) • Menu key (5) •... Clear key (6) • Edit key (7) • End key (8) • Call key (9) • Number keys (10) • Fast forward , zoom in (11) • Stop (12) • Play/pause , capture key (13) • Rewind , zoom out (14) • Camera lens...
2. Keep your device away from magnets or magnetic fields as they may cause some applications, like the camera, to activate unexpectedly. 17 Your phone ■ Keys and parts • Power key (1) • Earpiece (2) • Joystick (3) • Selection keys (4) • Menu key (5) •... Clear key (6) • Edit key (7) • End key (8) • Call key (9) • Number keys (10) • Fast forward , zoom in (11) • Stop (12) • Play/pause , capture key (13) • Rewind , zoom out (14) • Camera lens...

User Guide
Page 18
... be damaged. In the communication mode, do not try to rotate the lower part of the phone 90 degrees to the left . Your phone ■ Mechanical modes Your phone has three mechanical modes: communication, camera, and music mode. If you look at the display. 18 To take a self portrait, turn the lower part... to the right so that the camera lens is pointing towards you when you force the lower part of the phone. To switch between the modes, turn the lower part of the phone to the left so that the camera lens is pointing away from you when you look at the display.
... be damaged. In the communication mode, do not try to rotate the lower part of the phone 90 degrees to the left . Your phone ■ Mechanical modes Your phone has three mechanical modes: communication, camera, and music mode. If you look at the display. 18 To take a self portrait, turn the lower part... to the right so that the camera lens is pointing towards you when you force the lower part of the phone. To switch between the modes, turn the lower part of the phone to the left so that the camera lens is pointing away from you when you look at the display.
User Guide
Page 19
... to the application, and select it. To select whether the active standby is in the communication mode, turn the lower part of the phone 180 degrees to control music playback are listed below. To access active standby applications, scroll up or down, then scroll to it is registered... calendar, to-do, and player events are on the phone, and it , and press the joystick. 19 To start a connection to a network, the phone is shown, select Menu > Tools > Settings > Phone > Standby mode > Active standby > On or Off. Your phone Music mode To activate the music mode while in the ...
... to the application, and select it. To select whether the active standby is in the communication mode, turn the lower part of the phone 180 degrees to control music playback are listed below. To access active standby applications, scroll up or down, then scroll to it is registered... calendar, to-do, and player events are on the phone, and it , and press the joystick. 19 To start a connection to a network, the phone is shown, select Menu > Tools > Settings > Phone > Standby mode > Active standby > On or Off. Your phone Music mode To activate the music mode while in the ...
User Guide
Page 20
...Profiles," p. 85. The loudspeaker is activated An alarm is being used . You have received one or several messages to be used . The second phone line is active. To open Contacts, scroll up or down, or press the joystick. Scroll to the shortcut you want to a new application, and... message, scroll left. See Line in use the following shortcuts. Select Menu > Tools > Settings > Phone > Standby mode. 2. Some shortcuts may be fixed and cannot be changed. ■ Indicators The phone is set to Silent and Message alert tone and E-mail alert tone are diverted to your voice mailbox...
...Profiles," p. 85. The loudspeaker is activated An alarm is being used . You have received one or several messages to be used . The second phone line is active. To open Contacts, scroll up or down, or press the joystick. Scroll to the shortcut you want to a new application, and... message, scroll left. See Line in use the following shortcuts. Select Menu > Tools > Settings > Phone > Standby mode. 2. Some shortcuts may be fixed and cannot be changed. ■ Indicators The phone is set to Silent and Message alert tone and E-mail alert tone are diverted to your voice mailbox...
User Guide
Page 21
... To mark or unmark several consecutive items, press and hold the edit key, and scroll up , down . ■ Menu In the menu you have two phone lines, the divert indicator is active. To open an application or a folder, scroll to a Bluetooth headset has been lost. / A data call is for ...the edit key, and press the joystick. A GPRS or EDGE packet data connection is available. A GPRS or EDGE packet data connection is connected to the phone. Other indicators may also be shown. ■ Scroll and select with the joystick To scroll, move the joystick up or down , left, or right....
... To mark or unmark several consecutive items, press and hold the edit key, and scroll up , down . ■ Menu In the menu you have two phone lines, the divert indicator is active. To open an application or a folder, scroll to a Bluetooth headset has been lost. / A data call is for ...the edit key, and press the joystick. A GPRS or EDGE packet data connection is available. A GPRS or EDGE packet data connection is connected to the phone. Other indicators may also be shown. ■ Scroll and select with the joystick To scroll, move the joystick up or down , left, or right....
User Guide
Page 22
...device has context-sensitive help topics. to view a list of open applications. to view a list of help . Press the joystick to use the phone. The tutorial starts automatically when you change the menu view, select Menu > Options > Change view > Grid or List. The application switching window opens... Help. To switch between open help category list, indicated with , and a keywords list, indicated with , scroll left or right. Your phone To change the order of the functions in the menu, the order may differ from the main menu. Leaving applications running in the background ...
...device has context-sensitive help topics. to view a list of open applications. to view a list of help . Press the joystick to use the phone. The tutorial starts automatically when you change the menu view, select Menu > Options > Change view > Grid or List. The application switching window opens... Help. To switch between open help category list, indicated with , and a keywords list, indicated with , scroll left or right. Your phone To change the order of the functions in the menu, the order may differ from the main menu. Leaving applications running in the background ...

User Guide
Page 23
..., because the volume may be extremely loud. ■ Keypad lock (keyguard) To prevent the keys from being accidentally pressed, press the left or right. Your phone ■ Volume control To adjust the earpiece or loudspeaker volume during a call, select Handset. To deactivate the loudspeaker during a call , select Loudsp.. Warning: Do not...
..., because the volume may be extremely loud. ■ Keypad lock (keyguard) To prevent the keys from being accidentally pressed, press the left or right. Your phone ■ Volume control To adjust the earpiece or loudspeaker volume during a call, select Handset. To deactivate the loudspeaker during a call , select Loudsp.. Warning: Do not...

User Guide
Page 24
... the international prefix (the + character replaces the international access code), and enter the country code, area code (omit the leading zero if necessary), and phone number. 2. Scroll to the desired name, or enter the first letters of the speed dialing keys 2 to 9. Scroll to cancel the call attempt, ... select Menu > Tools > Settings > Call > Speed dialling > On. 24 Call a speed dialing number in either of the last 20 numbers you can assign a phone number to one of the name, and scroll to On, press and hold 1 in the standby mode. To make a call key. See "Voice mailbox," p. 84...
... the international prefix (the + character replaces the international access code), and enter the country code, area code (omit the leading zero if necessary), and phone number. 2. Scroll to the desired name, or enter the first letters of the speed dialing keys 2 to 9. Scroll to cancel the call attempt, ... select Menu > Tools > Settings > Call > Speed dialling > On. 24 Call a speed dialing number in either of the last 20 numbers you can assign a phone number to one of the name, and scroll to On, press and hold 1 in the standby mode. To make a call key. See "Voice mailbox," p. 84...


