Instruction Manual
Page 4
NOTES Have Nikon spot check your camera regularly Nikon recommends that you have your camera correctly The F5 camera's performance has been optimized for use with other manufacturers may not meet Nikon's criteria for specifications, and nonconforming accessories could damage the F5's components. Accessories from other than Nikon brand accessories. 4 Nikon cannot guarantee the F5's performance when it is used with Nikon brand accessories. Using your camera serviced at an authorized dealer or service center, at least once every two years.
NOTES Have Nikon spot check your camera regularly Nikon recommends that you have your camera correctly The F5 camera's performance has been optimized for use with other manufacturers may not meet Nikon's criteria for specifications, and nonconforming accessories could damage the F5's components. Accessories from other than Nikon brand accessories. 4 Nikon cannot guarantee the F5's performance when it is used with Nikon brand accessories. Using your camera serviced at an authorized dealer or service center, at least once every two years.
Instruction Manual
Page 5
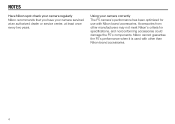
...F5's various features in this manual. How this instruction manual is organized Before You Begin Describes information required before taking pictures. -P.24 Basic Operation Introduces basic shooting using the most basic settings. P.127 -P.168 5 Index Use alphabetically listed index on pages 162 and 163 to check your camera.... -P.15 Preparation Describes preparation of camera, loading of the righthand pages ... organized". General Functions Explains photography fundamentals with the F5 including film advance mode, focus area, focus mode...
...F5's various features in this manual. How this instruction manual is organized Before You Begin Describes information required before taking pictures. -P.24 Basic Operation Introduces basic shooting using the most basic settings. P.127 -P.168 5 Index Use alphabetically listed index on pages 162 and 163 to check your camera.... -P.15 Preparation Describes preparation of camera, loading of the righthand pages ... organized". General Functions Explains photography fundamentals with the F5 including film advance mode, focus area, focus mode...

Instruction Manual
Page 7
... PREVIEW BUTTON 100 ACCESSORY SHOE 100 SYNC TERMINAL 101 REMOTE TERMINAL 101 OPERATION WITH PERSONAL COMPUTER 102-103 SELF-DIAGNOSTIC SHUTTER SYSTEM 104 CHANGING CAMERA BACK 105 CHANGING VIEWFINDERS 106 CHANGING FOCUSING SCREENS 107 FLASH PHOTOGRAPHY 108-124 TTL AUTO FLASH-Automatic Balanced Fill-Flash and Standard TTL Flash ...127-168 LENS 128-131 ATTACHING NON-AI LENS 132 OPTIONAL ACCESSORIES 133-145 SPECIAL FOCUSING SITUATIONS IN AF 146-147 TROUBLESHOOTING 148-150 CAMERA CARE TIPS 151-153 NOTES ON BATTERIES 154 GLOSSARY 155-161 INDEX 162-163 SPECIFICATIONS 164-168 7
... PREVIEW BUTTON 100 ACCESSORY SHOE 100 SYNC TERMINAL 101 REMOTE TERMINAL 101 OPERATION WITH PERSONAL COMPUTER 102-103 SELF-DIAGNOSTIC SHUTTER SYSTEM 104 CHANGING CAMERA BACK 105 CHANGING VIEWFINDERS 106 CHANGING FOCUSING SCREENS 107 FLASH PHOTOGRAPHY 108-124 TTL AUTO FLASH-Automatic Balanced Fill-Flash and Standard TTL Flash ...127-168 LENS 128-131 ATTACHING NON-AI LENS 132 OPTIONAL ACCESSORIES 133-145 SPECIAL FOCUSING SITUATIONS IN AF 146-147 TROUBLESHOOTING 148-150 CAMERA CARE TIPS 151-153 NOTES ON BATTERIES 154 GLOSSARY 155-161 INDEX 162-163 SPECIFICATIONS 164-168 7

Instruction Manual
Page 8
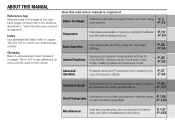
... 42-43) C for Continuous Servo AF (pp. 44-45) M for Manual focus (pp. 45-48) Camera back lock release: To open camera back, lift film rewind knob while sliding camera back lock release. Metering system selector lock release Diopter adjustment knob (p. 96) Metering system selector (p. 51) Film... Finder DP-30 8 Mirror lockup lever (p. 99) Depth-of-field preview button (p. 100) Power/LCD panel illumination switch: Rotate to turn camera ON/OFF or illuminate LCD panels. (p. 96) Sub-Command Dial: Rotate to release shutter, depress fully; exposure meter automatically switches off after approx. ...
... 42-43) C for Continuous Servo AF (pp. 44-45) M for Manual focus (pp. 45-48) Camera back lock release: To open camera back, lift film rewind knob while sliding camera back lock release. Metering system selector lock release Diopter adjustment knob (p. 96) Metering system selector (p. 51) Film... Finder DP-30 8 Mirror lockup lever (p. 99) Depth-of-field preview button (p. 100) Power/LCD panel illumination switch: Rotate to turn camera ON/OFF or illuminate LCD panels. (p. 96) Sub-Command Dial: Rotate to release shutter, depress fully; exposure meter automatically switches off after approx. ...

Instruction Manual
Page 9
Sync terminal Self-timer indicator LED (pp. 82-83) Camera strap eyelet Exposure mode (MODE) button (p. 56) Exposure compensation (=) button (p. 77) Camera strap eyelet Film advance mode selector lock release Film advance mode/self-timer selector (pp. 36, 82) Accessory shoe: For Nikon dedicated Speedlights. Film plane indicator: Exact distance from lens mounting flange to film plane is 46.5mm. Top LCD panel (p. 12) AF area mode button (˝) (p. 40) Multiple exposure (Z) button (p. 86) 9
Sync terminal Self-timer indicator LED (pp. 82-83) Camera strap eyelet Exposure mode (MODE) button (p. 56) Exposure compensation (=) button (p. 77) Camera strap eyelet Film advance mode selector lock release Film advance mode/self-timer selector (pp. 36, 82) Accessory shoe: For Nikon dedicated Speedlights. Film plane indicator: Exact distance from lens mounting flange to film plane is 46.5mm. Top LCD panel (p. 12) AF area mode button (˝) (p. 40) Multiple exposure (Z) button (p. 86) 9

Instruction Manual
Page 11
Vertical-shooting shutter release button Lock lever for vertical shooting: Pressing AF start (AF-ON) button for vertical-shooting shutter release button Camera back Tripod socket 11 AF start button starts autofocus operation and switches exposure meter on.
Vertical-shooting shutter release button Lock lever for vertical shooting: Pressing AF start (AF-ON) button for vertical-shooting shutter release button Camera back Tripod socket 11 AF start button starts autofocus operation and switches exposure meter on.

Instruction Manual
Page 16
e.g., how to prepare the camera for shooting- Whether you are a beginner or a seasoned photographer, you how to mount lens, load film. PREPARATION This section shows you should master this section before proceeding further. 16
e.g., how to prepare the camera for shooting- Whether you are a beginner or a seasoned photographer, you how to mount lens, load film. PREPARATION This section shows you should master this section before proceeding further. 16

Instruction Manual
Page 17
...minimum aperture setting and the power switch is turned off and avoid direct sunlight. • For Nikon lens compatibility, see pages 128-131. • To mount non-AI lens, see page 131. 1 Remove camera body cap and front and rear lens caps. Unlike other CPU Nikkor lenses, aperture does not...need to its minimum and lock. MOUNTING LENS 2 Position lens in the LCD panel and viewfinder. 17 aperture should be set to be selected from camera body. Some non-AI lens cannot be attached. Taking care not to minimum (largest f-number). • CPU Nikkor lenses other CPU Nikkor lens ...
...minimum aperture setting and the power switch is turned off and avoid direct sunlight. • For Nikon lens compatibility, see pages 128-131. • To mount non-AI lens, see page 131. 1 Remove camera body cap and front and rear lens caps. Unlike other CPU Nikkor lenses, aperture does not...need to its minimum and lock. MOUNTING LENS 2 Position lens in the LCD panel and viewfinder. 17 aperture should be set to be selected from camera body. Some non-AI lens cannot be attached. Taking care not to minimum (largest f-number). • CPU Nikkor lenses other CPU Nikkor lens ...

Instruction Manual
Page 18
Do not move the lens' aperture once it is attached, aperture does not need to be set to the F5 camera body.) In this case, aperture can also be set with aperture ring. Push and hold lens release button and turn lens clockwise. 18 When lens ...is the lens' minimum aperture. • Aperture setting operations are performed using the Sub-Command Dial on the camera body. The largest f-number of aperture on the lens' aperture index is detached from camera for a long time Make sure to attach the supplied body cap or optional body cap BF-1A. (BF...
Do not move the lens' aperture once it is attached, aperture does not need to be set to the F5 camera body.) In this case, aperture can also be set with aperture ring. Push and hold lens release button and turn lens clockwise. 18 When lens ...is the lens' minimum aperture. • Aperture setting operations are performed using the Sub-Command Dial on the camera body. The largest f-number of aperture on the lens' aperture index is detached from camera for a long time Make sure to attach the supplied body cap or optional body cap BF-1A. (BF...
Instruction Manual
Page 19
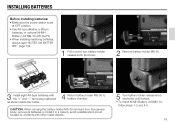
CAUTION: When carrying the battery holder MS-30 removed from the camera body, remove its batteries or install it stops. • To install Ni-MH Battery Unit MN-30, follow steps 1-2 and 4-5. 19 INSTALLING BATTERIES Before installing ... power switch is set at OFF position. • Use AA-type alkaline or lithium batteries, or optional Ni-MH Battery Unit MN-30 with the F5. • When installing/replacing batteries, always read "NOTES ON BATTERIES", page 154. 1 Pull out and turn battery holder release knob as shown. 2 Remove battery holder...
CAUTION: When carrying the battery holder MS-30 removed from the camera body, remove its batteries or install it stops. • To install Ni-MH Battery Unit MN-30, follow steps 1-2 and 4-5. 19 INSTALLING BATTERIES Before installing ... power switch is set at OFF position. • Use AA-type alkaline or lithium batteries, or optional Ni-MH Battery Unit MN-30 with the F5. • When installing/replacing batteries, always read "NOTES ON BATTERIES", page 154. 1 Pull out and turn battery holder release knob as shown. 2 Remove battery holder...

Instruction Manual
Page 20
... are nearing exhaustion. For details, see page 89. The battery mark and exposure indications automatically turn off after shutter release and the camera does not function normally. Rotate power switch to ON position while pressing the lock release, and confirm that the LCD panel and viewfinder... LCD show aperture/shutter speed indications, and autofocus operation starts (unless camera is shown in the top LCD panel, indicating sufficient battery power. after you take your finger off the shutter release button, then ...
... are nearing exhaustion. For details, see page 89. The battery mark and exposure indications automatically turn off after shutter release and the camera does not function normally. Rotate power switch to ON position while pressing the lock release, and confirm that the LCD panel and viewfinder... LCD show aperture/shutter speed indications, and autofocus operation starts (unless camera is shown in the top LCD panel, indicating sufficient battery power. after you take your finger off the shutter release button, then ...
Instruction Manual
Page 21
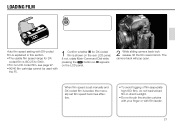
... (especially high-ISO film), do not load/unload film in direct sunlight. • Do not touch the shutter curtains with your finger or with the F5. 1 Confirm whether s for DX-coded film is explained in this section. • The usable film speed range for DX- LOADING FILM Auto film speed setting... with DX-coded film is shown on the LCD panel. 2 While sliding camera back lock release, lift the film rewind knob. The camera back will pop open. If not, rotate Main-Command Dial while pressing the ° button so s appears on the rear...
... (especially high-ISO film), do not load/unload film in direct sunlight. • Do not touch the shutter curtains with your finger or with the F5. 1 Confirm whether s for DX-coded film is explained in this section. • The usable film speed range for DX- LOADING FILM Auto film speed setting... with DX-coded film is shown on the LCD panel. 2 While sliding camera back lock release, lift the film rewind knob. The camera back will pop open. If not, rotate Main-Command Dial while pressing the ° button so s appears on the rear...

Instruction Manual
Page 22
3 Insert film cartridge. 4 Pull film leader across to red film index mark. 5 Check to ensure film is properly positioned with no slack, then gently close camera back until it locks. 22
3 Insert film cartridge. 4 Pull film leader across to red film index mark. 5 Check to ensure film is properly positioned with no slack, then gently close camera back until it locks. 22

Instruction Manual
Page 23
Film winds up and you can be set to advance the film automatically when the camera back is closed and the power is on. To check if the film is loaded properly before closing the camera back, hold the film leader with an unacceptable DX code is properly wound to the film spool.... c The camera can confirm if the film leader is loaded, the Err in the top and rear LCD...
Film winds up and you can be set to advance the film automatically when the camera back is closed and the power is on. To check if the film is loaded properly before closing the camera back, hold the film leader with an unacceptable DX code is properly wound to the film spool.... c The camera can confirm if the film leader is loaded, the Err in the top and rear LCD...

Instruction Manual
Page 24
Open camera back and reload film properly. 24 7 Confirm frame counter shows 1 on the top LCD panel and viewfinder. E appears and Err blinks in the top LCD panel and viewfinder, and alert LED blinks if film is incorrectly positioned. The rear LCD panel shows automatically set film speed.
Open camera back and reload film properly. 24 7 Confirm frame counter shows 1 on the top LCD panel and viewfinder. E appears and Err blinks in the top LCD panel and viewfinder, and alert LED blinks if film is incorrectly positioned. The rear LCD panel shows automatically set film speed.

Instruction Manual
Page 26
... lightly pressed, use Custom Setting #15. They remain on . c To deactivate autofocus when shutter release button is difficult to release shutter. To start autofocus in camera shake. To release the shutter, fully depress shutter release button while pressing the AF start button. Indications inside the viewfinder and LCD turn off the...
... lightly pressed, use Custom Setting #15. They remain on . c To deactivate autofocus when shutter release button is difficult to release shutter. To start autofocus in camera shake. To release the shutter, fully depress shutter release button while pressing the AF start button. Indications inside the viewfinder and LCD turn off the...
Instruction Manual
Page 27
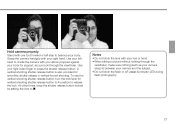
...without looking through the viewfinder, make sure nothing (such as you look through the viewfinder. Use your right index finger to cradle the camera with your elbow propped against your body for smoother shutter release in vertical-format shooting. A vertical-shooting shutter release button is also ...provided for support, as your camera strap) is between your body. Use your right hand. Hold camera properly Stand with one foot forward a half step to balance your camera and the subject. • Do not block the flash or AF-assist...
...without looking through the viewfinder, make sure nothing (such as you look through the viewfinder. Use your right index finger to cradle the camera with your elbow propped against your body for smoother shutter release in vertical-format shooting. A vertical-shooting shutter release button is also ...provided for support, as your camera strap) is between your body. Use your right hand. Hold camera properly Stand with one foot forward a half step to balance your camera and the subject. • Do not block the flash or AF-assist...
Instruction Manual
Page 31
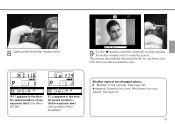
...43. 31 If HI appears in the shutter speed position- Shutter cannot be released when: ? Under-exposure alert: Use accessory Nikon Speedlight. The camera automatically advances the film by one frame, and LCD frame counter increases by one. If Lo appears in the shutter speed position...-Overexposure alert: Use Nikon ND filter. See page 146. > appears: Subject is too close. blinks: Focus manually. 8 Lightly press the shutter release button...
...43. 31 If HI appears in the shutter speed position- Shutter cannot be released when: ? Under-exposure alert: Use accessory Nikon Speedlight. The camera automatically advances the film by one frame, and LCD frame counter increases by one. If Lo appears in the shutter speed position...-Overexposure alert: Use Nikon ND filter. See page 146. > appears: Subject is too close. blinks: Focus manually. 8 Lightly press the shutter release button...
Instruction Manual
Page 33
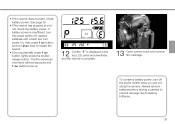
... prevent damage due to restart film rewind. • If you are not using the camera. If battery power is complete. 13 Open camera back and remove film cartridge. The film advances one frame without exposure and 1 „ button pops up. 12 Confirm "E" is displayed in the top LCD ...
... prevent damage due to restart film rewind. • If you are not using the camera. If battery power is complete. 13 Open camera back and remove film cartridge. The film advances one frame without exposure and 1 „ button pops up. 12 Confirm "E" is displayed in the top LCD ...
Instruction Manual
Page 34
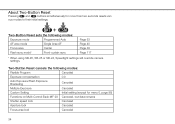
... mode* Front-curtain sync Page 53 Page 40 Page 38 Page 117 * When using SB-26, SB-25 or SB-24, Speedlight settings will override camera settings. About Two-Button Reset Pressing , and · buttons simultaneously for menu 0, page 88) Functions on Multi-Control Back MF-28 Canceled, but data remains...
... mode* Front-curtain sync Page 53 Page 40 Page 38 Page 117 * When using SB-26, SB-25 or SB-24, Speedlight settings will override camera settings. About Two-Button Reset Pressing , and · buttons simultaneously for menu 0, page 88) Functions on Multi-Control Back MF-28 Canceled, but data remains...
