
D90 User's Manual
Page 3
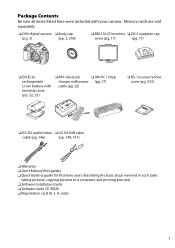
Memory cards are sold separately. ❏ D90 digital camera ❏ Body cap (pg. 3) (pp. 3, 240) ❏ BM-10 LCD monitor ❏ DK-5 eyepiece cap cover (pg. 17) (pg. 17) ❏ EN-EL3e rechargeable Li-ion battery with terminal cover (pp. 22, 23) ❏ MH-18a quick ❏ AN-DC1 strap charger with your camera. only) i A. S. Package Contents Be...
Memory cards are sold separately. ❏ D90 digital camera ❏ Body cap (pg. 3) (pp. 3, 240) ❏ BM-10 LCD monitor ❏ DK-5 eyepiece cap cover (pg. 17) (pg. 17) ❏ EN-EL3e rechargeable Li-ion battery with terminal cover (pp. 22, 23) ❏ MH-18a quick ❏ AN-DC1 strap charger with your camera. only) i A. S. Package Contents Be...
D90 User's Manual
Page 6
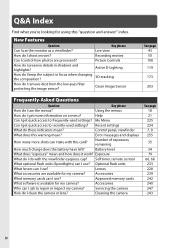
... What does this warning mean and how does it work? Battery level What does "exposure" mean ? Optional flash units What lenses can I use ? Q&A Index Find what you're looking for my camera? Servicing the camera How do I get more shots can I shoot movies? ...Number of exposures remaining How much charge does the battery have left? Self timer, remote control What optional flash units (Speedlights) ...
... What does this warning mean and how does it work? Battery level What does "exposure" mean ? Optional flash units What lenses can I use ? Q&A Index Find what you're looking for my camera? Servicing the camera How do I get more shots can I shoot movies? ...Number of exposures remaining How much charge does the battery have left? Self timer, remote control What optional flash units (Speedlights) ...
D90 User's Manual
Page 10
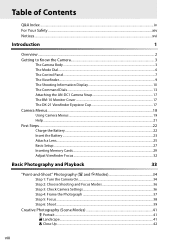
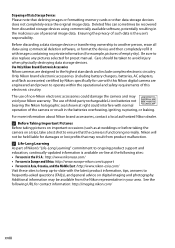
... 17 The BM-10 Monitor Cover 17 The DK-21 Viewfinder Eyepiece Cup 17 Camera Menus...18 Using Camera Menus ...19 Help ...21 First Steps ...22 Charge the Battery ...22 Insert the Battery ...23 Attach a Lens...25 Basic Setup...27 Inserting Memory Cards...29 Adjust Viewfinder Focus ...32 ...Basic Photography and Playback 33 "Point-and-Shoot" Photography (i and j Modes 34 Step 1: Turn the Camera On 34 Step 2: Choose Shooting and...
... 17 The BM-10 Monitor Cover 17 The DK-21 Viewfinder Eyepiece Cup 17 Camera Menus...18 Using Camera Menus ...19 Help ...21 First Steps ...22 Charge the Battery ...22 Insert the Battery ...23 Attach a Lens...25 Basic Setup...27 Inserting Memory Cards...29 Adjust Viewfinder Focus ...32 ...Basic Photography and Playback 33 "Point-and-Shoot" Photography (i and j Modes 34 Step 1: Turn the Camera On 34 Step 2: Choose Shooting and...

D90 User's Manual
Page 14
...Assign AE-L/AF-L Button 200 f5: Customize Command Dials 201 f6: No Memory Card? ...201 f7: Reverse Indicators...201 B The Setup Menu: Camera Setup 202 Format Memory Card ...202 LCD Brightness...202 Clean Image Sensor...203 Lock Mirror up for Built-in Flash 185 e3: Modeling Flash...191...203 Video Mode...203 HDMI...203 World Time ...204 Language ...204 Image Comment ...205 Auto Image Rotation ...205 Image Dust off Ref Photo 206 Battery Info...208 GPS ...208 Eye-Fi Upload ...208 Firmware Version ...208 N The Retouch Menu: Creating Retouched Copies 209 Creating Retouched Copies 210 D-...
...Assign AE-L/AF-L Button 200 f5: Customize Command Dials 201 f6: No Memory Card? ...201 f7: Reverse Indicators...201 B The Setup Menu: Camera Setup 202 Format Memory Card ...202 LCD Brightness...202 Clean Image Sensor...203 Lock Mirror up for Built-in Flash 185 e3: Modeling Flash...191...203 Video Mode...203 HDMI...203 World Time ...204 Language ...204 Image Comment ...205 Auto Image Rotation ...205 Image Dust off Ref Photo 206 Battery Info...208 GPS ...208 Eye-Fi Upload ...208 Firmware Version ...208 N The Retouch Menu: Creating Retouched Copies 209 Creating Retouched Copies 210 D-...
D90 User's Manual
Page 15
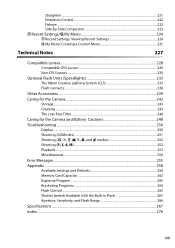
... ...229 Non-CPU Lenses ...230 Optional Flash Units (Speedlights 233 The Nikon Creative Lighting System (CLS 233 Flash Contacts ...238 Other Accessories ...239 Caring for the Camera...243 Storage...243 Cleaning ...243 The Low-Pass Filter...244 Caring for the Camera and Battery: Cautions 248 Troubleshooting ...250 Display ...250 Shooting (All Modes) ...251 Shooting...
... ...229 Non-CPU Lenses ...230 Optional Flash Units (Speedlights 233 The Nikon Creative Lighting System (CLS 233 Flash Contacts ...238 Other Accessories ...239 Caring for the Camera...243 Storage...243 Cleaning ...243 The Low-Pass Filter...244 Caring for the Camera and Battery: Cautions 248 Troubleshooting ...250 Display ...250 Shooting (All Modes) ...251 Shooting...

D90 User's Manual
Page 16
...inspection. In the event of malfunction, the product should be no less than one meter (39 in injury. Sunlight focused into the camera when the sun is in injury. xiv To prevent possible injury, read all those who use electronic equipment in injury. A Do ...or an unusual smell coming from the equipment or AC adapter (available separately), unplug the AC adapter and remove the battery immediately, taking care to a Nikon-authorized service center for inspection. The consequences that could cause temporary visual impairment. Keep these safety instructions where all ...
...inspection. In the event of malfunction, the product should be no less than one meter (39 in injury. Sunlight focused into the camera when the sun is in injury. xiv To prevent possible injury, read all those who use electronic equipment in injury. A Do ...or an unusual smell coming from the equipment or AC adapter (available separately), unplug the AC adapter and remove the battery immediately, taking care to a Nikon-authorized service center for inspection. The consequences that could cause temporary visual impairment. Keep these safety instructions where all ...
D90 User's Manual
Page 17
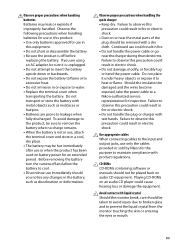
... the quick charger • Keep dry. Should the insulation be damaged and the wires become exposed, take the power cable to a Nikon-authorized service representative for an extended period. Failure to maintain compliance with product regulations. A CD-ROMs CD-ROMs containing software or manuals should you ... could result in electric shock. • Do not damage, modify, or forcibly tug or bend the power cable. Before removing the battery turn the camera off before replacing the battery. Do not place it under heavy objects or expose it is unplugged. • Do not attempt to insert the...
... the quick charger • Keep dry. Should the insulation be damaged and the wires become exposed, take the power cable to a Nikon-authorized service representative for an extended period. Failure to maintain compliance with product regulations. A CD-ROMs CD-ROMs containing software or manuals should you ... could result in electric shock. • Do not damage, modify, or forcibly tug or bend the power cable. Before removing the battery turn the camera off before replacing the battery. Do not place it under heavy objects or expose it is unplugged. • Do not attempt to insert the...
D90 User's Manual
Page 20
... is available on-line at weddings or before taking the camera on digital imaging and photography. For more information about Nikon brand accessories, contact a local authorized Nikon dealer. Care should be available from the Nikon representative in the malicious use of personal image data. The...containing no private information (for use of third-party rechargeable Li-ion batteries not bearing the Nikon holographic seal shown at right could damage the camera and may void your area. Nikon will not be recovered from discarded storage devices using commercial deletion software,...
... is available on-line at weddings or before taking the camera on digital imaging and photography. For more information about Nikon brand accessories, contact a local authorized Nikon dealer. Care should be available from the Nikon representative in the malicious use of personal image data. The...containing no private information (for use of third-party rechargeable Li-ion batteries not bearing the Nikon holographic seal shown at right could damage the camera and may void your area. Nikon will not be recovered from discarded storage devices using commercial deletion software,...
D90 User's Manual
Page 21
... Display 10 The Command Dials...13 Attaching the AN-DC1 Camera Strap 17 The BM-10 Monitor Cover...17 The DK-21 Viewfinder Eyepiece Cup 17 Camera Menus ...18 Using Camera Menus...19 Help...21 First Steps...22 Charge the Battery ...22 Insert the Battery ...23 Attach a Lens ...25 Basic Setup ...27 Inserting Memory Cards...
... Display 10 The Command Dials...13 Attaching the AN-DC1 Camera Strap 17 The BM-10 Monitor Cover...17 The DK-21 Viewfinder Eyepiece Cup 17 Camera Menus ...18 Using Camera Menus...19 Help...21 First Steps...22 Charge the Battery ...22 Insert the Battery ...23 Attach a Lens ...25 Basic Setup ...27 Inserting Memory Cards...
D90 User's Manual
Page 23
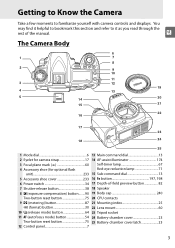
... 18 Speaker 19 Body cap 240 20 CPU contacts 21 Mounting index 25 22 Lens mount 60 23 Tripod socket 24 Battery-chamber cover 23 25 Battery-chamber cover latch 23 3 X The Camera Body 6 1 7 8 2 9 10 11 3 12 19 4 13 5 14 20 15 21 22 16 17 23 18 24 25 1 Mode dial... 6 2 Eyelet for camera strap 17 3 Focal plane mark (E 60 4 Accessory shoe (for optional flash unit 233 5 Accessory shoe cover 233 6 Power ...
... 18 Speaker 19 Body cap 240 20 CPU contacts 21 Mounting index 25 22 Lens mount 60 23 Tripod socket 24 Battery-chamber cover 23 25 Battery-chamber cover latch 23 3 X The Camera Body 6 1 7 8 2 9 10 11 3 12 19 4 13 5 14 20 15 21 22 16 17 23 18 24 25 1 Mode dial... 6 2 Eyelet for camera strap 17 3 Focal plane mark (E 60 4 Accessory shoe (for optional flash unit 233 5 Accessory shoe cover 233 6 Power ...

D90 User's Manual
Page 27
... indicator 124 White balance preset number 100 12 Release mode 64 Number of shots in bracketing 13 Aperture (f-number) sequence 92 Aperture-priority auto 82 2 Battery indicator 34 Manual exposure mode 83 3 Flash mode 71 Bracketing increment 4 Image size 63 AE/flash bracketing 92 5 Image quality 62 White balance bracketing 191...
... indicator 124 White balance preset number 100 12 Release mode 64 Number of shots in bracketing 13 Aperture (f-number) sequence 92 Aperture-priority auto 82 2 Battery indicator 34 Manual exposure mode 83 3 Flash mode 71 Bracketing increment 4 Image size 63 AE/flash bracketing 92 5 Image quality 62 White balance bracketing 191...

D90 User's Manual
Page 28
Power switch 8 After the power switch is released, the illuminator will remain lit while the camera exposure meters are active (six seconds at default settings) or until the shutter is released or the power switch is rotated to be read in ... 19 22 20 21 15 Flash compensation indicator 91 23 ISO sensitivity indicator 74 16 "Clock not set" indicator Auto ISO sensitivity indicator 166 Clock battery 27 24 Bracketing progress indicator Warnings 255 AE/flash bracketing 92 17 Flexible program indicator 80 18 Metering 87 White balance bracketing 191 ADL bracketing...
Power switch 8 After the power switch is released, the illuminator will remain lit while the camera exposure meters are active (six seconds at default settings) or until the shutter is released or the power switch is rotated to be read in ... 19 22 20 21 15 Flash compensation indicator 91 23 ISO sensitivity indicator 74 16 "Clock not set" indicator Auto ISO sensitivity indicator 166 Clock battery 27 24 Bracketing progress indicator Warnings 255 AE/flash bracketing 92 17 Flexible program indicator 80 18 Metering 87 White balance bracketing 191 ADL bracketing...

D90 User's Manual
Page 29
...of shots remaining before 2 Reference circle for center-weighted memory buffer fills 65 metering 87 White balance recording indicator ....... 101 3 Battery indicator 34 Exposure compensation value 90 4 Black-and-white indicator 181 Flash compensation value 91 5 Focus points 54, 173, 174... Shutter speed 81, 83 21 Electronic analog exposure display .........84 12 Aperture (f-number 82, 83 Exposure compensation 90 13 Battery indicator 34 22 Flash compensation indicator 91 14 White balance bracketing indicator...... 191 23 Exposure compensation indicator ...........90 15 Bracketing...
...of shots remaining before 2 Reference circle for center-weighted memory buffer fills 65 metering 87 White balance recording indicator ....... 101 3 Battery indicator 34 Exposure compensation value 90 4 Black-and-white indicator 181 Flash compensation value 91 5 Focus points 54, 173, 174... Shutter speed 81, 83 21 Electronic analog exposure display .........84 12 Aperture (f-number 82, 83 Exposure compensation 90 13 Battery indicator 34 22 Flash compensation indicator 91 14 White balance bracketing indicator...... 191 23 Exposure compensation indicator ...........90 15 Bracketing...

D90 User's Manual
Page 31
... 62 13 Fn button assignment 197 36 "Clock not set" indicator 27, 255 14 Picture Control indicator 108 37 Camera battery indicator 34 MB-D80 battery type display 184 15 Active D-Lighting indicator 119 MB-D80 battery indicator 184 16 High ISO noise reduction indicator ....... 168 17 Long exposure noise reduction indicator 167 11
... 62 13 Fn button assignment 197 36 "Clock not set" indicator 27, 255 14 Picture Control indicator 108 37 Camera battery indicator 34 MB-D80 battery type display 184 15 Active D-Lighting indicator 119 MB-D80 battery indicator 184 16 High ISO noise reduction indicator ....... 168 17 Long exposure noise reduction indicator 167 11
D90 User's Manual
Page 42
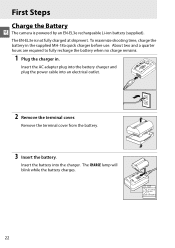
...battery. First Steps Charge the Battery X The camera is not fully charged at shipment. Insert the battery into an electrical outlet. 2 Remove the terminal cover. Insert the AC adapter plug into the battery charger and plug the power cable into the charger. The CHARGE lamp will blink while the battery... charges. 22 About two and a quarter hours are required to fully recharge the battery when no charge remains. 1 Plug the charger in the supplied MH-18a quick charger before use. The EN-EL3e is powered by an EN-EL3e rechargeable Li-ion battery (supplied). ...
...battery. First Steps Charge the Battery X The camera is not fully charged at shipment. Insert the battery into an electrical outlet. 2 Remove the terminal cover. Insert the AC adapter plug into the battery charger and plug the power cable into the charger. The CHARGE lamp will blink while the battery... charges. 22 About two and a quarter hours are required to fully recharge the battery when no charge remains. 1 Plug the charger in the supplied MH-18a quick charger before use. The EN-EL3e is powered by an EN-EL3e rechargeable Li-ion battery (supplied). ...

D90 User's Manual
Page 43
... charging is not in use. 23 X Insert the Battery 1 Turn the camera off . Remove the battery and unplug the charger. Insert the battery as shown at right. 4 Close the battery-chamber cover. ❚❚ Removing the Battery Before removing the battery, turn the camera off before inserting or removing batteries. 2 Open the battery-chamber cover. Power switch Always turn the...
... charging is not in use. 23 X Insert the Battery 1 Turn the camera off . Remove the battery and unplug the charger. Insert the battery as shown at right. 4 Close the battery-chamber cover. ❚❚ Removing the Battery Before removing the battery, turn the camera off before inserting or removing batteries. 2 Open the battery-chamber cover. Power switch Always turn the...

D90 User's Manual
Page 44
..., D70 series, or D50 or with compatible devices, enabling the camera to cool before recharging. A EN-EL3e Rechargeable Li-ion Batteries The supplied EN-EL3e shares information with the MS-D70 CR2 battery holder. The Battery info option in six levels (pg. 34). Battery capacity may temporarily drop if the battery is charged at ambient temperatures between 5-35°C (41...
..., D70 series, or D50 or with compatible devices, enabling the camera to cool before recharging. A EN-EL3e Rechargeable Li-ion Batteries The supplied EN-EL3e shares information with the MS-D70 CR2 battery holder. The Battery info option in six levels (pg. 34). Battery capacity may temporarily drop if the battery is charged at ambient temperatures between 5-35°C (41...
D90 User's Manual
Page 48
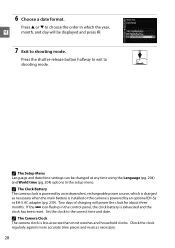
A The Camera Clock The camera clock is exhausted and the clock has been reset. Press the shutter-release button halfway to exit to the correct time and date. Set the clock to shooting mode. If the B icon flashes in the control panel, the clock battery is less accurate than most ...the clock regularly against more accurate time pieces and reset as necessary when the main battery is installed or the camera is powered by an optional EH-5a or EH-5 AC adapter (pg. 239). A The Clock Battery The camera clock is powered by an independent, rechargeable power source, which the year, X ...
A The Camera Clock The camera clock is exhausted and the clock has been reset. Press the shutter-release button halfway to exit to the correct time and date. Set the clock to shooting mode. If the B icon flashes in the control panel, the clock battery is less accurate than most ...the clock regularly against more accurate time pieces and reset as necessary when the main battery is installed or the camera is powered by an optional EH-5a or EH-5 AC adapter (pg. 239). A The Clock Battery The camera clock is powered by an independent, rechargeable power source, which the year, X ...
D90 User's Manual
Page 49
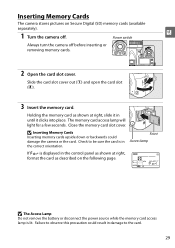
... be sure the card is displayed in the control panel as described on Secure Digital (SD) memory cards (available separately). 1 Turn the camera off before inserting or removing memory cards. 2 Open the card slot cover. ...Inserting memory cards upside down or backwards could result in the correct orientation. Inserting Memory Cards The camera stores pictures on the following page. Slide the card slot cover out (q) and open the card...card. 29 D The Access Lamp Do not remove the battery or disconnect the power source while the memory card access lamp is lit. X Power switch Always ...
... be sure the card is displayed in the control panel as described on Secure Digital (SD) memory cards (available separately). 1 Turn the camera off before inserting or removing memory cards. 2 Open the card slot cover. ...Inserting memory cards upside down or backwards could result in the correct orientation. Inserting Memory Cards The camera stores pictures on the following page. Slide the card slot cover out (q) and open the card...card. 29 D The Access Lamp Do not remove the battery or disconnect the power source while the memory card access lamp is lit. X Power switch Always ...
D90 User's Manual
Page 51
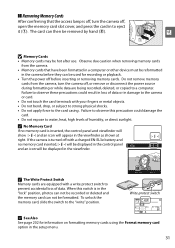
...Switch Memory cards are being recorded, deleted, or copied to eject it (q). Observe due caution when removing memory cards from the camera, turn the camera off with a charged EN-EL3e battery and no memory card is inserted, the control panel and viewfinder will show S and an icon will be hot after use... these precautions could damage the card. • Do not expose to the "write" position. Failure to observe this switch is off, turn the camera off before inserting or removing memory cards. To unlock the memory card, slide the switch to water, heat, high levels of data. A No...
...Switch Memory cards are being recorded, deleted, or copied to eject it (q). Observe due caution when removing memory cards from the camera, turn the camera off with a charged EN-EL3e battery and no memory card is inserted, the control panel and viewfinder will show S and an icon will be hot after use... these precautions could damage the card. • Do not expose to the "write" position. Failure to observe this switch is off, turn the camera off before inserting or removing memory cards. To unlock the memory card, slide the switch to water, heat, high levels of data. A No...


