
Product Manual
Page 8
... 3 s delay mode 2 s 1 s Off (default) d11 Flash warning On (default) Off d12 MB-D14 LR6 (AA alkaline) battery type HR6 (AA Ni-MH) (default) FR6 (AA lithium) d13 Battery order Use MB-D14 batteries first (default) Use camera battery first vi release button AE-L c2 Standby timer c3 Self-timer c4 Monitor off delay c5...
... 3 s delay mode 2 s 1 s Off (default) d11 Flash warning On (default) Off d12 MB-D14 LR6 (AA alkaline) battery type HR6 (AA Ni-MH) (default) FR6 (AA lithium) d13 Battery order Use MB-D14 batteries first (default) Use camera battery first vi release button AE-L c2 Standby timer c3 Self-timer c4 Monitor off delay c5...

Product Manual
Page 11
... menu Shooting menu Custom setting menu Setup menu Retouch menu - - Image comment Done Input comment Attach comment Auto image On rotation Off (default) Battery info - ix N RETOUCH MENU (0 261) D-Lighting Red-eye correction Trim Monochrome Filter effects - - - Choose start/end point Save selected ...fine-tune (On/Off) Saved value Default List saved values Eye-Fi upload 2 Slot 1 Slot 2 Firmware version - 1 Not available at battery levels of J or below. 2 Available only with compatible Eye-Fi memory cards. Select image Choose destination Choose size - - My Menu ...
... menu Shooting menu Custom setting menu Setup menu Retouch menu - - Image comment Done Input comment Attach comment Auto image On rotation Off (default) Battery info - ix N RETOUCH MENU (0 261) D-Lighting Red-eye correction Trim Monochrome Filter effects - - - Choose start/end point Save selected ...fine-tune (On/Off) Saved value Default List saved values Eye-Fi upload 2 Slot 1 Slot 2 Firmware version - 1 Not available at battery levels of J or below. 2 Available only with compatible Eye-Fi memory cards. Select image Choose destination Choose size - - My Menu ...

Product Manual
Page 12
... Information Display...9 The Command Dials ...12 The BM-14 Monitor Cover 17 Camera Menus...18 Using Camera Menus ...19 First Steps ...21 Charge the Battery ...21 Insert the Battery ...23 Attach a Lens...25 Basic Setup...27 Insert a Memory Card...29 Format the Memory Card ...31 Adjust Viewfinder Focus ...33 Basic Photography and...
... Information Display...9 The Command Dials ...12 The BM-14 Monitor Cover 17 Camera Menus...18 Using Camera Menus ...19 First Steps ...21 Charge the Battery ...21 Insert the Battery ...23 Attach a Lens...25 Basic Setup...27 Insert a Memory Card...29 Format the Memory Card ...31 Adjust Viewfinder Focus ...33 Basic Photography and...

Product Manual
Page 17
...: File Number Sequence 230 d8: Information Display 231 d9: LCD Illumination...231 d10: Exposure Delay Mode 231 d11: Flash Warning ...231 d12: MB-D14 Battery Type 232 d13: Battery Order...233 e: Bracketing/Flash ...234 e1: Flash Sync Speed ...234 e2: Flash Shutter Speed 235 e3: Flash Cntrl for Exposure Cntrl 224 b3...
...: File Number Sequence 230 d8: Information Display 231 d9: LCD Illumination...231 d10: Exposure Delay Mode 231 d11: Flash Warning ...231 d12: MB-D14 Battery Type 232 d13: Battery Order...233 e: Bracketing/Flash ...234 e1: Flash Sync Speed ...234 e2: Flash Shutter Speed 235 e3: Flash Cntrl for Exposure Cntrl 224 b3...

Product Manual
Page 18
... Brightness...250 Image Dust Off Ref Photo 251 Flicker Reduction...252 Time Zone and Date ...253 Language ...253 Image Comment ...253 Auto Image Rotation ...254 Battery Info...255 Copyright Information 256 Save/Load Settings...257 Virtual Horizon ...258 AF Fine-tune ...259 Eye-Fi Upload ...260 Firmware Version ...260 N The Retouch...
... Brightness...250 Image Dust Off Ref Photo 251 Flicker Reduction...252 Time Zone and Date ...253 Language ...253 Image Comment ...253 Auto Image Rotation ...254 Battery Info...255 Copyright Information 256 Save/Load Settings...257 Virtual Horizon ...258 AF Fine-tune ...259 Eye-Fi Upload ...260 Firmware Version ...260 N The Retouch...

Product Manual
Page 19
... My Menu/m Recent Settings 280 Recent Settings...283 Technical Notes 285 Compatible Lenses...285 Optional Flash Units (Speedlights 292 The Nikon Creative Lighting System (CLS 293 Other Accessories ...297 Attaching a Power Connector and AC Adapter 299 Caring for the Camera......Now" ...301 "Clean at Startup/Shutdown 302 Manual Cleaning...303 Caring for the Camera and Battery: Cautions 306 Available Settings ...309 Defaults ...312 Exposure Program (Mode P 315 Troubleshooting ...316 Battery/Display ...316 Shooting (All Modes) ...317 Shooting (P, S, A, M)...319 Playback ...320 Miscellaneous...
... My Menu/m Recent Settings 280 Recent Settings...283 Technical Notes 285 Compatible Lenses...285 Optional Flash Units (Speedlights 292 The Nikon Creative Lighting System (CLS 293 Other Accessories ...297 Attaching a Power Connector and AC Adapter 299 Caring for the Camera......Now" ...301 "Clean at Startup/Shutdown 302 Manual Cleaning...303 Caring for the Camera and Battery: Cautions 306 Available Settings ...309 Defaults ...312 Exposure Program (Mode P 315 Troubleshooting ...316 Battery/Display ...316 Shooting (All Modes) ...317 Shooting (P, S, A, M)...319 Playback ...320 Miscellaneous...

Product Manual
Page 20
...notice smoke or an unusual smell coming from the equipment or AC adapter (available separately), unplug the AC adapter and remove the battery immediately, taking care to a Nikonauthorized service center for extended periods may result in injury. Should the product break open as the... a qualified technician. A Keep out of reach of this equipment, consult a physician immediately. For Your Safety To prevent damage to your Nikon product or injury to yourself or to observe this precaution could result in injury. The consequences that small parts constitute a chocking hazard. A...
...notice smoke or an unusual smell coming from the equipment or AC adapter (available separately), unplug the AC adapter and remove the battery immediately, taking care to a Nikonauthorized service center for extended periods may result in injury. Should the product break open as the... a qualified technician. A Keep out of reach of this equipment, consult a physician immediately. For Your Safety To prevent damage to your Nikon product or injury to yourself or to observe this precaution could result in injury. The consequences that small parts constitute a chocking hazard. A...

Product Manual
Page 21
.... In medical facilities, follow staff instructions regarding the use with wet hands. Observe the following precautions when handling batteries for use only the cables provided or sold by Nikon for an extended period. A Use appropriate cables When connecting cables to the input and output jacks, use in... .) from the camera before boarding an aircraft, and turn the camera off and allow the battery to cool. • Discontinue use...
.... In medical facilities, follow staff instructions regarding the use with wet hands. Observe the following precautions when handling batteries for use only the cables provided or sold by Nikon for an extended period. A Use appropriate cables When connecting cables to the input and output jacks, use in... .) from the camera before boarding an aircraft, and turn the camera off and allow the battery to cool. • Discontinue use...

Product Manual
Page 22
...be collected separately. This symbol on the battery indicates that electrical and electronic equipment is accurate and complete, we would appreciate it were you to bring any means, without Nikon's prior written permission. • Nikon reserves the right to change the specifications ...local authorities in charge of waste management. DISPOSE OF USED BATTERIES ACCORDING TO THE INSTRUCTIONS. This symbol indicates that the battery is designated for separate collection at any time and without prior notice. • Nikon will not be reproduced, transmitted, transcribed, stored in a...
...be collected separately. This symbol on the battery indicates that electrical and electronic equipment is accurate and complete, we would appreciate it were you to bring any means, without Nikon's prior written permission. • Nikon reserves the right to change the specifications ...local authorities in charge of waste management. DISPOSE OF USED BATTERIES ACCORDING TO THE INSTRUCTIONS. This symbol indicates that the battery is designated for separate collection at any time and without prior notice. • Nikon will not be reproduced, transmitted, transcribed, stored in a...

Product Manual
Page 25
... As part of the camera or result in the batteries overheating, igniting, rupturing, or leaking. Additional information may void your Nikon warranty. D Use Only Nikon Brand Accessories Only Nikon brand accessories certified by Nikon specifically for use of third-party rechargeable Li-ion batteries not bearing the Nikon holographic seal shown at right could damage the camera...
... As part of the camera or result in the batteries overheating, igniting, rupturing, or leaking. Additional information may void your Nikon warranty. D Use Only Nikon Brand Accessories Only Nikon brand accessories certified by Nikon specifically for use of third-party rechargeable Li-ion batteries not bearing the Nikon holographic seal shown at right could damage the camera...

Product Manual
Page 26
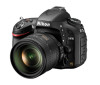
... included with your camera. • BS-1 accessory shoe cover • DK-21 rubber eyecup • D610 camera • BM-14 monitor cover • BF-1B body cap • EN-EL15 rechargeable Li-ion battery (with terminal cover) • MH-25 battery charger (AC wall adapter supplied only in countries or regions where required.
... included with your camera. • BS-1 accessory shoe cover • DK-21 rubber eyecup • D610 camera • BM-14 monitor cover • BF-1B body cap • EN-EL15 rechargeable Li-ion battery (with terminal cover) • MH-25 battery charger (AC wall adapter supplied only in countries or regions where required.

Product Manual
Page 29
... 12, 245 3 Depth-of-field preview button...60, 77, 244, 248 4 Fn (function) button 92, 149, 174, 242 5 Battery-chamber cover 23 6 Battery-chamber cover latch 23 7 Contact cover for optional MB-D14 battery pack 297 8 Power connector cover 299 9 CPU contacts 10 Lens mount 26, 103 11 AF coupling 12 Tripod socket...
... 12, 245 3 Depth-of-field preview button...60, 77, 244, 248 4 Fn (function) button 92, 149, 174, 242 5 Battery-chamber cover 23 6 Battery-chamber cover latch 23 7 Contact cover for optional MB-D14 battery pack 297 8 Power connector cover 299 9 CPU contacts 10 Lens mount 26, 103 11 AF coupling 12 Tripod socket...

Product Manual
Page 33
... Number of shots in WB bracketing sequence 156 Number of intervals for interval timer photography 165 Focal length (non-CPU lenses 172 3 MB-D14 battery indicator 233 4 Battery indicator 35 5 Flash mode 144 6 Autofocus mode 97 7 Image size 95 8 Image quality 93 9 White balance fine-tuning indicator 118 10 White balance 115...
... Number of shots in WB bracketing sequence 156 Number of intervals for interval timer photography 165 Focal length (non-CPU lenses 172 3 MB-D14 battery indicator 233 4 Battery indicator 35 5 Flash mode 144 6 Autofocus mode 97 7 Image size 95 8 Image quality 93 9 White balance fine-tuning indicator 118 10 White balance 115...

Product Manual
Page 34
...Flash sync indicator 234 16 Aperture stop indicator 73, 288 17 Exposure indicator 78 Exposure compensation display 112 Roll indicator 243 18 Low battery warning 35 19 Exposure and flash bracketing indicator ....... 153 WB bracketing indicator 156 ADL bracketing indicator 158 20 Auto ISO sensitivity indicator...and does not indicate a malfunction. The Viewfinder X 1 Framing grid (displayed when On is selected for over 1000 exposures 36 D No Battery When the battery is totally exhausted or no battery is inserted, the display in the viewfinder will return to normal when a fully-charged...
...Flash sync indicator 234 16 Aperture stop indicator 73, 288 17 Exposure indicator 78 Exposure compensation display 112 Roll indicator 243 18 Low battery warning 35 19 Exposure and flash bracketing indicator ....... 153 WB bracketing indicator 156 ADL bracketing indicator 158 20 Auto ISO sensitivity indicator...and does not indicate a malfunction. The Viewfinder X 1 Framing grid (displayed when On is selected for over 1000 exposures 36 D No Battery When the battery is totally exhausted or no battery is inserted, the display in the viewfinder will return to normal when a fully-charged...

Product Manual
Page 35
... progress indicator Exposure and flash bracketing 153 WB bracketing 156 10 HDR indicator 140 HDR exposure differential 140 11 Camera battery indicator 35 12 MB-D14 battery type display 232 MB-D14 battery indicator 232 13 "K" (appears when memory remains for over 1000 exposures 36 14 Number of exposures remaining 36 Time-lapse...
... progress indicator Exposure and flash bracketing 153 WB bracketing 156 10 HDR indicator 140 HDR exposure differential 140 11 Camera battery indicator 35 12 MB-D14 battery type display 232 MB-D14 battery indicator 232 13 "K" (appears when memory remains for over 1000 exposures 36 14 Number of exposures remaining 36 Time-lapse...

Product Manual
Page 47
... (41°F-95°F). The AC adapter plug should be in the supplied MH-25 battery charger before use. Remove the terminal cover from the battery. 3 Insert the battery. D Charging the Battery Charge the battery indoors at right; Charging is below 0°C (32°F) or above 60°C... if its temperature is complete when the CHARGE lamp stops flashing. Battery Charging charging complete 5 Remove the battery when charging is powered by an EN-EL15 rechargeable Li-ion battery (supplied). First Steps Charge the Battery The camera is complete. do not rotate. 2 Remove the terminal...
... (41°F-95°F). The AC adapter plug should be in the supplied MH-25 battery charger before use. Remove the terminal cover from the battery. 3 Insert the battery. D Charging the Battery Charge the battery indoors at right; Charging is below 0°C (32°F) or above 60°C... if its temperature is complete when the CHARGE lamp stops flashing. Battery Charging charging complete 5 Remove the battery when charging is powered by an EN-EL15 rechargeable Li-ion battery (supplied). First Steps Charge the Battery The camera is complete. do not rotate. 2 Remove the terminal...

Product Manual
Page 49
... and open (w) the battery-chamber cover. Battery latch A Removing the Battery Turn the camera off before inserting or removing batteries. 1 Open the battery-chamber cover. Insert the battery in place when the battery is fully inserted (w). 3 Close the battery-chamber cover. The latch locks the battery in the orientation shown (q), using the battery to keep the orange battery latch pressed to...
... and open (w) the battery-chamber cover. Battery latch A Removing the Battery Turn the camera off before inserting or removing batteries. 1 Open the battery-chamber cover. Insert the battery in place when the battery is fully inserted (w). 3 Close the battery-chamber cover. The latch locks the battery in the orientation shown (q), using the battery to keep the orange battery latch pressed to...

Product Manual
Page 50
... above 40°C (104°F); Unplug when not in the Battery info (0 255) display may be hot immediately after use. If the battery is in overheating and damage to 60°C (140°F). failure to your retailer or a Nikon-authorized service representative. Battery capacity may increase at room temperature indicates that the temperature is...
... above 40°C (104°F); Unplug when not in the Battery info (0 255) display may be hot immediately after use. If the battery is in overheating and damage to 60°C (140°F). failure to your retailer or a Nikon-authorized service representative. Battery capacity may increase at room temperature indicates that the temperature is...
Product Manual
Page 54
...) and Time zone and date (0 253) options in the information display, the clock battery is exhausted and the clock has been reset. Set the clock to the correct time and date. A The Clock... Battery The camera clock is powered by an optional EP-5B power connector and EH-5b AC ...adapter (0 297). Check the clock regularly against more accurate time pieces and reset as necessary when the main battery is installed or the camera is less accurate than most watches and household clocks. A Setting the Clock Language...
...) and Time zone and date (0 253) options in the information display, the clock battery is exhausted and the clock has been reset. Set the clock to the correct time and date. A The Clock... Battery The camera clock is powered by an optional EP-5B power connector and EH-5b AC ...adapter (0 297). Check the clock regularly against more accurate time pieces and reset as necessary when the main battery is installed or the camera is less accurate than most watches and household clocks. A Setting the Clock Language...

Product Manual
Page 56
... water, heat, high levels of data or in damage to the camera or card. • Do not touch the card terminals with a charged EN-EL15 battery and no memory card inserted, S will flash (0 324). the card in each slot). Do not remove memory cards from the camera. • Turn the power...
... water, heat, high levels of data or in damage to the camera or card. • Do not touch the card terminals with a charged EN-EL15 battery and no memory card inserted, S will flash (0 324). the card in each slot). Do not remove memory cards from the camera. • Turn the power...


