
Product Manual
Page 3
Table of Contents For Your Safety xi Notices xv Wireless xx Introduction 1 Getting to Know the Camera 1 Camera Menus: An Overview 13 Using the Touch Screen 17 First Steps 27 "Point-and-Shoot" Modes (i and j) 38 Framing Photos in the Viewfinder 39 Viewing Photographs 42 Deleting Unwanted Pictures 43 Framing Photos in the Monitor 45 Viewing Photographs 48 Deleting Unwanted Pictures 49 Recording Movies 50 Viewing Movies 52 Deleting Unwanted Movies 53 i
Table of Contents For Your Safety xi Notices xv Wireless xx Introduction 1 Getting to Know the Camera 1 Camera Menus: An Overview 13 Using the Touch Screen 17 First Steps 27 "Point-and-Shoot" Modes (i and j) 38 Framing Photos in the Viewfinder 39 Viewing Photographs 42 Deleting Unwanted Pictures 43 Framing Photos in the Monitor 45 Viewing Photographs 48 Deleting Unwanted Pictures 49 Recording Movies 50 Viewing Movies 52 Deleting Unwanted Movies 53 i
Product Manual
Page 6
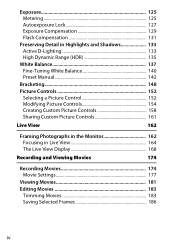
... High Dynamic Range (HDR 135 White Balance 137 Fine-Tuning White Balance 140 Preset Manual 142 Bracketing 148 Picture Controls 152 Selecting a Picture Control 152 Modifying Picture Controls 154 Creating Custom Picture Controls 158 Sharing Custom Picture Controls 161 Live View 162 Framing Photographs in the Monitor 162 Focusing in Live View 164 The Live...
... High Dynamic Range (HDR 135 White Balance 137 Fine-Tuning White Balance 140 Preset Manual 142 Bracketing 148 Picture Controls 152 Selecting a Picture Control 152 Modifying Picture Controls 154 Creating Custom Picture Controls 158 Sharing Custom Picture Controls 161 Live View 162 Framing Photographs in the Monitor 162 Focusing in Live View 164 The Live...
Product Manual
Page 7
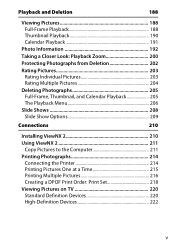
... 191 Photo Information 192 Taking a Closer Look: Playback Zoom 200 Protecting Photographs from Deletion 202 Rating Pictures 203 Rating Individual Pictures 203 Rating Multiple Pictures 204 Deleting Photographs 205 Full-Frame, Thumbnail, and Calendar Playback 205 The Playback Menu 206 Slide Shows... 2 210 Using ViewNX 2 211 Copy Pictures to the Computer 211 Printing Photographs 214 Connecting the Printer 214 Printing Pictures One at a Time 215 Printing Multiple Pictures 216 Creating a DPOF Print Order: Print Set 218 Viewing Pictures on TV 220 Standard Definition Devices 220 ...
... 191 Photo Information 192 Taking a Closer Look: Playback Zoom 200 Protecting Photographs from Deletion 202 Rating Pictures 203 Rating Individual Pictures 203 Rating Multiple Pictures 204 Deleting Photographs 205 Full-Frame, Thumbnail, and Calendar Playback 205 The Playback Menu 206 Slide Shows... 2 210 Using ViewNX 2 211 Copy Pictures to the Computer 211 Printing Photographs 214 Connecting the Printer 214 Printing Pictures One at a Time 215 Printing Multiple Pictures 216 Creating a DPOF Print Order: Print Set 218 Viewing Pictures on TV 220 Standard Definition Devices 220 ...
Product Manual
Page 8
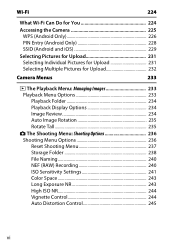
... 224 Accessing the Camera 225 WPS (Android Only 226 PIN Entry (Android Only 228 SSID (Android and iOS 229 Selecting Pictures for Upload 231 Selecting Individual Pictures for Upload 231 Selecting Multiple Pictures for Upload 232 Camera Menus 233 D The Playback Menu: Managing Images 233 Playback Menu Options 233 Playback Folder 234 Playback...
... 224 Accessing the Camera 225 WPS (Android Only 226 PIN Entry (Android Only 228 SSID (Android and iOS 229 Selecting Pictures for Upload 231 Selecting Individual Pictures for Upload 231 Selecting Multiple Pictures for Upload 232 Camera Menus 233 D The Playback Menu: Managing Images 233 Playback Menu Options 233 Playback Folder 234 Playback...

Product Manual
Page 20
... manual (0 146). NO LICENSE IS GRANTED OR SHALL BE IMPLIED FOR ANY OTHER USE. Before discarding the camera or transferring ownership to delete any pictures selected for example, pictures of personal image data. ADDITIONAL INFORMATION MAY BE OBTAINED FROM MPEG LA, L.L.C. Deleted files can sometimes be taken to also replace any personal...
... manual (0 146). NO LICENSE IS GRANTED OR SHALL BE IMPLIED FOR ANY OTHER USE. Before discarding the camera or transferring ownership to delete any pictures selected for example, pictures of personal image data. ADDITIONAL INFORMATION MAY BE OBTAINED FROM MPEG LA, L.L.C. Deleted files can sometimes be taken to also replace any personal...
Product Manual
Page 21
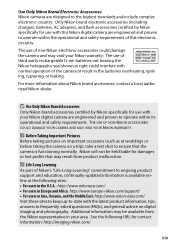
... the highest standards and include complex electronic circuitry. D Use Only Nikon Brand Accessories Only Nikon brand accessories certified by Nikon specifically for contact information: http://imaging.nikon.com/ xix For more information about Nikon brand accessories, contact a local authorized Nikon dealer. A Before Taking Important Pictures Before taking pictures on important occasions (such as at the following URL for...
... the highest standards and include complex electronic circuitry. D Use Only Nikon Brand Accessories Only Nikon brand accessories certified by Nikon specifically for contact information: http://imaging.nikon.com/ xix For more information about Nikon brand accessories, contact a local authorized Nikon dealer. A Before Taking Important Pictures Before taking pictures on important occasions (such as at the following URL for...
Product Manual
Page 29
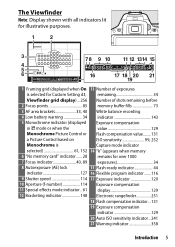
... White balance recording 4 Low battery warning 34 indicator 143 5 Monochrome indicator (displayed Exposure compensation in % mode or when the value 129 Monochrome Picture Control or Flash compensation value........ 131 a Picture Control based on ISO sensitivity 99, 252 Monochrome is Capture mode indicator selected 61, 152 14 "k" (appears when memory 6 "No memory card...
... White balance recording 4 Low battery warning 34 indicator 143 5 Monochrome indicator (displayed Exposure compensation in % mode or when the value 129 Monochrome Picture Control or Flash compensation value........ 131 a Picture Control based on ISO sensitivity 99, 252 Monochrome is Capture mode indicator selected 61, 152 14 "k" (appears when memory 6 "No memory card...
Product Manual
Page 30
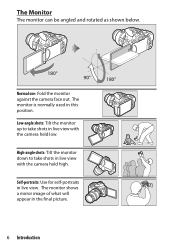
Self-portraits: Use for self-portraits in the final picture. 6 Introduction The Monitor The monitor can be angled and rotated as shown below. 180° 90° Normal use: Fold the monitor against the camera face out. The monitor shows a mirror image of what will appear in live view. Low-angle shots: Tilt the monitor up to take shots in live view with the camera held low. 180° High-angle shots: Tilt the monitor down to take shots in this position. The monitor is normally used in live view with the camera held high.
Self-portraits: Use for self-portraits in the final picture. 6 Introduction The Monitor The monitor can be angled and rotated as shown below. 180° 90° Normal use: Fold the monitor against the camera face out. The monitor shows a mirror image of what will appear in live view. Low-angle shots: Tilt the monitor up to take shots in live view with the camera held low. 180° High-angle shots: Tilt the monitor down to take shots in this position. The monitor is normally used in live view with the camera held high.

Product Manual
Page 34
... Metering 125 4 HDR (high dynamic range)....... 135 12 AF-area mode 82, 166 5 Active D-Lighting 133 13 Focus mode 78, 164 6 White balance 137 14 Picture Control 152 7 ISO sensitivity 99 8 Exposure compensation 129 10 Introduction
... Metering 125 4 HDR (high dynamic range)....... 135 12 AF-area mode 82, 166 5 Active D-Lighting 133 13 Focus mode 78, 164 6 White balance 137 14 Picture Control 152 7 ISO sensitivity 99 8 Exposure compensation 129 10 Introduction

Product Manual
Page 46
... until the selected number of shots is recorded. 22 Introduction the delay and number of shots is greater than 1, the camera will automatically take pictures even when the 3 icon is selected, you lift your finger from the screen. Use the shutter-release button to take photographs in blurred photographs... to take photographs during movie recording. The shutter-release button can be used to show that touch shooting options are active. D Taking Pictures Using Tap Shooting Options Avoid moving the camera when releasing the shutter. Camera movement can not be used only to take...
... until the selected number of shots is recorded. 22 Introduction the delay and number of shots is greater than 1, the camera will automatically take pictures even when the 3 icon is selected, you lift your finger from the screen. Use the shutter-release button to take photographs in blurred photographs... to take photographs during movie recording. The shutter-release button can be used to show that touch shooting options are active. D Taking Pictures Using Tap Shooting Options Avoid moving the camera when releasing the shutter. Camera movement can not be used only to take...
Product Manual
Page 49
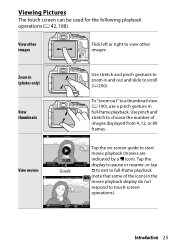
Viewing Pictures The touch screen can be used for the following playback operations (0 42, 188). Use pinch and stretch to choose the number of the icons in ...
Viewing Pictures The touch screen can be used for the following playback operations (0 42, 188). Use pinch and stretch to choose the number of the icons in ...
Product Manual
Page 53
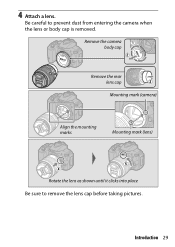
4 Attach a lens. Be careful to remove the lens cap before taking pictures. Introduction 29 Remove the camera body cap Remove the rear lens cap Mounting mark (camera) Align the mounting marks Mounting mark (lens) Rotate the lens as shown until it clicks into place Be sure to prevent dust from entering the camera when the lens or body cap is removed.
4 Attach a lens. Be careful to remove the lens cap before taking pictures. Introduction 29 Remove the camera body cap Remove the rear lens cap Mounting mark (camera) Align the mounting marks Mounting mark (lens) Rotate the lens as shown until it clicks into place Be sure to prevent dust from entering the camera when the lens or body cap is removed.
Product Manual
Page 54
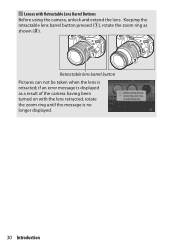
if an error message is displayed as shown (w). Retractable lens barrel button Pictures can not be taken when the lens is retracted; Keeping the retractable lens barrel button pressed (q), rotate the zoom ring as a result of the camera having been turned on with Retractable Lens Barrel Buttons Before using the camera, unlock and extend the lens. A Lenses with the lens retracted, rotate the zoom ring until the message is no longer displayed. 30 Introduction
if an error message is displayed as shown (w). Retractable lens barrel button Pictures can not be taken when the lens is retracted; Keeping the retractable lens barrel button pressed (q), rotate the zoom ring as a result of the camera having been turned on with Retractable Lens Barrel Buttons Before using the camera, unlock and extend the lens. A Lenses with the lens retracted, rotate the zoom ring until the message is no longer displayed. 30 Introduction

Product Manual
Page 66
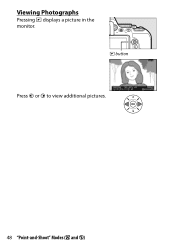
Viewing Photographs Pressing K displays a picture in the monitor. K button Press 4 or 2 to view additional pictures. 42 "Point-and-Shoot" Modes (i and j)
Viewing Photographs Pressing K displays a picture in the monitor. K button Press 4 or 2 to view additional pictures. 42 "Point-and-Shoot" Modes (i and j)

Product Manual
Page 67
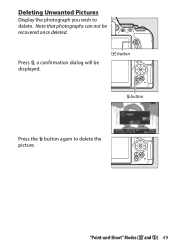
Press O; K button O button Press the O button again to delete. a confirmation dialog will be recovered once deleted. Note that photographs can not be displayed. "Point-and-Shoot" Modes (i and j) 43 Deleting Unwanted Pictures Display the photograph you wish to delete the picture.
Press O; K button O button Press the O button again to delete. a confirmation dialog will be recovered once deleted. Note that photographs can not be displayed. "Point-and-Shoot" Modes (i and j) 43 Deleting Unwanted Pictures Display the photograph you wish to delete the picture.

Product Manual
Page 70
.... If the camera is complete, the photograph will be displayed in green; if the camera is complete. The focus point will flash red. 4 Take the picture.
.... If the camera is complete, the photograph will be displayed in green; if the camera is complete. The focus point will flash red. 4 Take the picture.
Product Manual
Page 72
K button Press 4 or 2 to view additional pictures. 48 "Point-and-Shoot" Modes (i and j) Viewing Photographs Pressing K displays a picture in the monitor.
K button Press 4 or 2 to view additional pictures. 48 "Point-and-Shoot" Modes (i and j) Viewing Photographs Pressing K displays a picture in the monitor.
Product Manual
Page 73
Press O; K button O button Press the O button again to delete. Note that photographs can not be displayed. Deleting Unwanted Pictures Display the photograph you wish to delete the picture. a confirmation dialog will be recovered once deleted. "Point-and-Shoot" Modes (i and j) 49
Press O; K button O button Press the O button again to delete. Note that photographs can not be displayed. Deleting Unwanted Pictures Display the photograph you wish to delete the picture. a confirmation dialog will be recovered once deleted. "Point-and-Shoot" Modes (i and j) 49
Product Manual
Page 76
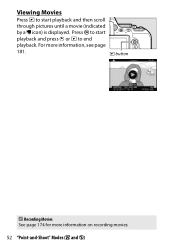
K button A Recording Movies See page 174 for more information, see page 181. Viewing Movies Press K to end playback. For more information on recording movies. 52 "Point-and-Shoot" Modes (i and j) Press J to start playback and press 1 or K to start playback and then scroll through pictures until a movie (indicated by a 1 icon) is displayed.
K button A Recording Movies See page 174 for more information, see page 181. Viewing Movies Press K to end playback. For more information on recording movies. 52 "Point-and-Shoot" Modes (i and j) Press J to start playback and press 1 or K to start playback and then scroll through pictures until a movie (indicated by a 1 icon) is displayed.

Product Manual
Page 78
.../Dawn w Pet Portrait x Candlelight y Blossom z Autumn Colors 0 Food 54 Matching Settings to suit the selected scene, making creative photography as simple as selecting a mode, framing a picture, and shooting as described on page 38. Choosing a scene mode automatically optimizes settings to the Subject or Situation (Scene Mode) Matching Settings to the Subject...
.../Dawn w Pet Portrait x Candlelight y Blossom z Autumn Colors 0 Food 54 Matching Settings to suit the selected scene, making creative photography as simple as selecting a mode, framing a picture, and shooting as described on page 38. Choosing a scene mode automatically optimizes settings to the Subject or Situation (Scene Mode) Matching Settings to the Subject...


