D50 User's Manual
Page 8
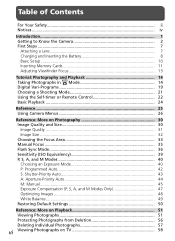
... Your Safety ii Notices ...iv Introduction...1 Getting to Know the Camera 2 First Steps ...7 Attaching a Lens 7 Charging and Inserting the Battery 8 Basic Setup 10 Inserting Memory Cards 11 Adjusting Viewfinder Focus 13 Tutorial: Photography and Playback 14 Taking Photographs in Mode 14 Digital Vari-Programs 19 Choosing a Shooting Mode 21 Using the...
... Your Safety ii Notices ...iv Introduction...1 Getting to Know the Camera 2 First Steps ...7 Attaching a Lens 7 Charging and Inserting the Battery 8 Basic Setup 10 Inserting Memory Cards 11 Adjusting Viewfinder Focus 13 Tutorial: Photography and Playback 14 Taking Photographs in Mode 14 Digital Vari-Programs 19 Choosing a Shooting Mode 21 Using the...

D50 User's Manual
Page 10
...camera when lenses are removed or exchanged. Foreign Matter on the Low-Pass Filter Nikon takes every possible precaution to prevent foreign matter from coming into contact with the latest product information, tips, answers to frequently-asked questions (FAQs), and general advice on digital imaging and photography. The D50...or the clean image options available in dusty environments. To protect the camera when no lens is in place, be adhering to ensure that may be available from entering the camera, do not exchange lenses in some third-party imaging software. Additional information...
...camera when lenses are removed or exchanged. Foreign Matter on the Low-Pass Filter Nikon takes every possible precaution to prevent foreign matter from coming into contact with the latest product information, tips, answers to frequently-asked questions (FAQs), and general advice on digital imaging and photography. The D50...or the clean image options available in dusty environments. To protect the camera when no lens is in place, be adhering to ensure that may be available from entering the camera, do not exchange lenses in some third-party imaging software. Additional information...

D50 User's Manual
Page 11
... you through the process of a Nikon D50 single-lens reflex (SLR) digital camera with your computer. • PictureProject Reference Manual (on CD): The PictureProject Reference Manual contains information on viewing the reference manual, see the Quick Start Guide. Please be sure to read all instructions thoroughly to your Nikon digital camera. Lens An AF-S DX 18-55 mm...
... you through the process of a Nikon D50 single-lens reflex (SLR) digital camera with your computer. • PictureProject Reference Manual (on CD): The PictureProject Reference Manual contains information on viewing the reference manual, see the Quick Start Guide. Please be sure to read all instructions thoroughly to your Nikon digital camera. Lens An AF-S DX 18-55 mm...

D50 User's Manual
Page 12
... a few moments to it helpful to bookmark this section and refer to familiarize yourself with camera controls and displays. Camera Body Accessory shoe: 109 Control panel: 4 AF-assist illuminator: 34 [Self-timer lamp: 22] [Red-eye reduction lamp: 36] (self-timer / remote control...: 109 Built-in flash: 109 (flash sync mode) button: 18, 36 [ Flash compensation: 38] Mode dial: 6 Eyelet for camera strap: 7 Infrared receiver: 28 Lens release button: 7 Power switch: 14 Shutter-release Focus-mode selector: button: 17 15, 35 Connector cover USB connector: 60, 63 Video connector: 58...
... a few moments to it helpful to bookmark this section and refer to familiarize yourself with camera controls and displays. Camera Body Accessory shoe: 109 Control panel: 4 AF-assist illuminator: 34 [Self-timer lamp: 22] [Red-eye reduction lamp: 36] (self-timer / remote control...: 109 Built-in flash: 109 (flash sync mode) button: 18, 36 [ Flash compensation: 38] Mode dial: 6 Eyelet for camera strap: 7 Infrared receiver: 28 Lens release button: 7 Power switch: 14 Shutter-release Focus-mode selector: button: 17 15, 35 Connector cover USB connector: 60, 63 Video connector: 58...

D50 User's Manual
Page 17
... when removing or exchanging lenses. Detaching Lenses Be sure the camera is equipped with the mounting index on the camera body, position the lens in the camera's bayonet mount. Being careful not to prevent dust from the lens. 2 Keeping the mounting index on the lens aligned with an aperture ring, lock aperture at the minimum setting...
... when removing or exchanging lenses. Detaching Lenses Be sure the camera is equipped with the mounting index on the camera body, position the lens in the camera's bayonet mount. Being careful not to prevent dust from the lens. 2 Keeping the mounting index on the lens aligned with an aperture ring, lock aperture at the minimum setting...

D50 User's Manual
Page 23
Before shooting, make sure that the display in the viewfinder is in clear focus. 1 Remove the lens cap and turn the camera on. 2 Slide the diopter adjustment control up and down until the focus brackets are framed in the viewfinder. When operating the diopter adjustment control with your eye to the viewfinder, be removed when adjusting viewfinder focus. 13 Focus brackets The eyepiece cup can be careful not to put your fingers or fingernails in sharp focus. Introduction-First Steps Adjusting Viewfinder Focus Photographs are in your eye.
Before shooting, make sure that the display in the viewfinder is in clear focus. 1 Remove the lens cap and turn the camera on. 2 Slide the diopter adjustment control up and down until the focus brackets are framed in the viewfinder. When operating the diopter adjustment control with your eye to the viewfinder, be removed when adjusting viewfinder focus. 13 Focus brackets The eyepiece cup can be careful not to put your fingers or fingernails in sharp focus. Introduction-First Steps Adjusting Viewfinder Focus Photographs are in your eye.
D50 User's Manual
Page 24
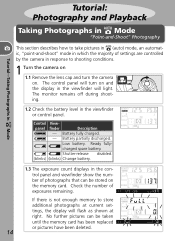
... and viewfinder show the number of exposures remaining. Battery partially discharged. If there is not enough memory to shooting conditions. 1 Turn the camera on 1.1 Remove the lens cap and turn on . Tutorial: Photography and Playback Taking Photographs in Mode "Point-and-Shoot" Photography Tutorial-Taking Photographs in Mode This section...
... and viewfinder show the number of exposures remaining. Battery partially discharged. If there is not enough memory to shooting conditions. 1 Turn the camera on 1.1 Remove the lens cap and turn on . Tutorial: Photography and Playback Taking Photographs in Mode "Point-and-Shoot" Photography Tutorial-Taking Photographs in Mode This section...

D50 User's Manual
Page 25
See the lens manual for details. Indicators not mentioned in the text are shown in black. Tutorial-Taking Photographs in Mode Illustrations In illustrations throughout this manual, indicators in the control panel and viewfinder are relevant to A (autofocus). 2 Select mode and adjust camera settings 2.1 Rotate the mode dial to . 2.2 Rotate the focus-mode selector to AF (autofocus). 2.3 Slide the lens A-M mode switch to the explanation in accompanying text are shown in gray. 15
See the lens manual for details. Indicators not mentioned in the text are shown in black. Tutorial-Taking Photographs in Mode Illustrations In illustrations throughout this manual, indicators in the control panel and viewfinder are relevant to A (autofocus). 2 Select mode and adjust camera settings 2.1 Rotate the mode dial to . 2.2 Rotate the focus-mode selector to AF (autofocus). 2.3 Slide the lens A-M mode switch to the explanation in accompanying text are shown in gray. 15

D50 User's Manual
Page 26
... the zoom ring to increase the area visible in Mode 3 Frame a photograph 3.1 Hold the camera as shown. Zoom in your right hand and cradle the camera body or lens with your torso for support. 3.2 Frame a photo in the viewfinder with the main subject positioned in any of the frame, or zoom...
... the zoom ring to increase the area visible in Mode 3 Frame a photograph 3.1 Hold the camera as shown. Zoom in your right hand and cradle the camera body or lens with your torso for support. 3.2 Frame a photo in the viewfinder with the main subject positioned in any of the frame, or zoom...

D50 User's Manual
Page 28
Remove lens hoods when using the flash. Wait until is displayed in the control panel. To save battery power when the flash is not in ...
Remove lens hoods when using the flash. Wait until is displayed in the control panel. To save battery power when the flash is not in ...

D50 User's Manual
Page 29
...to , the D50 offers a choice of children. To take pictures in Digital Vari-Program modes: 1 Rotate the mode dial to select a Digital VariProgram mode. 2 Frame a photograph, focus, and shoot as rotating the mode dial. Mode Description Portrait For portraits. Camera selects focus .... Colors are softened, lending composition sense of small objects. Increase distance between subject and background or use telephoto lens for portraits. See "Taking Photographs in Flash If additional lighting is pressed halfway. Night portrait For portraits taken against a...
...to , the D50 offers a choice of children. To take pictures in Digital Vari-Program modes: 1 Rotate the mode dial to select a Digital VariProgram mode. 2 Frame a photograph, focus, and shoot as rotating the mode dial. Mode Description Portrait For portraits. Camera selects focus .... Colors are softened, lending composition sense of small objects. Increase distance between subject and background or use telephoto lens for portraits. See "Taking Photographs in Flash If additional lighting is pressed halfway. Night portrait For portraits taken against a...

D50 User's Manual
Page 44
...the shutterrelease button is pressed halfway. Focus will light to function correctly, the lens must have a focal length of the illuminator (0.5- 3 m/1´8˝-9´10˝). Do not change the distance between the camera and subject while focus lock is in -focus indicator appears, and remain ...locked while the shutter-release button is pressed halfway. In continuous mode ( 21), focus will remain locked between shots. Lens hoods should be in the final...
...the shutterrelease button is pressed halfway. Focus will light to function correctly, the lens must have a focal length of the illuminator (0.5- 3 m/1´8˝-9´10˝). Do not change the distance between the camera and subject while focus lock is in -focus indicator appears, and remain ...locked while the shutter-release button is pressed halfway. In continuous mode ( 21), focus will remain locked between shots. Lens hoods should be in the final...

D50 User's Manual
Page 45
See the documentation provided with your subject and the camera, measure from the focal plane mark on the clear matte field in focus. Focal Plane Position To determine the distance between your lens for manual focus lenses or when autofocus does not produce the desired results. ... details. After positioning the subject in the active focus area, press the shutter-release button halfway and rotate the lens focus ring until the image displayed on the camera body. 35 Photographs can be adjusted manually with manual priority), focus can be used : Focus-mode selector ➤...
See the documentation provided with your subject and the camera, measure from the focal plane mark on the clear matte field in focus. Focal Plane Position To determine the distance between your lens for manual focus lenses or when autofocus does not produce the desired results. ... details. After positioning the subject in the active focus area, press the shutter-release button halfway and rotate the lens focus ring until the image displayed on the camera body. 35 Photographs can be adjusted manually with manual priority), focus can be used : Focus-mode selector ➤...

D50 User's Manual
Page 47
Reference-Flash Sync Mode Using the Built-in Flash Use with lenses with non-CPU lenses is 200 mm) and remove lens hoods to adjust sensitivity for manual control of 60 cm (2´), and can be used by the built-in continuous shooting mode ( 21), only one ...
Reference-Flash Sync Mode Using the Built-in Flash Use with lenses with non-CPU lenses is 200 mm) and remove lens hoods to adjust sensitivity for manual control of 60 cm (2´), and can be used by the built-in continuous shooting mode ( 21), only one ...

D50 User's Manual
Page 50
... snapshots and in other situations in the control panel and viewfinder: Indicator Description Subject too bright. camera selects aperture for adjusting camera settings. The camera exposure meter can be adjusted manually using the lens aperture ring. A Aperture-priority auto User chooses aperture; Exposure can be used to "bulb" for shutter speed and...
... snapshots and in other situations in the control panel and viewfinder: Indicator Description Subject too bright. camera selects aperture for adjusting camera settings. The camera exposure meter can be adjusted manually using the lens aperture ring. A Aperture-priority auto User chooses aperture; Exposure can be used to "bulb" for shutter speed and...

D50 User's Manual
Page 53
... blur, try increasing sensitivity ( 39), using the built-in seconds (for example, if a lens has a focal length of a tripod is recommended when shooting at slower shutter speeds. Shutter Speed and Camera Shake To prevent blurring caused by blurring moving objects, high shutter speeds to "freeze" motion. ..., the shutter speed should be faster than the inverse of the focal length of the lens, in flash ( 18), mounting the camera on a tripod, or attaching a VR lens. 43 Use of 300 mm, shutter speed should be faster than /1 300 s). Reference-P, S, A, and M Modes S: Shutter-Priority ...
... blur, try increasing sensitivity ( 39), using the built-in seconds (for example, if a lens has a focal length of a tripod is recommended when shooting at slower shutter speeds. Shutter Speed and Camera Shake To prevent blurring caused by blurring moving objects, high shutter speeds to "freeze" motion. ..., the shutter speed should be faster than the inverse of the focal length of the lens, in flash ( 18), mounting the camera on a tripod, or attaching a VR lens. 43 Use of 300 mm, shutter speed should be faster than /1 300 s). Reference-P, S, A, and M Modes S: Shutter-Priority ...

D50 User's Manual
Page 55
... for a long time-exposure ( ). To set to values between 30 s and ¼,000 s, or the shutter can be held open indefinitely for the lens. 1 Rotate the mode dial to M. 2 Rotate the command dial to adjust shutter speed and aperture until the desired exposure is achieved. 3 Frame a photograph, focus, and...
... for a long time-exposure ( ). To set to values between 30 s and ¼,000 s, or the shutter can be held open indefinitely for the lens. 1 Rotate the mode dial to M. 2 Rotate the command dial to adjust shutter speed and aperture until the desired exposure is achieved. 3 Frame a photograph, focus, and...

D50 User's Manual
Page 56
...on the optional ML-L3 remote control is pressed (2 s after the button is pressed in delayed remote mode) and remains open while the camera shutter-release button is open for Custom Setting 11 (EV Step), the amount of under - Depending on before taking photographs ( 78). "...on the option chosen for more than 3 EV The electronic analog exposure display is not shown when shutter speed or a non-CPU lens is displayed instead of ; Nikon recommends using a fully-charged battery or an optional EH-5 AC adapter to "1/2 Step" Optimal exposure Underexposed by 1/3 EV Underexposed ...
...on the optional ML-L3 remote control is pressed (2 s after the button is pressed in delayed remote mode) and remains open while the camera shutter-release button is open for Custom Setting 11 (EV Step), the amount of under - Depending on before taking photographs ( 78). "...on the option chosen for more than 3 EV The electronic analog exposure display is not shown when shutter speed or a non-CPU lens is displayed instead of ; Nikon recommends using a fully-charged battery or an optional EH-5 AC adapter to "1/2 Step" Optimal exposure Underexposed by 1/3 EV Underexposed ...

D50 User's Manual
Page 58
...). Results will vary with exposure and the position of the subject in the frame, even in the sRGB color space. 48 • Use a type G or D lens for current shooting conditions.
...). Results will vary with exposure and the position of the subject in the frame, even in the sRGB color space. 48 • Use a type G or D lens for current shooting conditions.
D50 User's Manual
Page 84
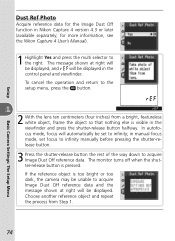
... monitor turns off when the shutter-release button is too bright or too dark, the camera may be unable to acquire Image Dust Off reference data and the message shown at right... shutter-release button. 3 Press the shutter-release button the rest of the way down to in Nikon Capture 4 version 4.3 or later (available separately; for the Image Dust Off function in fi... right. If the reference object is pressed. Setup Basic Camera Settings: The Setup Menu Dust Ref Photo Acquire reference data for more information, see the Nikon Capture 4 User's Manual). 1 Highlight Yes and press...
... monitor turns off when the shutter-release button is too bright or too dark, the camera may be unable to acquire Image Dust Off reference data and the message shown at right... shutter-release button. 3 Press the shutter-release button the rest of the way down to in Nikon Capture 4 version 4.3 or later (available separately; for the Image Dust Off function in fi... right. If the reference object is pressed. Setup Basic Camera Settings: The Setup Menu Dust Ref Photo Acquire reference data for more information, see the Nikon Capture 4 User's Manual). 1 Highlight Yes and press...


