
PS110 Reference Manual
Page 9
Appendix D Using NetWare 5 NDPS Overview ...D-1 Creating an NDPS Manager Object D-1 Creating an NDPS Printer Agent D-3 Workstation Configuration D-5 Installing and Configuring the Public Access Printers D-5 Appendix E IP Setup Overview ...E-1 Index Contents ix
Appendix D Using NetWare 5 NDPS Overview ...D-1 Creating an NDPS Manager Object D-1 Creating an NDPS Printer Agent D-3 Workstation Configuration D-5 Installing and Configuring the Public Access Printers D-5 Appendix E IP Setup Overview ...E-1 Index Contents ix
PS110 Reference Manual
Page 11
... Window 3-7 Figure 3-7. NETGEAR Print Server Software Installation Window 3-19 Figure 3-22. Figure 1-4. Choose Destination Location Window 3-5 Figure 3-5. Setup Window 3-9 Figure 3-10. Choose Destination Location Window 3-20 Figures xi Figure 1-6. Epson Spool Manager Queue Setup Window 3-11 Figure 3-13. Figures Figure 1-1. Figure 1-2. Figure 1-3. Figure 1-5. Front Panel of the Model PS104 Print Server 1-2 Front Panel of...
... Window 3-7 Figure 3-7. NETGEAR Print Server Software Installation Window 3-19 Figure 3-22. Figure 1-4. Choose Destination Location Window 3-5 Figure 3-5. Setup Window 3-9 Figure 3-10. Choose Destination Location Window 3-20 Figures xi Figure 1-6. Epson Spool Manager Queue Setup Window 3-11 Figure 3-13. Figures Figure 1-1. Figure 1-2. Figure 1-3. Figure 1-5. Front Panel of the Model PS104 Print Server 1-2 Front Panel of...
PS110 Reference Manual
Page 12
... 4-24. Install From Disk Window 4-24 Figure 4-27. TCP/IP Menu 3-27 Figure 4-1. Printer Select Window (End Setup 4-17 Figure 4-20. NETGEAR Print Server Software Installation Window 4-20 Figure 4-23. User PC Installation Option Window 4-3 Figure 4-3. Firstgear for Print Server ...18 Figure 4-21. Firstgear for Print Server Icon 3-24 Figure 3-27. NETGEAR Print Server Administration Program Window 3-26 Figure 3-29. Figure 3-23. Setup Complete Window 3-22 Figure 3-25. Epson Spool Manager Queue Setup Window 4-11 Figure 4-13. Add Printer Wizard Window (Print Test Page...
... 4-24. Install From Disk Window 4-24 Figure 4-27. TCP/IP Menu 3-27 Figure 4-1. Printer Select Window (End Setup 4-17 Figure 4-20. NETGEAR Print Server Software Installation Window 4-20 Figure 4-23. User PC Installation Option Window 4-3 Figure 4-3. Firstgear for Print Server ...18 Figure 4-21. Firstgear for Print Server Icon 3-24 Figure 3-27. NETGEAR Print Server Administration Program Window 3-26 Figure 3-29. Figure 3-23. Setup Complete Window 3-22 Figure 3-25. Epson Spool Manager Queue Setup Window 4-11 Figure 4-13. Add Printer Wizard Window (Print Test Page...
PS110 Reference Manual
Page 13
... Subnetting a Class B Address B-4 Figure D-1. Figure D-3. Create NDPS Manager Object Window D-2 Create Printer Agent Window D-3 Configure Port Handler Window D-4 Figure E-1. Figure 4-28. NETGEAR Print Server Administration Program 7-2 FirstGear Setup Utility Quick Setup Screen 7-3 System Menu Tab Window 7-5 NetWare PServer Tab Window 7-7 NetWare RPrinter Tab Window 7-9 TCP/IP Menu Tab Window 7-10 Logical Port Menu...
... Subnetting a Class B Address B-4 Figure D-1. Figure D-3. Create NDPS Manager Object Window D-2 Create Printer Agent Window D-3 Configure Port Handler Window D-4 Figure E-1. Figure 4-28. NETGEAR Print Server Administration Program 7-2 FirstGear Setup Utility Quick Setup Screen 7-3 System Menu Tab Window 7-5 NetWare PServer Tab Window 7-7 NetWare RPrinter Tab Window 7-9 TCP/IP Menu Tab Window 7-10 Logical Port Menu...
PS110 Reference Manual
Page 21
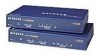
... 95, Windows 98, Windows NT, Novell NetWare, and UNIX) • Easy configuration of the device with FirstGear, NETGEAR configuration software that assures fast and easy setup for Windows 95, Windows 98, and Window NT users • Support for 10BASE-T Ethernet connection with four 10BASE-T ports... or 10/ 100BASE-T Ethernet connection on the Model PS110 Print Server • One IEEE 1284 bidirectional parallel port on the Model PS104 and Model PS105 Print Servers and two bidirectional parallel ports on the Internet Introduction 1-1 Chapter 1 Introduction This chapter describes the features ...
... 95, Windows 98, Windows NT, Novell NetWare, and UNIX) • Easy configuration of the device with FirstGear, NETGEAR configuration software that assures fast and easy setup for Windows 95, Windows 98, and Window NT users • Support for 10BASE-T Ethernet connection with four 10BASE-T ports... or 10/ 100BASE-T Ethernet connection on the Model PS110 Print Server • One IEEE 1284 bidirectional parallel port on the Model PS104 and Model PS105 Print Servers and two bidirectional parallel ports on the Internet Introduction 1-1 Chapter 1 Introduction This chapter describes the features ...
PS110 Reference Manual
Page 27
.../PS110 Print Server Resource CD • Model PS104/PS105/PS110 Print Server Installation Guide • Warranty & Owner Registration Card • Customer Support Phone Card Call your reseller or NETGEAR Customer Support in your area if there are any wrong, missing, or damaged parts. Keep the carton, including the original packing materials.... repair. Make sure the operating environment meets the physical requirements of customer support in your area. Chapter 2 Installation This chapter describes the installation and setup of the NETGEAR Model PS104/PS105/PS110 print server.
.../PS110 Print Server Resource CD • Model PS104/PS105/PS110 Print Server Installation Guide • Warranty & Owner Registration Card • Customer Support Phone Card Call your reseller or NETGEAR Customer Support in your area if there are any wrong, missing, or damaged parts. Keep the carton, including the original packing materials.... repair. Make sure the operating environment meets the physical requirements of customer support in your area. Chapter 2 Installation This chapter describes the installation and setup of the NETGEAR Model PS104/PS105/PS110 print server.
PS110 Reference Manual
Page 31
...with diskette-this option is geared toward the user who is already connected to the LAN and needs to set up a PC to the NETGEAR print server. • Admin Installation-this option generates an installation floppy disk for Print Server Program in a Microsoft Windows networking environment. ... the Microsoft Windows platform, you must: • Install FirstGear for Print Server software. • Run Setup. • Configure the user PC to print to configure and use the NETGEAR Model PS104/PS105/PS110 print server in Windows 95 or Windows 98. Chapter 3 Microsoft Windows 95 and Windows 98 ...
...with diskette-this option is geared toward the user who is already connected to the LAN and needs to set up a PC to the NETGEAR print server. • Admin Installation-this option generates an installation floppy disk for Print Server Program in a Microsoft Windows networking environment. ... the Microsoft Windows platform, you must: • Install FirstGear for Print Server software. • Run Setup. • Configure the user PC to print to configure and use the NETGEAR Model PS104/PS105/PS110 print server in Windows 95 or Windows 98. Chapter 3 Microsoft Windows 95 and Windows 98 ...
PS110 Reference Manual
Page 32
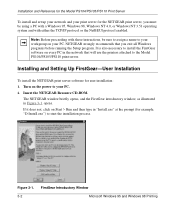
... software on your PC. Installation and Reference for the Model PS104/PS105/PS110 Print Server To install and set up your network and your print server for the NETGEAR print server, you exit all Windows programs before running the Setup program. Insert the NETGEAR Resource CD-ROM. Figure 3-1. 3-2 FirstGear Introductory Window Microsoft Windows 95...
... software on your PC. Installation and Reference for the Model PS104/PS105/PS110 Print Server To install and set up your network and your print server for the NETGEAR print server, you exit all Windows programs before running the Setup program. Insert the NETGEAR Resource CD-ROM. Figure 3-1. 3-2 FirstGear Introductory Window Microsoft Windows 95...
PS110 Reference Manual
Page 37
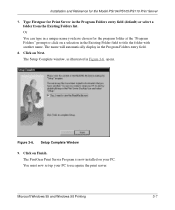
... the program folder at the "Program Folders" prompt or click on Next. Click on a selection in the Program Folders entry field. 8. Setup Complete Window 9. Installation and Reference for Print Server in Figure 3-6, opens. The FirstGear Print Server Program is now installed on Finish. Type... Firstgear for the Model PS104/PS105/PS110 Print Server 7. Click on your PC to title the folder with another name. The Setup Complete window, as illustrated in the Program Folders entry field (default) or select a ...
... the program folder at the "Program Folders" prompt or click on Next. Click on a selection in the Program Folders entry field. 8. Setup Complete Window 9. Installation and Reference for Print Server in Figure 3-6, opens. The FirstGear Print Server Program is now installed on Finish. Type... Firstgear for the Model PS104/PS105/PS110 Print Server 7. Click on your PC to title the folder with another name. The Setup Complete window, as illustrated in the Program Folders entry field (default) or select a ...
PS110 Reference Manual
Page 39
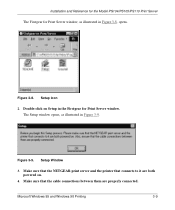
Figure 3-8. Make sure that connects to it are properly connected. Setup Icon 2. Installation and Reference for the Model PS104/PS105/PS110 Print Server The Firstgear for Print Server window. Double-click on . 4. Figure 3-9. The Setup window opens, as illustrated in the Firstgear for Print Server window, as illustrated in Figure 3-9. Make sure that the NETGEAR print server and the printer that the cable connections between them are both powered on Setup in Figure 3-8, opens. Setup Window 3. Microsoft Windows 95 and Windows 98 Printing 3-9
Figure 3-8. Make sure that connects to it are properly connected. Setup Icon 2. Installation and Reference for the Model PS104/PS105/PS110 Print Server The Firstgear for Print Server window. Double-click on . 4. Figure 3-9. The Setup window opens, as illustrated in the Firstgear for Print Server window, as illustrated in Figure 3-9. Make sure that the NETGEAR print server and the printer that the cable connections between them are both powered on Setup in Figure 3-8, opens. Setup Window 3. Microsoft Windows 95 and Windows 98 Printing 3-9
PS110 Reference Manual
Page 40
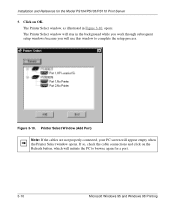
...Printer Select Window (Add Port) Note: If the cables are not properly connected, your PC screen will initiate the PC to complete the setup process. Click on the Refresh button, which will appear empty when the Printer Select window opens. The Printer Select window will stay in Figure... 3-10, opens. The Printer Select window, as illustrated in the background while you work through subsequent setup windows because you will use this window to browse again for the Model PS104/PS105/PS110 Print Server 5. Figure 3-10. If so, check the cable connections and click on OK. ...
...Printer Select Window (Add Port) Note: If the cables are not properly connected, your PC screen will initiate the PC to complete the setup process. Click on the Refresh button, which will appear empty when the Printer Select window opens. The Printer Select window will stay in Figure... 3-10, opens. The Printer Select window, as illustrated in the background while you work through subsequent setup windows because you will use this window to browse again for the Model PS104/PS105/PS110 Print Server 5. Figure 3-10. If so, check the cable connections and click on OK. ...

PS110 Reference Manual
Page 41
... opens, as illustrated in Figure 3-12. Epson Spool Manager Queue Setup Window Microsoft Windows 95 and Windows 98 Printing 3-11 You must disable the Epson printer. The ADDPORT window for the Model PS104/PS105/PS110 Print Server 6. Click on Add. To disable: a. Installation and Reference for Epson print connection, as illustrated in...
... opens, as illustrated in Figure 3-12. Epson Spool Manager Queue Setup Window Microsoft Windows 95 and Windows 98 Printing 3-11 You must disable the Epson printer. The ADDPORT window for the Model PS104/PS105/PS110 Print Server 6. Click on Add. To disable: a. Installation and Reference for Epson print connection, as illustrated in...
PS110 Reference Manual
Page 42
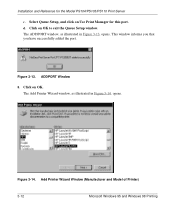
The Add Printer Wizard window, as illustrated in Figure 3-14, opens. d. Add Printer Wizard Window (Manufacturer and Model of Printer) 3-12 Microsoft Windows 95 and Windows 98 Printing Click on OK. ADDPORT Window 8. Figure 3-14. Select Queue Setup, and click on Use Print Manager for the Model PS104/PS105/PS110 Print Server c. Click on OK to exit the Queue Setup window. Installation and Reference for this port. Figure 3-13. This window informs you that you have successfully added the port. The ADDPORT window, as illustrated in Figure 3-13, opens.
The Add Printer Wizard window, as illustrated in Figure 3-14, opens. d. Add Printer Wizard Window (Manufacturer and Model of Printer) 3-12 Microsoft Windows 95 and Windows 98 Printing Click on OK. ADDPORT Window 8. Figure 3-14. Select Queue Setup, and click on Use Print Manager for the Model PS104/PS105/PS110 Print Server c. Click on OK to exit the Queue Setup window. Installation and Reference for this port. Figure 3-13. This window informs you that you have successfully added the port. The ADDPORT window, as illustrated in Figure 3-13, opens.
PS110 Reference Manual
Page 46
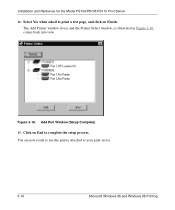
Add Port Window (Setup Complete) 13. Installation and Reference for the Model PS104/PS105/PS110 Print Server 12. Figure 3-18. The Add Printer window closes and the Printer Select window, as illustrated in Figure 3-18, comes back into view. Click on Finish. You are now ready to use the printer attached to complete the setup process. Select Yes when asked to print a test page, and click on End to your print server. 3-16 Microsoft Windows 95 and Windows 98 Printing
Add Port Window (Setup Complete) 13. Installation and Reference for the Model PS104/PS105/PS110 Print Server 12. Figure 3-18. The Add Printer window closes and the Printer Select window, as illustrated in Figure 3-18, comes back into view. Click on Finish. You are now ready to use the printer attached to complete the setup process. Select Yes when asked to print a test page, and click on End to your print server. 3-16 Microsoft Windows 95 and Windows 98 Printing
PS110 Reference Manual
Page 52
... step 12 if you already have installed. Figure 3-24. Setup Complete Window 12. The Setup Complete window, as illustrated in step 7. Click on Next when the Adobe Acrobat Setup window opens. You must now set up your PC. Installation and Reference for the Model PS104/PS105/PS110 Print Server 9. If you do not want...
... step 12 if you already have installed. Figure 3-24. Setup Complete Window 12. The Setup Complete window, as illustrated in step 7. Click on Next when the Adobe Acrobat Setup window opens. You must now set up your PC. Installation and Reference for the Model PS104/PS105/PS110 Print Server 9. If you do not want...
PS110 Reference Manual
Page 53
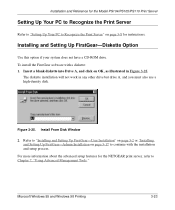
Installation and Reference for the Model PS104/PS105/PS110 Print Server Setting Up Your PC to Recognize the Print Server Refer to "Setting Up Your PC to Chapter 7, "Using Advanced Management Tools." ... for instructions. To install the FirstGear software with the installation and setup process. Refer to "Installing and Setting Up FirstGear-User Installation" on page 3-2 or "Installing and Setting Up FirstGear-Admin Installation on page 3-8 for the NETGEAR print server, refer to Recognize the Print Server" on page 3-17 to continue with a diskette...
Installation and Reference for the Model PS104/PS105/PS110 Print Server Setting Up Your PC to Recognize the Print Server Refer to "Setting Up Your PC to Chapter 7, "Using Advanced Management Tools." ... for instructions. To install the FirstGear software with the installation and setup process. Refer to "Installing and Setting Up FirstGear-User Installation" on page 3-2 or "Installing and Setting Up FirstGear-Admin Installation on page 3-8 for the NETGEAR print server, refer to Recognize the Print Server" on page 3-17 to continue with a diskette...
PS110 Reference Manual
Page 58
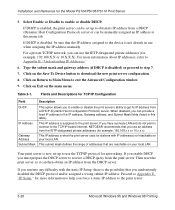
... configuration. 8. If you have a private LAN and do not plan to connect to the TCP/IP-based Internet, NETGEAR recommends that the IP address assigned to the device is what the print server uses for example, 192.168.X.X or ... address, and Subnet Mask fields (listed in use the IETP-designated private addresses (for stations with the static IP Setup, there is disabled) or proceed to the print server. If DHCP is disabled, be sure that you can use... from a DHCP (Dynamic Host Configuration Protocol) server. Fields and Descriptions for the Model PS104/PS105/PS110 Print Server 5.
... configuration. 8. If you have a private LAN and do not plan to connect to the TCP/IP-based Internet, NETGEAR recommends that the IP address assigned to the device is what the print server uses for example, 192.168.X.X or ... address, and Subnet Mask fields (listed in use the IETP-designated private addresses (for stations with the static IP Setup, there is disabled) or proceed to the print server. If DHCP is disabled, be sure that you can use... from a DHCP (Dynamic Host Configuration Protocol) server. Fields and Descriptions for the Model PS104/PS105/PS110 Print Server 5.
PS110 Reference Manual
Page 59
... NT Printing 4-1 Chapter 4 Microsoft Windows NT Printing This chapter describes how to configure and use the NETGEAR Model PS104/PS105/PS110 print server in Windows NT. There are several options to choose from: • User.../IP protocol or the NetBEUI protocol enabled. FirstGear for Print Server This section describes how to the NETGEAR print server. • Admin Installation-this option generates an installation floppy disk for Print Server Program ...; Install FirstGear for Print Server software. • Run Setup • Configure the user PC to print to the NETGEAR print server.
... NT Printing 4-1 Chapter 4 Microsoft Windows NT Printing This chapter describes how to configure and use the NETGEAR Model PS104/PS105/PS110 print server in Windows NT. There are several options to choose from: • User.../IP protocol or the NetBEUI protocol enabled. FirstGear for Print Server This section describes how to the NETGEAR print server. • Admin Installation-this option generates an installation floppy disk for Print Server Program ...; Install FirstGear for Print Server software. • Run Setup • Configure the user PC to print to the NETGEAR print server.
PS110 Reference Manual
Page 60
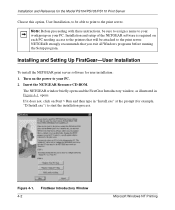
...prompt (for example, "D:Install.exe") to your PC. NETGEAR strongly recommends that will be attached to the print server. Figure 4-1. 4-2 FirstGear Introductory Window Microsoft Windows NT Printing Installation and Reference for the Model PS104/PS105/PS110 Print Server Choose this option, User Installation, ...that you exit all Windows programs before running the Setup program. Note: Before proceeding with these instructions, be able to print to the print server. Insert the NETGEAR Resource CD-ROM. Installation and setup of the NETGEAR software is required on the power to start ...
...prompt (for example, "D:Install.exe") to your PC. NETGEAR strongly recommends that will be attached to the print server. Figure 4-1. 4-2 FirstGear Introductory Window Microsoft Windows NT Printing Installation and Reference for the Model PS104/PS105/PS110 Print Server Choose this option, User Installation, ...that you exit all Windows programs before running the Setup program. Note: Before proceeding with these instructions, be able to print to the print server. Insert the NETGEAR Resource CD-ROM. Installation and setup of the NETGEAR software is required on the power to start ...

PS110 Reference Manual
Page 65
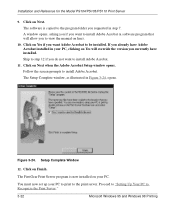
The Setup Complete window, as illustrated in Figure 4-6, opens. Figure 4-6. Setup Complete Window 9. Microsoft Windows NT Printing 4-7 Installation and Reference for the Model PS104/PS105/PS110 Print Server 8. Click on Finish. You must now set up your PC. Click on Next. The FirstGear Print Server Program is now installed on your PC to recognize the print server.
The Setup Complete window, as illustrated in Figure 4-6, opens. Figure 4-6. Setup Complete Window 9. Microsoft Windows NT Printing 4-7 Installation and Reference for the Model PS104/PS105/PS110 Print Server 8. Click on Finish. You must now set up your PC. Click on Next. The FirstGear Print Server Program is now installed on your PC to recognize the print server.


