
External Controls
Page 4
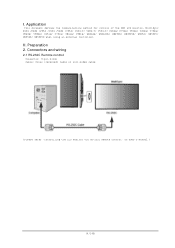
Connectors and wiring 2.1 RS-232C Remote control Connector: 9-pin D-Sub Cable: Cross (reversed) cable or null modem cable (Please refer "Controlling the LCD monitor via RS-232C Remote control" on User's manual.) (4/145) II. Preparation 2. I. Application This document defines the communications method for control of the NEC LCD monitor, MultiSync P404 /P484 /P554 /V404 /V484 /V554/ V404-T/ V484-T/ V554-T/ P654Q/ P754Q/ V554Q/ V654Q/ V754Q/ V864Q/ V984Q/ C651Q/ C751Q/ C861Q/ C981Q/ UN462A/ UN462VA/ UN492S/ UN492VS/ UN552/ UN552V/ UN552S/ UN552VS when using an external controller.
Connectors and wiring 2.1 RS-232C Remote control Connector: 9-pin D-Sub Cable: Cross (reversed) cable or null modem cable (Please refer "Controlling the LCD monitor via RS-232C Remote control" on User's manual.) (4/145) II. Preparation 2. I. Application This document defines the communications method for control of the NEC LCD monitor, MultiSync P404 /P484 /P554 /V404 /V484 /V554/ V404-T/ V484-T/ V554-T/ P654Q/ P754Q/ V554Q/ V654Q/ V754Q/ V864Q/ V984Q/ C651Q/ C751Q/ C861Q/ C981Q/ UN462A/ UN462VA/ UN492S/ UN492VS/ UN552/ UN552V/ UN552S/ UN552VS when using an external controller.
External Controls
Page 5
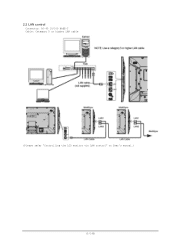
2.2 LAN control Connector: RJ-45 10/100 BASE-T Cable: Category 5 or higher LAN cable (Please refer "Controlling the LCD monitor via LAN control" on User's manual.) (5/145)
2.2 LAN control Connector: RJ-45 10/100 BASE-T Cable: Category 5 or higher LAN cable (Please refer "Controlling the LCD monitor via LAN control" on User's manual.) (5/145)
External Controls
Page 6
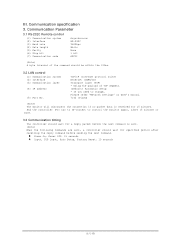
..., Auto Setup, Factory Reset: 10 seconds (6/145) Communication specification 3. And the controller (PC) has to re-connect to change, Please refer "Network settings" on User's manual. 7142 (Fixed) (Note) The monitor will disconnect the connection if no packet data is sent. (Note) When the following commands are sent, a controller should be...
..., Auto Setup, Factory Reset: 10 seconds (6/145) Communication specification 3. And the controller (PC) has to re-connect to change, Please refer "Network settings" on User's manual. 7142 (Fixed) (Note) The monitor will disconnect the connection if no packet data is sent. (Note) When the following commands are sent, a controller should be...

External Controls
Page 37
...COMP Item AUTO TILE MATRIX SETIP SETTING COPY H MONITOR V MONITOR POSITION TILE COMP H SIZE V SIZE H ADJUSTMENT V ADJUSTMENT TILE CUT H ADJUSTMENT V ADJUSTMENT FRAME COMP AUTO MANUAL OP code OP code Parameter page Refer to chapter 21 Refer to Chapter 23 02h D0h 0: No mean 1 | 10(0Ah) 02h D1h 02h D2h 02h... Down | 200(C8h): Up 0: No mean 1: NO 2: YES 0: Left | 65535(FFFFh): Right 11h C2h 0: Down | 65535(FFFFh): Up 11h 01h 0: No mean 1: NONE 2: AUTO 3: MANUAL 11h 02h 0: No mean 50(32h): 0.5F 100(64h): 1.0F 150(96h): 1.5F 200(C8h): 2.0F 11h 03h 0: No mean 25(19h): 0.25F 50(32h...
...COMP Item AUTO TILE MATRIX SETIP SETTING COPY H MONITOR V MONITOR POSITION TILE COMP H SIZE V SIZE H ADJUSTMENT V ADJUSTMENT TILE CUT H ADJUSTMENT V ADJUSTMENT FRAME COMP AUTO MANUAL OP code OP code Parameter page Refer to chapter 21 Refer to Chapter 23 02h D0h 0: No mean 1 | 10(0Ah) 02h D1h 02h D2h 02h... Down | 200(C8h): Up 0: No mean 1: NO 2: YES 0: Left | 65535(FFFFh): Right 11h C2h 0: Down | 65535(FFFFh): Up 11h 01h 0: No mean 1: NONE 2: AUTO 3: MANUAL 11h 02h 0: No mean 50(32h): 0.5F 100(64h): 1.0F 150(96h): 1.5F 200(C8h): 2.0F 11h 03h 0: No mean 25(19h): 0.25F 50(32h...

External Controls
Page 38
...) 10h E4h/E5h E4h: Set centigrade 0 - 65535(FFFFh) E5h: Set offset from max. DISPLAY PROTECTION FAN CONTROL V SCAN REVERSE *3 Item V SCAN REVERSE MANUAL ENABLE TILE MATRIX MEM MONITOR ID GROUP ID AUTO ID AUTO ID RESET RESET (MULTI DISPLAY) POWER SAVE POWER SAVE MESSAGE11h COOLING FAN FAN SPEED... SENSOR1 SENSOR2 SENSOR3 OP code OP code page 11h 04h 11h 05h Parameter 0: No mean 1: NONE 2: AUTO 3: MANUAL 0: No mean 1: NON REVERSE 2: REVERSE Remarks 02h D3h 10h 4Ah 0: No mean 1: NO 2: YES 0: No mean 1: COMMON 2: INPUT 02h 3Eh 1-...
...) 10h E4h/E5h E4h: Set centigrade 0 - 65535(FFFFh) E5h: Set offset from max. DISPLAY PROTECTION FAN CONTROL V SCAN REVERSE *3 Item V SCAN REVERSE MANUAL ENABLE TILE MATRIX MEM MONITOR ID GROUP ID AUTO ID AUTO ID RESET RESET (MULTI DISPLAY) POWER SAVE POWER SAVE MESSAGE11h COOLING FAN FAN SPEED... SENSOR1 SENSOR2 SENSOR3 OP code OP code page 11h 04h 11h 05h Parameter 0: No mean 1: NONE 2: AUTO 3: MANUAL 0: No mean 1: NON REVERSE 2: REVERSE Remarks 02h D3h 10h 4Ah 0: No mean 1: NO 2: YES 0: No mean 1: COMMON 2: INPUT 02h 3Eh 1-...

Users Manual - English
Page 1
User's Manual Large Format Display MultiSync V654Q MultiSync V754Q MultiSync V864Q MultiSync V984Q MODEL: V654Q, V754Q, V864Q, V984Q Please find your model name in the label on the rear side of monitor.
User's Manual Large Format Display MultiSync V654Q MultiSync V754Q MultiSync V864Q MultiSync V984Q MODEL: V654Q, V754Q, V864Q, V984Q Please find your model name in the label on the rear side of monitor.

Users Manual - English
Page 3
...Ste 500 Downers Grove, IL 60515 Tel. Address: 3250 Lacey Rd, Ste 500 Downers Grove, IL 60515 Tel. NEC is a registered trademark of NEC Display Solutions, Ltd. in this manual. English-1 For HDMI, DisplayPort and D-Sub 9-pin, please use a signal cable with ferrite core. in the United... with Part 15 of FCC Rules. No.: (630) 467-3000 Type of Product: Display Monitor Equipment Classification: Class B Peripheral Model: V754Q V864Q V984Q SUPPLIER'S DECLARATION OF CONFORMITY This device complies with Part 15 of FCC Rules. No.: (630) 467-3000 Type of Product:...
...Ste 500 Downers Grove, IL 60515 Tel. Address: 3250 Lacey Rd, Ste 500 Downers Grove, IL 60515 Tel. NEC is a registered trademark of NEC Display Solutions, Ltd. in this manual. English-1 For HDMI, DisplayPort and D-Sub 9-pin, please use a signal cable with ferrite core. in the United... with Part 15 of FCC Rules. No.: (630) 467-3000 Type of Product: Display Monitor Equipment Classification: Class B Peripheral Model: V754Q V864Q V984Q SUPPLIER'S DECLARATION OF CONFORMITY This device complies with Part 15 of FCC Rules. No.: (630) 467-3000 Type of Product:...

Users Manual - English
Page 14
Raspberry Pi Compute Module Slot Slot for more information. Please refer to https://www.nec-display.com/dl/en/manual/raspberrypi/ for installing a Raspberry Pi Compute Module Interface Board and Raspberry Pi Compute Module. See page 8. R Rating Label S Intelligent Wireless Data Sensor Sensor for wireless ...
Raspberry Pi Compute Module Slot Slot for more information. Please refer to https://www.nec-display.com/dl/en/manual/raspberrypi/ for installing a Raspberry Pi Compute Module Interface Board and Raspberry Pi Compute Module. See page 8. R Rating Label S Intelligent Wireless Data Sensor Sensor for wireless ...

Users Manual - English
Page 16
... using. Handling the remote control • Do not expose to strong shock. • Do not allow water or other liquid to the Option Board's user's manual for the Remote Control Point the top of the remote control toward the monitor's remote control sensor during multi picture mode. If the remote control...
... using. Handling the remote control • Do not expose to strong shock. • Do not allow water or other liquid to the Option Board's user's manual for the Remote Control Point the top of the remote control toward the monitor's remote control sensor during multi picture mode. If the remote control...
Users Manual - English
Page 17
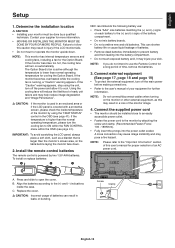
...If the temperature is covered with a protective screen, please check the inside the case. To install or replace batteries: NEC recommends the following battery use the Remote Control for cooling the Option Board. Connect external equipment (See page 17, page...and (-) indications inside temperature of time, remove the batteries. 3. B. Align the batteries according to the "Important Information" section of this user's manual for further information. English Setup 1. This can result in injury if the LCD monitor falls. • Do not mount or operate the monitor upside...
...If the temperature is covered with a protective screen, please check the inside the case. To install or replace batteries: NEC recommends the following battery use the Remote Control for cooling the Option Board. Connect external equipment (See page 17, page...and (-) indications inside temperature of time, remove the batteries. 3. B. Align the batteries according to the "Important Information" section of this user's manual for further information. English Setup 1. This can result in injury if the LCD monitor falls. • Do not mount or operate the monitor upside...

Users Manual - English
Page 19
... without a built-in a loss of image. Before making connections: * Turn off the device's power before connecting it to the monitor. * Refer to the device's user manual for available connection types and instructions for the device. * We recommend turning off the monitor's main power before connecting or disconnecting a USB storage device or...
... without a built-in a loss of image. Before making connections: * Turn off the device's power before connecting it to the monitor. * Refer to the device's user manual for available connection types and instructions for the device. * We recommend turning off the monitor's main power before connecting or disconnecting a USB storage device or...

Users Manual - English
Page 21
... OSD menu (see page 72, page 73, page 74 and page 75). To use the Media Player function, please use this case, please check user's manual of your computer or device, or contact your supplier for power supply information (see page 44). • When you use the USB CM1 (2A) port...
... OSD menu (see page 72, page 73, page 74 and page 75). To use the Media Player function, please use this case, please check user's manual of your computer or device, or contact your supplier for power supply information (see page 44). • When you use the USB CM1 (2A) port...

Users Manual - English
Page 25
... monitor is 1920 (Horizontal) x 1080 (Vertical). Installing microSD card slot cover To secure your microSD memory card, we recommend you to the computer's instruction user's manual or Help file on the file, it in unit the spring lock is engaged. • When ejecting a microSD memory card from the microSD card slot...
... monitor is 1920 (Horizontal) x 1080 (Vertical). Installing microSD card slot cover To secure your microSD memory card, we recommend you to the computer's instruction user's manual or Help file on the file, it in unit the spring lock is engaged. • When ejecting a microSD memory card from the microSD card slot...

Users Manual - English
Page 26
... this monitor in accordance with the drawing below , please use it with the Media Player. Please connect the USB memory to the computer's instruction user's manual or Help file on the file, thumbnail cannot be determined is larger than the supported sizes listed below . Displays a list of the previous files. RETURN...
... this monitor in accordance with the drawing below , please use it with the Media Player. Please connect the USB memory to the computer's instruction user's manual or Help file on the file, thumbnail cannot be determined is larger than the supported sizes listed below . Displays a list of the previous files. RETURN...

Users Manual - English
Page 27
...plays a selected file. If OK is changed to MP, while "AUTO PLAY" has been set to "AUTO". • The images will be displayed using "MANUAL" in which the images are switched by operating a button on the remote control, or "AUTO" in the file list screen or top screen of the...are not activated. Check the check box to activate above settings. SAVE LAST SCREEN: When the slideshow finishes, the last slideshow image is "MANUAL". FOLDER Select a file by SET/POINT ZOOM button and confirm by ENT button. Media Player settings Select the icon in which the images are ...
...plays a selected file. If OK is changed to MP, while "AUTO PLAY" has been set to "AUTO". • The images will be displayed using "MANUAL" in which the images are switched by operating a button on the remote control, or "AUTO" in the file list screen or top screen of the...are not activated. Check the check box to activate above settings. SAVE LAST SCREEN: When the slideshow finishes, the last slideshow image is "MANUAL". FOLDER Select a file by SET/POINT ZOOM button and confirm by ENT button. Media Player settings Select the icon in which the images are ...

Users Manual - English
Page 32
...People with normal color vision. SAMPLE OF PRESET GAMMA 100 80 LUMINANCE [cd/m2] 60 40 L* 20 sRGB DICOM SIM. If you to manually select the brightness level of LCD panel technology. NOTE: Depending on screen. NOTE: - These variations are five selections: sRGB, L STAR,... SIM. GAMMA Allows you prefer to get the color reproduction to be a variation in how the screen's color is available on the NEC Display Solutions website. There are characteristic of grayscale. We recommend to those with other monitors. L STAR: GAMMA setting for evaluating how ...
...People with normal color vision. SAMPLE OF PRESET GAMMA 100 80 LUMINANCE [cd/m2] 60 40 L* 20 sRGB DICOM SIM. If you to manually select the brightness level of LCD panel technology. NOTE: Depending on screen. NOTE: - These variations are five selections: sRGB, L STAR,... SIM. GAMMA Allows you prefer to get the color reproduction to be a variation in how the screen's color is available on the NEC Display Solutions website. There are characteristic of grayscale. We recommend to those with other monitors. L STAR: GAMMA setting for evaluating how ...

Users Manual - English
Page 43
...*2: When you need to delete the setting. *1: If SPECTRAVIEW ENGINE is ON, this function is selected. If you to the network when MANUAL is connected with the Monitor ID. For more time when there are applied. TIME SETTING POWER SAVE MESSAGE When the monitor goes into power ... when ON is available only when connecting the optional control unit. DNS Set the IP addresses of the fans, backlight and temperature sensors. MANUAL: Manually enter the IP address of the monitor to MODE1 or MODE2. By pressing the + button on " mode. IP SETTING Enabling this option...
...*2: When you need to delete the setting. *1: If SPECTRAVIEW ENGINE is ON, this function is selected. If you to the network when MANUAL is connected with the Monitor ID. For more time when there are applied. TIME SETTING POWER SAVE MESSAGE When the monitor goes into power ... when ON is available only when connecting the optional control unit. DNS Set the IP addresses of the fans, backlight and temperature sensors. MANUAL: Manually enter the IP address of the monitor to MODE1 or MODE2. By pressing the + button on " mode. IP SETTING Enabling this option...

Users Manual - English
Page 46
... (Not adjustable) AUTO OFF Monitor power is automatically off when the internal PC is off and on which Option Board you can be shut down manually. *1: This function depends on again. When changing the setting, turn the monitor's main power switch off or the monitor is set to the connected option...
... (Not adjustable) AUTO OFF Monitor power is automatically off when the internal PC is off and on which Option Board you can be shut down manually. *1: This function depends on again. When changing the setting, turn the monitor's main power switch off or the monitor is set to the connected option...

Users Manual - English
Page 50
Please execute AUTO ID (see page 40) before manually specifying the ID number or control by using RS-232C, REMOTE IN or LAN daisy-chain connection. Main Monitor Connector IN OUT RS-232C REMOTE IN LAN2 LAN1 Sub Monitors Connector IN OUT LAN1 LAN2 Connection LAN1 LAN2 LAN Cable LAN1 LAN2 LAN Cable Next monitor English-48 Multiple Monitors Connection You can control multiple monitors by the specified ID number. NOTE: Multiple monitors that are daisy-chained have a limit to the connectable monitors.
Please execute AUTO ID (see page 40) before manually specifying the ID number or control by using RS-232C, REMOTE IN or LAN daisy-chain connection. Main Monitor Connector IN OUT RS-232C REMOTE IN LAN2 LAN1 Sub Monitors Connector IN OUT LAN1 LAN2 Connection LAN1 LAN2 LAN Cable LAN1 LAN2 LAN Cable Next monitor English-48 Multiple Monitors Connection You can control multiple monitors by the specified ID number. NOTE: Multiple monitors that are daisy-chained have a limit to the connectable monitors.

Users Manual - English
Page 55
... as [0.0.0.0] to delete the setting. PRIMARY DNS Enter the primary DNS server settings of the DNS server that is connected with the monitor. MANUAL: Manually set back to the factory settings when IP ADDRESS RESET is selected for the monitor connected to the network when... [MANUAL] is selected for [IP SETTING]. MANUAL: Manually enter the IP address of the network connected with the monitor. NOTE: Enter [0.0.0.0] to delete the setting. NOTE: Enter [0.0.0.0] to the monitor ...
... as [0.0.0.0] to delete the setting. PRIMARY DNS Enter the primary DNS server settings of the DNS server that is connected with the monitor. MANUAL: Manually set back to the factory settings when IP ADDRESS RESET is selected for the monitor connected to the network when... [MANUAL] is selected for [IP SETTING]. MANUAL: Manually enter the IP address of the network connected with the monitor. NOTE: Enter [0.0.0.0] to delete the setting. NOTE: Enter [0.0.0.0] to the monitor ...


