Specification Brochure
Page 2
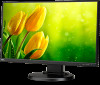
... on screen menu controls easy navigation, making display adjustments easier than ever •• 4 way ergonomic stand includes pivot in a package with none of the business-class features needed with ultra narrow bezels and a slim design. NEC's ultra narrow bezel MultiSync E Series deliver all four sides (1.0mm each) •• Touch on all of the bezels. The MultiSync E221N and E241N include future-proof connectivity...
... on screen menu controls easy navigation, making display adjustments easier than ever •• 4 way ergonomic stand includes pivot in a package with none of the business-class features needed with ultra narrow bezels and a slim design. NEC's ultra narrow bezel MultiSync E Series deliver all four sides (1.0mm each) •• Touch on all of the bezels. The MultiSync E221N and E241N include future-proof connectivity...

Specification Brochure
Page 3
... the advanced control to the VESA mounting plate and the panel portion of the monitor is designed to fit most thin clients on each side. The included thin / zero client mount makes installing a thin client easy. Comprehensive Input Panel DisplayPort, HDM, and 15-pin VGA connect you to maximize your investment. Four-way ergonomic stand boasts dual direction pivot, tilt, swivel and height adjustment up to...
... the advanced control to the VESA mounting plate and the panel portion of the monitor is designed to fit most thin clients on each side. The included thin / zero client mount makes installing a thin client easy. Comprehensive Input Panel DisplayPort, HDM, and 15-pin VGA connect you to maximize your investment. Four-way ergonomic stand boasts dual direction pivot, tilt, swivel and height adjustment up to...
Specification Brochure
Page 4
...; OSD Lock Out; Digital controls; and the NEC logo are registered trademarks of America, Inc. Specifications MODEL Display POWER CONSUMPTION PHYSICAL SPECIFICATIONS ENVIRONMENTAL CONDITIONS ENVIRONMENTAL COMPLIANCE LIMITED WARRANTY Panel Technology Backlight Type Viewable Image Size Aspect Ratio Native Resolution Pixel Pitch Pixels Per Inch Brightness (typical) Contrast Ratio (typical) Viewing Angle (typical) Response Time (typical) Displayable Colors Synchronization Range Horizontal (Analog/Digital) Vertical Input Signal Video Sync Input Connectors Output Connectors...
...; OSD Lock Out; Digital controls; and the NEC logo are registered trademarks of America, Inc. Specifications MODEL Display POWER CONSUMPTION PHYSICAL SPECIFICATIONS ENVIRONMENTAL CONDITIONS ENVIRONMENTAL COMPLIANCE LIMITED WARRANTY Panel Technology Backlight Type Viewable Image Size Aspect Ratio Native Resolution Pixel Pitch Pixels Per Inch Brightness (typical) Contrast Ratio (typical) Viewing Angle (typical) Response Time (typical) Displayable Colors Synchronization Range Horizontal (Analog/Digital) Vertical Input Signal Video Sync Input Connectors Output Connectors...
Launch Press Release
Page 2
... MultiSync E221N-BK and E241N-BK will be available in the MultiSync E221N-BK and E241N-BK: LED backlight technology with 16:9 aspect ratio and 1920x1080 native resolution provides a smooth viewing experience 25,000:1 dynamic contrast ratio delivers detailed images and text Expanded connectivity including DisplayPort, VGA and DVI-D ports Integrated speakers and headphone jack enable business conferencing Ambient light sensor automatically adjusts the brightness to the optimal setting depending...
... MultiSync E221N-BK and E241N-BK will be available in the MultiSync E221N-BK and E241N-BK: LED backlight technology with 16:9 aspect ratio and 1920x1080 native resolution provides a smooth viewing experience 25,000:1 dynamic contrast ratio delivers detailed images and text Expanded connectivity including DisplayPort, VGA and DVI-D ports Integrated speakers and headphone jack enable business conferencing Ambient light sensor automatically adjusts the brightness to the optimal setting depending...
Users Manual
Page 3
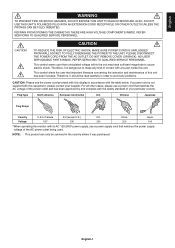
... THE POWER CORD FROM THE AC OUTLET. NO USER SERVICEABLE PARTS INSIDE. If a power cord is dangerous to cause electric shock. DO NOT REMOVE COVER (OR BACK). Therefore, it is not supplied with any part inside this equipment, please contact your particular country. Voltage 120* 230 230 China 220 Japan 100 * When operating the monitor with its AC 125-240V power supply, use the power cord provided...
... THE POWER CORD FROM THE AC OUTLET. NO USER SERVICEABLE PARTS INSIDE. If a power cord is dangerous to cause electric shock. DO NOT REMOVE COVER (OR BACK). Therefore, it is not supplied with any part inside this equipment, please contact your particular country. Voltage 120* 230 230 China 220 Japan 100 * When operating the monitor with its AC 125-240V power supply, use the power cord provided...

Users Manual
Page 4
... user is encouraged to try to part 15 of other cables and adapters may cause harmful interference to radio communications. English-2 Use the attached specified cables with this equipment does cause harmful interference to comply with radio and television reception. (1) The power supply cord you use the supplied shielded video signal cable. These limits are designed to Identify and Resolve Radio-TV Interference Problems...
... user is encouraged to try to part 15 of other cables and adapters may cause harmful interference to radio communications. English-2 Use the attached specified cables with this equipment does cause harmful interference to comply with radio and television reception. (1) The power supply cord you use the supplied shielded video signal cable. These limits are designed to Identify and Resolve Radio-TV Interference Problems...
Users Manual
Page 6
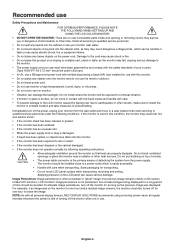
... not bend power cord. • Do not use monitor in Europe). • In UK, use . Save packaging for one hour to prevent falling. Immediately turn off for transporting. • Do not touch LCD panel surface while transporting, mounting and setting. CAUTION • The power cable connector is when a residual or "ghost" image of time should be avoided. Image Persistence: Image persistence is the primary means of monitor. Unlike CRT monitors, LCD monitors' image persistence...
... not bend power cord. • Do not use monitor in Europe). • In UK, use . Save packaging for one hour to prevent falling. Immediately turn off for transporting. • Do not touch LCD panel surface while transporting, mounting and setting. CAUTION • The power cable connector is when a residual or "ghost" image of time should be avoided. Image Persistence: Image persistence is the primary means of monitor. Unlike CRT monitors, LCD monitors' image persistence...

Users Manual
Page 7
.... CHECK THE FOLLOWING WHEN YOU POSITION THE MONITOR: • For optimum performance, allow 20 minutes for the display to warm up a healthy work environment, write to its maximum setting. • Use the preset Size and Position controls with standard signals. • Use the preset Color Setting. • Use non-interlaced signals with a vertical refresh rate between 60 Hz. • Do not use an anti-glare filter. • Clean the LCD monitor surface...
.... CHECK THE FOLLOWING WHEN YOU POSITION THE MONITOR: • For optimum performance, allow 20 minutes for the display to warm up a healthy work environment, write to its maximum setting. • Use the preset Size and Position controls with standard signals. • Use the preset Color Setting. • Use non-interlaced signals with a vertical refresh rate between 60 Hz. • Do not use an anti-glare filter. • Clean the LCD monitor surface...

Users Manual
Page 8
... procedure if you need to the LCD stand: 1. For a MAC with HDMI logo. Please use a High Speed HDMI cable with Thunderbolt output: Connect a Mini DisplayPort to DisplayPort adapter to the computer and then attach the DisplayPort cable to the adapter and to the connector of the display card in Figure 1. Place monitor face down the top button to read "Recommended Use" (page 4) before installation. English-6 Quick Start To attach the Base to re...
... procedure if you need to the LCD stand: 1. For a MAC with HDMI logo. Please use a High Speed HDMI cable with Thunderbolt output: Connect a Mini DisplayPort to DisplayPort adapter to the computer and then attach the DisplayPort cable to the adapter and to the connector of the display card in Figure 1. Place monitor face down the top button to read "Recommended Use" (page 4) before installation. English-6 Quick Start To attach the Base to re...

Users Manual
Page 9
... have installed the cables. English-7 Please check that is not removable. 6. To keep the cables neatly organized, place them into the stand. Connect one end of the power cord to the power outlet. Use an audio cable without a built-in resistor turns down the sound. Power Cord Figure C.2 HDMI Cable D-SUB Cable DisplayPort Cable Audio Cable Power Cord Figure C.3 HDMI Cable D-SUB Cable DisplayPort Cable Audio Cable 7. NOTE: Please refer to Caution section of this manual for proper selection of the monitor and the other settings...
... have installed the cables. English-7 Please check that is not removable. 6. To keep the cables neatly organized, place them into the stand. Connect one end of the power cord to the power outlet. Use an audio cable without a built-in resistor turns down the sound. Power Cord Figure C.2 HDMI Cable D-SUB Cable DisplayPort Cable Audio Cable Power Cord Figure C.3 HDMI Cable D-SUB Cable DisplayPort Cable Audio Cable 7. NOTE: Please refer to Caution section of this manual for proper selection of the monitor and the other settings...
Users Manual
Page 10
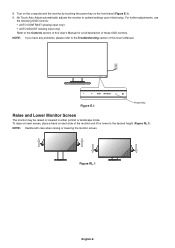
...; AUTO CONTRAST (Analog input only) • AUTO ADJUST (Analog input only) Refer to the desired height (Figure RL.1). To raise or lower screen, place a hand on the front bezel (Figure E.1). 9. 8. Turn on the computer and the monitor by touching the power key on each side of the monitor and lift or lower to the Controls section of these OSD controls. NOTE: If you have any problems, please refer to optimal settings...
...; AUTO CONTRAST (Analog input only) • AUTO ADJUST (Analog input only) Refer to the desired height (Figure RL.1). To raise or lower screen, place a hand on the front bezel (Figure E.1). 9. 8. Turn on the computer and the monitor by touching the power key on each side of the monitor and lift or lower to the Controls section of these OSD controls. NOTE: If you have any problems, please refer to optimal settings...

Users Manual
Page 11
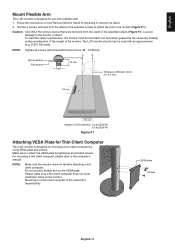
... display mount. • To meet the safety requirements, the mounting stand must be UL-certified. * Contact your dealer for use with care when tilting the monitor screen. Flexible Arm Installation This LCD monitor is designed for more information. Figure R.1 Tilt and Swivel Grasp the top and bottom sides of the monitor screen with your fingers. English Screen Rotation Before rotating, disconnect power cord and all cables...
... display mount. • To meet the safety requirements, the mounting stand must be UL-certified. * Contact your dealer for use with care when tilting the monitor screen. Flexible Arm Installation This LCD monitor is designed for more information. Figure R.1 Tilt and Swivel Grasp the top and bottom sides of the monitor screen with your fingers. English Screen Rotation Before rotating, disconnect power cord and all cables...

Users Manual
Page 12
... down on a non-abrasive surface (Figure S.1). Connect the cables to avoid stand drop, when removing screws, please support stand with care when the monitor is now ready for alternate mounting purposes: 1. Disconnect all cables. 2. Figure S.1 Figure S.2 8. NOTE: Handle with your hand. 5. "TOP SIDE" mark Please match top side of the monitor. NOTE: Use only VESA-compatible alternative mounting method. NOTE: Match "TOP SIDE" mark on...
... down on a non-abrasive surface (Figure S.1). Connect the cables to avoid stand drop, when removing screws, please support stand with care when the monitor is now ready for alternate mounting purposes: 1. Disconnect all cables. 2. Figure S.1 Figure S.2 8. NOTE: Handle with your hand. 5. "TOP SIDE" mark Please match top side of the monitor. NOTE: Use only VESA-compatible alternative mounting method. NOTE: Match "TOP SIDE" mark on...
Users Manual
Page 13
... the weight of LCD assembly: 3.0 kg (E221N) 3.5 kg (E241N) Figure F.1 Attaching VESA Plate for Thin Client Computer This LCD monitor is designed for use with an approved arm (e.g. VESA plate Screws English-11 Do not mount a flexible arm on the monitor. Please make sure a thin client computer does not cover ventilation holes on the VESA plate. TUEV GS mark). Spring washer Flat washer 12 mm...
... the weight of LCD assembly: 3.0 kg (E221N) 3.5 kg (E241N) Figure F.1 Attaching VESA Plate for Thin Client Computer This LCD monitor is designed for use with an approved arm (e.g. VESA plate Screws English-11 Do not mount a flexible arm on the monitor. Please make sure a thin client computer does not cover ventilation holes on the VESA plate. TUEV GS mark). Spring washer Flat washer 12 mm...

Users Manual
Page 15
... menu. SIZE (Analog input only) Adjusts the horizontal size by detecting the screen's black areas and optimizes it. For changing to other settings from 0% to show OSD menu and enter COLOR control. The change will appear on screen. GREEN Increases or decreases Green. See page 15. ECO MODE OFF: Sets brightness variable from L/B mode, touch the SELECT key to 100%. CONTRAST Adjusts the image brightness in COLOR control, CONTRAST and DV MODE are disabled. AUTO ADJUST (Analog input only) Automatically adjusts the Image Position, the H. The change will appear on screen. OSD...
... menu. SIZE (Analog input only) Adjusts the horizontal size by detecting the screen's black areas and optimizes it. For changing to other settings from 0% to show OSD menu and enter COLOR control. The change will appear on screen. GREEN Increases or decreases Green. See page 15. ECO MODE OFF: Sets brightness variable from L/B mode, touch the SELECT key to 100%. CONTRAST Adjusts the image brightness in COLOR control, CONTRAST and DV MODE are disabled. AUTO ADJUST (Analog input only) Automatically adjusts the Image Position, the H. The change will appear on screen. OSD...
Users Manual
Page 16
FULL: The image is based on the OECD (2008 Edition). The carbon saving information can be reset and touching the INPUT/RESET key. ASPECT: The image is under native resolution. RESPONSE IMPROVE Turns the Response Improve function ON or OFF. DDC/CI This function allows the DDC/CI function ON or OFF. MONITOR INFO Indicates the model and serial numbers of resolutions as the input signal priority: 1280 x 768...
FULL: The image is based on the OECD (2008 Edition). The carbon saving information can be reset and touching the INPUT/RESET key. ASPECT: The image is under native resolution. RESPONSE IMPROVE Turns the Response Improve function ON or OFF. DDC/CI This function allows the DDC/CI function ON or OFF. MONITOR INFO Indicates the model and serial numbers of resolutions as the input signal priority: 1280 x 768...
Users Manual
Page 18
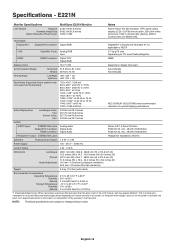
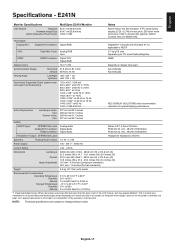
... shown that are subject to HDCP VGA: 15pin Mini D-sub: Analog RGB Sync 0.7 Vp-p/75 ohm Separate sync.TTL level Positive/Negative HDMI: HDMI Connector: Digital YUV Digital RGB HDMI Display Colors 16,777,216 Depends on the screen is normal and necessary for optimal display performance. English-16 E221N Monitor Specifications MultiSync E221N Monitor Notes LCD Module Diagonal: 54.62 cm/21.5 inches Viewable Image Size: 54.62 cm/21.5 inches Native Resolution (Pixel Count): 1920 x 1080 Active matrix...
... shown that are subject to HDCP VGA: 15pin Mini D-sub: Analog RGB Sync 0.7 Vp-p/75 ohm Separate sync.TTL level Positive/Negative HDMI: HDMI Connector: Digital YUV Digital RGB HDMI Display Colors 16,777,216 Depends on the screen is normal and necessary for optimal display performance. English-16 E221N Monitor Specifications MultiSync E221N Monitor Notes LCD Module Diagonal: 54.62 cm/21.5 inches Viewable Image Size: 54.62 cm/21.5 inches Native Resolution (Pixel Count): 1920 x 1080 Active matrix...
Users Manual
Page 19
... resolution for optimal display performance. This is actually one pixel, so to expand resolutions to 75 Hz 1440 x 900*1 at 60 Hz NEC DISPLAY SOLUTIONS cites recommended 1920 x 1080 at panel technologies when displaying non-native resolutions full screen. thin film transistor (TFT) liquid crystal display (LCD); 0.2745 mm dot pitch; 250 cd/m2 white luminance; 1000:1 contrast ratio (typical), (5000:1 Contrast ratio, DV MODE ON). Input Signal DisplayPort: DisplayPort Connector: Digital RGB...
... resolution for optimal display performance. This is actually one pixel, so to expand resolutions to 75 Hz 1440 x 900*1 at 60 Hz NEC DISPLAY SOLUTIONS cites recommended 1920 x 1080 at panel technologies when displaying non-native resolutions full screen. thin film transistor (TFT) liquid crystal display (LCD); 0.2745 mm dot pitch; 250 cd/m2 white luminance; 1000:1 contrast ratio (typical), (5000:1 Contrast ratio, DV MODE ON). Input Signal DisplayPort: DisplayPort Connector: Digital RGB...
Users Manual
Page 20
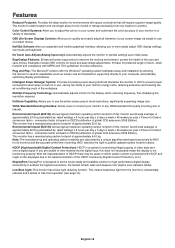
... color depths over a digital signal. VESA Standard Mounting Interface: Allows users to connect your screen image via mouse and keyboard. Environmental Impact (E221N): Annual typical maximum operating carbon footprint of the user and save money. NaViSet Software offers an expanded and intuitive graphical interface, allowing you to optimal settings upon initial setup. ErgoDesign Features: Enhanced human ergonomics to improve the working environment, protect the health of this monitor...
... color depths over a digital signal. VESA Standard Mounting Interface: Allows users to connect your screen image via mouse and keyboard. Environmental Impact (E221N): Annual typical maximum operating carbon footprint of the user and save money. NaViSet Software offers an expanded and intuitive graphical interface, allowing you to optimal settings upon initial setup. ErgoDesign Features: Enhanced human ergonomics to improve the working environment, protect the health of this monitor...
Users Manual
Page 21
..., the monitor automatically adjusts brightness based on the environment. When the display mode is changed, the OSD Image Adjust settings may need to be re-adjusted. • Check the monitor and your display card with respect to compatibility and recommended signal timings. • If your display card with DisplayPort. No Sound • Check to see if mute is activated. • Check the volume in the OSD menu. • Check selected OSD's Tools "SOUND INPUT", when DisplayPort or HDMI is in use 60 Hz refresh rate...
..., the monitor automatically adjusts brightness based on the environment. When the display mode is changed, the OSD Image Adjust settings may need to be re-adjusted. • Check the monitor and your display card with respect to compatibility and recommended signal timings. • If your display card with DisplayPort. No Sound • Check to see if mute is activated. • Check the volume in the OSD menu. • Check selected OSD's Tools "SOUND INPUT", when DisplayPort or HDMI is in use 60 Hz refresh rate...


