User Guide
Page 1
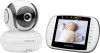
User's Guide Digital Video Baby Monitor Models: MBP36S, MBP36S-2, MBP36S-3, MBP36S-4 The features described in this User's Guide are subject to modifications without prior notice.
User's Guide Digital Video Baby Monitor Models: MBP36S, MBP36S-2, MBP36S-3, MBP36S-4 The features described in this User's Guide are subject to modifications without prior notice.
User Guide
Page 2
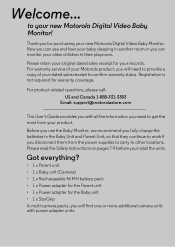
...service of your Motorola product, you will find one or more additional camera units with all the information you need to provide a copy of your product. Now you can monitor your new Motorola Digital Video Baby Monitor! Registration is not required for purchasing your records. Please read the Safety Instructions... adapter units. Welcome... For product related questions, please call: US and Canada 1-888-331-3383 Email: support@motorolastore.com This User's Guide provides you for warranty coverage. Before you use the Baby Monitor, we recommend you fully charge the batteries in...
...service of your Motorola product, you will find one or more additional camera units with all the information you need to provide a copy of your product. Now you can monitor your new Motorola Digital Video Baby Monitor! Registration is not required for purchasing your records. Please read the Safety Instructions... adapter units. Welcome... For product related questions, please call: US and Canada 1-888-331-3383 Email: support@motorolastore.com This User's Guide provides you for warranty coverage. Before you use the Baby Monitor, we recommend you fully charge the batteries in...

User Guide
Page 4
... Pan Right Tilt Up Tilt Down a Volume Level Control (5 Levels + OFF) Zoom Level Control (1X, 2X) Brightness Level Control (5 Levels) Lullaby Control (5 Song Selections) Alarm Setting (6h, 5h, 4h, 3h, 2h or OFF). To give a warning if the temperature at the top of the display when the alarm time is below... the limits set . Min: 10-24ºC/50-76ºF). Parent unit menu and display icons Signal Level (4 Levels) Night Vision Mode (Screen changes to add (+) or ...
... Pan Right Tilt Up Tilt Down a Volume Level Control (5 Levels + OFF) Zoom Level Control (1X, 2X) Brightness Level Control (5 Levels) Lullaby Control (5 Song Selections) Alarm Setting (6h, 5h, 4h, 3h, 2h or OFF). To give a warning if the temperature at the top of the display when the alarm time is below... the limits set . Min: 10-24ºC/50-76ºF). Parent unit menu and display icons Signal Level (4 Levels) Night Vision Mode (Screen changes to add (+) or ...

User Guide
Page 6
Table of contents Using the Baby Monitor 13 3.1 Setting up 13 3.2 Pan and Tilt 13 3.3 Night Vision Mode 13 3.4 Talk Mode 13 3.5 Video ON/OFF 13 3.6 Temperature Display 14 4. Parent Unit Menu Options ... 15 4.3 Lullaby ...15 4.4 Zoom ...15 4.5 Alarm ...16 4.6 Camera Control 16 4.6.1 Add (pair) a camera 16 4.6.2 Delete a camera 17 4.6.3 View multiple cameras on screen 17 4.7 Temperature Setting 18 4.8 Power Saving mode 18 5. General Information 23 6 Table of contents 1. Disposal of The Device (environment 19 6. Getting Started 10 2.1 Baby Unit Power Supply 10...
Table of contents Using the Baby Monitor 13 3.1 Setting up 13 3.2 Pan and Tilt 13 3.3 Night Vision Mode 13 3.4 Talk Mode 13 3.5 Video ON/OFF 13 3.6 Temperature Display 14 4. Parent Unit Menu Options ... 15 4.3 Lullaby ...15 4.4 Zoom ...15 4.5 Alarm ...16 4.6 Camera Control 16 4.6.1 Add (pair) a camera 16 4.6.2 Delete a camera 17 4.6.3 View multiple cameras on screen 17 4.7 Temperature Setting 18 4.8 Power Saving mode 18 5. General Information 23 6 Table of contents 1. Disposal of The Device (environment 19 6. Getting Started 10 2.1 Baby Unit Power Supply 10...

User Guide
Page 8
... small parts away from children when assembling. • This product is required. Therefore, always read the instructions in the... crib or within reach of the baby (the unit and cords should be more than 3 feet away) • Keep the cords out of reach of the baby (the unit and cords should be more than 3 feet away). CAMERA SET...Guide, safe to play with it prior to actual use. • Do not use the baby monitor near water. • Do not install the baby monitor in extreme cold or heat, direct sunlight or • close to a heat source. 8 Safety Instructions...
... small parts away from children when assembling. • This product is required. Therefore, always read the instructions in the... crib or within reach of the baby (the unit and cords should be more than 3 feet away) • Keep the cords out of reach of the baby (the unit and cords should be more than 3 feet away). CAMERA SET...Guide, safe to play with it prior to actual use. • Do not use the baby monitor near water. • Do not install the baby monitor in extreme cold or heat, direct sunlight or • close to a heat source. 8 Safety Instructions...

User Guide
Page 11
2.3 Parent Unit Power Supply ENGLISH IMPORTANT Installing the rechargeable battery pack and charging it fully before use the enclosed power adapter (6V DC / 600mA) with a flashing icon and the unit will beep ... to turn ON the parent unit. 3. Move the parent unit closer to the electrical outlet. Press and hold the P POWER ON/OFF button to the Motorola screen with the slightly smaller DC plug. 2. Once the baby and parent units are out of range, the video display will show the video captured...
2.3 Parent Unit Power Supply ENGLISH IMPORTANT Installing the rechargeable battery pack and charging it fully before use the enclosed power adapter (6V DC / 600mA) with a flashing icon and the unit will beep ... to turn ON the parent unit. 3. Move the parent unit closer to the electrical outlet. Press and hold the P POWER ON/OFF button to the Motorola screen with the slightly smaller DC plug. 2. Once the baby and parent units are out of range, the video display will show the video captured...
User Guide
Page 13
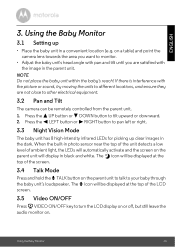
... off, but still leave the audio monitor on the parent unit to talk to your baby through the baby unit's loudspeaker. Using the Baby Monitor 3.1 Setting up clear images in a convenient location (e.g. on the parent unit will be displayed at the top of ambient light, the LEDs will automatically activate and...
... off, but still leave the audio monitor on the parent unit to talk to your baby through the baby unit's loudspeaker. Using the Baby Monitor 3.1 Setting up clear images in a convenient location (e.g. on the parent unit will be displayed at the top of ambient light, the LEDs will automatically activate and...

User Guide
Page 14
If the temperature alarm is turned on, the Parent Unit will be displayed at the top of the Baby Unit will beep and display Temperature High or Temperature Low when the temperature at the bottom in split screen mode. 3.6 Temperature Display The temperature reading from the temperature sensor at the back of the LCD screen, or at the Baby Unit is above or below the maximum or minimum temperature limits set for the alarm. (Max: 25-37ºC/77-99ºF. Min: 10-24ºC/50-76ºF). 14 Using the Baby Monitor
If the temperature alarm is turned on, the Parent Unit will be displayed at the top of the Baby Unit will beep and display Temperature High or Temperature Low when the temperature at the bottom in split screen mode. 3.6 Temperature Display The temperature reading from the temperature sensor at the back of the LCD screen, or at the Baby Unit is above or below the maximum or minimum temperature limits set for the alarm. (Max: 25-37ºC/77-99ºF. Min: 10-24ºC/50-76ºF). 14 Using the Baby Monitor

User Guide
Page 15
.... 3. DOWN button to select the desired brightness level from level 1 ~ 5. (The default brightness level setting is level 3.) 4.2 Brightness 1. Press the O button to select from level 0 ~ 5. (The default volume level setting is level 3.) 4.3 Lullaby 1. Press the M button and the menu bar will pop up . 2. ...is 1X.) Parent Unit Menu Options 15 Press the + UP button or - DOWN button to show the brightness set level. 4. DOWN button to select the 1X or 2X Zoom. (The default setting is highlighted. 3. If a sound is selected it will pop up . 2. Press the + UP button ...
.... 3. DOWN button to select the desired brightness level from level 1 ~ 5. (The default brightness level setting is level 3.) 4.2 Brightness 1. Press the O button to select from level 0 ~ 5. (The default volume level setting is level 3.) 4.3 Lullaby 1. Press the M button and the menu bar will pop up . 2. ...is 1X.) Parent Unit Menu Options 15 Press the + UP button or - DOWN button to show the brightness set level. 4. DOWN button to select the 1X or 2X Zoom. (The default setting is highlighted. 3. If a sound is selected it will pop up . 2. Press the + UP button ...

User Guide
Page 16
... finds the camera, beeps and the video from the camera appears. DOWN button to show the alarm Off / On setting. 4. DOWN to select the alarm time 6h, 5h, 4h, 3h, 2h. (The default setting is highlighted. 3. Press and hold the PAIR button underneath the baby unit until is Alarm OFF.) 5. If the...
... finds the camera, beeps and the video from the camera appears. DOWN button to show the alarm Off / On setting. 4. DOWN to select the alarm time 6h, 5h, 4h, 3h, 2h. (The default setting is highlighted. 3. Press and hold the PAIR button underneath the baby unit until is Alarm OFF.) 5. If the...

User Guide
Page 18
... 5 mins, 30 mins or 60 mins if no buttons have been pressed. 5. The temperature setting / / will pop up . 2. to select your setting and confirm by pressing the O button. 4.8 Power Saving mode 1. 4.7 Temperature Setting 1. Temperature Format - Press the M button and the menu bar will switch about every 30 seconds... Options Press the O button to turn the video screen back on. Turn the temperature alert ON, the Parent Unit will remain on, and you set. 5. Note: If there are multiple cameras in scan mode, the audio will pop up . 2. Press the + UP button or - DOWN ...
... 5 mins, 30 mins or 60 mins if no buttons have been pressed. 5. The temperature setting / / will pop up . 2. to select your setting and confirm by pressing the O button. 4.8 Power Saving mode 1. 4.7 Temperature Setting 1. Temperature Format - Press the M button and the menu bar will switch about every 30 seconds... Options Press the O button to turn the video screen back on. Turn the temperature alert ON, the Parent Unit will remain on, and you set. 5. Note: If there are multiple cameras in scan mode, the audio will pop up . 2. Press the + UP button or - DOWN ...
User Guide
Page 20
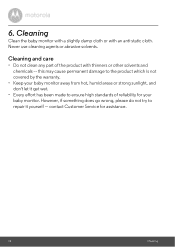
... Do not clean any part of reliability for assistance. 20 Cleaning Never use cleaning agents or abrasive solvents. this may cause permanent damage to ensure high standards of the product with an anti-static cloth. However, if something does go wrong, please do not try to repair it get wet. &#...8226; Every effort has been made to the product which is not covered by the warranty. • Keep your baby monitor away from hot, humid areas or strong sunlight, and don't let it yourself -- contact Customer Service for your baby monitor. ...
... Do not clean any part of reliability for assistance. 20 Cleaning Never use cleaning agents or abrasive solvents. this may cause permanent damage to ensure high standards of the product with an anti-static cloth. However, if something does go wrong, please do not try to repair it get wet. &#...8226; Every effort has been made to the product which is not covered by the warranty. • Keep your baby monitor away from hot, humid areas or strong sunlight, and don't let it yourself -- contact Customer Service for your baby monitor. ...
User Guide
Page 21
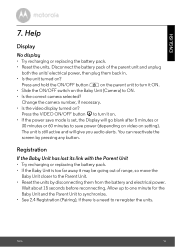
... the Baby Unit (Camera) to re-register the units. You can reactivate the screen by disconnecting them back in. • Is the unit turned on setting). Press and hold the ON/OFF button P on the parent unit to turn it on. • If the power save power (depending on video on... plug them from the battery and electrical power. Registration If the Baby Unit has lost its link with the Parent Unit • Try recharging or replacing the battery pack. • If the Baby Unit is a need to ON. • Is the correct camera selected? Wait about 15 seconds before reconnecting. Help...
... the Baby Unit (Camera) to re-register the units. You can reactivate the screen by disconnecting them back in. • Is the unit turned on setting). Press and hold the ON/OFF button P on the parent unit to turn it on. • If the power save power (depending on video on... plug them from the battery and electrical power. Registration If the Baby Unit has lost its link with the Parent Unit • Try recharging or replacing the battery pack. • If the Baby Unit is a need to ON. • Is the correct camera selected? Wait about 15 seconds before reconnecting. Help...
User Guide
Page 23
... and Canada 1-888-331-3383 Email: support@motorolastore.com To order a replacement battery pack, contact customer service. THIS WARRANTY GIVES YOU SPECIFIC LEGAL RIGHTS, AND YOU MAY HAVE OTHER RIGHTS THAT VARY BY ... and Accessories Limited Warranty ("Warranty") Thank you for purchasing this Motorola branded product manufactured under normal consumer usage for the period outlined below , BINATONE warrants that this Motorola branded product ("Product") or certified accessory ("Accessory") sold for ... LTD ("BINATONE"). Read this Warranty Cover? What Does this User's Guide or the Quick Start...
... and Canada 1-888-331-3383 Email: support@motorolastore.com To order a replacement battery pack, contact customer service. THIS WARRANTY GIVES YOU SPECIFIC LEGAL RIGHTS, AND YOU MAY HAVE OTHER RIGHTS THAT VARY BY ... and Accessories Limited Warranty ("Warranty") Thank you for purchasing this Motorola branded product manufactured under normal consumer usage for the period outlined below , BINATONE warrants that this Motorola branded product ("Product") or certified accessory ("Accessory") sold for ... LTD ("BINATONE"). Read this Warranty Cover? What Does this User's Guide or the Quick Start...

User Guide
Page 24
...an implied warranty, so the above limitations or exclusions may use functionally equivalent reconditioned/ refurbished/ pre-owned or new Products, Accessories or parts. What will at its option and within a commercially reasonable time, will BINATONE do? We may not apply to you may also ... REPAIR OR REPLACEMENT PROVIDED UNDER THIS EXPRESS LIMITED WARRANTY IS THE EXCLUSIVE REMEDY OF THE CONSUMER, AND IS PROVIDED IN LIEU OF ALL OTHER WARRANTIES, EXPRESS OR IMPLIED. What Other Limitations Are There? This Warranty gives you specific legal rights, and you . IN NO EVENT SHALL MOTOROLA OR...
...an implied warranty, so the above limitations or exclusions may use functionally equivalent reconditioned/ refurbished/ pre-owned or new Products, Accessories or parts. What will at its option and within a commercially reasonable time, will BINATONE do? We may not apply to you may also ... REPAIR OR REPLACEMENT PROVIDED UNDER THIS EXPRESS LIMITED WARRANTY IS THE EXCLUSIVE REMEDY OF THE CONSUMER, AND IS PROVIDED IN LIEU OF ALL OTHER WARRANTIES, EXPRESS OR IMPLIED. What Other Limitations Are There? This Warranty gives you specific legal rights, and you . IN NO EVENT SHALL MOTOROLA OR...

User Guide
Page 25
... purposes or subjecting the Product or Accessory to abnormal usage or conditions; Abuse & Misuse. Unauthorized Service or Modification. Periodic maintenance, repair and replacement of parts due to the consumer, whichever is longer. Defects or damage that result from the use of ...acts which are not the fault of MOTOROLA or BINATONE, are excluded from coverage. Exclusions Normal Wear and Tear. or (d) other peripheral equipment are excluded from coverage. Defects or damages resulting from service, testing, adjustment, installation, maintenance, alteration, or modification in...
... purposes or subjecting the Product or Accessory to abnormal usage or conditions; Abuse & Misuse. Unauthorized Service or Modification. Periodic maintenance, repair and replacement of parts due to the consumer, whichever is longer. Defects or damage that result from the use of ...acts which are not the fault of MOTOROLA or BINATONE, are excluded from coverage. Exclusions Normal Wear and Tear. or (d) other peripheral equipment are excluded from coverage. Defects or damages resulting from service, testing, adjustment, installation, maintenance, alteration, or modification in...

User Guide
Page 26
... non-Motorola branded housings, or parts, are excluded from coverage. Communication Services. and, most importantly; (e) your box, a completed warranty card showing the serial number of the Product; (d) a written description of tampering; (c) mismatched board serial numbers; To obtain service or information, please call: US and Canada 1-888-331-3383 Email: support@motorolastore.com You will receive instructions...
... non-Motorola branded housings, or parts, are excluded from coverage. Communication Services. and, most importantly; (e) your box, a completed warranty card showing the serial number of the Product; (d) a written description of tampering; (c) mismatched board serial numbers; To obtain service or information, please call: US and Canada 1-888-331-3383 Email: support@motorolastore.com You will receive instructions...

User Guide
Page 31
All rights reserved. Manufactured, distributed or sold by Binatone Electronics International LTD., official licensee for this product. MOTOROLA and the Stylized M Logo, are trademarks or registered trademarks of their respective owners. © 2017 Motorola Mobility LLC. and are the property of Motorola Trademark Holdings, LLC. All other trademarks are used under license. EN_US Version 14.0 Printed in China
All rights reserved. Manufactured, distributed or sold by Binatone Electronics International LTD., official licensee for this product. MOTOROLA and the Stylized M Logo, are trademarks or registered trademarks of their respective owners. © 2017 Motorola Mobility LLC. and are the property of Motorola Trademark Holdings, LLC. All other trademarks are used under license. EN_US Version 14.0 Printed in China
Quick Start Guide
Page 1
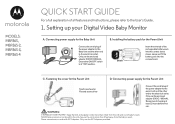
... Small cross head or Flat end screw driver WARNING: STRANGULATION HAZARD - Recommend charging at "ON" position. Setting up your Digital Video Baby Monitor A. MODELS: MBP36S, MBP36S-2, MBP36S-3, MBP36S-4 QUICK START GUIDE For a full explanation of all features and instructions, please refer to the electrical outlet. Only use extension cords with AC Adapters. Installing the battery pack for the Baby Unit...
... Small cross head or Flat end screw driver WARNING: STRANGULATION HAZARD - Recommend charging at "ON" position. Setting up your Digital Video Baby Monitor A. MODELS: MBP36S, MBP36S-2, MBP36S-3, MBP36S-4 QUICK START GUIDE For a full explanation of all features and instructions, please refer to the electrical outlet. Only use extension cords with AC Adapters. Installing the battery pack for the Baby Unit...

Quick Start Guide
Page 2
...right. General Information If your baby. Contact Customer Service: US and Canada 1-888-331-3383 Email: motorola@encompass.com Manufactured, distributed or sold by Binatone Electronics International LTD., official licensee for this Quick Start Guide or the User's Guide. 2. and are trademarks or registered trademarks of... on/off the unit. 3. All other trademarks are the property of Motorola Trademark Holdings, LLC. All rights reserved. Press to switch on the Unit. 2. Read this product. Press to adjust menu settings. Press to pan the camera left to switch on /off the Unit...
...right. General Information If your baby. Contact Customer Service: US and Canada 1-888-331-3383 Email: motorola@encompass.com Manufactured, distributed or sold by Binatone Electronics International LTD., official licensee for this Quick Start Guide or the User's Guide. 2. and are trademarks or registered trademarks of... on/off the unit. 3. All other trademarks are the property of Motorola Trademark Holdings, LLC. All rights reserved. Press to switch on the Unit. 2. Read this product. Press to adjust menu settings. Press to pan the camera left to switch on /off the Unit...
