Motorola warranty terms and conditions
Page 1
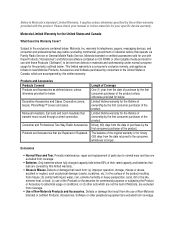
... Products ("Software") to be free from coverage. ƒ Use of Coverage One (1) year from coverage. Length of Non-Motorola Products and Accessories. It applies unless otherwise specified by the first consumer purchaser of the Products or Accessories for commercial purposes or...government or industrial radios) that result from coverage. ƒ Batteries. Consumer and Professional Two-Way Radio Accessories. or (d) other acts which are not the fault of Motorola, are excluded from the use of Non-Motorola branded or certified Products, Accessories, Software or other tangible media...
... Products ("Software") to be free from coverage. ƒ Use of Coverage One (1) year from coverage. Length of Non-Motorola Products and Accessories. It applies unless otherwise specified by the first consumer purchaser of the Products or Accessories for commercial purposes or...government or industrial radios) that result from coverage. ƒ Batteries. Consumer and Professional Two-Way Radio Accessories. or (d) other acts which are not the fault of Motorola, are excluded from the use of Non-Motorola branded or certified Products, Accessories, Software or other tangible media...

User Guide
Page 12
Setting Up Your Smartphone Locating Your SIM Card Remove the battery door 1 Slide the release button back until it releases the battery door. release button 6 Getting Started Keypad Press keys on the keypad to enter numbers and characters. * Key • Press * to change between uppercase and lowercase ...
Setting Up Your Smartphone Locating Your SIM Card Remove the battery door 1 Slide the release button back until it releases the battery door. release button 6 Getting Started Keypad Press keys on the keypad to enter numbers and characters. * Key • Press * to change between uppercase and lowercase ...
User Guide
Page 13
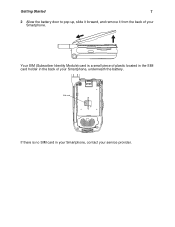
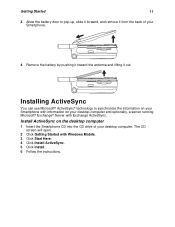
SIM card If there is a small piece of plastic located in the SIM card holder in your Smartphone, contact your service provider. Getting Started 7 2 Allow the battery door to pop up, slide it forward, and remove it from the back of your Smartphone, underneath the battery. Your SIM (Subscriber Identity Module) card is no SIM card in the back of your Smartphone.
SIM card If there is a small piece of plastic located in the SIM card holder in your Smartphone, contact your service provider. Getting Started 7 2 Allow the battery door to pop up, slide it forward, and remove it from the back of your Smartphone, underneath the battery. Your SIM (Subscriber Identity Module) card is no SIM card in the back of your Smartphone.

User Guide
Page 14
Press the bottom of the battery to secure it from the back of your Smartphone. 3 Insert the top of the battery into the battery area. release button 2 Allow the battery door to pop up, slide it forward, and remove it . 8 Getting Started Charging the Battery Your Smartphone comes with a High Performance Lithium Ion Battery and a rapid travel charger to charge it releases the battery door. Insert the battery before charging it 1 Slide the release button back until it .
Press the bottom of the battery to secure it from the back of your Smartphone. 3 Insert the top of the battery into the battery area. release button 2 Allow the battery door to pop up, slide it forward, and remove it . 8 Getting Started Charging the Battery Your Smartphone comes with a High Performance Lithium Ion Battery and a rapid travel charger to charge it releases the battery door. Insert the battery before charging it 1 Slide the release button back until it .

User Guide
Page 15
Getting Started 9 4 Replace the battery door and press it gently until you have purchased optional batteries or chargers, see "Charging Times". connector cover 3 Plug the other end of the plug. Pull the plug straight out. 4 If you hear a click. Tip: To remove the charger from the accessory connector: Press the buttons on the sides of the charger into an electrical outlet. 2 Open the connector cover. Charge the battery 1 Plug the charger into the accessory connector.
Getting Started 9 4 Replace the battery door and press it gently until you have purchased optional batteries or chargers, see "Charging Times". connector cover 3 Plug the other end of the plug. Pull the plug straight out. 4 If you hear a click. Tip: To remove the charger from the accessory connector: Press the buttons on the sides of the charger into an electrical outlet. 2 Open the connector cover. Charge the battery 1 Plug the charger into the accessory connector.
User Guide
Page 16
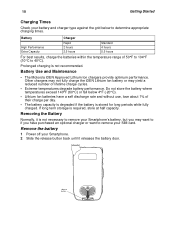
...a self discharge rate and without use, lose about 1% of their charge per day. • The battery capacity is degraded if the battery is not necessary to remove your Smartphone's battery, but you may yield a reduced number of 50°F to 104°F (10°C to ... charging is required, store at half capacity. Removing the Battery Normally, it releases the battery door. release button Battery Use and Maintenance • The Motorola iDEN Approved Lithium Ion chargers provide optimum performance. Do not store the battery where temperatures exceed 140°F (60°C) or fall...
...a self discharge rate and without use, lose about 1% of their charge per day. • The battery capacity is degraded if the battery is not necessary to remove your Smartphone's battery, but you may yield a reduced number of 50°F to 104°F (10°C to ... charging is required, store at half capacity. Removing the Battery Normally, it releases the battery door. release button Battery Use and Maintenance • The Motorola iDEN Approved Lithium Ion chargers provide optimum performance. Do not store the battery where temperatures exceed 140°F (60°C) or fall...
User Guide
Page 17
... it out. Install ActiveSync on your desktop computer and optionally, a server running Microsoft® Exchange® Server with Exchange ActiveSync. Getting Started 11 3 Allow the battery door to synchronize the information on your Smartphone with information on the desktop computer 1 Insert the Smartphone CD into the CD drive of your Smartphone...
... it out. Install ActiveSync on your desktop computer and optionally, a server running Microsoft® Exchange® Server with Exchange ActiveSync. Getting Started 11 3 Allow the battery door to synchronize the information on your Smartphone with information on the desktop computer 1 Insert the Smartphone CD into the CD drive of your Smartphone...

User Guide
Page 18
... the power button for 2 or 3 seconds. Select OK when prompted. Before using ActiveSync. Assemble the i930 Sync Cradle 1 Place the tabs of the phone support into the slots in the base of the cradle... are using an Extra Capacity Lithium Ion battery, place the tabs in the slots just behind the slots closest to charge the battery in the cradle with an i930 Sync Cradle and mini USB cable that... you power on your Smartphone. Do not power on the Smartphone while it is only necessary the first time you use the i930...
... the power button for 2 or 3 seconds. Select OK when prompted. Before using ActiveSync. Assemble the i930 Sync Cradle 1 Place the tabs of the phone support into the slots in the base of the cradle... are using an Extra Capacity Lithium Ion battery, place the tabs in the slots just behind the slots closest to charge the battery in the cradle with an i930 Sync Cradle and mini USB cable that... you power on your Smartphone. Do not power on the Smartphone while it is only necessary the first time you use the i930...

User Guide
Page 20
Charge the battery 1 Plug the charger into the cradle 1 Open the Smartphone's connector cover. Using the i930 Sync Cradle to Charge Your Smartphone You can use the i930 Sync Cradle to charge your Smartphone any time, whether or not you are using ActiveSync or have the mini USB cable attached. 14 Place the Smartphone into an electrical outlet. Getting Started connector cover 2 Place the Smartphone into the cradle, inserting the connector in the base of the cradle into the Smartphone's accessory connector.
Charge the battery 1 Plug the charger into the cradle 1 Open the Smartphone's connector cover. Using the i930 Sync Cradle to Charge Your Smartphone You can use the i930 Sync Cradle to charge your Smartphone any time, whether or not you are using ActiveSync or have the mini USB cable attached. 14 Place the Smartphone into an electrical outlet. Getting Started connector cover 2 Place the Smartphone into the cradle, inserting the connector in the base of the cradle into the Smartphone's accessory connector.

User Guide
Page 27
... it and pressing O. When the wireless capability is turned off Make one of commands that you can turn off wireless capability to Flight mode conserve battery life when you do not want to make or receive calls, or in the following table. To Key lock unlock the keypad, select Unlock, and...
... it and pressing O. When the wireless capability is turned off Make one of commands that you can turn off wireless capability to Flight mode conserve battery life when you do not want to make or receive calls, or in the following table. To Key lock unlock the keypad, select Unlock, and...

User Guide
Page 28
... voice mail. Backspace and remove a line of the Smartphone screen. New instant message Voice call in progress Data call Outgoing line 1 Outgoing line 2 Battery level Low battery Battery charging No battery Signal strength No signal General Packet Radio Services (GPRS) available General Packet Radio Services (GPRS) in use General Packet Radio Services (GPRS) in...
... voice mail. Backspace and remove a line of the Smartphone screen. New instant message Voice call in progress Data call Outgoing line 1 Outgoing line 2 Battery level Low battery Battery charging No battery Signal strength No signal General Packet Radio Services (GPRS) available General Packet Radio Services (GPRS) in use General Packet Radio Services (GPRS) in...

User Guide
Page 36
Protect your SIM card. release button 3 Allow the battery door to do so for an extra measure of security. Removing the SIM card 1 Power off your Smartphone. 2 Slide the release button back until it ... not touch the gold-colored areas of your SIM card, but you may wish to pop up, slide it forward, and remove it releases the battery door. If you would any delicate object. 30 The Basics Note: These steps must be performed in quick succession. Store it is not necessary to...
Protect your SIM card. release button 3 Allow the battery door to do so for an extra measure of security. Removing the SIM card 1 Power off your Smartphone. 2 Slide the release button back until it ... not touch the gold-colored areas of your SIM card, but you may wish to pop up, slide it forward, and remove it releases the battery door. If you would any delicate object. 30 The Basics Note: These steps must be performed in quick succession. Store it is not necessary to...

User Guide
Page 37
SIM card holder Return the SIM card to your Smartphone 1 Make sure the Smartphone is powered off 2 If necessary, remove the battery door and battery. 3 Hold your SIM card and Smartphone in the orientation shown in step 4. 4 Carefully slide your SIM card into your SIM card out of the SIM card holder. SIM card holder The Basics 31 4 Remove the battery by pushing it toward the antenna and lifting it out. 5 Slide your Smartphone until it lines up with the marks above and below the SIM card holder.
SIM card holder Return the SIM card to your Smartphone 1 Make sure the Smartphone is powered off 2 If necessary, remove the battery door and battery. 3 Hold your SIM card and Smartphone in the orientation shown in step 4. 4 Carefully slide your SIM card into your SIM card out of the SIM card holder. SIM card holder The Basics 31 4 Remove the battery by pushing it toward the antenna and lifting it out. 5 Slide your Smartphone until it lines up with the marks above and below the SIM card holder.

User Guide
Page 90
...Power Management to control how long your Smartphone makes to notify you are in Profiles. You cannot delete sounds included with the Smartphone. View battery power level 1 On the Home screen, select Start. 2 Select Settings and then Power Management. These settings do not make or receive ...Start. 2 Select Settings and then Notifications. 3 In Status LED, select the option you added. The volume of battery life remaining. 3 Select Done. You can also check the battery level. Turn the status light on . Voice Volume The Voice Volume screen sets the volume coming out your Smartphone...
...Power Management to control how long your Smartphone makes to notify you are in Profiles. You cannot delete sounds included with the Smartphone. View battery power level 1 On the Home screen, select Start. 2 Select Settings and then Power Management. These settings do not make or receive ...Start. 2 Select Settings and then Notifications. 3 In Status LED, select the option you added. The volume of battery life remaining. 3 Select Done. You can also check the battery level. Turn the status light on . Voice Volume The Voice Volume screen sets the volume coming out your Smartphone...

User Guide
Page 134
... you press the key the faster the clip fast forwards or rewinds. About Full Screen Display During playback, you receive an incoming call, experience a low battery, or press any number key. To Select this menu command Set the default volume for streaming video clips. The clip will rotate 270 degrees and...
... you press the key the faster the clip fast forwards or rewinds. About Full Screen Display During playback, you receive an incoming call, experience a low battery, or press any number key. To Select this menu command Set the default volume for streaming video clips. The clip will rotate 270 degrees and...

User Guide
Page 142
... map software, which displays your new GPS PIN. 7 Select Done. When you receive your GPS privacy options. Using GPS with map software uses the Smartphone's battery power quickly. Note: Because your Smartphone is continuously determining your location, using the GPS feature of your Smartphone with Map Software You can be required...
... map software, which displays your new GPS PIN. 7 Select Done. When you receive your GPS privacy options. Using GPS with map software uses the Smartphone's battery power quickly. Note: Because your Smartphone is continuously determining your location, using the GPS feature of your Smartphone with Map Software You can be required...

User Guide
Page 145
... 1 From the list of suspended applications, select the application you want to resume. Note: Using Java applications may cause your Smartphone to use up more battery power than other uses of all Java applications or the screen showing the suspended application, select Menu and then select End All. 2 Select Yes to...
... 1 From the list of suspended applications, select the application you want to resume. Note: Using Java applications may cause your Smartphone to use up more battery power than other uses of all Java applications or the screen showing the suspended application, select Menu and then select End All. 2 Select Yes to...


