User Guide
Page 2
... the dealer or an experienced radio/TV technician for easy access when disconnecting the power cord/adapter of thunderstorm or lightning activity...a main line cord that are not likely to radio communications. Postpone router installation until there is encouraged to try to persons, including the following...product safety requirements of the country of use of cord sets may result in safe operating condition. Different types of the...cleaners directly on or pinched by Motorola for connections to plugs and convenience receptacles, and examine the point where they exit from vibration ...
... the dealer or an experienced radio/TV technician for easy access when disconnecting the power cord/adapter of thunderstorm or lightning activity...a main line cord that are not likely to radio communications. Postpone router installation until there is encouraged to try to persons, including the following...product safety requirements of the country of use of cord sets may result in safe operating condition. Different types of the...cleaners directly on or pinched by Motorola for connections to plugs and convenience receptacles, and examine the point where they exit from vibration ...

User Guide
Page 5
...to: SELECTING THE WA840 BROADBAND CONNECTION PROTOCOL ...3-18 Options related to: SETTING UP A STATIC BROADBAND CONNECTION 3-19 Options related to: SETTING UP A PPPoE BROADBAND CONNECTION 3-20 Options related to: SETTING UP A LINK TO A DYNAMIC DOMAIN NAME SERVICE...3-22 Options related... FILTERS Configuration Page 3-26 FILTERS Page - All Configuration Options 3-6 Options related to: CONTROLLING ACCESS TO THE CONFIGURATION UTILITY 3-6 Options related to: ENABLING PRIMARY ACCESS POINT FUNCTIONS 3-6 Options related to: ENABLING TIME-RELATED FUNCTIONS 3-8 Options related to: LOGGING WA840 ...
...to: SELECTING THE WA840 BROADBAND CONNECTION PROTOCOL ...3-18 Options related to: SETTING UP A STATIC BROADBAND CONNECTION 3-19 Options related to: SETTING UP A PPPoE BROADBAND CONNECTION 3-20 Options related to: SETTING UP A LINK TO A DYNAMIC DOMAIN NAME SERVICE...3-22 Options related... FILTERS Configuration Page 3-26 FILTERS Page - All Configuration Options 3-6 Options related to: CONTROLLING ACCESS TO THE CONFIGURATION UTILITY 3-6 Options related to: ENABLING PRIMARY ACCESS POINT FUNCTIONS 3-6 Options related to: ENABLING TIME-RELATED FUNCTIONS 3-8 Options related to: LOGGING WA840 ...

User Guide
Page 6
... Action Buttons 3-41 The WIRELESS Configuration Page 3-42 WIRELESS Page - Recommended Configuration Options 3-59 SECURITY Page - Matching Settings in the WA840 and Wireless Clients 3-68 The FIRMWARE Configuration Page 3-72 FIRMWARE Page Configuration Options 3-72 Section 4: Troubleshooting 4-1 Contact Us ...4-1 Hardware Solutions ...4-1 My computer is experiencing difficulty in connecting to the access point 4-2 Software Solutions...4-2 I would like...
... Action Buttons 3-41 The WIRELESS Configuration Page 3-42 WIRELESS Page - Recommended Configuration Options 3-59 SECURITY Page - Matching Settings in the WA840 and Wireless Clients 3-68 The FIRMWARE Configuration Page 3-72 FIRMWARE Page Configuration Options 3-72 Section 4: Troubleshooting 4-1 Contact Us ...4-1 Hardware Solutions ...4-1 My computer is experiencing difficulty in connecting to the access point 4-2 Software Solutions...4-2 I would like...
User Guide
Page 15
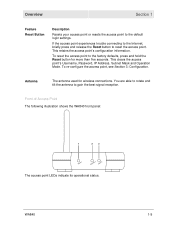
.... You are able to rotate and tilt the antenna to reset the access point. Front of Access Point The following illustration shows the WA840 front panel: 1 2 3 Power Wireless Device The access point LEDs indicate its operational status. If the access point experiences trouble connecting to the Internet, briefly press and release the Reset button to gain the best signal...
.... You are able to rotate and tilt the antenna to reset the access point. Front of Access Point The following illustration shows the WA840 front panel: 1 2 3 Power Wireless Device The access point LEDs indicate its operational status. If the access point experiences trouble connecting to the Internet, briefly press and release the Reset button to gain the best signal...

User Guide
Page 16
...Green The device is not powered on the bottom of the access point. ON OFF Red None The Power LED turns RED as soon as the reset button is enabled / active traffic present. NOTE: The wireless LED does not blink on and operating normally. No external ... and needs to factory default settings. The wireless interface is depressed. You can determine your version of hardware by looking at the product label on . 2 Wireless OFF ON/Blinking None Green The wireless interface is down , the LED starts to blink RED, and the access point's username, password, private LAN...
...Green The device is not powered on the bottom of the access point. ON OFF Red None The Power LED turns RED as soon as the reset button is enabled / active traffic present. NOTE: The wireless LED does not blink on and operating normally. No external ... and needs to factory default settings. The wireless interface is depressed. You can determine your version of hardware by looking at the product label on . 2 Wireless OFF ON/Blinking None Green The wireless interface is down , the LED starts to blink RED, and the access point's username, password, private LAN...
User Guide
Page 17
Section 2: Installation To get your network up and running: ƒ Set up the access point's software manually, refer to the access point. Follow the prompts. The following sections provide detailed instructions for some reason you physically place your access point. ƒ Electrical Connection: how to the threaded knob until firmly seated. Hardware Setup Hardware setup includes: ƒ Antenna...
Section 2: Installation To get your network up and running: ƒ Set up the access point's software manually, refer to the access point. Follow the prompts. The following sections provide detailed instructions for some reason you physically place your access point. ƒ Electrical Connection: how to the threaded knob until firmly seated. Hardware Setup Hardware setup includes: ƒ Antenna...

User Guide
Page 23
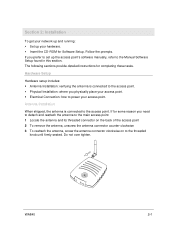
... the supplied CD-ROM to quickly set up your network, use this section to configure it. You need one Ethernet cable for advanced configuration. Once your network is up your PCs ƒ Enter Wireless Security settings Wired Connection to Access Point Power Reset LAN Antenna If you ...'d prefer to manually set up and running, refer to Section 3: Configuration for this procedure, to connect the PC ...
... the supplied CD-ROM to quickly set up your network, use this section to configure it. You need one Ethernet cable for advanced configuration. Once your network is up your PCs ƒ Enter Wireless Security settings Wired Connection to Access Point Power Reset LAN Antenna If you ...'d prefer to manually set up and running, refer to Section 3: Configuration for this procedure, to connect the PC ...
User Guide
Page 25
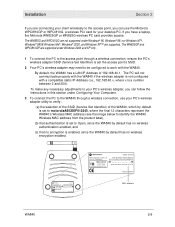
... are not supported under Windows 2000 and XP only. 1 To connect the PC to the access point through a wireless connection, use the Motorola WPCI810GP or WPCI810G, a wireless PCI card for your PC's wireless adapter utility to verify: (a) the selection of the SSID (Service Set Identifier) of 192.168.40.1. Installation Section 2 If you are connecting your client...
... are not supported under Windows 2000 and XP only. 1 To connect the PC to the access point through a wireless connection, use the Motorola WPCI810GP or WPCI810G, a wireless PCI card for your PC's wireless adapter utility to verify: (a) the selection of the SSID (Service Set Identifier) of 192.168.40.1. Installation Section 2 If you are connecting your client...

User Guide
Page 26
... to the WA840. Using DHCP Not using DHCP Then... Once the PC is recommended that you need to configure the PC's network setting to specify a static IP address for the computer that PC. 2-10 WA840 For advanced WA840 configuration, review and adjust any other ...and 4 with the WA840, you will include in your wireless network and follow the steps to access the built-in Web-based Configuration Utility and configure the WA840: a. For a typical WA840 configuration as a wireless access point or as a wireless-only broadband router, review and adjust as necessary only those devices, but it...
... to the WA840. Using DHCP Not using DHCP Then... Once the PC is recommended that you need to configure the PC's network setting to specify a static IP address for the computer that PC. 2-10 WA840 For advanced WA840 configuration, review and adjust any other ...and 4 with the WA840, you will include in your wireless network and follow the steps to access the built-in Web-based Configuration Utility and configure the WA840: a. For a typical WA840 configuration as a wireless access point or as a wireless-only broadband router, review and adjust as necessary only those devices, but it...
User Guide
Page 27
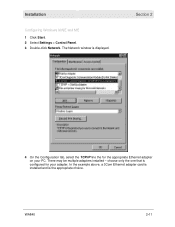
choose only the one that is configured for the appropriate Ethernet adapter on your adapter. The Network window is the appropriate choice. There may be multiple adapters installed - WA840 2-11 In the example above, a 3Com Ethernet adapter card is installed and is displayed. Installation Configuring Windows 98SE and ME 1 Click Start. 2 Select Settings > Control Panel. 3 Double-click Network. Section 2 4 On the Configuration tab, select the TCP/IP line the for your PC.
choose only the one that is configured for the appropriate Ethernet adapter on your adapter. The Network window is the appropriate choice. There may be multiple adapters installed - WA840 2-11 In the example above, a 3Com Ethernet adapter card is installed and is displayed. Installation Configuring Windows 98SE and ME 1 Click Start. 2 Select Settings > Control Panel. 3 Double-click Network. Section 2 4 On the Configuration tab, select the TCP/IP line the for your PC.
User Guide
Page 28
... CD and follow the prompts. 12 Restart your computer to save your settings. 13 Proceed to the Configure Your Wireless Security Settings section to see if the installation files are installed at c:\windows\options\cabs. First check to set up the security settings. 2-12 WA840 Windows may ask for the Windows Installation disk. Installation 6 Click...
... CD and follow the prompts. 12 Restart your computer to save your settings. 13 Proceed to the Configure Your Wireless Security Settings section to see if the installation files are installed at c:\windows\options\cabs. First check to set up the security settings. 2-12 WA840 Windows may ask for the Windows Installation disk. Installation 6 Click...
User Guide
Page 29
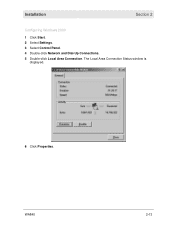
Installation Section 2 Configuring Windows 2000 1 Click Start. 2 Select Settings. 3 Select Control Panel. 4 Double-click Network and Dial-Up Connections. 5 Double-click Local Area Connection. WA840 2-13 The Local Area Connection Status window is displayed. 6 Click Properties.
Installation Section 2 Configuring Windows 2000 1 Click Start. 2 Select Settings. 3 Select Control Panel. 4 Double-click Network and Dial-Up Connections. 5 Double-click Local Area Connection. WA840 2-13 The Local Area Connection Status window is displayed. 6 Click Properties.

User Guide
Page 31
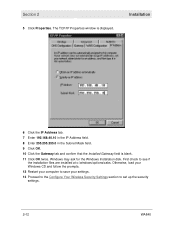
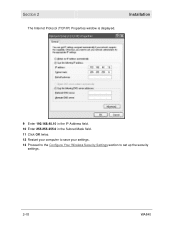
Section 2 9 Enter 192.168.40.10 in the IP Address field. 10 Enter 255.255.255.0 in the Subnet Mask field. 11 Click OK twice. 12 Restart your computer to save your settings. 13 Proceed to the Configure Your Wireless Security Settings section to set up the security settings. Installation The Internet Protocol (TCP/IP) Properties window is displayed. WA840 2-15
Section 2 9 Enter 192.168.40.10 in the IP Address field. 10 Enter 255.255.255.0 in the Subnet Mask field. 11 Click OK twice. 12 Restart your computer to save your settings. 13 Proceed to the Configure Your Wireless Security Settings section to set up the security settings. Installation The Internet Protocol (TCP/IP) Properties window is displayed. WA840 2-15

User Guide
Page 32
If you have retained the default interface for Windows 2000. 1 Click Start. 2 Select Settings. 3 Select Control Panel. 4 Double-click Network and Dial-Up Connections. 5 Double-click Local Area Connection. The Local Area Connection Status window is displayed. 6 Click Properties. 2-16 WA840 Section 2 Installation Configuring Windows XP This configuration assumes you are running the 'Classic' interface, please follow the instructions for Windows XP.
If you have retained the default interface for Windows 2000. 1 Click Start. 2 Select Settings. 3 Select Control Panel. 4 Double-click Network and Dial-Up Connections. 5 Double-click Local Area Connection. The Local Area Connection Status window is displayed. 6 Click Properties. 2-16 WA840 Section 2 Installation Configuring Windows XP This configuration assumes you are running the 'Classic' interface, please follow the instructions for Windows XP.
User Guide
Page 34
Installation 9 Enter 192.168.40.10 in the IP Address field. 10 Enter 255.255.255.0 in the Subnet Mask field. 11 Click OK twice. 12 Restart your computer to save your settings. 13 Proceed to the Configure Your Wireless Security Settings section to set up the security settings. 2-18 WA840 Section 2 The Internet Protocol (TCP/IP) Properties window is displayed.
Installation 9 Enter 192.168.40.10 in the IP Address field. 10 Enter 255.255.255.0 in the Subnet Mask field. 11 Click OK twice. 12 Restart your computer to save your settings. 13 Proceed to the Configure Your Wireless Security Settings section to set up the security settings. 2-18 WA840 Section 2 The Internet Protocol (TCP/IP) Properties window is displayed.

User Guide
Page 35
... Installation Wizard CD-ROM. Where adjustments of configuration options are factory set to these factory defaults, unless you to customize the WA840 to adjust any other configuration options. While using the Web-based Configuration Utility, as a wireless access point or a wireless-only broadband router. your WA840 Access Point. When you login to the utility for reference only; Section...
... Installation Wizard CD-ROM. Where adjustments of configuration options are factory set to these factory defaults, unless you to customize the WA840 to adjust any other configuration options. While using the Web-based Configuration Utility, as a wireless access point or a wireless-only broadband router. your WA840 Access Point. When you login to the utility for reference only; Section...
User Guide
Page 36
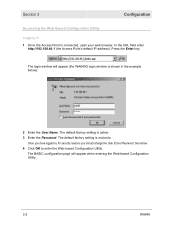
...://192.168.40.1 (the Access Point's default IP address). The default factory setting is connected, open your web browser. Section 3 Configuration Accessing the Web-Based Configuration Utility Logging In 1 Once the Access Point is admin. 3 Enter the Password. The BASIC configuration page will appear (the WA840G login window is motorola. The default factory setting is shown in , for...
...://192.168.40.1 (the Access Point's default IP address). The default factory setting is connected, open your web browser. Section 3 Configuration Accessing the Web-Based Configuration Utility Logging In 1 Once the Access Point is admin. 3 Enter the Password. The BASIC configuration page will appear (the WA840G login window is motorola. The default factory setting is shown in , for...

User Guide
Page 37
...bar, and clicking on your local network to run and share certain programs that use the Internet. ƒ WIRELESS: This page allows you to configure your wireless network. ƒ SECURITY: This page allows you to configure security features to protect information shared over a ...easy reference. Figure 3-2 Configuration Page Selection Bar You can access any page by -page descriptions of the WA840. WA840 3-3 Configuration Section 3 Overview of Configuration Pages Navigation Between Pages The Web-based Configuration Utility is to set parental controls on the use of the Internet. ƒ...
...bar, and clicking on your local network to run and share certain programs that use the Internet. ƒ WIRELESS: This page allows you to configure your wireless network. ƒ SECURITY: This page allows you to configure security features to protect information shared over a ...easy reference. Figure 3-2 Configuration Page Selection Bar You can access any page by -page descriptions of the WA840. WA840 3-3 Configuration Section 3 Overview of Configuration Pages Navigation Between Pages The Web-based Configuration Utility is to set parental controls on the use of the Internet. ƒ...

User Guide
Page 39
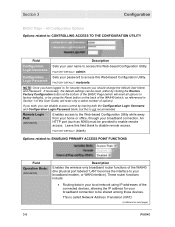
FACTORY DEFAULT: admin Configuration Login Password: Sets your user name to access this Web-based Configuration Utility. FACTORY DEFAULT: motorola NOTE: Once you have logged in Section 1 of this User Guide, will reset all options to factory defaults), or by leaving both the Configuration Login ...
FACTORY DEFAULT: admin Configuration Login Password: Sets your user name to access this Web-based Configuration Utility. FACTORY DEFAULT: motorola NOTE: Once you have logged in Section 1 of this User Guide, will reset all options to factory defaults), or by leaving both the Configuration Login ...
User Guide
Page 40
...user name to : ENABLING PRIMARY ACCESS POINT FUNCTIONS Field Operation Mode: (ADVANCED) Description Enables the wireless-only broadband router functions of the WA840 (which will reset only a select number of options). FACTORY DEFAULT: (blank) Options related to access this is called Network Address ...) 3-6 WA840 Login Username: FACTORY DEFAULT: admin Configuration Sets your broadband modem, or WAN interface). Login Password: FACTORY DEFAULT: motorola NOTE: Once you should change the default User Name and Password. These router functions include: • Routing data in , for...
...user name to : ENABLING PRIMARY ACCESS POINT FUNCTIONS Field Operation Mode: (ADVANCED) Description Enables the wireless-only broadband router functions of the WA840 (which will reset only a select number of options). FACTORY DEFAULT: (blank) Options related to access this is called Network Address ...) 3-6 WA840 Login Username: FACTORY DEFAULT: admin Configuration Sets your broadband modem, or WAN interface). Login Password: FACTORY DEFAULT: motorola NOTE: Once you should change the default User Name and Password. These router functions include: • Routing data in , for...


