User Guide
Page 1
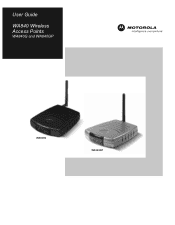
User Guide WA840 Wireless Access Points WA840G and WA840GP WA840G WA840GP
User Guide WA840 Wireless Access Points WA840G and WA840GP WA840G WA840GP

User Guide
Page 4
...1-1 Features ...1-2 Understanding Your User Guide...1-3 Box Contents...1-3 Understanding Functions...1-4 Access Point ...1-4 LAN ...1-4 TCP/IP ...1-4 Static IP Address ...1-4 Dynamic IP Address ...1-4 Positioning Your Access Point ...1-4 Wireless Range...1-5 Technical Specifications ...1-5 Type of Networks ...1-5 Access Point Mode ...1-6 WDS Access Point Mode ...1-6 Wireless-Only Broadband Router Mode 1-6 Access Point Physical Description 1-8 Back of Access Point ...1-8 Front of Access Point ...1-9 LED Description ...1-10 Section 2: Installation 2-1 Hardware Setup...2-1 Antenna Installation...
...1-1 Features ...1-2 Understanding Your User Guide...1-3 Box Contents...1-3 Understanding Functions...1-4 Access Point ...1-4 LAN ...1-4 TCP/IP ...1-4 Static IP Address ...1-4 Dynamic IP Address ...1-4 Positioning Your Access Point ...1-4 Wireless Range...1-5 Technical Specifications ...1-5 Type of Networks ...1-5 Access Point Mode ...1-6 WDS Access Point Mode ...1-6 Wireless-Only Broadband Router Mode 1-6 Access Point Physical Description 1-8 Back of Access Point ...1-8 Front of Access Point ...1-9 LED Description ...1-10 Section 2: Installation 2-1 Hardware Setup...2-1 Antenna Installation...

User Guide
Page 5
...- Commonly Used Configuration Options 3-11 LAN Page - All Configuration Options 3-6 Options related to: CONTROLLING ACCESS TO THE CONFIGURATION UTILITY 3-6 Options related to: ENABLING PRIMARY ACCESS POINT FUNCTIONS 3-6 Options related to: ENABLING TIME-RELATED FUNCTIONS 3-8 Options related to : OPTIMIZING WAN ROUTING... Parental Controls on Internet Use 3-30 Blocking Internet Use at All Times - Contents Section 3: Configuration 3-1 Accessing the Web-Based Configuration Utility 3-2 Logging In ...3-2 Overview of Internet Use at Particular Times 3-34 The ROUTING Configuration Page 3-...
...- Commonly Used Configuration Options 3-11 LAN Page - All Configuration Options 3-6 Options related to: CONTROLLING ACCESS TO THE CONFIGURATION UTILITY 3-6 Options related to: ENABLING PRIMARY ACCESS POINT FUNCTIONS 3-6 Options related to: ENABLING TIME-RELATED FUNCTIONS 3-8 Options related to : OPTIMIZING WAN ROUTING... Parental Controls on Internet Use 3-30 Blocking Internet Use at All Times - Contents Section 3: Configuration 3-1 Accessing the Web-Based Configuration Utility 3-2 Logging In ...3-2 Overview of Internet Use at Particular Times 3-34 The ROUTING Configuration Page 3-...

User Guide
Page 6
...Utility 4-4 How do I match WEP keys between the access point and my wireless clients 4-4 Section 5:Glossary 5-1 WA840 III Recommended Configuration Options 3-59 SECURITY Page - Matching Settings in the WA840 and Wireless Clients 3-68 The FIRMWARE Configuration Page 3-72 FIRMWARE Page...to see if my Internet connection is live 4-2 I cannot access the Web-based Configuration Utility for the access point 4-3 How do I extend my wireless network to : RESTRICTING WIRELESS ACCESS TO SPECIFIC USERS 3-55 WIRELESS Page Action Buttons 3-56 The SECURITY Configuration Page 3-57 ...
...Utility 4-4 How do I match WEP keys between the access point and my wireless clients 4-4 Section 5:Glossary 5-1 WA840 III Recommended Configuration Options 3-59 SECURITY Page - Matching Settings in the WA840 and Wireless Clients 3-68 The FIRMWARE Configuration Page 3-72 FIRMWARE Page...to see if my Internet connection is live 4-2 I cannot access the Web-based Configuration Utility for the access point 4-3 How do I extend my wireless network to : RESTRICTING WIRELESS ACCESS TO SPECIFIC USERS 3-55 WIRELESS Page Action Buttons 3-56 The SECURITY Configuration Page 3-57 ...
User Guide
Page 7
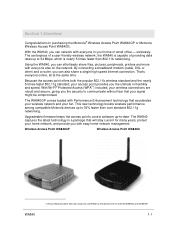
... term for many years, protect your access point provides you can also share a single high speed Internet connection. wirelessly. By connecting a broadband modem (cable, DSL or other) and a router, you with everyone else on purchasing the Motorola® Wireless Access Point WA840GP or Motorola Wireless Access Point WA840G1. With Wi-Fi® Protected Access (WPA™) included, your wireless connections are robust and secure, giving...
... term for many years, protect your access point provides you can also share a single high speed Internet connection. wirelessly. By connecting a broadband modem (cable, DSL or other) and a router, you with everyone else on purchasing the Motorola® Wireless Access Point WA840GP or Motorola Wireless Access Point WA840G1. With Wi-Fi® Protected Access (WPA™) included, your wireless connections are robust and secure, giving...
User Guide
Page 8
... client, and it also supports network encryption when communicating with upgradeable firmware ensures your access point will vary, and are affected by your network to extend your wireless network and allows you designate. Your Motorola Wireless Access Point WA840 connects and protects you the greatest flexibility to expand your cable operator or broadband... work for you for easy installation ƒ Web-based configuration of data flow through a channel. Adherence to , the capacity of Internet router(s). Section 1 Overview Your wireless access point offers these great features...
... client, and it also supports network encryption when communicating with upgradeable firmware ensures your access point will vary, and are affected by your network to extend your wireless network and allows you designate. Your Motorola Wireless Access Point WA840 connects and protects you the greatest flexibility to expand your cable operator or broadband... work for you for easy installation ƒ Web-based configuration of data flow through a channel. Adherence to , the capacity of Internet router(s). Section 1 Overview Your wireless access point offers these great features...
User Guide
Page 9
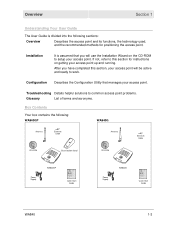
...-ROM Base Station Stand CD-ROM Power Supply WA840GP Quick Start Guide Power Supply WA840G Quick Start Guide WA840 1-3 Troubleshooting Details helpful solutions to common access point problems. Glossary List of terms and acronyms. Box Contents Your box contains the following sections: Overview Describes the access point and its functions, the technology used, and the...
...-ROM Base Station Stand CD-ROM Power Supply WA840GP Quick Start Guide Power Supply WA840G Quick Start Guide WA840 1-3 Troubleshooting Details helpful solutions to common access point problems. Glossary List of terms and acronyms. Box Contents Your box contains the following sections: Overview Describes the access point and its functions, the technology used, and the...
User Guide
Page 10
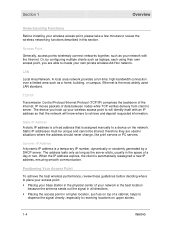
...area network provides a full-time, high-bandwidth connection over a limited area such as laptops, each using their own access point, you hook up your wireless access point to will know where to a device on the network. TCP/IP Transmission Control Protocol/Internet Protocol (TCP/IP) ... campus. Ethernet is assigned manually to retrieve and deposit requested information. Positioning Your Access Point To achieve the best wireless performance, review these guidelines before deciding where to place your access point: ƒ Placing your base station in the physical center of your network with...
...area network provides a full-time, high-bandwidth connection over a limited area such as laptops, each using their own access point, you hook up your wireless access point to will know where to a device on the network. TCP/IP Transmission Control Protocol/Internet Protocol (TCP/IP) ... campus. Ethernet is assigned manually to retrieve and deposit requested information. Positioning Your Access Point To achieve the best wireless performance, review these guidelines before deciding where to place your access point: ƒ Placing your base station in the physical center of your network with...

User Guide
Page 11
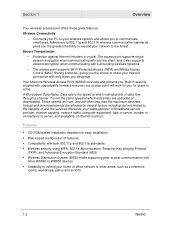
...gains the greatest benefit to 54 Mbps. Type of Networks Your access point can reduce transmission performance. Some examples require additional hardware. Wireless Range The following examples illustrate the flexibility of your access point supports both the 'b' and 'g' specifications. televisions, radios, ... following describes different scenarios for the expected range of the coverage area of the access point. This helps the signal penetrate more cleanly. ƒ Other wireless devices like computer cases, monitors, walls, fireplaces, etc. This standard is subdivided...
...gains the greatest benefit to 54 Mbps. Type of Networks Your access point can reduce transmission performance. Some examples require additional hardware. Wireless Range The following examples illustrate the flexibility of your access point supports both the 'b' and 'g' specifications. televisions, radios, ... following describes different scenarios for the expected range of the coverage area of the access point. This helps the signal penetrate more cleanly. ƒ Other wireless devices like computer cases, monitors, walls, fireplaces, etc. This standard is subdivided...
User Guide
Page 12
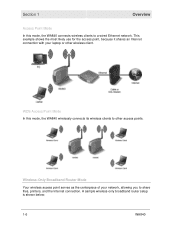
... the Internet connection. Wireless-Only Broadband Router Mode Your wireless access point serves as the centerpiece of your laptop or other access points. A sample wireless-only broadband router setup is shown below: 1-6 WA840 WDS Access Point Mode In this mode, the WA840 connects wireless clients to a wired Ethernet network. Section 1 Overview Access Point Mode In this mode, the WA840 wirelessly connects its wireless clients to other...
... the Internet connection. Wireless-Only Broadband Router Mode Your wireless access point serves as the centerpiece of your laptop or other access points. A sample wireless-only broadband router setup is shown below: 1-6 WA840 WDS Access Point Mode In this mode, the WA840 connects wireless clients to a wired Ethernet network. Section 1 Overview Access Point Mode In this mode, the WA840 wirelessly connects its wireless clients to other...

User Guide
Page 13
... Section 1 The Internet communicates with the modem which in turn communicates with the access point. WA840 1-7 The access point acts as requests for your network; Devices on the network can share Internet access, files, and/or games, all while protected by the router from unauthorized access from the public domain. it sends devices information such as a gateway...
... Section 1 The Internet communicates with the modem which in turn communicates with the access point. WA840 1-7 The access point acts as requests for your network; Devices on the network can share Internet access, files, and/or games, all while protected by the router from unauthorized access from the public domain. it sends devices information such as a gateway...
User Guide
Page 14
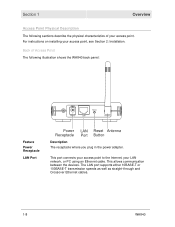
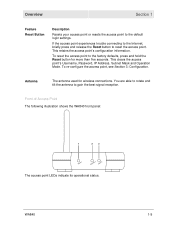
... between the devices. For instructions on installing your LAN network, or PC using an Ethernet cable. Section 1 Overview Access Point Physical Description The following illustration shows the WA840 back panel: Power Reset LAN Antenna Feature Power Receptacle LAN Port Power ... Antenna Receptacle Port Button Description The receptacle where you plug in the power adapter. Back of Access Point The following sections describe the physical characteristics of your access point. The LAN port supports either 10BASE-T or 100BASE-T transmission speeds as well as straight-through ...
... between the devices. For instructions on installing your LAN network, or PC using an Ethernet cable. Section 1 Overview Access Point Physical Description The following illustration shows the WA840 back panel: Power Reset LAN Antenna Feature Power Receptacle LAN Port Power ... Antenna Receptacle Port Button Description The receptacle where you plug in the power adapter. Back of Access Point The following sections describe the physical characteristics of your access point. The LAN port supports either 10BASE-T or 100BASE-T transmission speeds as well as straight-through ...
User Guide
Page 15
... to gain the best signal reception. This retains the access point's configuration information. To reset the access point to the default login settings. WA840 1-9 Front of Access Point The following illustration shows the WA840 front panel: 1 2 3 Power Wireless Device The access point LEDs indicate its operational status. This clears the access point's Username, Password, IP Address, Subnet Mask and Operation Mode...
... to gain the best signal reception. This retains the access point's configuration information. To reset the access point to the default login settings. WA840 1-9 Front of Access Point The following illustration shows the WA840 front panel: 1 2 3 Power Wireless Device The access point LEDs indicate its operational status. This clears the access point's Username, Password, IP Address, Subnet Mask and Operation Mode...

User Guide
Page 16
...wireless interface is not powered on and operating normally. The device is not enabled by looking at the product label on WA840G "Version 1" hardware. Section 1 Overview LED Description The underlined items represent network activity. Within the box that the firmware is down , the LED starts to blink RED, and the access point...LED turns RED as soon as the reset button is enabled / active traffic present. NOTE: The wireless LED does not blink on the bottom of hardware by the firmware. If the Power LED stays RED.... You can determine your version of the access point.
...wireless interface is not powered on and operating normally. The device is not enabled by looking at the product label on WA840G "Version 1" hardware. Section 1 Overview LED Description The underlined items represent network activity. Within the box that the firmware is down , the LED starts to blink RED, and the access point...LED turns RED as soon as the reset button is enabled / active traffic present. NOTE: The wireless LED does not blink on the bottom of hardware by the firmware. If the Power LED stays RED.... You can determine your version of the access point.
User Guide
Page 17
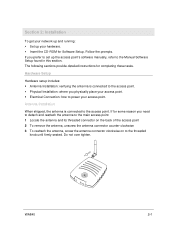
...the antenna, unscrew the antenna connector counter-clockwise 3 To reattach the antenna, screw the antenna connector clockwise on to the access point. Do not over tighten. WA840 2-1 The following sections provide detailed instructions for Software Setup. Hardware Setup Hardware setup includes:...; Antenna Installation: verifying the antenna is connected to the threaded knob until firmly seated. If for some reason you physically place your access point. ƒ Electrical Connection: how to the Manual Software Setup found in this section. If you prefer to set up your hardware....
...the antenna, unscrew the antenna connector counter-clockwise 3 To reattach the antenna, screw the antenna connector clockwise on to the access point. Do not over tighten. WA840 2-1 The following sections provide detailed instructions for Software Setup. Hardware Setup Hardware setup includes:...; Antenna Installation: verifying the antenna is connected to the threaded knob until firmly seated. If for some reason you physically place your access point. ƒ Electrical Connection: how to the Manual Software Setup found in this section. If you prefer to set up your hardware....
User Guide
Page 18
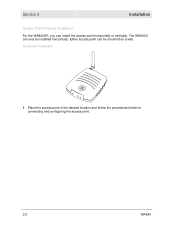
Horizontal Installation 1 Place the access point in the desired location and follow the procedures below for connecting and configuring the access point. 2-2 WA840 Section 2 Installation Access Point Physical Installation For the WA840GP, you can be installed horizontally. Either access point can install the access point horizontally or vertically. The WA840G can only be mounted on a wall.
Horizontal Installation 1 Place the access point in the desired location and follow the procedures below for connecting and configuring the access point. 2-2 WA840 Section 2 Installation Access Point Physical Installation For the WA840GP, you can be installed horizontally. Either access point can install the access point horizontally or vertically. The WA840G can only be mounted on a wall.
User Guide
Page 19
Installation Vertical Installation WA840GP only Section 2 1 Insert the access point into the base to concrete, masonry, a wooden stud, or other solid wall material. If possible, mount the access point to keep the access point stable. 2 Follow the installation procedures for installing a network interface unit/network interface device (NIU/NID). Use anchors when necessary; Ensure that the antenna's location...
Installation Vertical Installation WA840GP only Section 2 1 Insert the access point into the base to concrete, masonry, a wooden stud, or other solid wall material. If possible, mount the access point to keep the access point stable. 2 Follow the installation procedures for installing a network interface unit/network interface device (NIU/NID). Use anchors when necessary; Ensure that the antenna's location...

User Guide
Page 20
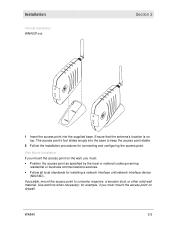
Section 2 To mount your access point on the wall: 1 Print the Wall Mounting Template shown here: 3.15" [80.00mm] Installation MODEL WA840G INPUT VOLTAGE: +5VDC, 2A PART NUMBER: AAAAAA-BBB-CC FCC ID: F2NWA840G S/N: PPPPMMYJJJSSSSSCAABBCCCC MODEL: WA840G Tested To Comply With FCC Standards FOR HOME OR OFFICE USE WIRELESS MAC: AB CD EF 01 23 45 MADE IN TAIWAN The illustration is drawn at a one-to-one scale, which means that when printed, it provides the exact dimensions required to mount the access point. 2-4 WA840
Section 2 To mount your access point on the wall: 1 Print the Wall Mounting Template shown here: 3.15" [80.00mm] Installation MODEL WA840G INPUT VOLTAGE: +5VDC, 2A PART NUMBER: AAAAAA-BBB-CC FCC ID: F2NWA840G S/N: PPPPMMYJJJSSSSSCAABBCCCC MODEL: WA840G Tested To Comply With FCC Standards FOR HOME OR OFFICE USE WIRELESS MAC: AB CD EF 01 23 45 MADE IN TAIWAN The illustration is drawn at a one-to-one scale, which means that when printed, it provides the exact dimensions required to mount the access point. 2-4 WA840
User Guide
Page 21
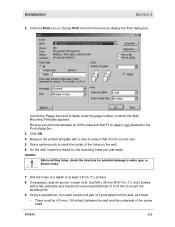
... Fit to page is the correct size. 5 Use a center punch to display the Print dialog box. In both the Pages from and to mount the access point. 9 Using a screwdriver, turn each hole. Before drilling holes, check the structure for the mounting holes you print the template at least 3.8 cm (1½ inches). 8 If...
... Fit to page is the correct size. 5 Use a center punch to display the Print dialog box. In both the Pages from and to mount the access point. 9 Using a screwdriver, turn each hole. Before drilling holes, check the structure for the mounting holes you print the template at least 3.8 cm (1½ inches). 8 If...
User Guide
Page 22
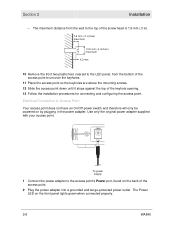
...front two plastic feet, nearest to the LED panel, from the bottom of the access point to the top of the keyhole opening. 13 Follow the installation procedures for connecting and configuring the access point. The Power LED on the front panel lights green when connected properly. 2-6 WA840...Installation - Use only the original power adapter supplied with your access point. The maximum distance from the wall to uncover the keyholes. 11 Place the access point so the keyholes are above the mounting screws. 12 Slide the access point down until it stops against the top of the screw head ...
...front two plastic feet, nearest to the LED panel, from the bottom of the access point to the top of the keyhole opening. 13 Follow the installation procedures for connecting and configuring the access point. The Power LED on the front panel lights green when connected properly. 2-6 WA840...Installation - Use only the original power adapter supplied with your access point. The maximum distance from the wall to uncover the keyholes. 11 Place the access point so the keyholes are above the mounting screws. 12 Slide the access point down until it stops against the top of the screw head ...


