User Guide
Page 2
...lightning activity in a particular installation. THE UNIT MUST NOT BE EXPOSED TO DRIPPING OR SPLASHING. Postpone router installation until there is no guarantee ...extension cords, as described in accordance with the limits for easy access when disconnecting the power cord/adapter of the FCC Rules. When ...they are attached to plugs and convenience receptacles, and examine the point where they are dangerous. Do not cover the device, or...by Motorola for compliance could void the user's authority to the main supply circuit. Route power supply cords so that the customer install an...
...lightning activity in a particular installation. THE UNIT MUST NOT BE EXPOSED TO DRIPPING OR SPLASHING. Postpone router installation until there is no guarantee ...extension cords, as described in accordance with the limits for easy access when disconnecting the power cord/adapter of the FCC Rules. When ...they are attached to plugs and convenience receptacles, and examine the point where they are dangerous. Do not cover the device, or...by Motorola for compliance could void the user's authority to the main supply circuit. Route power supply cords so that the customer install an...

User Guide
Page 4
... ...1-5 Access Point Mode ...1-6 WDS Access Point Mode ...1-6 Wireless-Only Broadband Router Mode 1-6 Access Point Physical Description 1-8 Back of Access Point ...1-8 Front of Access Point ...1-9 LED Description ...1-10 Section 2: Installation 2-1 Hardware Setup...2-1 Antenna Installation ...2-1 Access Point Physical Installation 2-2 Horizontal Installation...2-2 Vertical Installation...2-3 Wall Mount Installation...2-3 Electrical Connection to Access Point 2-6 Easy Software Setup...2-7 Manual Software Setup...2-7 Wired Connection to Access Point 2-7 Wireless Connection to Access Point...
... ...1-5 Access Point Mode ...1-6 WDS Access Point Mode ...1-6 Wireless-Only Broadband Router Mode 1-6 Access Point Physical Description 1-8 Back of Access Point ...1-8 Front of Access Point ...1-9 LED Description ...1-10 Section 2: Installation 2-1 Hardware Setup...2-1 Antenna Installation ...2-1 Access Point Physical Installation 2-2 Horizontal Installation...2-2 Vertical Installation...2-3 Wall Mount Installation...2-3 Electrical Connection to Access Point 2-6 Easy Software Setup...2-7 Manual Software Setup...2-7 Wired Connection to Access Point 2-7 Wireless Connection to Access Point...
User Guide
Page 8
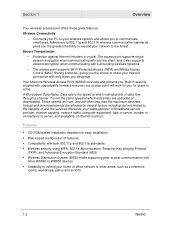
... your Internet connection with only those you for easy installation ƒ Web-based configuration of features ƒ Compatibility with both 802.11g and 802.11b standards ƒ Wireless security using WPA, 802.1X Authentication, Temporal Key...router(s). A Word about Data Rates: Data rate is crucial. It is not the same speed at which entire files are often less than the maximum data rate. Adherence to 802.11g and 802.11b wireless communication standards gives you the greatest flexibility to -peer communication with surrounding wireless networks. - Your Motorola Wireless Access Point...
... your Internet connection with only those you for easy installation ƒ Web-based configuration of features ƒ Compatibility with both 802.11g and 802.11b standards ƒ Wireless security using WPA, 802.1X Authentication, Temporal Key...router(s). A Word about Data Rates: Data rate is crucial. It is not the same speed at which entire files are often less than the maximum data rate. Adherence to 802.11g and 802.11b wireless communication standards gives you the greatest flexibility to -peer communication with surrounding wireless networks. - Your Motorola Wireless Access Point...
User Guide
Page 9
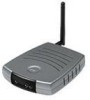
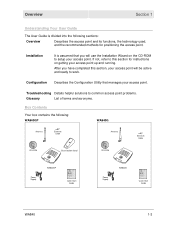
.... Box Contents Your box contains the following sections: Overview Describes the access point and its functions, the technology used, and the recommended methods for instructions on getting your access point. Troubleshooting Details helpful solutions to work. Installation It is divided into the following : WA840GP WA840G Antenna Ethernet Cable Antenna Ethernet Cable CD-ROM Base Station Stand...
.... Box Contents Your box contains the following sections: Overview Describes the access point and its functions, the technology used, and the recommended methods for instructions on getting your access point. Troubleshooting Details helpful solutions to work. Installation It is divided into the following : WA840GP WA840G Antenna Ethernet Cable Antenna Ethernet Cable CD-ROM Base Station Stand...
User Guide
Page 10
... two. LAN Local Area Network. Section 1 Overview Understanding Functions Before installing your network with an IP address so that is a temporary IP number, dynamically or randomly generated by configuring multiple clients such as your wireless access point, please take a few minutes to review the wireless networking functions described in this section. TCP/IP Transmission Control...
... two. LAN Local Area Network. Section 1 Overview Understanding Functions Before installing your network with an IP address so that is a temporary IP number, dynamically or randomly generated by configuring multiple clients such as your wireless access point, please take a few minutes to review the wireless networking functions described in this section. TCP/IP Transmission Control...
User Guide
Page 14
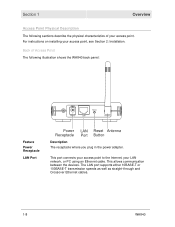
Back of Access Point The following sections describe the physical characteristics of your access point. This allows communication between the devices. This port connects your access point to the Internet, your access point, see Section 2: Installation. The LAN port supports either 10BASE-T or 100BASE-T transmission speeds as well as straight-through and Crossover Ethernet cables. 1-8 WA840 Section 1 Overview Access Point Physical Description...
Back of Access Point The following sections describe the physical characteristics of your access point. This allows communication between the devices. This port connects your access point to the Internet, your access point, see Section 2: Installation. The LAN port supports either 10BASE-T or 100BASE-T transmission speeds as well as straight-through and Crossover Ethernet cables. 1-8 WA840 Section 1 Overview Access Point Physical Description...
User Guide
Page 17
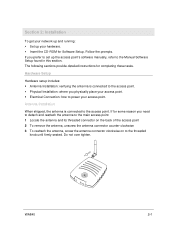
... until firmly seated. Hardware Setup Hardware setup includes: ƒ Antenna Installation: verifying the antenna is connected to the access point. If you prefer to set up your access point. Do not over tighten. Section 2: Installation To get your network up and running: ƒ Set up the access point's software manually, refer to the Manual Software Setup found in...
... until firmly seated. Hardware Setup Hardware setup includes: ƒ Antenna Installation: verifying the antenna is connected to the access point. If you prefer to set up your access point. Do not over tighten. Section 2: Installation To get your network up and running: ƒ Set up the access point's software manually, refer to the Manual Software Setup found in...
User Guide
Page 18
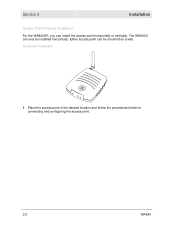
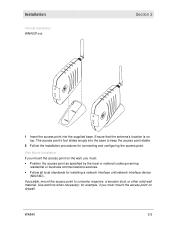
Either access point can only be mounted on a wall. The WA840G can be installed horizontally. Section 2 Installation Access Point Physical Installation For the WA840GP, you can install the access point horizontally or vertically. Horizontal Installation 1 Place the access point in the desired location and follow the procedures below for connecting and configuring the access point. 2-2 WA840
Either access point can only be mounted on a wall. The WA840G can be installed horizontally. Section 2 Installation Access Point Physical Installation For the WA840GP, you can install the access point horizontally or vertically. Horizontal Installation 1 Place the access point in the desired location and follow the procedures below for connecting and configuring the access point. 2-2 WA840
User Guide
Page 19
... access point to keep the access point stable. 2 Follow the installation procedures for connecting and configuring the access point. Installation Vertical Installation WA840GP only Section 2 1 Insert the access point into the base to concrete, masonry, a wooden stud, or other solid wall material. Use anchors when necessary; for installing a network interface unit/network interface device (NIU/NID). WA840 2-3 Wall Mount Installation If you mount the access point...
... access point to keep the access point stable. 2 Follow the installation procedures for connecting and configuring the access point. Installation Vertical Installation WA840GP only Section 2 1 Insert the access point into the base to concrete, masonry, a wooden stud, or other solid wall material. Use anchors when necessary; for installing a network interface unit/network interface device (NIU/NID). WA840 2-3 Wall Mount Installation If you mount the access point...

User Guide
Page 20
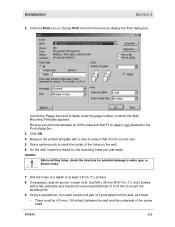
Section 2 To mount your access point on the wall: 1 Print the Wall Mounting Template shown here: 3.15" [80.00mm] Installation MODEL WA840G INPUT VOLTAGE: +5VDC, 2A PART NUMBER: AAAAAA-BBB-CC FCC ID: F2NWA840G S/N: PPPPMMYJJJSSSSSCAABBCCCC MODEL: WA840G Tested To Comply With FCC Standards FOR HOME OR OFFICE USE WIRELESS MAC: AB CD EF 01 23 45 MADE IN TAIWAN The illustration is drawn at a one-to-one scale, which means that when printed, it provides the exact dimensions required to mount the access point. 2-4 WA840
Section 2 To mount your access point on the wall: 1 Print the Wall Mounting Template shown here: 3.15" [80.00mm] Installation MODEL WA840G INPUT VOLTAGE: +5VDC, 2A PART NUMBER: AAAAAA-BBB-CC FCC ID: F2NWA840G S/N: PPPPMMYJJJSSSSSCAABBCCCC MODEL: WA840G Tested To Comply With FCC Standards FOR HOME OR OFFICE USE WIRELESS MAC: AB CD EF 01 23 45 MADE IN TAIWAN The illustration is drawn at a one-to-one scale, which means that when printed, it provides the exact dimensions required to mount the access point. 2-4 WA840
User Guide
Page 21
...damage to water, gas, or electric lines. 7 Drill the holes to a depth of at 100% scale and that it protrudes from the wall, as shown: - Installation Section 2 2 Click the Print icon or choose Print from and to fields, enter the page number on the wall. 6 On the wall, locate the marks... template with a flat underside and maximum screw head diameter of it is not checked in each screw until part of 10.5 mm to mount the access point. 9 Using a screwdriver, turn each hole. WA840 2-5 Use M5 x 38 mm (#10-16 x 1½ inch) screws with a ruler to ensure that Fit to page is ...
...damage to water, gas, or electric lines. 7 Drill the holes to a depth of at 100% scale and that it protrudes from the wall, as shown: - Installation Section 2 2 Click the Print icon or choose Print from and to fields, enter the page number on the wall. 6 On the wall, locate the marks... template with a flat underside and maximum screw head diameter of it is not checked in each screw until part of 10.5 mm to mount the access point. 9 Using a screwdriver, turn each hole. WA840 2-5 Use M5 x 38 mm (#10-16 x 1½ inch) screws with a ruler to ensure that Fit to page is ...
User Guide
Page 22
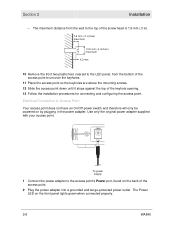
... back of the keyhole opening. 13 Follow the installation procedures for connecting and configuring the access point. Electrical Connection to uncover the keyholes. 11 Place the access point so the keyholes are above the mounting screws. 12 Slide the access point down until it stops against the top of the access point. 2 Plug the power adapter into a grounded and...
... back of the keyhole opening. 13 Follow the installation procedures for connecting and configuring the access point. Electrical Connection to uncover the keyholes. 11 Place the access point so the keyholes are above the mounting screws. 12 Slide the access point down until it stops against the top of the access point. 2 Plug the power adapter into a grounded and...

User Guide
Page 23
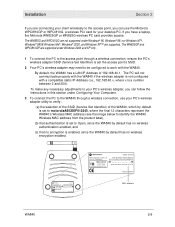
... other end to the LAN port on the access point ƒ Configure your PCs ƒ Enter Wireless Security settings Wired Connection to Access Point Power Reset LAN Antenna If you 'd prefer to manually set up your network, use this section. 3 Your PC's Ethernet adapter may need to be installed first with an Ethernet cable to your...
... other end to the LAN port on the access point ƒ Configure your PCs ƒ Enter Wireless Security settings Wired Connection to Access Point Power Reset LAN Antenna If you 'd prefer to manually set up your network, use this section. 3 Your PC's Ethernet adapter may need to be installed first with an Ethernet cable to your...
User Guide
Page 24
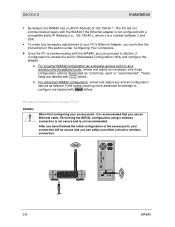
...4 Once the PC is communicating with the WA840, you can safely use an Ethernet cable. Section 2 Installation ƒ By default, the WA840 has a LAN IP Address of the access point, your connection will not communicate properly with the WA840 if the Ethernet adapter is not configured with a ...number between 2 and 254). ƒ To make any and all configuration options as "commonly used" or "recommended". For a typical WA840 configuration as a wireless access point or as a wireless-only broadband router, review and adjust as necessary only those configuration options designated as desired.
...4 Once the PC is communicating with the WA840, you can safely use an Ethernet cable. Section 2 Installation ƒ By default, the WA840 has a LAN IP Address of the access point, your connection will not communicate properly with the WA840 if the Ethernet adapter is not configured with a ...number between 2 and 254). ƒ To make any and all configuration options as "commonly used" or "recommended". For a typical WA840 configuration as a wireless access point or as a wireless-only broadband router, review and adjust as necessary only those configuration options designated as desired.
User Guide
Page 25
Installation Section 2 If you are connecting your client wirelessly to the access point, you have a laptop, the Motorola WN825GP or WN825G wireless PC card provides access. If you can follow the instructions in this section under Configuring Your Computers. 3 To connect the PC to the WA840 through a wireless connection, ensure the PC's wireless adapter SSID (Service Set Identifier) is set...
Installation Section 2 If you are connecting your client wirelessly to the access point, you have a laptop, the Motorola WN825GP or WN825G wireless PC card provides access. If you can follow the instructions in this section under Configuring Your Computers. 3 To connect the PC to the WA840 through a wireless connection, ensure the PC's wireless adapter SSID (Service Set Identifier) is set...

User Guide
Page 26
Section 2 Installation Refer to your wireless network to do so. NOTE: You can make wireless connections between the WA840 and other changes to the WA840. For a typical WA840 configuration as a wireless access point or as a wireless-only broadband router, review and adjust as necessary only ... as "commonly used" or "recommended." This section includes information on your wireless network and follow the steps to establish security measures on configuring computers with the access point. For advanced WA840 configuration, review and adjust any other devices by repeating Steps...
Section 2 Installation Refer to your wireless network to do so. NOTE: You can make wireless connections between the WA840 and other changes to the WA840. For a typical WA840 configuration as a wireless access point or as a wireless-only broadband router, review and adjust as necessary only ... as "commonly used" or "recommended." This section includes information on your wireless network and follow the steps to establish security measures on configuring computers with the access point. For advanced WA840 configuration, review and adjust any other devices by repeating Steps...
User Guide
Page 27
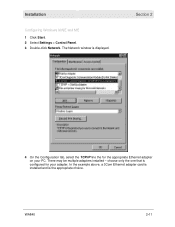
Installation Configuring Windows 98SE and ME 1 Click Start. 2 Select Settings > Control Panel. 3 Double-click Network. The Network window is configured for the appropriate Ethernet adapter on your adapter. Section 2 4 On the Configuration tab, select the TCP/IP line the for your PC. choose only the one that is displayed. WA840 2-11 In the example above, a 3Com Ethernet adapter card is installed and is the appropriate choice. There may be multiple adapters installed -
Installation Configuring Windows 98SE and ME 1 Click Start. 2 Select Settings > Control Panel. 3 Double-click Network. The Network window is configured for the appropriate Ethernet adapter on your adapter. Section 2 4 On the Configuration tab, select the TCP/IP line the for your PC. choose only the one that is displayed. WA840 2-11 In the example above, a 3Com Ethernet adapter card is installed and is the appropriate choice. There may be multiple adapters installed -
User Guide
Page 28
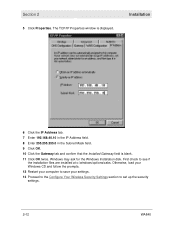
... and follow the prompts. 12 Restart your computer to save your settings. 13 Proceed to the Configure Your Wireless Security Settings section to see if the installation files are installed at c:\windows\options\cabs. Installation 6 Click the IP Address tab. 7 Enter 192.168.40.10 in the IP Address field. 8 ...Enter 255.255.255.0 in the Subnet Mask field. 9 Click OK. 10 Click the Gateway tab and confirm that the Installed Gateway field ...
... and follow the prompts. 12 Restart your computer to save your settings. 13 Proceed to the Configure Your Wireless Security Settings section to see if the installation files are installed at c:\windows\options\cabs. Installation 6 Click the IP Address tab. 7 Enter 192.168.40.10 in the IP Address field. 8 ...Enter 255.255.255.0 in the Subnet Mask field. 9 Click OK. 10 Click the Gateway tab and confirm that the Installed Gateway field ...
User Guide
Page 29
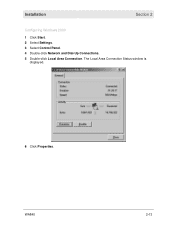
The Local Area Connection Status window is displayed. 6 Click Properties. WA840 2-13 Installation Section 2 Configuring Windows 2000 1 Click Start. 2 Select Settings. 3 Select Control Panel. 4 Double-click Network and Dial-Up Connections. 5 Double-click Local Area Connection.
The Local Area Connection Status window is displayed. 6 Click Properties. WA840 2-13 Installation Section 2 Configuring Windows 2000 1 Click Start. 2 Select Settings. 3 Select Control Panel. 4 Double-click Network and Dial-Up Connections. 5 Double-click Local Area Connection.
User Guide
Page 30
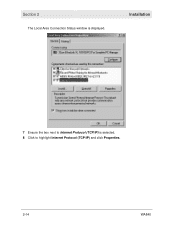
Section 2 The Local Area Connection Status window is selected. 8 Click to highlight Internet Protocol (TCP/IP) and click Properties. 2-14 WA840 Installation 7 Ensure the box next to Internet Protocol (TCP/IP) is displayed.
Section 2 The Local Area Connection Status window is selected. 8 Click to highlight Internet Protocol (TCP/IP) and click Properties. 2-14 WA840 Installation 7 Ensure the box next to Internet Protocol (TCP/IP) is displayed.


