
User Manual
Page 5
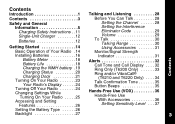
... Talking Range 30 Using Accessories 31 Basic Operation of Your Radio .14 Monitor/Signal Strength Installing Batteries 16 Indicator 31 Contents Battery Meter 18 Battery Life 18 Charging the NiMH battery .19 Charging Status 20 Charging Dock 21 Turning On Your Radio 23 Your Radio's Display . . . . . .24 Turning Off Your Radio 24 Changing Settings While Turning On Your...
... Talking Range 30 Using Accessories 31 Basic Operation of Your Radio .14 Monitor/Signal Strength Installing Batteries 16 Indicator 31 Contents Battery Meter 18 Battery Life 18 Charging the NiMH battery .19 Charging Status 20 Charging Dock 21 Turning On Your Radio 23 Your Radio's Display . . . . . .24 Turning Off Your Radio 24 Changing Settings While Turning On Your...

User Manual
Page 12
... with great force and cause serious injury to occupants of the vehicle. If a portable radio is a radio type especially qualified for use in the air bag deployment area and the air bag inflates, the radio may be advised to above include fueling areas such as below decks on boats, fuel ... the area over an air bag or in areas posted: "Turn off your radio prior to entering any other area where you are often but not always posted. Do not remove, install, or charge batteries in bodily injury or even death. Sparks in a potentially explosive atmosphere can cause an explosion...
... with great force and cause serious injury to occupants of the vehicle. If a portable radio is a radio type especially qualified for use in the air bag deployment area and the air bag inflates, the radio may be advised to above include fueling areas such as below decks on boats, fuel ... the area over an air bag or in areas posted: "Turn off your radio prior to entering any other area where you are often but not always posted. Do not remove, install, or charge batteries in bodily injury or even death. Sparks in a potentially explosive atmosphere can cause an explosion...
User Manual
Page 13
...radio that has a damaged antenna. battery 2. radio using the battery charger, read all instructions and cautionary markings on the: 1. Caution: To reduce the risk of batteries may complete an electrical circuit (short circuit) and become quite hot. Safety and General Information Operational Cautions Antennas Do not use any charged battery... burns if a conductive material such as jewelry, keys, or beaded chains touch exposed terminals. battery charger, and 3. Batteries All batteries can result. The conductive material may burst, causing personal injury and damage. 11 If a ...
...radio that has a damaged antenna. battery 2. radio using the battery charger, read all instructions and cautionary markings on the: 1. Caution: To reduce the risk of batteries may complete an electrical circuit (short circuit) and become quite hot. Safety and General Information Operational Cautions Antennas Do not use any charged battery... burns if a conductive material such as jewelry, keys, or beaded chains touch exposed terminals. battery charger, and 3. Batteries All batteries can result. The conductive material may burst, causing personal injury and damage. 11 If a ...

User Manual
Page 14
... the AC cord or plug provided with the unit. hour mAH Description Composition NTN9395 550 mAH T6000-Series NiMH Save these Instructions 1. NiMH Charging Adapter Batteries Safety and General Information Kit Number Capacity in a risk of damage to rain or snow. 2.
... the AC cord or plug provided with the unit. hour mAH Description Composition NTN9395 550 mAH T6000-Series NiMH Save these Instructions 1. NiMH Charging Adapter Batteries Safety and General Information Kit Number Capacity in a risk of damage to rain or snow. 2.

User Manual
Page 17
NiMH Battery Charging Contacts When using audio accessories, ensure that they are plugged in before you turn on your radio under all circumstances. Note: The belt clip holds the radio while being worn on the radio. * * Motorola recommends that the volume level be kept at a comfortable listening level when ... and is more appropriate to secure the radio. For high activity environments, an accessory carry case is not meant to attach or detach the clip from Motorola. 15 It was designed for other cool stuff available from the radio. Getting Started Belt Clip - Squeeze the...
NiMH Battery Charging Contacts When using audio accessories, ensure that they are plugged in before you turn on your radio under all circumstances. Note: The belt clip holds the radio while being worn on the radio. * * Motorola recommends that the volume level be kept at a comfortable listening level when ... and is more appropriate to secure the radio. For high activity environments, an accessory carry case is not meant to attach or detach the clip from Motorola. 15 It was designed for other cool stuff available from the radio. Getting Started Belt Clip - Squeeze the...

User Manual
Page 18
Latch 16 Call 1-800-353-2729 (U.S.A.) or 1-800-461-4575 (Canada) for the dealer nearest you don't have these items, they're also available in the NiMH battery upgrade kit (56319). If you . • Turn off the radio by pressing and holding P. • Push latch up until it clicks. • Lift back cover off. Getting Started Installing Batteries Your radio uses three AA batteries or a rechargeable Nickel-Metal Hydride (NiMH) battery. Some radio packages include a NiMH battery with charger adapter cover, charging dock, and charger.
Latch 16 Call 1-800-353-2729 (U.S.A.) or 1-800-461-4575 (Canada) for the dealer nearest you don't have these items, they're also available in the NiMH battery upgrade kit (56319). If you . • Turn off the radio by pressing and holding P. • Push latch up until it clicks. • Lift back cover off. Getting Started Installing Batteries Your radio uses three AA batteries or a rechargeable Nickel-Metal Hydride (NiMH) battery. Some radio packages include a NiMH battery with charger adapter cover, charging dock, and charger.

User Manual
Page 19
Getting Started • Remove and replace batteries so the • Hook back cover on the hinges. + marking matches the one in the compartment or the NiMH charge contacts are facing out toward the battery door. • Close the battery door, pressing lightly until the latch clicks and returns to its original position. 17
Getting Started • Remove and replace batteries so the • Hook back cover on the hinges. + marking matches the one in the compartment or the NiMH charge contacts are facing out toward the battery door. • Close the battery door, pressing lightly until the latch clicks and returns to its original position. 17
User Manual
Page 20
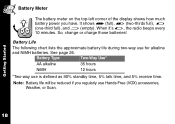
...* AA alkaline 35 hours NiMH 12 hours *Two-way use for alkaline and NiMH batteries. Getting Started Battery Meter The battery meter on the top-left corner of the display shows how much battery power you regularly use Hands-Free (VOX) accessories, Weather, or Scan. 18 So..., change or charge those batteries! When it's c, the radio beeps every 10 minutes. See page 26. It shows d (full), b ...
...* AA alkaline 35 hours NiMH 12 hours *Two-way use for alkaline and NiMH batteries. Getting Started Battery Meter The battery meter on the top-left corner of the display shows how much battery power you regularly use Hands-Free (VOX) accessories, Weather, or Scan. 18 So..., change or charge those batteries! When it's c, the radio beeps every 10 minutes. See page 26. It shows d (full), b ...
User Manual
Page 21
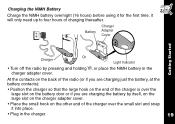
Battery Charger Adapter Cover Getting Started Charger Or Light Indicator • Turn off the radio by itself, on the large slot on the charger adapter cover. • Place the small hook on the other end of the charger over the ... need up to four hours of the radio (or if you are charging just the battery, at the battery contacts): • Position the charger so that the large hook on the battery door or if you are charging the battery by pressing and holding P, or place the NiMH battery in the charger. 19 Charging the NiMH...
Battery Charger Adapter Cover Getting Started Charger Or Light Indicator • Turn off the radio by itself, on the large slot on the charger adapter cover. • Place the small hook on the other end of the charger over the ... need up to four hours of the radio (or if you are charging just the battery, at the battery contacts): • Position the charger so that the large hook on the battery door or if you are charging the battery by pressing and holding P, or place the NiMH battery in the charger. 19 Charging the NiMH...
User Manual
Page 22
... itself, remove the charger from the charger adapter 20 cover before inserting and/or removing the battery from the charger adapter cover. If flashing red persists for charging; Battery waiting to 104o F Note: When moving between 5o to 40o C or 41o to charge. Light Indicator Color Charging...Charging Level Complete Solid Red Flashing Green Solid Green Rapid charging Top-off charging Charging complete Up to 90% 90% to the radio, the NiMH battery, or the charging dock. Getting Started Charging Status The Light Indicator shows the charging status when the charger is faulty and ...
... itself, remove the charger from the charger adapter 20 cover before inserting and/or removing the battery from the charger adapter cover. If flashing red persists for charging; Battery waiting to 104o F Note: When moving between 5o to 40o C or 41o to charge. Light Indicator Color Charging...Charging Level Complete Solid Red Flashing Green Solid Green Rapid charging Top-off charging Charging complete Up to 90% 90% to the radio, the NiMH battery, or the charging dock. Getting Started Charging Status The Light Indicator shows the charging status when the charger is faulty and ...
User Manual
Page 24
Getting Started • Position the charger with the hook on the light indicator end over the left slot. • Snap the hook on the cord end into the charging dock until you hear a click. • When the light indicator turns solid green, the battery is fully charged. 22 Charging Dock Light Indicator Charger • Place the radio, or the NiMH battery in the charger adapter cover, into the right slot, clamping the charger onto the charging dock contacts. • Plug in the charger.
Getting Started • Position the charger with the hook on the light indicator end over the left slot. • Snap the hook on the cord end into the charging dock until you hear a click. • When the light indicator turns solid green, the battery is fully charged. 22 Charging Dock Light Indicator Charger • Place the radio, or the NiMH battery in the charger adapter cover, into the right slot, clamping the charger onto the charging dock contacts. • Plug in the charger.

User Manual
Page 26
Getting Started Your Radio's Display Lock Set Battery Meter Channel Scan On QuieT6000™ Eavesdrop Reducer VibraCall® Alert On Interference Eliminator Code Automatic Power Off Hands-free Use with Accessories (VOX) Volume Control Signal Strength Indicator Transmit Call Tone\ Call Tone Received Channel Indicator Ring Alert On Weather On Turning Off Your Radio To turn off your radio press and hold P for one second. The radio beeps and the display goes blank. 24
Getting Started Your Radio's Display Lock Set Battery Meter Channel Scan On QuieT6000™ Eavesdrop Reducer VibraCall® Alert On Interference Eliminator Code Automatic Power Off Hands-free Use with Accessories (VOX) Volume Control Signal Strength Indicator Transmit Call Tone\ Call Tone Received Channel Indicator Ring Alert On Weather On Turning Off Your Radio To turn off your radio press and hold P for one second. The radio beeps and the display goes blank. 24

User Manual
Page 28
... press M or wait ten seconds (60 seconds for either alkaline or rechargeable batteries. All the features that work using the same basic key sequence! Setting the Battery Type This feature allows the battery meter to recognize and properly display the power usage for Simple Menu mode) to... select options and set . 26 Either A (Alkaline) or n (NiMH or NiCad rechargeable) is done using this key sequence are described on the following pages. Use your radio's ...
... press M or wait ten seconds (60 seconds for either alkaline or rechargeable batteries. All the features that work using the same basic key sequence! Setting the Battery Type This feature allows the battery meter to recognize and properly display the power usage for Simple Menu mode) to... select options and set . 26 Either A (Alkaline) or n (NiMH or NiCad rechargeable) is done using this key sequence are described on the following pages. Use your radio's ...

User Manual
Page 47
... scanning, the radio will resume. If you exit the menu, O displays on that channel and displays its channel and code. Select - To stop scanning, briefly press ). This helps save battery life. O 8 After you want to scan channels without having to turn itself off after which... power shuts off feature has been activated. to switch channels by pressing M. To set the number of hours 1 - 8, after a certain period of inactivity. When the radio detects channel ...
... scanning, the radio will resume. If you exit the menu, O displays on that channel and displays its channel and code. Select - To stop scanning, briefly press ). This helps save battery life. O 8 After you want to scan channels without having to turn itself off after which... power shuts off feature has been activated. to switch channels by pressing M. To set the number of hours 1 - 8, after a certain period of inactivity. When the radio detects channel ...

User Manual
Page 49
If the radio gets wet... Do not use alcohol or clean the exterior. Do not use until completely dry. 47 Use and Care Turn it off and remove batteries. cleaning solutions. Use and Care glub Use a soft damp cloth to Do not immerse in water. Dry with soft cloth.
If the radio gets wet... Do not use alcohol or clean the exterior. Do not use until completely dry. 47 Use and Care Turn it off and remove batteries. cleaning solutions. Use and Care glub Use a soft damp cloth to Do not immerse in water. Dry with soft cloth.

User Manual
Page 52
...not match other Confirm interference eliminator code is completely pressed as in buildings or vehicles decrease range. Wearing radio close to improve transmission. all radios must use , try another. Change location of sight to body such as you transmit. noises or ...conversation on a belt decreases range. Reposition, replace, or recharge batteries. Limited talk range Steel and/or concrete structures, heavy foliage, ...
...not match other Confirm interference eliminator code is completely pressed as in buildings or vehicles decrease range. Wearing radio close to improve transmission. all radios must use , try another. Change location of sight to body such as you transmit. noises or ...conversation on a belt decreases range. Reposition, replace, or recharge batteries. Limited talk range Steel and/or concrete structures, heavy foliage, ...
User Manual
Page 53
...be acknowleged by pressing \ for three code locked seconds. 51 If QuieT6000 feature is on , or setting does not match other radios; Heavy static or interference Eavesdrop Reducer code is up to listen. Talk range is on , transmit call must be at least ... too far apart or obstacles interfering with only VibraCall selected, a received call tone before the radio can receive any incoming transmissions. Reposition, replace, or recharge batteries. Channel and/or Make sure menu is NOT being pressed while trying to two miles in clear, unobstructed conditions. Symptom Try ...
...be acknowleged by pressing \ for three code locked seconds. 51 If QuieT6000 feature is on , or setting does not match other radios; Heavy static or interference Eavesdrop Reducer code is up to listen. Talk range is on , transmit call must be at least ... too far apart or obstacles interfering with only VibraCall selected, a received call tone before the radio can receive any incoming transmissions. Reposition, replace, or recharge batteries. Channel and/or Make sure menu is NOT being pressed while trying to two miles in clear, unobstructed conditions. Symptom Try ...

User Manual
Page 54
... QuieT6000 mode is set to quick charge. Extreme operating temperatures affect battery life. Low battery meter reading although new batteries are installed Verify that the radio is set and on the radio. Press ( to talk to the radio, battery, or charging dock. See page 36. Disable Simple Menu by pressing \ while turning on . Recharge or replace NiMH...
... QuieT6000 mode is set to quick charge. Extreme operating temperatures affect battery life. Low battery meter reading although new batteries are installed Verify that the radio is set and on the radio. Press ( to talk to the radio, battery, or charging dock. See page 36. Disable Simple Menu by pressing \ while turning on . Recharge or replace NiMH...
User Manual
Page 55
... / Replacements. Exception: The warranty for Spirit GT series and Talkabout series two-way radio accessories is for one year. The warranty is longer. 53 The warranty is for the balance of Coverage Is From the date the Products are sold by Motorola (Products). • Batteries. Defects in materials and workmanship in the United States...
... / Replacements. Exception: The warranty for Spirit GT series and Talkabout series two-way radio accessories is for one year. The warranty is longer. 53 The warranty is for the balance of Coverage Is From the date the Products are sold by Motorola (Products). • Batteries. Defects in materials and workmanship in the United States...

User Manual
Page 56
... (if applicable) and, most importantly; (e) your expense for any duties. No software updates are provided. You must also return all detachable parts such as antennas, batteries and chargers. III. What We Will Do to Correct Warranty Problems At no charge to refund the Products' purchase price. We may use functionally equivalent.... RETAIN YOUR ORIGINAL PROOF OF PURCHASE. We will receive instructions on how to ship the Products to us at your address and telephone number. IV. Motorola Limited Warranty V. If requested, you must ship the Products to...
... (if applicable) and, most importantly; (e) your expense for any duties. No software updates are provided. You must also return all detachable parts such as antennas, batteries and chargers. III. What We Will Do to Correct Warranty Problems At no charge to refund the Products' purchase price. We may use functionally equivalent.... RETAIN YOUR ORIGINAL PROOF OF PURCHASE. We will receive instructions on how to ship the Products to us at your address and telephone number. IV. Motorola Limited Warranty V. If requested, you must ship the Products to...


