
User Guide
Page 2
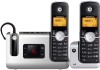
... for your records. Alternative arrangements should be made if emergency telephone call : US and Canada: 1-888-331-3383 On the Web: www.motorola.com • 30 name and number phonebook. • Answering machine with 15 minutes digital recording time.* • Caller ID shows you...your original dated sales receipt for warranty coverage. For warranty service of the last 30 callers in a calls list.** • Register up to 5 handsets or wireless headsets to a single base. • Make internal calls, transfer external calls, hold 3-way conversation between two internal callers and an ...
... for your records. Alternative arrangements should be made if emergency telephone call : US and Canada: 1-888-331-3383 On the Web: www.motorola.com • 30 name and number phonebook. • Answering machine with 15 minutes digital recording time.* • Caller ID shows you...your original dated sales receipt for warranty coverage. For warranty service of the last 30 callers in a calls list.** • Register up to 5 handsets or wireless headsets to a single base. • Make internal calls, transfer external calls, hold 3-way conversation between two internal callers and an ...
User Guide
Page 3
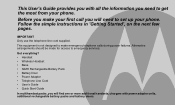
... Cord • User's Guide • Quick Start Guide In multihandset packs, you need to make your first call you will find one or more additional handsets, chargers with power adapter units, additional rechargeable battery packs and battery doors. This User's Guide provides you with all the information you will need to...
... Cord • User's Guide • Quick Start Guide In multihandset packs, you need to make your first call you will find one or more additional handsets, chargers with power adapter units, additional rechargeable battery packs and battery doors. This User's Guide provides you with all the information you will need to...
User Guide
Page 4
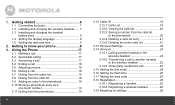
...a calls list entry 21 3.12.5 Deleting the entire calls list 21 3.13 Personal Settings 22 3.14 Intercom 23 3.14.1 Calling another handset or the wireless headset 23 3.14.3 Three-party conference call to know your phone 9 3. Getting started 6 1.1 Connecting the base ...7 1.2 Installing and charging the wireless headset...... 7 1.3 Installing and charging the handset battery pack 8 1.4 Setting the display language 8 1.5 Setting the date and time 9 2. 1. Getting to another handset or the wireless headset 23 3.14.2 Transferring a call 24 3.15 Setting the dial mode 24...
...a calls list entry 21 3.12.5 Deleting the entire calls list 21 3.13 Personal Settings 22 3.14 Intercom 23 3.14.1 Calling another handset or the wireless headset 23 3.14.3 Three-party conference call to know your phone 9 3. Getting started 6 1.1 Connecting the base ...7 1.2 Installing and charging the wireless headset...... 7 1.3 Installing and charging the handset battery pack 8 1.4 Setting the display language 8 1.5 Setting the date and time 9 2. 1. Getting to another handset or the wireless headset 23 3.14.2 Transferring a call 24 3.15 Setting the dial mode 24...
User Guide
Page 5
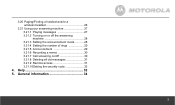
3.20 Paging/Finding a handset and/or a wireless headset 26 3.21 Using your answering machine 27 3.21.1 Playing messages 27 3.21.2 Turning on or off the answering machine 28 3.21.3 Setting the announcement mode ...........28 3.21.4 Setting the number of rings 29 3.21.5 Announcement 29 3.21.6 Recording a memo 30 3.21.7 Call screening on/off 30 3.21.8 Deleting all old messages 31 3.21.9 Remote access 31 3.21.10Setting the security code 32 4. General information 34 5 Help 32 5.
3.20 Paging/Finding a handset and/or a wireless headset 26 3.21 Using your answering machine 27 3.21.1 Playing messages 27 3.21.2 Turning on or off the answering machine 28 3.21.3 Setting the announcement mode ...........28 3.21.4 Setting the number of rings 29 3.21.5 Announcement 29 3.21.6 Recording a memo 30 3.21.7 Call screening on/off 30 3.21.8 Deleting all old messages 31 3.21.9 Remote access 31 3.21.10Setting the security code 32 4. General information 34 5 Help 32 5.
User Guide
Page 6
...telephone wiring during a lightning storm. • Never install telephone jacks in range of the base. Location When choosing a location for multi-handset packs). Move back within the range area. Do not connect the telephone line cord into an electrical outlet at the network interface. &#... lighting, microwave ovens, heating appliances, and direct sunlight. • Avoid areas of the base, the screen shows SEARCHING.... The handset will also reduce the range significantly. Only use the adapter and telephone line cord supplied with the larger pin is specifically designed for...
...telephone wiring during a lightning storm. • Never install telephone jacks in range of the base. Location When choosing a location for multi-handset packs). Move back within the range area. Do not connect the telephone line cord into an electrical outlet at the network interface. &#... lighting, microwave ovens, heating appliances, and direct sunlight. • Avoid areas of the base, the screen shows SEARCHING.... The handset will also reduce the range significantly. Only use the adapter and telephone line cord supplied with the larger pin is specifically designed for...
User Guide
Page 8
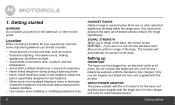
Slide off the battery compartment cover to select LANGUAGE. 3. Once charged, the (battery icon) will indicate that the handset is fully charged. Repeat to remove it. Put the handset on . 3. 1.3 Installing and charging the handset battery pack 1. Press MENU to select SETUP HS. 2. Place the supplied rechargeable battery pack in the battery compartment, with...
Slide off the battery compartment cover to select LANGUAGE. 3. Once charged, the (battery icon) will indicate that the handset is fully charged. Repeat to remove it. Put the handset on . 3. 1.3 Installing and charging the handset battery pack 1. Press MENU to select SETUP HS. 2. Place the supplied rechargeable battery pack in the battery compartment, with...
User Guide
Page 9
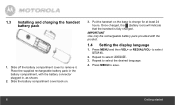
... for use. 2. Press MENU and then edit the time in 12hr format. Press VOL+ or REDIAL/VOL- Getting to know your phone Overview of your handset Getting to save the settings. Press VOL+ or REDIAL/VOL- Repeat to toggle AM/PM settings. 5. Your phone is received. 2. to edit the year and...
... for use. 2. Press MENU and then edit the time in 12hr format. Press VOL+ or REDIAL/VOL- Getting to know your phone Overview of your handset Getting to save the settings. Press VOL+ or REDIAL/VOL- Repeat to toggle AM/PM settings. 5. Your phone is received. 2. to edit the year and...
User Guide
Page 10
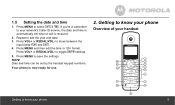
... confirm and save the entry to scroll down the list. c) During a call to the right. b) In editing mode: Press to move the cursor to another handset or the wireless headset. d) During a call: Press to end a call : Press to the previous level. d) In calls list entry: Press to access the menu list... to decrease the volume. 5 Talk Off / Back a) In menu/editing mode: Press to exit to decrease the volume. d) During a call . 10 Getting to know your handset and their multi-function tasks. 1 Menu / Select a) In idle mode: Press to save the settings.
... confirm and save the entry to scroll down the list. c) During a call to the right. b) In editing mode: Press to move the cursor to another handset or the wireless headset. d) During a call: Press to end a call : Press to the previous level. d) In calls list entry: Press to access the menu list... to decrease the volume. 5 Talk Off / Back a) In menu/editing mode: Press to exit to decrease the volume. d) During a call . 10 Getting to know your handset and their multi-function tasks. 1 Menu / Select a) In idle mode: Press to save the settings.
User Guide
Page 12
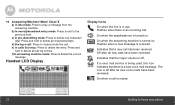
14 Answering Machine/ Mute/ Clear/ X a) In idle mode: Press to mute/unmute the call. d) During a call: Press to play a message from the answering machine. Handset LCD Display Display Icons On when the line is received. Flashes when a new message is in use. Indicates that the ringer volume is off after ...
14 Answering Machine/ Mute/ Clear/ X a) In idle mode: Press to mute/unmute the call. d) During a call: Press to play a message from the answering machine. Handset LCD Display Display Icons On when the line is received. Flashes when a new message is in use. Indicates that the ringer volume is off after ...
User Guide
Page 15
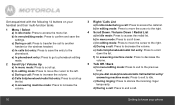
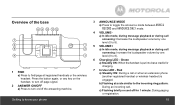
c) Flashing briefly on /off the answering machine. Red a) Steadily ON: During a call . Press the button again, or any key on the handset, to turn on and off for charging. 7 In Use LED - Overview of the base 1 FIND a) Press to turn off page signal. 2 ANSWER ON/OFF ...a) Press to find/page all registered handsets or the wireless headset. Green a) Steadily ON: When the handset is engaged. b) Flashing at a rate similar to 8). 6 Charging LED - Getting to know your phone 3 ANNOUNCE MODE a) Press to ...
c) Flashing briefly on /off the answering machine. Red a) Steadily ON: During a call . Press the button again, or any key on the handset, to turn on and off for charging. 7 In Use LED - Overview of the base 1 FIND a) Press to turn off page signal. 2 ANSWER ON/OFF ...a) Press to find/page all registered handsets or the wireless headset. Green a) Steadily ON: When the handset is engaged. b) Flashing at a rate similar to 8). 6 Charging LED - Getting to know your phone 3 ANNOUNCE MODE a) Press to ...
User Guide
Page 17
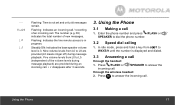
... playback) are provided (L0 means ringer off) during an incoming call 1. In idle mode, press and hold a key from L0 to answer the through the handset: 1. Flashing: Indicates an incoming call / recording of new messages. Nine volume levels from L0 to dial the phone number. 3.2 Speed dial calling 1. Using the Phone...
... playback) are provided (L0 means ringer off) during an incoming call 1. In idle mode, press and hold a key from L0 to answer the through the handset: 1. Flashing: Indicates an incoming call / recording of new messages. Nine volume levels from L0 to dial the phone number. 3.2 Speed dial calling 1. Using the Phone...
User Guide
Page 18
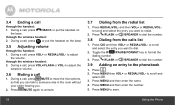
... the phonebook 1. to scroll and select the entry you want to someone else in the room without your caller hearing you. 2. Press . 2. through the handset: 1. to adjust the earpiece volume. 3.6 Muting a call , press /MUTE to mute the microphone, so that you can talk to dial. 2. Press ...Press /FLASH or /SPEAKER to dial the number. 3.9 Adding an entry to adjust the volume. Press MENU and then enter the number. 5. through the handset: 1. Press /FLASH or /SPEAKER to save. 18 Using the Phone During a call 1. Press REDIAL/VOL- to format the dialing number. 3. Press ...
... the phonebook 1. to scroll and select the entry you want to someone else in the room without your caller hearing you. 2. Press . 2. through the handset: 1. to adjust the earpiece volume. 3.6 Muting a call , press /MUTE to mute the microphone, so that you can talk to dial. 2. Press ...Press /FLASH or /SPEAKER to dial the number. 3.9 Adding an entry to adjust the volume. Press MENU and then enter the number. 5. through the handset: 1. Press /FLASH or /SPEAKER to save. 18 Using the Phone During a call 1. Press REDIAL/VOL- to format the dialing number. 3. Press ...
User Guide
Page 19
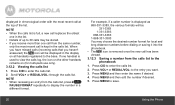
... DIAL. 3. Press . 2. Press and then VOL+ or REDIAL/VOL- Some operators may charge a subscription for incoming calls, the handset will display UNAVAILABLE. • If the incoming call is from a withheld telephone number, the handset will display PRIVATE. • Information about incoming calls will show the entries starting with B, etc. 3.12 Caller ID...
... DIAL. 3. Press . 2. Press and then VOL+ or REDIAL/VOL- Some operators may charge a subscription for incoming calls, the handset will display UNAVAILABLE. • If the incoming call is from a withheld telephone number, the handset will display PRIVATE. • Information about incoming calls will show the entries starting with B, etc. 3.12 Caller ID...
User Guide
Page 20
For example, if a caller number is used to view the calls log, the icon on the other handsets remains on all handsets registered to 30 calls may choose the desired number format for multi-pack use only). 3.12.2 Viewing the calls list 1. displayed in chronological order with ...the most recent call at the top of up to the base. Scroll VOL+ or REDIAL/VOL- to the entry you receive more than one handset is displayed as 888-331-3383, the various formats will be stored. • If you want. 3. NOTE • When the calls list is full, a new...
For example, if a caller number is used to view the calls log, the icon on the other handsets remains on all handsets registered to 30 calls may choose the desired number format for multi-pack use only). 3.12.2 Viewing the calls list 1. displayed in chronological order with ...the most recent call at the top of up to the base. Scroll VOL+ or REDIAL/VOL- to the entry you receive more than one handset is displayed as 888-331-3383, the various formats will be stored. • If you want. 3. NOTE • When the calls list is full, a new...
User Guide
Page 22
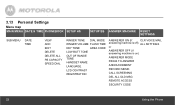
... DELETE ALL PB CAPACITY SPEED DIAL RINGER TONE DIAL MODE RINGER VOLUME FLASH TIME KEY TONE AREA CODE LOW BATT TONE OUT OF RANGE TONE HANDSET NAME LANGUAGE LCD CONTRAST REGISTRATION ANSWERER ON (If CLR VOICE MAIL answering machine is off) ALL SETTINGS or ANSWERER OFF (If answering machine is on...
... DELETE ALL PB CAPACITY SPEED DIAL RINGER TONE DIAL MODE RINGER VOLUME FLASH TIME KEY TONE AREA CODE LOW BATT TONE OUT OF RANGE TONE HANDSET NAME LANGUAGE LCD CONTRAST REGISTRATION ANSWERER ON (If CLR VOICE MAIL answering machine is off) ALL SETTINGS or ANSWERER OFF (If answering machine is on...
User Guide
Page 23
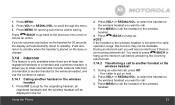
...you want to standby. Except for 30 seconds, the display will be available. Press MENU to another handset or the wireless headset, and use the conference option. 3.14.1 Calling another handset or the wireless headset 1. Press /BACK to hang up the intercom call before answering the incoming ...external call. 3.14.2 Transferring a call , you to make internal calls, transfer external calls from one handset to call the handset or the wireless headset. 23 Press MENU to hang up . Your caller is not within the valid operation range, this function...
...you want to standby. Except for 30 seconds, the display will be available. Press MENU to another handset or the wireless headset, and use the conference option. 3.14.1 Calling another handset or the wireless headset 1. Press /BACK to hang up the intercom call before answering the incoming ...external call. 3.14.2 Transferring a call , you to make internal calls, transfer external calls from one handset to call the handset or the wireless headset. 23 Press MENU to hang up . Your caller is not within the valid operation range, this function...
User Guide
Page 24
... wireless headset, you can also press on the wireless headset to transfer the call and leave the other handset engaged with the caller. During an external call . If the other handset answers by pressing / FLASH or /SPEAKER or the wireless headset answers by pressing , press /BACK to hang up the... the wireless headset does not answer, press /MUTE to talk to call . 3. Your caller is suitable for your caller again. to select the handset or the wireless headset you should need to change this setting unless advised to end a three-party conference call . NOTE During an external call,...
... wireless headset, you can also press on the wireless headset to transfer the call and leave the other handset engaged with the caller. During an external call . If the other handset answers by pressing / FLASH or /SPEAKER or the wireless headset answers by pressing , press /BACK to hang up the... the wireless headset does not answer, press /MUTE to talk to call . 3. Your caller is suitable for your caller again. to select the handset or the wireless headset you should need to change this setting unless advised to end a three-party conference call . NOTE During an external call,...
User Guide
Page 25
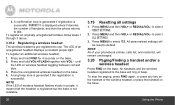
... AREA CODE. Press MENU and then VOL+ or REDIAL/VOL- to select YES or NO. 4. Press MENU to save . 3.17 Setting the area code 1. Additional handsets must be registered to the base before you want. (8 options are available: 90, 100, 110, 250, 300, 400, 600 and 700MS) 4. Place the unregistered ...cordless handset on the base. 2. Press MENU and then VOL+ or REDIAL/VOL- Press MENU and then VOL+ or REDIAL/VOL- After the call is ended, the ...
... AREA CODE. Press MENU and then VOL+ or REDIAL/VOL- to select YES or NO. 4. Press MENU to save . 3.17 Setting the area code 1. Additional handsets must be registered to the base before you want. (8 options are available: 90, 100, 110, 250, 300, 400, 600 and 700MS) 4. Place the unregistered ...cordless handset on the base. 2. Press MENU and then VOL+ or REDIAL/VOL- Press MENU and then VOL+ or REDIAL/VOL- After the call is ended, the ...
User Guide
Page 26
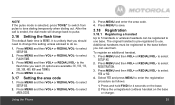
..., it means that the headset is registered but the base is not available. 26 3.19 Resetting all settings 1. to select YES. NOTE All of handsets, and then the phone returns to select ALL SETTINGS. 3. Using the Phone Press and hold VOL+/FLASH together with VOL - A long beep tone ...is generated if the registration is successful. All handsets and the wireless headset registered to the base will remain unchanged. 3.20 Paging/Finding a handset and/or a wireless headset Press FIND on the base. To stop the paging, press FIND again, or...
..., it means that the headset is registered but the base is not available. 26 3.19 Resetting all settings 1. to select YES. NOTE All of handsets, and then the phone returns to select ALL SETTINGS. 3. Using the Phone Press and hold VOL+/FLASH together with VOL - A long beep tone ...is generated if the registration is successful. All handsets and the wireless headset registered to the base will remain unchanged. 3.20 Paging/Finding a handset and/or a wireless headset Press FIND on the base. To stop the paging, press FIND again, or...
User Guide
Page 27
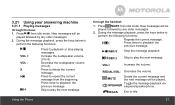
... followed by any older messages. 2. New messages will be played followed by any older messages. 2. 3.21 Using your answering machine 3.21.1 Playing messages through the handset: 1. Skip to repeat the current message from idle mode. VOL+ Increase the volume. Press to play the next message. Press /MUTE from idle mode. New...
... followed by any older messages. 2. New messages will be played followed by any older messages. 2. 3.21 Using your answering machine 3.21.1 Playing messages through the handset: 1. Skip to repeat the current message from idle mode. VOL+ Increase the volume. Press to play the next message. Press /MUTE from idle mode. New...


