

User Guide
Page 1
User's Guide L701 / L702 / L703 / L704 / L705 L701M / L702M / L703M / L704M / L705M DECT 6.0 Digital Cordless Phone with Answering machine Warning Use only the adapter and telephone line cord provided in the box.
User's Guide L701 / L702 / L703 / L704 / L705 L701M / L702M / L703M / L704M / L705M DECT 6.0 Digital Cordless Phone with Answering machine Warning Use only the adapter and telephone line cord provided in the box.

User Guide
Page 2
... telephone calls when the power fails. Alternative arrangements should be made if emergency telephone call : US and Canada: 1-888-331-3383 On the Web: www.motorola.com • 30 name and number phonebook. • Answering machine with up to 5 cordless handsets to a single base. • Make internal calls, transfer external calls...; Register up to 15 minutes digital recording time.* • Caller ID shows you will need to confirm warranty status. For warranty service of your new Motorola Phone! Welcome... to your dated sales receipt to provide a copy of your...
... telephone calls when the power fails. Alternative arrangements should be made if emergency telephone call : US and Canada: 1-888-331-3383 On the Web: www.motorola.com • 30 name and number phonebook. • Answering machine with up to 5 cordless handsets to a single base. • Make internal calls, transfer external calls...; Register up to 15 minutes digital recording time.* • Caller ID shows you will need to confirm warranty status. For warranty service of your new Motorola Phone! Welcome... to your dated sales receipt to provide a copy of your...
User Guide
Page 3
... first call you will find one or more additional handsets, chargers with all the information you need to set up your phone. This User's Guide provides you with power adapter units, additional rechargeable battery packs and battery doors. Alternative arrangements should be... made for access to get the most from your phone. Got everything? • Handset • Base • NiMH Rechargeable Battery Pack • Battery Door • Power Adapter • Telephone...
... first call you will find one or more additional handsets, chargers with all the information you need to set up your phone. This User's Guide provides you with power adapter units, additional rechargeable battery packs and battery doors. Alternative arrangements should be... made for access to get the most from your phone. Got everything? • Handset • Base • NiMH Rechargeable Battery Pack • Battery Door • Power Adapter • Telephone...
User Guide
Page 4
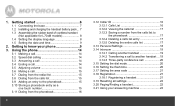
... the area code 21 3.18 Registration 21 3.18.1 Registering a handset 21 3.19 Resetting all settings 22 3.20 Paging/Finding a handset 22 3.21 Using your phone 9 3. Using the phone 14 3.1 Making a call 14 3.2 Speed dial calling 14 3.3 Answering a call 14 3.4 Ending a call 14 3.5 Adjusting volume 14 3.6 Muting a call 15 3.7 Dialing from the redial...
... the area code 21 3.18 Registration 21 3.18.1 Registering a handset 21 3.19 Resetting all settings 22 3.20 Paging/Finding a handset 22 3.21 Using your phone 9 3. Using the phone 14 3.1 Making a call 14 3.2 Speed dial calling 14 3.3 Answering a call 14 3.4 Ending a call 14 3.5 Adjusting volume 14 3.6 Muting a call 15 3.7 Dialing from the redial...
User Guide
Page 6
Location When choosing a location for your phone in the bathroom or other electrical appliances working within in wet locations unless the jack is specifically designed for wet locations. • Never touch non-... IMPORTANT The base must be plugged into the telephone wall jack until the handset is fully charged. Getting started WARNING Do not place your new phone, here are some important guidelines you are no other humid areas. SIGNAL STRENGTH When out of range of excessive dust, moisture and low temperature. •...
Location When choosing a location for your phone in the bathroom or other electrical appliances working within in wet locations unless the jack is specifically designed for wet locations. • Never touch non-... IMPORTANT The base must be plugged into the telephone wall jack until the handset is fully charged. Getting started WARNING Do not place your new phone, here are some important guidelines you are no other humid areas. SIGNAL STRENGTH When out of range of excessive dust, moisture and low temperature. •...
User Guide
Page 9
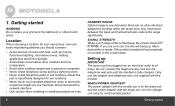
... and the date. 3. Press MENU and then use the keypad to edit the time in 12 HR format. Getting to know your phone Overview of your handset Getting to your phone 9 Press VOL+ or REDIAL/VOL- to select DATE&TIME. to toggle AM/PM settings. 5. Press MENU and then VOL+ or REDIAL... you're a subscriber to know your network's Caller ID service, the date and time is automatically set when a call is now ready for use. 2. Your phone is received. 2. 1.5 Setting the date and time 1. Press MENU to move between the input fields YEAR and DATE. 4. Press VOL+ or REDIAL/VOL-
... and the date. 3. Press MENU and then use the keypad to edit the time in 12 HR format. Getting to know your phone Overview of your handset Getting to your phone 9 Press VOL+ or REDIAL/VOL- to select DATE&TIME. to toggle AM/PM settings. 5. Press MENU and then VOL+ or REDIAL... you're a subscriber to know your network's Caller ID service, the date and time is automatically set when a call is now ready for use. 2. Your phone is received. 2. 1.5 Setting the date and time 1. Press MENU to move between the input fields YEAR and DATE. 4. Press VOL+ or REDIAL/VOL-
User Guide
Page 10
... save the entry to scroll up . d) Calls list / phonebook / redial list entry: Press to the phonebook. Get acquainted with the following 14 buttons on your phone
... save the entry to scroll up . d) Calls list / phonebook / redial list entry: Press to the phonebook. Get acquainted with the following 14 buttons on your phone
User Guide
Page 11
... dial mode will change back to make a call : Press to switch from the answering machine. Press and hold to the right. Getting to know your phone 12 Talk On / Flash a) In idle / pre-dial mode: Press to pulse. b) During a call with the speakerphone. c) In editing mode: Press to move the cursor...
... dial mode will change back to make a call : Press to switch from the answering machine. Press and hold to the right. Getting to know your phone 12 Talk On / Flash a) In idle / pre-dial mode: Press to pulse. b) During a call with the speakerphone. c) In editing mode: Press to move the cursor...
User Guide
Page 12
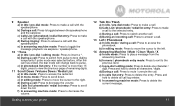
Flashes when new answering machine message is displayed. Off when new voice mail has been listened to know your phone In Caller ID mode, the time of call is received. Flashes when there is detected, needs charging. Flashes when low battery level is an incoming ...
Flashes when new answering machine message is displayed. Off when new voice mail has been listened to know your phone In Caller ID mode, the time of call is received. Flashes when there is detected, needs charging. Flashes when low battery level is an incoming ...
User Guide
Page 13
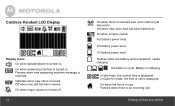
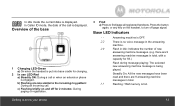
... handset, to turn off for charging. 2 In use LED-Red a) Steadily ON: During a call or when an extension phone is put into base cradle for 2 minutes: During paging or registration. 3 Find a) Press to know your phone 13 Overview of new answering machine messages. (e.g. In Caller ID mode, the date of the call .
... handset, to turn off for charging. 2 In use LED-Red a) Steadily ON: During a call or when an extension phone is put into base cradle for 2 minutes: During paging or registration. 3 Find a) Press to know your phone 13 Overview of new answering machine messages. (e.g. In Caller ID mode, the date of the call .
User Guide
Page 14
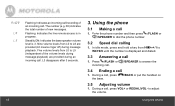
... and then press /FLASH or /SPEAKER to answer the 3.4 Ending a call 1. Press /FLASH or incoming call. /SPEAKER to dial the phone number. 3.2 Speed dial calling 1. Using the phone 3.1 Making a call , press VOL+ or REDIAL/VOL- L3 disappears after 3 seconds. 14 3. During a call 1. Steadily ON: Indicates the base speaker volume level is in...
... and then press /FLASH or /SPEAKER to answer the 3.4 Ending a call 1. Press /FLASH or incoming call. /SPEAKER to dial the phone number. 3.2 Speed dial calling 1. Using the phone 3.1 Making a call , press VOL+ or REDIAL/VOL- L3 disappears after 3 seconds. 14 3. During a call 1. Steadily ON: Indicates the base speaker volume level is in...
User Guide
Page 15
... number 1. Press . 2. Press MENU and then VOL+ or REDIAL/VOL- to select the entry you . 2. Press MENU and then VOL+ or REDIAL/VOL- Using the phone 3.9 Adding an entry to save . Press MENU to format the dialing number. 3. 3.6 Muting a call , press /MUTE to mute the microphone, so that you can be...
... number 1. Press . 2. Press MENU and then VOL+ or REDIAL/VOL- to select the entry you . 2. Press MENU and then VOL+ or REDIAL/VOL- Using the phone 3.9 Adding an entry to save . Press MENU to format the dialing number. 3. 3.6 Muting a call , press /MUTE to mute the microphone, so that you can be...

User Guide
Page 16
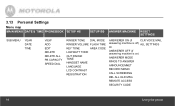
... used to locate. For example, pressing 2 will show the entries starting with A. Some operators may charge a subscription for multi-pack use only). 16 Using the phone Press and then VOL+ or REDIAL/VOL-
... used to locate. For example, pressing 2 will show the entries starting with A. Some operators may charge a subscription for multi-pack use only). 16 Using the phone Press and then VOL+ or REDIAL/VOL-
User Guide
Page 17
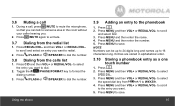
... the phonebook 1. Press /MUTE to enter the calls list. 2. Press MENU to browse the calls list. Scroll VOL+ or REDIAL/VOL- to confirm. Using the phone 3.12.3 Saving a number from the calls list, press #/ / PAUSE/FORMAT repeatedly to select the entry you want . 3. Press VOL+ or REDIAL/VOL- to display the...
... the phonebook 1. Press /MUTE to enter the calls list. 2. Press MENU to browse the calls list. Scroll VOL+ or REDIAL/VOL- to confirm. Using the phone 3.12.3 Saving a number from the calls list, press #/ / PAUSE/FORMAT repeatedly to select the entry you want . 3. Press VOL+ or REDIAL/VOL- to display the...
User Guide
Page 18
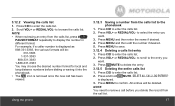
... answering machine is on) ANSWERER MODE RINGS TO ANSWER ANNOUNCEMNET RECORD MEMO CALL SCREENING DEL ALL OLD MSG REMOTE ACCESS SECURITY CODE 18 Using the phone
... answering machine is on) ANSWERER MODE RINGS TO ANSWER ANNOUNCEMNET RECORD MEMO CALL SCREENING DEL ALL OLD MSG REMOTE ACCESS SECURITY CODE 18 Using the phone
User Guide
Page 19
... call . During an external call is not within the valid operation range, this function may not be displayed in the list. 2. Press MENU. 2. Using the phone 19 Press /MUTE to go back to another handset 1. to select the handset you will be available. NOTE If the handset is put on the...
... call . During an external call is not within the valid operation range, this function may not be displayed in the list. 2. Press MENU. 2. Using the phone 19 Press /MUTE to go back to another handset 1. to select the handset you will be available. NOTE If the handset is put on the...
User Guide
Page 20
... want to transfer the call , press INT. - Press /BACK on any handset to your country and network operator. to select SETUP BS. 20 Using the phone If the other handset answers by pressing /FLASH or /SPEAKER, press /BACK to call 1. Press MENU and then VOL+ or REDIAL/VOL- After the call...
... want to transfer the call , press INT. - Press /BACK on any handset to your country and network operator. to select SETUP BS. 20 Using the phone If the other handset answers by pressing /FLASH or /SPEAKER, press /BACK to call 1. Press MENU and then VOL+ or REDIAL/VOL- After the call...
User Guide
Page 21
...VOL+ or REDIAL/VOL- to enter the registration procedure as follows: 1. Select YES then press MENU to select SETUP BS. 2. Using the phone 21 Press MENU and then VOL+ or REDIAL/VOL- to the flash time you can be registered to select YES or NO. 4. Press MENU... Press MENU and then VOL+ or REDIAL/VOL- A confirmation tone is generated if registration is displayed where X denotes the number of handsets, and then the phone returns to use them. 2. to select REGISTRATION. 3. Press MENU and then VOL+ or REDIAL/VOL- Press MENU to save . 3.18 Registration 3.18.1 Registering...
...VOL+ or REDIAL/VOL- to enter the registration procedure as follows: 1. Select YES then press MENU to select SETUP BS. 2. Using the phone 21 Press MENU and then VOL+ or REDIAL/VOL- to the flash time you can be registered to select YES or NO. 4. Press MENU... Press MENU and then VOL+ or REDIAL/VOL- A confirmation tone is generated if registration is displayed where X denotes the number of handsets, and then the phone returns to use them. 2. to select REGISTRATION. 3. Press MENU and then VOL+ or REDIAL/VOL- Press MENU to save . 3.18 Registration 3.18.1 Registering...

User Guide
Page 22
..., press FIND again, or press any older messages. 2. to select ALL SETTINGS. 3. REDIAL/VOL- to select RESET SETTINGS. 2. Press MENU to idle. 22 Using the phone 3.19 Resetting all settings 1. VOL+ Increase the volume. Press /MUTE on the handset to perform the following functions: Press to the base will be reset...
..., press FIND again, or press any older messages. 2. to select ALL SETTINGS. 3. REDIAL/VOL- to select RESET SETTINGS. 2. Press MENU to idle. 22 Using the phone 3.19 Resetting all settings 1. VOL+ Increase the volume. Press /MUTE on the handset to perform the following functions: Press to the base will be reset...
User Guide
Page 23
... modes: • ANNC & RECORD invites your announcement but they cannot leave a message. 4. to select the rings to select ANSWERER ON or ANSWERER OFF. Using the phone 23 If the answering machine is no message. Press MENU and then VOL+ or REDIAL/VOL- Press MENU and then VOL+ or REDIAL/VOL- to...
... modes: • ANNC & RECORD invites your announcement but they cannot leave a message. 4. to select the rings to select ANSWERER ON or ANSWERER OFF. Using the phone 23 If the answering machine is no message. Press MENU and then VOL+ or REDIAL/VOL- Press MENU and then VOL+ or REDIAL/VOL- to...


