
User Guide
Page 4
... a speed dial location 19 3.9.4 Deleting an entry in a speed dial location 19 3.9.2 Storing an entry to know your phone 10 2.1 Overview of your handset 10 2.2 Cordless handset LCD display 12 2.3 Overview of the base 13 2.4 Overview of the charger 15 3. Getting to a speed dial location 19 3.9.3 Dialing the entry from the memory 20 4 Getting started 7 1.1 Connecting the base 8 1.2 Connecting the charger 8 1.3 Installing and charging the handset battery pack 8 1.4 Setting the display language 9 1.5 Setting the date and time...
... a speed dial location 19 3.9.4 Deleting an entry in a speed dial location 19 3.9.2 Storing an entry to know your phone 10 2.1 Overview of your handset 10 2.2 Cordless handset LCD display 12 2.3 Overview of the base 13 2.4 Overview of the charger 15 3. Getting to a speed dial location 19 3.9.3 Dialing the entry from the memory 20 4 Getting started 7 1.1 Connecting the base 8 1.2 Connecting the charger 8 1.3 Installing and charging the handset battery pack 8 1.4 Setting the display language 9 1.5 Setting the date and time...

User Guide
Page 5
... conference calls 24 3.14 Handset settings 25 3.14.1 Setting the ringer tone 25 3.14.2 Setting the ringer volume 25 3.14.3 3.16.3 Setting the alert tone 25 3.14.4 Renaming the handset 26 3.14.5 Setting the language 26 3.14.6 Setting the contrast 26 3.14.7 Setting the equalizer 26 3.14.8 Setting the auto talk 26 3.15 Base settings 26 3.15.1 Setting the dial mode 26 3.15.2 Setting the flash time 27 3.15.3 Setting the area code 27 3.16 Registration ...27 3.16.1 Registering a handset 27 3.17 Resetting all messages...
... conference calls 24 3.14 Handset settings 25 3.14.1 Setting the ringer tone 25 3.14.2 Setting the ringer volume 25 3.14.3 3.16.3 Setting the alert tone 25 3.14.4 Renaming the handset 26 3.14.5 Setting the language 26 3.14.6 Setting the contrast 26 3.14.7 Setting the equalizer 26 3.14.8 Setting the auto talk 26 3.15 Base settings 26 3.15.1 Setting the dial mode 26 3.15.2 Setting the flash time 27 3.15.3 Setting the area code 27 3.16 Registration ...27 3.16.1 Registering a handset 27 3.17 Resetting all messages...

User Guide
Page 7
... touch non-insulated telephone wires or terminals, unless the telephone line has been disconnected at all times. The cordless handset will also reduce the range significantly. ENGLISH 1. Only use the adapter and telephone line cord supplied with the larger pin is specifically designed for multi-handset packs). Getting started WARNING Do not place your new phone, here are some important guidelines you are no other humid area. Getting started 7
... touch non-insulated telephone wires or terminals, unless the telephone line has been disconnected at all times. The cordless handset will also reduce the range significantly. ENGLISH 1. Only use the adapter and telephone line cord supplied with the larger pin is specifically designed for multi-handset packs). Getting started WARNING Do not place your new phone, here are some important guidelines you are no other humid area. Getting started 7

User Guide
Page 11
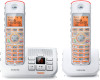
... activate speed dial. 7 #/Pause / ABC / Format a) In idle / pre-dial / number editing mode / during a call : Press to switch from Caller ID list. After the call : Press to insert a "#", press and hold to the right. b) In menu mode: Press to idle. Getting to silence the incoming ringer temporarily. c) During ringing: Press to know your phone 11 b) During a call: Press to transfer the call to another handset. 9 Microphone 10 Speaker a) In idle / pre-dial mode...
... activate speed dial. 7 #/Pause / ABC / Format a) In idle / pre-dial / number editing mode / during a call : Press to switch from Caller ID list. After the call : Press to insert a "#", press and hold to the right. b) In menu mode: Press to idle. Getting to silence the incoming ringer temporarily. c) During ringing: Press to know your phone 11 b) During a call: Press to transfer the call to another handset. 9 Microphone 10 Speaker a) In idle / pre-dial mode...

User Guide
Page 12
... new voicemail not yet listened to mute / unmute the call . 13 Talk On / Flash a) In idle / pre-dial mode: Press to . Off when new voicemail has been listened to make a call is turned on. On when a call to the previous level. b) Calls list / phonebook / redial list entry: Press to make a call . 2.2 Cordless handset LCD display Display Icons On when the speakerphone is muted. b) In editing mode: Press to move the cursor to the left. 15 MUTE / Clear / Back / X a) In menu / phonebook...
... new voicemail not yet listened to mute / unmute the call . 13 Talk On / Flash a) In idle / pre-dial mode: Press to . Off when new voicemail has been listened to make a call is turned on. On when a call to the previous level. b) Calls list / phonebook / redial list entry: Press to make a call . 2.2 Cordless handset LCD display Display Icons On when the speakerphone is muted. b) In editing mode: Press to move the cursor to the left. 15 MUTE / Clear / Back / X a) In menu / phonebook...

User Guide
Page 13
... play the next message. 5 PLAY/STOP Press to know your phone 13 Press the button again, or any key on . In idle mode, the current time is turned on the handset, to turn off page signal. 2 VOL+ Increase speaker volume during message playback or decrease the base ringer volume when there is an incoming external call . 3 VOL- Indicates when the telephone answering machine is displayed. Decrease speaker volume during message playback or increase the base ringer volume when there...
... play the next message. 5 PLAY/STOP Press to know your phone 13 Press the button again, or any key on . In idle mode, the current time is turned on the handset, to turn off page signal. 2 VOL+ Increase speaker volume during message playback or decrease the base ringer volume when there is an incoming external call . 3 VOL- Indicates when the telephone answering machine is displayed. Decrease speaker volume during message playback or increase the base ringer volume when there...
User Guide
Page 14
... DISPLAY -- Press again to turn on the answering machine. XX/FF Flashing XX alternatively with FF: There are XX new voice messages received where XX is from 01 to 59. XX/AN Flashing XX alternatively with --: Time is not set and there are YY old voice messages (no new voice messages). LX Steady: Indicates the current volume level where X is now recording. XX Flashing: There are being stored in the answering machine memory. Flashing...
... DISPLAY -- Press again to turn on the answering machine. XX/FF Flashing XX alternatively with FF: There are XX new voice messages received where XX is from 01 to 59. XX/AN Flashing XX alternatively with --: Time is not set and there are YY old voice messages (no new voice messages). LX Steady: Indicates the current volume level where X is now recording. XX Flashing: There are being stored in the answering machine memory. Flashing...

User Guide
Page 16
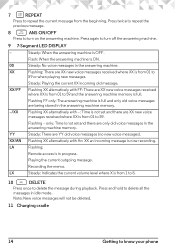
... dialed number. 3. Press /FLASH or /SPEAKER to dial the number. 3.1.4 Dialing from the speed dial location In idle mode, press and hold a key (1-9) until the speed dial number is displayed and dialed. 3.2 Muting a call 3.1.1 Predial Enter the phone number and then press number. /FLASH or /SPEAKER to dial the phone 3.1.2 Direct dialing Press /FLASH or /SPEAKER to someone else in the room without your caller hearing you want to answer an the incoming call. 3.4 Ending a call During a call, press /BACK or put the handset on the base. 3.5 Adjusting the volume During a call...
... dialed number. 3. Press /FLASH or /SPEAKER to dial the number. 3.1.4 Dialing from the speed dial location In idle mode, press and hold a key (1-9) until the speed dial number is displayed and dialed. 3.2 Muting a call 3.1.1 Predial Enter the phone number and then press number. /FLASH or /SPEAKER to dial the phone 3.1.2 Direct dialing Press /FLASH or /SPEAKER to someone else in the room without your caller hearing you want to answer an the incoming call. 3.4 Ending a call During a call, press /BACK or put the handset on the base. 3.5 Adjusting the volume During a call...

User Guide
Page 17
... 2 in the directory to match the number, the name will be displayed instead. to access the redial list. 2. to select PHONEBOOK. 3. Phonebook entries are already on hold and take the new call. If the redial number exceeds 15 digits, the telephone will display "SAVED" with a confirmation tone. 3.7.4 Deleting the entire redial list 1. Press /FLASH or /SPEAKER to dial to access the redial list. 2. The screen will only display the first 15 digits of 32 digits. Press...
... 2 in the directory to match the number, the name will be displayed instead. to access the redial list. 2. to select PHONEBOOK. 3. Phonebook entries are already on hold and take the new call. If the redial number exceeds 15 digits, the telephone will display "SAVED" with a confirmation tone. 3.7.4 Deleting the entire redial list 1. Press /FLASH or /SPEAKER to dial to access the redial list. 2. The screen will only display the first 15 digits of 32 digits. Press...

User Guide
Page 20
... dial a certain number more quickly. The screen will display "ENTER NUMBER" and will display "DELETED" with a confirmation tone. 3.10 Memory You can have a maximum of 24 digits for the number and 15 characters for the name. This feature makes it convenient when you will remain after resetting. 3.10.1 Storing a memory number 1. Press /FLASH or /SPEAKER. 2. Press SELECT and then VOL+ or REDIAL/VOL- In idle mode, use the dialing keys (0-9) to enter the number...
... dial a certain number more quickly. The screen will display "ENTER NUMBER" and will display "DELETED" with a confirmation tone. 3.10 Memory You can have a maximum of 24 digits for the number and 15 characters for the name. This feature makes it convenient when you will remain after resetting. 3.10.1 Storing a memory number 1. Press /FLASH or /SPEAKER. 2. Press SELECT and then VOL+ or REDIAL/VOL- In idle mode, use the dialing keys (0-9) to enter the number...
User Guide
Page 21
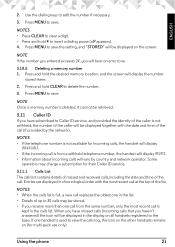
... country and network operator. NOTE If the number you entered exceeds 24, you receive more than one handset is full, a new call is not withheld, the number of the caller will hear an error tone. 3.10.5 Deleting a memory number 1. Use the dialing keys to delete the number. 3. Entries are displayed in chronological order with the date and time of the caller is kept in the list. • Details of up to view the calls log, the...
... country and network operator. NOTE If the number you entered exceeds 24, you receive more than one handset is full, a new call is not withheld, the number of the caller will hear an error tone. 3.10.5 Deleting a memory number 1. Use the dialing keys to delete the number. 3. Entries are displayed in chronological order with the date and time of the caller is kept in the list. • Details of up to view the calls log, the...
User Guide
Page 23
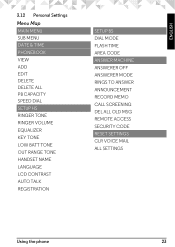
ENGLISH 3.12 Personal Settings Menu Map MAIN MENU SUB MENU DATE & TIME PHONEBOOK VIEW ADD EDIT DELETE DELETE ALL PB CAPACITY SPEED DIAL SETUP HS RINGER TONE RINGER VOLUME EQUALIZER KEY TONE LOW BATT TONE OUT RANGE TONE HANDSET NAME LANGUAGE LCD CONTRAST AUTO TALK REGISTRATION SETUP BS DIAL MODE FLASH TIME AREA CODE ANSWER MACHINE ANSWERER OFF ANSWERER MODE RINGS TO ANSWER ANNOUNCEMENT RECORD MEMO CALL SCREENING DEL ALL OLD MSG REMOTE ACCESS SECURITY CODE RESET SETTINGS CLR VOICE MAIL ALL SETTINGS Using the phone 23
ENGLISH 3.12 Personal Settings Menu Map MAIN MENU SUB MENU DATE & TIME PHONEBOOK VIEW ADD EDIT DELETE DELETE ALL PB CAPACITY SPEED DIAL SETUP HS RINGER TONE RINGER VOLUME EQUALIZER KEY TONE LOW BATT TONE OUT RANGE TONE HANDSET NAME LANGUAGE LCD CONTRAST AUTO TALK REGISTRATION SETUP BS DIAL MODE FLASH TIME AREA CODE ANSWER MACHINE ANSWERER OFF ANSWERER MODE RINGS TO ANSWER ANNOUNCEMENT RECORD MEMO CALL SCREENING DEL ALL OLD MSG REMOTE ACCESS SECURITY CODE RESET SETTINGS CLR VOICE MAIL ALL SETTINGS Using the phone 23

User Guide
Page 24
... intercom call before answering the incoming external call. 3.13.2 Transferring a call , press /FLASH then MENU. During an external call . All registered handsets will be displayed in the list. 2. When the other handset does not answer, press MUTE to talk to scroll through the menu. 3. Press /FLASH then MENU. Press SELECT to call. 3. Your call the handset. 4. Press VOL+ or REDIAL/VOL- If the other handset answers by pressing /FLASH or /SPEAKER, press /BACK to transfer the call , press /FLASH then MENU. All registered handsets...
... intercom call before answering the incoming external call. 3.13.2 Transferring a call , press /FLASH then MENU. During an external call . All registered handsets will be displayed in the list. 2. When the other handset does not answer, press MUTE to talk to scroll through the menu. 3. Press /FLASH then MENU. Press SELECT to call. 3. Your call the handset. 4. Press VOL+ or REDIAL/VOL- If the other handset answers by pressing /FLASH or /SPEAKER, press /BACK to transfer the call , press /FLASH then MENU. All registered handsets...
User Guide
Page 27
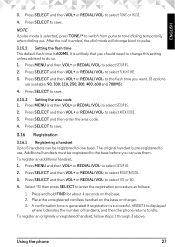
... SETUP BS. 2. ENGLISH 3. The original handset is displayed where X denotes the number of handsets, and then the phone returns to select TONE or PULSE. 4. HANDSET X is pre-registered to the base before you want. (8 options are available: 90, 100, 110, 250, 300, 400, 600 and 700MS) 4. to idle. After the call is ended, the dial mode will change back to pulse. 3.15.2 Setting the flash time The default flash time...
... SETUP BS. 2. ENGLISH 3. The original handset is displayed where X denotes the number of handsets, and then the phone returns to select TONE or PULSE. 4. HANDSET X is pre-registered to the base before you want. (8 options are available: 90, 100, 110, 250, 300, 400, 600 and 700MS) 4. to idle. After the call is ended, the dial mode will change back to pulse. 3.15.2 Setting the flash time The default flash time...

User Guide
Page 28
... handset, or place the handset on the base. to select YES. All handsets registered to the base will ring, and the handset screen will be reset to select RESET SETTINGS. 2. All personalized settings will display FIND HANDSET. 3.17 Resetting all settings 1. to default. Press SELECT and then VOL+ or REDIAL/VOL- NOTE Your phonebook entries, calls list, and redial list, will remain unchanged. 3.18 Paging/finding a handset Press FIND on the base. 28 Using the phone Press MENU...
... handset, or place the handset on the base. to select YES. All handsets registered to the base will ring, and the handset screen will be reset to select RESET SETTINGS. 2. All personalized settings will display FIND HANDSET. 3.17 Resetting all settings 1. to default. Press SELECT and then VOL+ or REDIAL/VOL- NOTE Your phonebook entries, calls list, and redial list, will remain unchanged. 3.18 Paging/finding a handset Press FIND on the base. 28 Using the phone Press MENU...

User Guide
Page 29
Besides recording incoming messages, you a message. NOTE Your answering machine is designed to answer calls after 10 rings and the answer only message will not be able to leave you to operate the remote access functions of incoming messages. • If the answering machine is to your callers. This is set to select ANSWER ON. 3. When the answering machine is set to OFF, will disappear from the handset screen and the 7-segment LED on the handset screen and the...
Besides recording incoming messages, you a message. NOTE Your answering machine is designed to answer calls after 10 rings and the answer only message will not be able to leave you to operate the remote access functions of incoming messages. • If the answering machine is to your callers. This is set to select ANSWER ON. 3. When the answering machine is set to OFF, will disappear from the handset screen and the 7-segment LED on the handset screen and the...

User Guide
Page 31
... to start recording your personalized OGM during playback and record a new one whenever you want. Answering machine 31 This mode can playback your own personalized OGM or the pre-set OGM will be used when the answering machine answers the call back later. 1. Press SELECT and then VOL+ or REDIAL/VOL- If your own OGM, it will display. 4.7 Playing back and deleting the outgoing message (OGM...
... to start recording your personalized OGM during playback and record a new one whenever you want. Answering machine 31 This mode can playback your own personalized OGM or the pre-set OGM will be used when the answering machine answers the call back later. 1. Press SELECT and then VOL+ or REDIAL/VOL- If your own OGM, it will display. 4.7 Playing back and deleting the outgoing message (OGM...

User Guide
Page 32
... Setting the call screening If the answering machine and call screening are broadcast at the telephone when a call is not recorded, the preset OGM will be restored automatically. 4.9 Setting the answer rings You can set OGM will be played. 4.8 Deleting the personalized OGM 1. to select RINGS TO ANSWER. 3. to select ANSWER MACHINE. 2. Press MENU and then VOL+ or REDIAL/VOL- Press CLEAR to delete your personalized OGM and return to save . 32 Answering machine...
... Setting the call screening If the answering machine and call screening are broadcast at the telephone when a call is not recorded, the preset OGM will be restored automatically. 4.9 Setting the answer rings You can set OGM will be played. 4.8 Deleting the personalized OGM 1. to select RINGS TO ANSWER. 3. to select ANSWER MACHINE. 2. Press MENU and then VOL+ or REDIAL/VOL- Press CLEAR to delete your personalized OGM and return to save . 32 Answering machine...

User Guide
Page 33
... the answering machine answers the calls and starts playing the OGM, press . Enter the 4-digit Remote Access PIN. NOTE If your desired function. Use the 4-digit remote access PIN code to prevent unauthorized access to your answering machine. 4.11.1 Changing the 4-digit security code 1. Press SELECT and then VOL+ or REDIAL/VOL- NOTE You must enter while the OGM is switched off , then listen to your messages remotely. 1. Press the appropriate keys from another tone-dialing phone...
... the answering machine answers the calls and starts playing the OGM, press . Enter the 4-digit Remote Access PIN. NOTE If your desired function. Use the 4-digit remote access PIN code to prevent unauthorized access to your answering machine. 4.11.1 Changing the 4-digit security code 1. Press SELECT and then VOL+ or REDIAL/VOL- NOTE You must enter while the OGM is switched off , then listen to your messages remotely. 1. Press the appropriate keys from another tone-dialing phone...
User Guide
Page 35
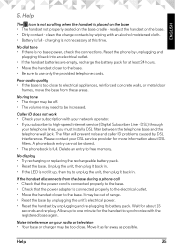
... dial tone • If there is full. Please contact your subscription with the registered base again. A phonebook entry cannot be increased. Unplug the unit, then plug it back into an electrical outlet. • If the handset batteries are empty, recharge the battery pack for the handset to be stored. • The phonebook is no base power, check the connections. It may be out of range. • Reset the base...
... dial tone • If there is full. Please contact your subscription with the registered base again. A phonebook entry cannot be increased. Unplug the unit, then plug it back into an electrical outlet. • If the handset batteries are empty, recharge the battery pack for the handset to be stored. • The phonebook is no base power, check the connections. It may be out of range. • Reset the base...


