

User Manual
Page 3
Welcome The Motorola Wireless Headset HS850 makes connectivity invisible and reliable. It is actively creating Bluetooth ® solutions for choosing the Motorola Wireless Headset HS850 with Bluetooth technology! 1 Motorola is astonishingly advanced and simple to use. Thank you for work, play, home, and life everywhere around the globe.
Welcome The Motorola Wireless Headset HS850 makes connectivity invisible and reliable. It is actively creating Bluetooth ® solutions for choosing the Motorola Wireless Headset HS850 with Bluetooth technology! 1 Motorola is astonishingly advanced and simple to use. Thank you for work, play, home, and life everywhere around the globe.
User Manual
Page 5
Contents Safety and General Information . . . 4 Introduction 10 Headset Features 10 Using Your Headset 12 Pairing Your Headset and Phone 15 Wearing Your Headset 19 Controlling Headset Volume . . . . . 22 Making and Receiving Calls. . . . . . 23 Headset Indicator 28 Audio Tones 30 3
Contents Safety and General Information . . . 4 Introduction 10 Headset Features 10 Using Your Headset 12 Pairing Your Headset and Phone 15 Wearing Your Headset 19 Controlling Headset Volume . . . . . 22 Making and Receiving Calls. . . . . . 23 Headset Indicator 28 Audio Tones 30 3
User Manual
Page 12
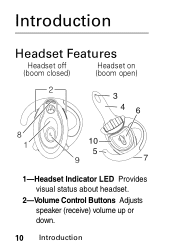
Introduction Headset Features Headset off (boom closed) Headset on (boom open) 2 3 46 8 1 10 5 9 7 1-Headset Indicator LED Provides visual status about headset. 2-Volume Control Buttons Adjusts speaker (receive) volume up or down. 10 Introduction
Introduction Headset Features Headset off (boom closed) Headset on (boom open) 2 3 46 8 1 10 5 9 7 1-Headset Indicator LED Provides visual status about headset. 2-Volume Control Buttons Adjusts speaker (receive) volume up or down. 10 Introduction

User Manual
Page 13
Introduction 11 Shroud can wear the headset around your neck and always keep it causes discomfort. 3-Microphone Receives your voice input. 4-Boom Contains microphone and controls power (On/Off) on headset. 5-Earhook Attaches headset to your ear. 6-Speaker Plays the sound you receive on the call. 7-Charging Port Accepts the plug for the battery charger. 8-Lanyard Loop Lets you attach a lanyard to the headset, so you can be removed if it near. 9-Multifunction Button E Controls several headset functions. 10-Removable Speaker Shroud Helps channel sound to your ear.
Introduction 11 Shroud can wear the headset around your neck and always keep it causes discomfort. 3-Microphone Receives your voice input. 4-Boom Contains microphone and controls power (On/Off) on headset. 5-Earhook Attaches headset to your ear. 6-Speaker Plays the sound you receive on the call. 7-Charging Port Accepts the plug for the battery charger. 8-Lanyard Loop Lets you attach a lanyard to the headset, so you can be removed if it near. 9-Multifunction Button E Controls several headset functions. 10-Removable Speaker Shroud Helps channel sound to your ear.

User Manual
Page 14
The more you hear five rapid high tones through the headset speaker, repeated at 20-second intervals, the headset battery needs to charge its self-contained battery for two hours. Recharging-When you talk on the phone with the headset, the less standby time your headset, you need to be recharged. Using Your Headset Charging Your Headset First-Time Use-Before you can use your battery has. 12 Using Your Headset Over time, batteries gradually wear down and require longer charging times. This is normal.
The more you hear five rapid high tones through the headset speaker, repeated at 20-second intervals, the headset battery needs to charge its self-contained battery for two hours. Recharging-When you talk on the phone with the headset, the less standby time your headset, you need to be recharged. Using Your Headset Charging Your Headset First-Time Use-Before you can use your battery has. 12 Using Your Headset Over time, batteries gradually wear down and require longer charging times. This is normal.

User Manual
Page 15
How to be disposed of batteries in a fire because they may need to Charge Action 1 Plug the Motorola charger into your headset, with the charger's release tab facing down and your local recycling center for proper disposal methods. Never dispose of properly and may explode. Release Tab Facing Down Using Your Headset 13 Contact your headset facing up. The rechargeable batteries that power this product must be recycled.
How to be disposed of batteries in a fire because they may need to Charge Action 1 Plug the Motorola charger into your headset, with the charger's release tab facing down and your local recycling center for proper disposal methods. Never dispose of properly and may explode. Release Tab Facing Down Using Your Headset 13 Contact your headset facing up. The rechargeable batteries that power this product must be recycled.

User Manual
Page 16
The headset will not function while charging. Your headset fully charges in approximately two hours. 3 When charging is complete. While charging, the headset indicator turns on and remains on until charging is complete (indicators off), remove the charger from the electrical outlet, press the release tab, and detach the charger cord from the headset. 14 Using Your Headset Action 2 Plug the other end of the charger into an electrical outlet.
The headset will not function while charging. Your headset fully charges in approximately two hours. 3 When charging is complete. While charging, the headset indicator turns on and remains on until charging is complete (indicators off), remove the charger from the electrical outlet, press the release tab, and detach the charger cord from the headset. 14 Using Your Headset Action 2 Plug the other end of the charger into an electrical outlet.

User Manual
Page 17
"Pairing" creates a link between devices equipped with Bluetooth wireless technology and allows the phone to charge your headset while in your headset's Using Your Headset 15 Note: You can make a call. A fully charged headset battery provides approximately: • talk time-8 hours • standby time (boom open)-200 hours Pairing Your Headset and Phone Note: You must pair your headset and phone before you can also use a Motorola Original™ Vehicle Power Adapter to remember your vehicle.
"Pairing" creates a link between devices equipped with Bluetooth wireless technology and allows the phone to charge your headset while in your headset's Using Your Headset 15 Note: You can make a call. A fully charged headset battery provides approximately: • talk time-8 hours • standby time (boom open)-200 hours Pairing Your Headset and Phone Note: You must pair your headset and phone before you can also use a Motorola Original™ Vehicle Power Adapter to remember your vehicle.
User Manual
Page 18
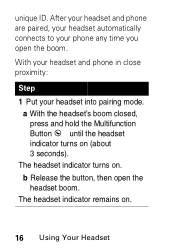
With your headset and phone in close proximity: Step 1 Put your phone any time you open the headset boom. The headset indicator remains on . unique ID. After your headset and phone are paired, your headset automatically connects to your headset into pairing mode. The headset indicator turns on . 16 Using Your Headset a With the headset's boom closed, press and hold the Multifunction Button E until the headset indicator turns on (about 3 seconds). b Release the button, then open the boom.
With your headset and phone in close proximity: Step 1 Put your phone any time you open the headset boom. The headset indicator remains on . unique ID. After your headset and phone are paired, your headset automatically connects to your headset into pairing mode. The headset indicator turns on . 16 Using Your Headset a With the headset's boom closed, press and hold the Multifunction Button E until the headset indicator turns on (about 3 seconds). b Release the button, then open the boom.

User Manual
Page 19
When the scan is complete, the phone displays the devices found. 3 Select the Motorola HS850 from the phone. The device ID is successful when the headset indicator flashes 10 times rapidly. Step 2 Perform a device discovery from the discovered devices list and confirm following the on device discovery for your phone, refer to pair the headset with the phone. Pairing is now stored in the phone's memory. For details on screen prompts. 4 When prompted by the phone, enter the passkey 0000 and confirm to the phone's user's guide. Using Your Headset 17
When the scan is complete, the phone displays the devices found. 3 Select the Motorola HS850 from the phone. The device ID is successful when the headset indicator flashes 10 times rapidly. Step 2 Perform a device discovery from the discovered devices list and confirm following the on device discovery for your phone, refer to pair the headset with the phone. Pairing is now stored in the phone's memory. For details on screen prompts. 4 When prompted by the phone, enter the passkey 0000 and confirm to the phone's user's guide. Using Your Headset 17

User Manual
Page 20
... to pair to another device in chronological order. Devices are stored in a "Paired Device List" in memory in the 18 Using Your Headset Pairing to Additional Devices Your headset can initiate a paired connection to your headset to more than eight devices is made, the oldest paired device is removed from the list. Your... headset will only automatically initiate a paired connection (by opening the boom) with the last device it was connected to eight different devices that have Bluetooth wireless ...
... to pair to another device in chronological order. Devices are stored in a "Paired Device List" in memory in the 18 Using Your Headset Pairing to Additional Devices Your headset can initiate a paired connection to your headset to more than eight devices is made, the oldest paired device is removed from the list. Your... headset will only automatically initiate a paired connection (by opening the boom) with the last device it was connected to eight different devices that have Bluetooth wireless ...
User Manual
Page 21
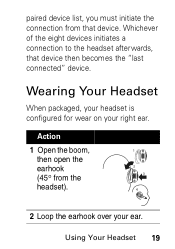
Wearing Your Headset When packaged, your headset is configured for wear on your ear. Action 1 Open the boom, then open the earhook (45° from that device then becomes the "last connected" device. Using Your Headset 19 Whichever of the eight devices initiates a connection to the headset afterwards, that device. paired device list, you must initiate the connection from the headset). 2 Loop the earhook over your right ear.
Wearing Your Headset When packaged, your headset is configured for wear on your ear. Action 1 Open the boom, then open the earhook (45° from that device then becomes the "last connected" device. Using Your Headset 19 Whichever of the eight devices initiates a connection to the headset afterwards, that device. paired device list, you must initiate the connection from the headset). 2 Loop the earhook over your right ear.

User Manual
Page 22
To change it for wear on your mouth. Wearing on the left ear: Action 1 Open the boom, then open the earhook (90° from the headset). 20 Using Your Headset Action 3 Press the headset to your ear. 4 Point the boom toward your left ear When packaged, the headset is configured for wear on the right ear.
To change it for wear on your mouth. Wearing on the left ear: Action 1 Open the boom, then open the earhook (90° from the headset). 20 Using Your Headset Action 3 Press the headset to your ear. 4 Point the boom toward your left ear When packaged, the headset is configured for wear on the right ear.

User Manual
Page 23
Using Your Headset 21 Then pull it away to remove it. 3 Flip the headset over. 4 Hook the bottom of the earhook onto the lower hinge pin, then lift and pull the top of the earhook up and off the upper hinge pin. Action 2 Gently lift and pull the top of the earhook over the upper hinge pin. 5 To change the volume button orientation, see "Volume Orientation" on page 22.
Using Your Headset 21 Then pull it away to remove it. 3 Flip the headset over. 4 Hook the bottom of the earhook onto the lower hinge pin, then lift and pull the top of the earhook up and off the upper hinge pin. Action 2 Gently lift and pull the top of the earhook over the upper hinge pin. 5 To change the volume button orientation, see "Volume Orientation" on page 22.
User Manual
Page 24
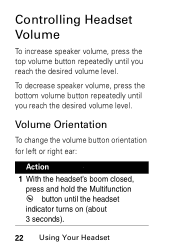
To decrease speaker volume, press the bottom volume button repeatedly until you reach the desired volume level. Volume Orientation To change the volume button orientation for left or right ear: Action 1 With the headset's boom closed, press and hold the Multifunction E button until the headset indicator turns on (about 3 seconds). 22 Using Your Headset Controlling Headset Volume To increase speaker volume, press the top volume button repeatedly until you reach the desired volume level.
To decrease speaker volume, press the bottom volume button repeatedly until you reach the desired volume level. Volume Orientation To change the volume button orientation for left or right ear: Action 1 With the headset's boom closed, press and hold the Multifunction E button until the headset indicator turns on (about 3 seconds). 22 Using Your Headset Controlling Headset Volume To increase speaker volume, press the top volume button repeatedly until you reach the desired volume level.

User Manual
Page 25
Using Your Headset 23 Please consult your phone supports. Note: Some phones do not support all features listed. Making and Receiving Calls Your headset supports both Handsfree and Headset Profiles. Accessing call functions depends on which profile your phone user's guide. Action 2 Press the volume button that you want to change the volume button orientation. Repeat the above steps anytime to use as the volume up. The headset indicator will flash several times to indicate success.
Using Your Headset 23 Please consult your phone supports. Note: Some phones do not support all features listed. Making and Receiving Calls Your headset supports both Handsfree and Headset Profiles. Accessing call functions depends on which profile your phone user's guide. Action 2 Press the volume button that you want to change the volume button orientation. Repeat the above steps anytime to use as the volume up. The headset indicator will flash several times to indicate success.

User Manual
Page 26
You can activate call . Redial a Number: On-Idle On- Make a Voice Dial Call: On in idle On Short press E , speak name, phone dials call functions according to complete the call. Long press E . (Idle) 24 Using Your Headset Release E , open boom. Dial a Number: On-user On dials number Press SEND on phone to the following table: Device Status Phone Headset Action Enter Pairing (Configuration) Mode: On Off Press & hold E (boom until LED remains closed) on.
You can activate call . Redial a Number: On-Idle On- Make a Voice Dial Call: On in idle On Short press E , speak name, phone dials call functions according to complete the call. Long press E . (Idle) 24 Using Your Headset Release E , open boom. Dial a Number: On-user On dials number Press SEND on phone to the following table: Device Status Phone Headset Action Enter Pairing (Configuration) Mode: On Off Press & hold E (boom until LED remains closed) on.
User Manual
Page 27
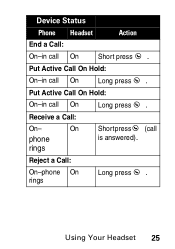
rings Reject a Call: On-phone On rings Long press E . Receive a Call: On- Put Active Call On Hold: On-in call On Long press E . Put Active Call On Hold: On-in call On Long press E . Using Your Headset 25 On ShortpressE (call On Short press E . Device Status Phone Headset Action End a Call: On-in call phone is answered).
rings Reject a Call: On-phone On rings Long press E . Receive a Call: On- Put Active Call On Hold: On-in call On Long press E . Put Active Call On Hold: On-in call On Long press E . Using Your Headset 25 On ShortpressE (call On Short press E . Device Status Phone Headset Action End a Call: On-in call phone is answered).

User Manual
Page 28
Both calls will become active. in call, On 2nd call on hold Press both Volume buttons simultaneously. Transfer call from phone to Headset: On-in call On Short press E , (call . Join two calls (3-way calling): On - Toggle between two active calls: On-in call, On 2nd call on hold Long press E . Device Status Phone Headset Action Answer 2nd incoming call: On-in call, On 2nd call coming in Long press E , places 1st call on hold, answers incoming call transferred to headset). 26 Using Your Headset
Both calls will become active. in call, On 2nd call on hold Press both Volume buttons simultaneously. Transfer call from phone to Headset: On-in call On Short press E , (call . Join two calls (3-way calling): On - Toggle between two active calls: On-in call, On 2nd call on hold Long press E . Device Status Phone Headset Action Answer 2nd incoming call: On-in call, On 2nd call coming in Long press E , places 1st call on hold, answers incoming call transferred to headset). 26 Using Your Headset

User Manual
Page 29
Note: If the link is abnormally disconnected (for example, out of range) the headset tries to reestablish the link. Headset Indicator With charger plugged in: Headset Indicator Headset ON Charging in progress OFF Charging complete With no charger attached: Headset Indicator OFF Headset Power off Using Your Headset 27
Note: If the link is abnormally disconnected (for example, out of range) the headset tries to reestablish the link. Headset Indicator With charger plugged in: Headset Indicator Headset ON Charging in progress OFF Charging complete With no charger attached: Headset Indicator OFF Headset Power off Using Your Headset 27


