
Operating and Installation manual
Page 2
... the laundry 11 2. Select a temperature and/or spin speed 14 Program guide 15 Final spin speed 19 5. Program end 27 Preparing your appliance for the first time 9 Setting the display language 9 Washing tips 10 Using the washer 11 1. Select Delay Start (if desired 25 8. Add detergent 21 Detergents 23 Fabric after care 24 7. Activate the Child Lock (if desired 26 10. Contents IMPORTANT SAFETY INSTRUCTIONS 4 Guide to the washer 7 Control panel 7 Display function 8 Before using...
... the laundry 11 2. Select a temperature and/or spin speed 14 Program guide 15 Final spin speed 19 5. Program end 27 Preparing your appliance for the first time 9 Setting the display language 9 Washing tips 10 Using the washer 11 1. Select Delay Start (if desired 25 8. Add detergent 21 Detergents 23 Fabric after care 24 7. Activate the Child Lock (if desired 26 10. Contents IMPORTANT SAFETY INSTRUCTIONS 4 Guide to the washer 7 Control panel 7 Display function 8 Before using...

Operating and Installation manual
Page 3
... Quick guide 29 Using the washer 29 Adding/removing laundry during a wash program 29 Cleaning and care 30 Cleaning the exterior and control panel 30 Cleaning the drum 30 Cleaning the dispenser drawer 31 Cleaning the water inlet filters 33 Frequently asked questions 34 No wash program will start 34 The display shows a fault message 35 General issues with the washer 36 Unsatisfactory wash results 37 The drum door cannot be opened 38 After sales service 41 Installation instructions 43 Installation 44 Installation site 46 Removing the shipping...
... Quick guide 29 Using the washer 29 Adding/removing laundry during a wash program 29 Cleaning and care 30 Cleaning the exterior and control panel 30 Cleaning the drum 30 Cleaning the dispenser drawer 31 Cleaning the water inlet filters 33 Frequently asked questions 34 No wash program will start 34 The display shows a fault message 35 General issues with the washer 36 Unsatisfactory wash results 37 The drum door cannot be opened 38 After sales service 41 Installation instructions 43 Installation 44 Installation site 46 Removing the shipping...

Operating and Installation manual
Page 4
... applications may be machine washable on the fabric care label. Close supervision is necessary when the appliance is used near children. ~ The drum door glass will be hot when washing at very high temperatures. Keep these operating instructions in a safe place and pass them on or in use to all instructions before installation or use . 4 Danger of fire, electric shock or injury to any future user. To reduce...
... applications may be machine washable on the fabric care label. Close supervision is necessary when the appliance is used near children. ~ The drum door glass will be hot when washing at very high temperatures. Keep these operating instructions in a safe place and pass them on or in use to all instructions before installation or use . 4 Danger of fire, electric shock or injury to any future user. To reduce...

Operating and Installation manual
Page 5
... be replaced with genuine Miele spare parts. ~ Installation, repair and maintenance work should be plugged into an appropriate outlet that is equipped with a cord having an equipment- This appliance is properly installed and grounded in the event of electric shock by a Miele Service technician with a genuine Miele power cord. ~ Before servicing, cleaning or in accordance with all hot water faucets and let the water flow from the main power supply. ~ Only use a new hose kit...
... be replaced with genuine Miele spare parts. ~ Installation, repair and maintenance work should be plugged into an appropriate outlet that is equipped with a cord having an equipment- This appliance is properly installed and grounded in the event of electric shock by a Miele Service technician with a genuine Miele power cord. ~ Before servicing, cleaning or in accordance with all hot water faucets and let the water flow from the main power supply. ~ Only use a new hose kit...
Operating and Installation manual
Page 6
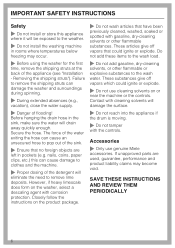
... that have been previously cleaned, washed, soaked or spotted with the controls. Closely follow the instructions on the washer, select a descaling agent with cleaning solvents will drain away quickly enough. Contact with corrosion protection. IMPORTANT SAFETY INSTRUCTIONS Safety ~ Do not install or store this can cause damage to clothes and the machine. ~ Proper dosing of the detergent will eliminate the need to remove lime deposits.
... that have been previously cleaned, washed, soaked or spotted with the controls. Closely follow the instructions on the washer, select a descaling agent with cleaning solvents will drain away quickly enough. Contact with corrosion protection. IMPORTANT SAFETY INSTRUCTIONS Safety ~ Do not install or store this can cause damage to clothes and the machine. ~ Proper dosing of the detergent will eliminate the need to remove lime deposits.

Operating and Installation manual
Page 8
... White + OK With the "+" button additional programs can be made with the "OK" button. 8 Denim / Jeans - Display of program settings - Example: Duration: 1:02 h MG G P G G GM MG G G G P GM Warm High spin Pressing the left menu button "Warm" allows to adjust the temperature. Extra White - Quick rinse - Silk - Temperature selection - Dress shirts - Table linens - Drain / Spin - Spin speed selection - Clean Machine "Menu" buttons Various settings can be adjusted and/or...
... White + OK With the "+" button additional programs can be made with the "OK" button. 8 Denim / Jeans - Display of program settings - Example: Duration: 1:02 h MG G P G G GM MG G G G P GM Warm High spin Pressing the left menu button "Warm" allows to adjust the temperature. Extra White - Quick rinse - Silk - Temperature selection - Dress shirts - Table linens - Drain / Spin - Spin speed selection - Clean Machine "Menu" buttons Various settings can be adjusted and/or...
Operating and Installation manual
Page 9
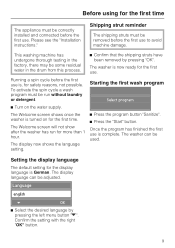
This washing machine has undergone thorough testing in the drum from this process. ^ Confirm that the shipping struts have been removed by pressing the left menu button "+". Language english + OK ^ Select the desired language by pressing "OK". Please see the "Installation instructions." To activate the spin cycle a wash program must be removed before the first use. Starting the first wash program Select program ^ Turn on for the display language...
This washing machine has undergone thorough testing in the drum from this process. ^ Confirm that the shipping struts have been removed by pressing the left menu button "+". Language english + OK ^ Select the desired language by pressing "OK". Please see the "Installation instructions." To activate the spin cycle a wash program must be removed before the first use. Starting the first wash program Select program ^ Turn on for the display language...

Operating and Installation manual
Page 10
... the first time Washing tips: Energy and water consumption - Detergent use a wash program without stains use - For light to save energy when tumble drying. 10 Keep in the remaining time displayed for the wash load to remove as much water as possible to normal soiled items without an option. - Select the highest spin speed suitable for the wash. - Do not overload the washer. Very Warm" instead of detergent. - Before using for small...
... the first time Washing tips: Energy and water consumption - Detergent use a wash program without stains use - For light to save energy when tumble drying. 10 Keep in the remaining time displayed for the wash load to remove as much water as possible to normal soiled items without an option. - Select the highest spin speed suitable for the wash. - Do not overload the washer. Very Warm" instead of detergent. - Before using for small...

Operating and Installation manual
Page 15
... synthetics, mixed I High spin fabrics or wrinkle free cottons. H Med spin G Options: Pre-wash, Extended, Sensitive, Buzzer E Max spin Items which do not M Med spin contain wool or silk. The default settings are highlighted in the drum door seal. Using the washer Program guide Temperature Normal Hot Very warm Warm Cold No heat Wrinkle-free Hot Very warm Warm Cold No heat Sanitize Sanitize Hot Handwash Warm Cold No heat Final Spin Item / Tip Options...
... synthetics, mixed I High spin fabrics or wrinkle free cottons. H Med spin G Options: Pre-wash, Extended, Sensitive, Buzzer E Max spin Items which do not M Med spin contain wool or silk. The default settings are highlighted in the drum door seal. Using the washer Program guide Temperature Normal Hot Very warm Warm Cold No heat Wrinkle-free Hot Very warm Warm Cold No heat Sanitize Sanitize Hot Handwash Warm Cold No heat Final Spin Item / Tip Options...

Operating and Installation manual
Page 16
Slow spin Rinse hold No spin Express Warm Cold No heat Custom Sanitize Hot Very warm Warm Cold No heat Options: Buzzer B Max spin A High spin Med spin Slow spin Rinse hold A No spin 16 Options: Extended, Pre-wash, Sensitive, Buzzer E Max spin All options are selectable for D High spin "Sanitize" and "Normal" programs. Med spin C Slow spin B Rinse hold No spin Small loads of mixed items without a high degree of soiling. Using the washer Temperature Woolens Warm Cold No...
Slow spin Rinse hold No spin Express Warm Cold No heat Custom Sanitize Hot Very warm Warm Cold No heat Options: Buzzer B Max spin A High spin Med spin Slow spin Rinse hold A No spin 16 Options: Extended, Pre-wash, Sensitive, Buzzer E Max spin All options are selectable for D High spin "Sanitize" and "Normal" programs. Med spin C Slow spin B Rinse hold No spin Small loads of mixed items without a high degree of soiling. Using the washer Temperature Woolens Warm Cold No...

Operating and Installation manual
Page 19
... cycle. 19 Rinse spin The laundry is set default to start the final spin. - The laundry is not removed immediately at the end of the wash program. This will also reduce the rinse spin speeds. Using the washer Final spin speed Program Normal Wrinkle free Sanitize Handwash Woolens Express Custom Extra White Delicates Silk Denim / Jeans Dress shirts Comforters Outerwear Table linens Beach towels Drain / Spin Quick rinse Clean Machine Max spin High spin Max spin Med spin High spin Max spin...
... cycle. 19 Rinse spin The laundry is set default to start the final spin. - The laundry is not removed immediately at the end of the wash program. This will also reduce the rinse spin speeds. Using the washer Final spin speed Program Normal Wrinkle free Sanitize Handwash Woolens Express Custom Extra White Delicates Silk Denim / Jeans Dress shirts Comforters Outerwear Table linens Beach towels Drain / Spin Quick rinse Clean Machine Max spin High spin Max spin Med spin High spin Max spin...

Operating and Installation manual
Page 21
... light stains. fabrics may cause: - Too much detergent may become gray and stiff over time. - poor wash, rinse and spin results. - Hard water deposits on the laundry. - Light soiling No soiling or stains are visible. Too little detergent may cause: - Using the washer 6. Higher environmental burden. 21 Add detergent Front loading washing machines require significantly less detergent than traditional top loaders. Ineffective cleaning of the detergent manufacturer. Over sudsing with minimal drum movement...
... light stains. fabrics may cause: - Too much detergent may become gray and stiff over time. - poor wash, rinse and spin results. - Hard water deposits on the laundry. - Light soiling No soiling or stains are visible. Too little detergent may cause: - Using the washer 6. Higher environmental burden. 21 Add detergent Front loading washing machines require significantly less detergent than traditional top loaders. Ineffective cleaning of the detergent manufacturer. Over sudsing with minimal drum movement...
Operating and Installation manual
Page 27
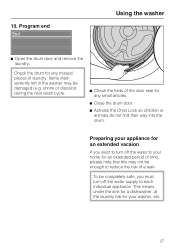
... Using the washer ^ Open the drum door and remove the laundry. shrink or discolor) during the next wash cycle. ^ Check the folds of laundry. This means under the sink for a dishwasher, at the laundry bib for your home for an extended period of time, please note that this may be damaged (e.g. Items inadvertently left in the washer may not be completely safe, you elect to turn...
... Using the washer ^ Open the drum door and remove the laundry. shrink or discolor) during the next wash cycle. ^ Check the folds of laundry. This means under the sink for a dishwasher, at the laundry bib for your home for an extended period of time, please note that this may be damaged (e.g. Items inadvertently left in the washer may not be completely safe, you elect to turn...

Operating and Installation manual
Page 34
... the door. ^ Press the "MasterCare" button. ^ Use the display to run this program approx. Do not exceed the max. Once the program is completed without laundry in the drum. ,Do not use on washing machines (available from Miele). Cleaning and care ,Before cleaning or maintenance, disconnect the power supply by unplugging the unit or manually "tripping" the circuit breaker. ,Do not hose the washer down. Cleaning the exterior and control panel ^ Clean the...
... the door. ^ Press the "MasterCare" button. ^ Use the display to run this program approx. Do not exceed the max. Once the program is completed without laundry in the drum. ,Do not use on washing machines (available from Miele). Cleaning and care ,Before cleaning or maintenance, disconnect the power supply by unplugging the unit or manually "tripping" the circuit breaker. ,Do not hose the washer down. Cleaning the exterior and control panel ^ Clean the...

Operating and Installation manual
Page 37
... bolt. Both filters must be checked and cleaned if necessary every 6 months. These filters should be put back in place after cleaning. 33 This may need to protect each inlet valve. Cleaning and care Cleaning the water inlet filters The washer has two water inlet filters to be done more frequently with some water supplies. ^ Turn off the water supply. ^ Unscrew the inlet hose from the valve by turning the connector counterclockwise using a wrench if necessary. ^ Remove the rubber seal...
... bolt. Both filters must be checked and cleaned if necessary every 6 months. These filters should be put back in place after cleaning. 33 This may need to protect each inlet valve. Cleaning and care Cleaning the water inlet filters The washer has two water inlet filters to be done more frequently with some water supplies. ^ Turn off the water supply. ^ Unscrew the inlet hose from the valve by turning the connector counterclockwise using a wrench if necessary. ^ Remove the rubber seal...

Operating and Installation manual
Page 40
... lights. There are not resting evenly on the floor. If the fault message appears again, call Miele's Technical Service Department. Clean the water intake hose filter under running water and carefully remove any large particles. - Clean the siphon tube (see "Installation - without a "hot" wash in the fabric softener compartment §. A large amount of the pump process are normal. The four feet are unusual sounds coming from the drain pump. Level the machine (see "Cleaning and careCleaning the detergent dispenser drawer"). Leveling the washer"). The water pressure...
... lights. There are not resting evenly on the floor. If the fault message appears again, call Miele's Technical Service Department. Clean the water intake hose filter under running water and carefully remove any large particles. - Clean the siphon tube (see "Installation - without a "hot" wash in the fabric softener compartment §. A large amount of the pump process are normal. The four feet are unusual sounds coming from the drain pump. Level the machine (see "Cleaning and careCleaning the detergent dispenser drawer"). Leveling the washer"). The water pressure...

Operating and Installation manual
Page 42
The door lock opens. Clean the drain filter and drain pump. See "Cleaning and Care - Press the "Pause" button. Activate the Child Lock". Cleaning the drain pump and lint trap". Power failure Open the door as described in the drum and the washer cannot drain the water. The Child Lock is still water in the chapter "Using the washer - As a safeguard against scalding, the drum door cannot be opened if the wash water temperature is over 130°F (55°C). 38 Frequently asked...
The door lock opens. Clean the drain filter and drain pump. See "Cleaning and Care - Press the "Pause" button. Activate the Child Lock". Cleaning the drain pump and lint trap". Power failure Open the door as described in the drum and the washer cannot drain the water. The Child Lock is still water in the chapter "Using the washer - As a safeguard against scalding, the drum door cannot be opened if the wash water temperature is over 130°F (55°C). 38 Frequently asked...

Operating and Installation manual
Page 48
Installation Front view a High pressure intake hose, red mark for hot water b High pressure intake hose, blue mark for cold water c Power cord d - g Flexible drain hose with detachable swivel elbow (drain options shown) h Control panel i Detergent dispenser drawer and door opener in case of power failure j Drum door k Access panel to lint trap and drain pump l Four height-adjustable feet 44
Installation Front view a High pressure intake hose, red mark for hot water b High pressure intake hose, blue mark for cold water c Power cord d - g Flexible drain hose with detachable swivel elbow (drain options shown) h Control panel i Detergent dispenser drawer and door opener in case of power failure j Drum door k Access panel to lint trap and drain pump l Four height-adjustable feet 44

Operating and Installation manual
Page 53
... check for leaks. Open the water supply slowly to a portable water supply. The washing machine has ½" (13 mm) pressure hoses with a length of 8' 2 7/16" to 13' 1 ½" (2.5 to the solenoid valve) must also be removed. A non-return valve is seated properly on the hose connector. Adjust the rubber seal and the bolted connection if necessary. If there is under water pressure. Replace the hose only with a genuine Miele hose...
... check for leaks. Open the water supply slowly to a portable water supply. The washing machine has ½" (13 mm) pressure hoses with a length of 8' 2 7/16" to 13' 1 ½" (2.5 to the solenoid valve) must also be removed. A non-return valve is seated properly on the hose connector. Adjust the rubber seal and the bolted connection if necessary. If there is under water pressure. Replace the hose only with a genuine Miele hose...

Operating and Installation manual
Page 54
... hot water only. ^ Turn on the valve(s) and check for a complete fill. Both hoses must be connected to the cold water valve through the use of a Y adapter (available at the hot water inlet, the unit will not be installed. The water pressure must be within 15 -145 psi (1 -10 bar). Do not remove these filters except for a hot water connection ^ Connect the cold water intake hose (blue mark) to the cold water valve and the hot water...
... hot water only. ^ Turn on the valve(s) and check for a complete fill. Both hoses must be connected to the cold water valve through the use of a Y adapter (available at the hot water inlet, the unit will not be installed. The water pressure must be within 15 -145 psi (1 -10 bar). Do not remove these filters except for a hot water connection ^ Connect the cold water intake hose (blue mark) to the cold water valve and the hot water...


