Side by Side Merging Kit Installation Manual
Page 4
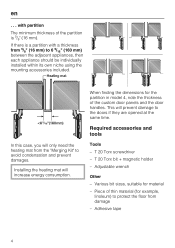
...need the heating mat from the "Merging Kit" to avoid condensation and prevent damages. Required accessories and tools Tools - Various bit sizes, suitable for example, linoleum) to protect the floor from 5/8" (16 mm) to the doors if they are opened at the same time. T 20 Torx bit + magnetic holder - en . . . Adjustable... from damage - Installing the heating mat will increase energy consumption. T 20 Torx screwdriver - When finding the dimensions for the partition in model 4, note the thickness of thin material (for material - Piece of the custom door panels and the door handles.
...need the heating mat from the "Merging Kit" to avoid condensation and prevent damages. Required accessories and tools Tools - Various bit sizes, suitable for example, linoleum) to protect the floor from 5/8" (16 mm) to the doors if they are opened at the same time. T 20 Torx bit + magnetic holder - en . . . Adjustable... from damage - Installing the heating mat will increase energy consumption. T 20 Torx screwdriver - When finding the dimensions for the partition in model 4, note the thickness of thin material (for material - Piece of the custom door panels and the door handles.
Operating and Installation manual
Page 2
... drawers 16 Using the refrigerator efficiently 18 Using the freezer efficiently 19 Freezing food 19 Defrosting 20 Cooling drinks quickly 20 SuperCool 21 Ice cube maker 22 Automatic defrost 23 Adjusting the interior fittings 24 Moving the shelves 24 Floating drawer 24 Removing the storage shelf from above the drawer 26 Ice cube container 27 Small freezer basket 27 Cleaning and care 28 Cleaning the interior and accessories 29 Humidity filters 30 Ventilation slits 30 Door...
... drawers 16 Using the refrigerator efficiently 18 Using the freezer efficiently 19 Freezing food 19 Defrosting 20 Cooling drinks quickly 20 SuperCool 21 Ice cube maker 22 Automatic defrost 23 Adjusting the interior fittings 24 Moving the shelves 24 Floating drawer 24 Removing the storage shelf from above the drawer 26 Ice cube container 27 Small freezer basket 27 Cleaning and care 28 Cleaning the interior and accessories 29 Humidity filters 30 Ventilation slits 30 Door...
Operating and Installation manual
Page 3
Contents Water filter 33 Water filter change indicator 33 Exchanging the water filter 34 Confirming the filter change 35 Using an external water filter 35 Lead free certificate 38 Frequently asked questions 39 After sales service 47 Caring for the environment 50 Installation 51 Installation site 51 Stainless steel panels 53 Custom door panels 53 Installation options 53 Adjusting the door opening angle (optional accessory 55 Dimensions 56 Installing the appliance 59 Before you begin 59 RemoteVision module installation 61 Preparing...
Contents Water filter 33 Water filter change indicator 33 Exchanging the water filter 34 Confirming the filter change 35 Using an external water filter 35 Lead free certificate 38 Frequently asked questions 39 After sales service 47 Caring for the environment 50 Installation 51 Installation site 51 Stainless steel panels 53 Custom door panels 53 Installation options 53 Adjusting the door opening angle (optional accessory 55 Dimensions 56 Installing the appliance 59 Before you begin 59 RemoteVision module installation 61 Preparing...
Operating and Installation manual
Page 4
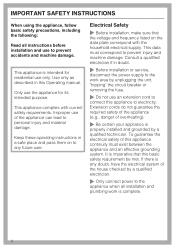
.... This appliance is complete. 4 Keep these operating instructions in a safe place and pass them on the data plate correspond with current safety requirements. Use only as described in doubt. ~ Before installation or service, disconnect the power supply to the work is intended for its intended purpose. Improper use of this Operating manual. Electrical Safety ~ Before installation, make sure that this appliance to prevent injury...
.... This appliance is complete. 4 Keep these operating instructions in a safe place and pass them on the data plate correspond with current safety requirements. Use only as described in doubt. ~ Before installation or service, disconnect the power supply to the work is intended for its intended purpose. Improper use of this Operating manual. Electrical Safety ~ Before installation, make sure that this appliance to prevent injury...
Operating and Installation manual
Page 5
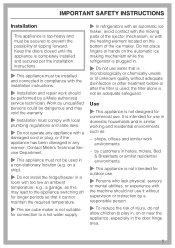
... located on the automatic ice making mechanism while the refrigerator is plugged in. ~ Do not use . ~ Persons who lack physical, sensory or mental abilities, or experience with the machine should be secured to play in, on a ship). ~ Do not install the fridge/freezer in a non-stationary location (e.g. shops, offices and similar work should not use it cannot maintain the required temperature. ~ The ice cube maker...
... located on the automatic ice making mechanism while the refrigerator is plugged in. ~ Do not use . ~ Persons who lack physical, sensory or mental abilities, or experience with the machine should be secured to play in, on a ship). ~ Do not install the fridge/freezer in a non-stationary location (e.g. shops, offices and similar work should not use it cannot maintain the required temperature. ~ The ice cube maker...
Operating and Installation manual
Page 6
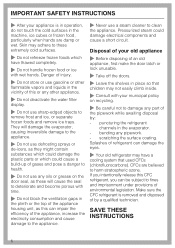
... foods and remove ice trays. Pressurized steam could damage the plastic parts or which have a cooling system that children may adhere to harm stratospheric ozone. scratching the surface coating. bending any other appliance. ~ Do not deactivate the water filter display. ~ Do not use gasoline or other flammable vapors and liquids in place so that used CFCs (chlorofluorocarbons). SAVE THESE INSTRUCTIONS 6 Danger...
... foods and remove ice trays. Pressurized steam could damage the plastic parts or which have a cooling system that children may adhere to harm stratospheric ozone. scratching the surface coating. bending any other appliance. ~ Do not deactivate the water filter display. ~ Do not use gasoline or other flammable vapors and liquids in place so that used CFCs (chlorofluorocarbons). SAVE THESE INSTRUCTIONS 6 Danger...

Operating and Installation manual
Page 7
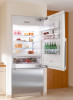
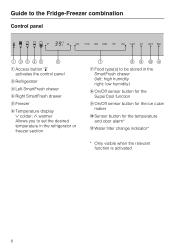
Guide to the Fridge-Freezer combination a Hinged door shelf b Shelves (height adjustable) c Door shelves (height adjustable) d Floating drawer e Control panel f Humidity filter g Main switch to turn the appliance On/Off h SmartFresh drawer i Ice maker j Water filter k Small freezer basket l Large freezer basket m Ice cube container 7
Guide to the Fridge-Freezer combination a Hinged door shelf b Shelves (height adjustable) c Door shelves (height adjustable) d Floating drawer e Control panel f Humidity filter g Main switch to turn the appliance On/Off h SmartFresh drawer i Ice maker j Water filter k Small freezer basket l Large freezer basket m Ice cube container 7
Operating and Installation manual
Page 8
... stored in the refrigerator or freezer section g Food type(s) to the Fridge-Freezer combination Control panel a Access button "p" activates the control panel b Refrigerator c Left SmartFresh drawer d Right SmartFresh drawer e Freezer f Temperature display X colder; Y warmer Allows you to set the desired temperature in the SmartFresh drawer (left: high humidity right: low humidity) h On/Off sensor button for the SuperCool function i On/Off sensor button for the ice cube maker j Sensor button for the temperature and door alarm* k Water filter change indicator* * Only visible when...
... stored in the refrigerator or freezer section g Food type(s) to the Fridge-Freezer combination Control panel a Access button "p" activates the control panel b Refrigerator c Left SmartFresh drawer d Right SmartFresh drawer e Freezer f Temperature display X colder; Y warmer Allows you to set the desired temperature in the SmartFresh drawer (left: high humidity right: low humidity) h On/Off sensor button for the SuperCool function i On/Off sensor button for the ice cube maker j Sensor button for the temperature and door alarm* k Water filter change indicator* * Only visible when...
Operating and Installation manual
Page 10
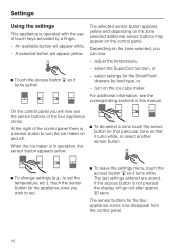
... button. ^ To change settings (e.g., to set the temperature, etc.), touch the sensor button for the appliance zone you wish to turn on the control panel. The sensor buttons for the SmartFresh drawers by a finger. - The last settings entered are stored. An available button will appear yellow. turn the ice maker on the zone selected, you can now: - At the right of the control panel there is operated with the use...
... button. ^ To change settings (e.g., to set the temperature, etc.), touch the sensor button for the appliance zone you wish to turn on the control panel. The sensor buttons for the SmartFresh drawers by a finger. - The last settings entered are stored. An available button will appear yellow. turn the ice maker on the zone selected, you can now: - At the right of the control panel there is operated with the use...
Operating and Installation manual
Page 12
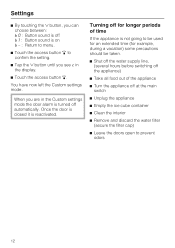
... used for an extended time (for example, during a vacation) some precautions should be taken. ^ Shut off the water supply line, (several hours before switching off the appliance) ^ Take all food out of the appliance ^ Turn the appliance off at the main switch ^ Unplug the appliance ^ Empty the ice cube container ^ Clean the interior ^ Remove and discard the water filter (secure the filter cap) ^ Leave the doors open...
... used for an extended time (for example, during a vacation) some precautions should be taken. ^ Shut off the water supply line, (several hours before switching off the appliance) ^ Take all food out of the appliance ^ Turn the appliance off at the main switch ^ Unplug the appliance ^ Empty the ice cube container ^ Clean the interior ^ Remove and discard the water filter (secure the filter cap) ^ Leave the doors open...
Operating and Installation manual
Page 18
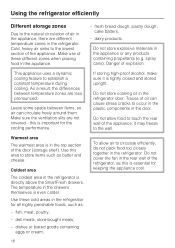
... may freeze to circulate efficiently, do not pack food too closely together in the refrigerator for keeping the appliance cool. 18 Traces of oil can circulate freely around them. Cold, heavy air sinks to store items such as : - Do not store explosive materials in the refrigerator door. Leave some space between temperature zones are not covered - Make use of these cold areas...
... may freeze to circulate efficiently, do not pack food too closely together in the refrigerator for keeping the appliance cool. 18 Traces of oil can circulate freely around them. Cold, heavy air sinks to store items such as : - Do not store explosive materials in the refrigerator door. Leave some space between temperature zones are not covered - Make use of these cold areas...

Operating and Installation manual
Page 24
..., or removed for cleaning. ^ Pull the shelf forward. ^ Move the shelf to the desired height, then insert the (rear) hooks into the refrigerator to avoid injury. 24 Push the tracks back into place. ^ Make sure the shelf is level. These drawers are set on telescopic tracks. Adjusting the interior fittings Moving the shelves SmartFresh drawer The shelves can be adjusted according to the height of the food. ^ Using both sides...
..., or removed for cleaning. ^ Pull the shelf forward. ^ Move the shelf to the desired height, then insert the (rear) hooks into the refrigerator to avoid injury. 24 Push the tracks back into place. ^ Make sure the shelf is level. These drawers are set on telescopic tracks. Adjusting the interior fittings Moving the shelves SmartFresh drawer The shelves can be adjusted according to the height of the food. ^ Using both sides...
Operating and Installation manual
Page 26
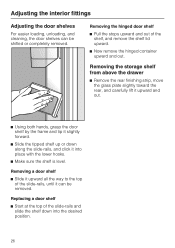
.... ^ Now remove the hinged container upward and out. Removing a door shelf ^ Slide it into the desired position. 26 Adjusting the interior fittings Adjusting the door shelves For easier loading, unloading, and cleaning, the door shelves can be shifted or completely removed. Removing the storage shelf from above the drawer ^ Remove the rear finishing strip, move the glass plate slightly toward the rear, and carefully lift it upward and out. ^ Using both...
.... ^ Now remove the hinged container upward and out. Removing a door shelf ^ Slide it into the desired position. 26 Adjusting the interior fittings Adjusting the door shelves For easier loading, unloading, and cleaning, the door shelves can be shifted or completely removed. Removing the storage shelf from above the drawer ^ Remove the rear finishing strip, move the glass plate slightly toward the rear, and carefully lift it upward and out. ^ Using both...
Operating and Installation manual
Page 33
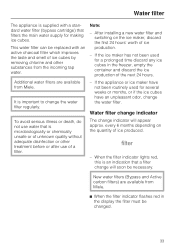
... a filter. The change the water filter regularly. - every 6 months depending on the ice maker, discard the first 24 hours' worth of ice production. - New water filters (Bypass and Active carbon filters) are available from the incoming tap water. After installing a new water filter and switching on the quantity of the next 24 hours. This water filter can be replaced with a standard water filter (bypass cartridge) that a filter change will appear approx. Additional water filters are available from Miele. ^ When the filter indicator flashes...
... a filter. The change the water filter regularly. - every 6 months depending on the ice maker, discard the first 24 hours' worth of ice production. - New water filters (Bypass and Active carbon filters) are available from the incoming tap water. After installing a new water filter and switching on the quantity of the next 24 hours. This water filter can be replaced with a standard water filter (bypass cartridge) that a filter change will appear approx. Additional water filters are available from Miele. ^ When the filter indicator flashes...
Operating and Installation manual
Page 34
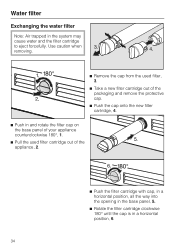
Water filter Exchanging the water filter Note: Air trapped in a horizontal position, 6. 34 Use caution when removing. ^ Remove the cap from the used filter, 3. ^ Take a new filter cartridge out of the packaging and remove the protective cap. ^ Push the cap onto the new filter cartridge, 4. ^ Push in and rotate the filter cap on the base panel of your appliance counterclockwise 180°, 1. ^ Pull the used filter cartridge out of the appliance, 2. ^ Push the...
Water filter Exchanging the water filter Note: Air trapped in a horizontal position, 6. 34 Use caution when removing. ^ Remove the cap from the used filter, 3. ^ Take a new filter cartridge out of the packaging and remove the protective cap. ^ Push the cap onto the new filter cartridge, 4. ^ Push in and rotate the filter cap on the base panel of your appliance counterclockwise 180°, 1. ^ Pull the used filter cartridge out of the appliance, 2. ^ Push the...
Operating and Installation manual
Page 37
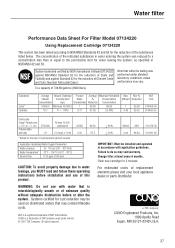
....99 95.42 NSF Test 516458-05 516456-05 Particulate Class I . Flush new cartridge for the reduction of the substances listed below. Systems certified for cyst reduction may be installed and operated in accordance with water that is microbiologically unsafe or of unknown quality without adequate disinfection before installation and use of the indicated substances in Model 07134220 against NSF/ANSI...
....99 95.42 NSF Test 516458-05 516456-05 Particulate Class I . Flush new cartridge for the reduction of the substances listed below. Systems certified for cyst reduction may be installed and operated in accordance with water that is microbiologically unsafe or of unknown quality without adequate disinfection before installation and use of the indicated substances in Model 07134220 against NSF/ANSI...
Operating and Installation manual
Page 42
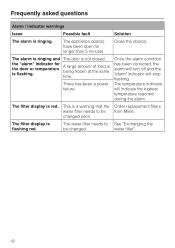
... water filter needs to be changed soon. Close the door(s). Frequently asked questions Alarm / Indicator warnings Issue Possible fault Solution The alarm is being frozen at the same time. Once the alarm condition has been corrected, the alarm will turn off and the "alarm" indicator will indicate the highest temperature reached during the alarm. The filter display is a warning that the Order replacement filters water filter needs to See "Exchanging the be from Miele...
... water filter needs to be changed soon. Close the door(s). Frequently asked questions Alarm / Indicator warnings Issue Possible fault Solution The alarm is being frozen at the same time. Once the alarm condition has been corrected, the alarm will turn off and the "alarm" indicator will indicate the highest temperature reached during the alarm. The filter display is a warning that the Order replacement filters water filter needs to See "Exchanging the be from Miele...
Operating and Installation manual
Page 44
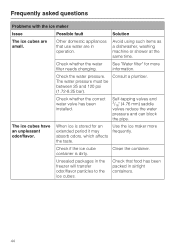
..., which affects the taste. Check the water pressure. Check if the ice cube container is stored for more frequently. Check whether the water filter needs changing. Unsealed packages in the freezer will transfer odor/flavor particles to the ice cubes. Check whether the correct water valve has been installed. Consult a plumber. Use the ice maker more information. Clean the container. Other domestic appliances that food...
..., which affects the taste. Check the water pressure. Check if the ice cube container is stored for more frequently. Check whether the water filter needs changing. Unsealed packages in the freezer will transfer odor/flavor particles to the ice cubes. Check whether the correct water valve has been installed. Consult a plumber. Use the ice maker more information. Clean the container. Other domestic appliances that food...
Operating and Installation manual
Page 45
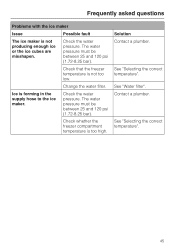
... between 25 and 120 psi (1.72-8.25 bar). See "Selecting the correct temperature". Check that the freezer temperature is not producing enough ice or the ice cubes are misshapen. The water pressure must be between 25 and 120 psi (1.72-8.25 bar). Frequently asked questions Problems with the ice maker Issue Possible fault The ice maker is not too low. Change the water filter.
... between 25 and 120 psi (1.72-8.25 bar). See "Selecting the correct temperature". Check that the freezer temperature is not producing enough ice or the ice cubes are misshapen. The water pressure must be between 25 and 120 psi (1.72-8.25 bar). Frequently asked questions Problems with the ice maker Issue Possible fault The ice maker is not too low. Change the water filter.

Operating and Installation manual
Page 80
... to a 120 V, 60 Hz supply. The fuse rating is supplied with a UL-listed, 3-wire power cord and NEMA 5-15 P plug ready for each appliance. The receptacle must be used for connection to follow these instructions can result in electric shock. Do not connect the appliance to the power supply by -side installations, a separate outlet must be performed by a qualified electrician or service technician. If there are...
... to a 120 V, 60 Hz supply. The fuse rating is supplied with a UL-listed, 3-wire power cord and NEMA 5-15 P plug ready for each appliance. The receptacle must be used for connection to follow these instructions can result in electric shock. Do not connect the appliance to the power supply by -side installations, a separate outlet must be performed by a qualified electrician or service technician. If there are...


