Product Manual
Page 2
... Control panel ...19 Sensor buttons...20 Touch display ...22 Symbols ...23 Basic operation ...24 Features ...26 Model numbers ...26 Data plate ...26 Items included...26 Standard and optional accessories 26 Glass Tray ...27 Wire rack with non-tip safety notches 27 Speed Oven controls 30 Safety features ...30 System lock 30 Safety cut-out 30 Cooling fan...31 PerfectClean treated surfaces 31 Before using for the first time 32 General settings ...32 Heating...
... Control panel ...19 Sensor buttons...20 Touch display ...22 Symbols ...23 Basic operation ...24 Features ...26 Model numbers ...26 Data plate ...26 Items included...26 Standard and optional accessories 26 Glass Tray ...27 Wire rack with non-tip safety notches 27 Speed Oven controls 30 Safety features ...30 System lock 30 Safety cut-out 30 Cooling fan...31 PerfectClean treated surfaces 31 Before using for the first time 32 General settings ...32 Heating...
Product Manual
Page 8
... void the warranty. Before installing the oven, check for examination, repair or adjustment. IMPORTANT SAFETY INSTRUCTIONS Children Children should be performed by a Miele authorized service technician in accordance with national and local safety regulations and the provided installation instructions. Technical safety This appliance must be installed and connected in , on any plastic wrappings, bags, etc. Do not operate a damaged appliance...
... void the warranty. Before installing the oven, check for examination, repair or adjustment. IMPORTANT SAFETY INSTRUCTIONS Children Children should be performed by a Miele authorized service technician in accordance with national and local safety regulations and the provided installation instructions. Technical safety This appliance must be installed and connected in , on any plastic wrappings, bags, etc. Do not operate a damaged appliance...
Product Manual
Page 10
... parts of the oven such as the door glass, vents, and the control panel can become hot enough to function correctly, it requires an adequate supply of cool air. Ensure that the cool air supply is not heated by Miele original spare parts only. Only with heating elements or interior surfaces of the oven until the oven has completely cooled down. IMPORTANT SAFETY INSTRUCTIONS Defective components should be replaced...
... parts of the oven such as the door glass, vents, and the control panel can become hot enough to function correctly, it requires an adequate supply of cool air. Ensure that the cool air supply is not heated by Miele original spare parts only. Only with heating elements or interior surfaces of the oven until the oven has completely cooled down. IMPORTANT SAFETY INSTRUCTIONS Defective components should be replaced...
Product Manual
Page 12
Use Convection Bake for these items and monitor the process carefully. Use caution when using the Broil mode. Do not use any flames, do not open the door until the smoke has dissipated. Do not use "). 12 Interrupt the process by turning the appliance off and disconnecting it to melt and damage the appliance. Do not open the Speed Oven door if smoke occurs...
Use Convection Bake for these items and monitor the process carefully. Use caution when using the Broil mode. Do not use any flames, do not open the door until the smoke has dissipated. Do not use "). 12 Interrupt the process by turning the appliance off and disconnecting it to melt and damage the appliance. Do not open the Speed Oven door if smoke occurs...
Product Manual
Page 13
... temperature to keep food in the oven warm, the high humidity and amount of plastic, paper or other inflammable materials. Instead use Convection Bake or Surround for these procedures. When using Microwave . Always cover food when using residual heat to the lowest setting and leave the oven on automatically and dissipate the moisture. 13 IMPORTANT SAFETY INSTRUCTIONS For modes without microwave power...
... temperature to keep food in the oven warm, the high humidity and amount of plastic, paper or other inflammable materials. Instead use Convection Bake or Surround for these procedures. When using Microwave . Always cover food when using residual heat to the lowest setting and leave the oven on automatically and dissipate the moisture. 13 IMPORTANT SAFETY INSTRUCTIONS For modes without microwave power...
Product Manual
Page 16
... temperature, first interrupt the cooking process. These pads can cause the glass to break. Steam could be used for food use the oven to clean the door glass. 16 Cleaning and care Do not use abrasive cleaners, hard sponges, brushes or sharp metal tools to heat up heating pads filled with the heating element. Make certain that the power cords of the food. Only use a thermometer specifically approved for cooking...
... temperature, first interrupt the cooking process. These pads can cause the glass to break. Steam could be used for food use the oven to clean the door glass. 16 Cleaning and care Do not use abrasive cleaners, hard sponges, brushes or sharp metal tools to heat up heating pads filled with the heating element. Make certain that the power cords of the food. Only use a thermometer specifically approved for cooking...
Product Manual
Page 31
.... Follow the instructions in the oven, on the control panel or on automatically when a cooking program is a smooth, non-stick surface that cleans easily with cool room air before venting it out into the kitchen through vents located between the appliance door and the control panel. The cooling fan will turn itself off automatically after a cooking process to prevent moisture building up in the "Cleaning and Care" section of...
.... Follow the instructions in the oven, on the control panel or on automatically when a cooking program is a smooth, non-stick surface that cleans easily with cool room air before venting it out into the kitchen through vents located between the appliance door and the control panel. The cooling fan will turn itself off automatically after a cooking process to prevent moisture building up in the "Cleaning and Care" section of...
Product Manual
Page 32
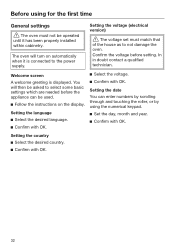
...; Set the day, month and year. Confirm with OK. The oven will then be asked to the power supply. Setting the voltage (electrical version) The voltage set must not be used. Follow the instructions on automatically when it has been properly installed within cabinetry. Setting the date You can be operated until it is displayed. You will turn on the display.
...; Set the day, month and year. Confirm with OK. The oven will then be asked to the power supply. Setting the voltage (electrical version) The voltage set must not be used. Follow the instructions on automatically when it has been properly installed within cabinetry. Setting the date You can be operated until it is displayed. You will turn on the display.

Product Manual
Page 42
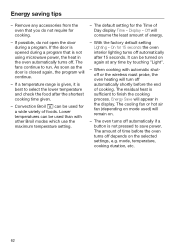
... Time Controlled setting and try not to corrosion of the appliance. The default temperature is displayed along with the available temperature range. Change the default temperature. Confirm with temperatures that differ from the default, it makes sense to prevent humidity from building up in the warm oven. Temperature Controlled The cooling fan turns off when the temperature in the surrounding cabinetry. - After selecting this option, a list...
... Time Controlled setting and try not to corrosion of the appliance. The default temperature is displayed along with the available temperature range. Change the default temperature. Confirm with temperatures that differ from the default, it makes sense to prevent humidity from building up in the warm oven. Temperature Controlled The cooling fan turns off when the temperature in the surrounding cabinetry. - After selecting this option, a list...
Product Manual
Page 62
... heat is not using microwave power, the heat in the display. Off will remain on the selected settings, e.g. It can be turned on again at any accessories from the oven that is sufficient to run. Remove any time by touching "Light". - If possible, do not require for 15 seconds the oven interior lighting turns off automatically if a button is opened during a program that you do not open the door during a program. Convection Broil...
... heat is not using microwave power, the heat in the display. Off will remain on the selected settings, e.g. It can be turned on again at any accessories from the oven that is sufficient to run. Remove any time by touching "Light". - If possible, do not require for 15 seconds the oven interior lighting turns off automatically if a button is opened during a program that you do not open the door during a program. Convection Broil...

Product Manual
Page 74
... the oven. Select Operating Modes . Select the desired mode. The oven heating, lighting and cooling fan will start. The microwave power level, cooking time, set a maximum duration of 2:00 hours. Select Start. Volume - The remaining time appears in the display. In the Combi modes, the maximum microwave power level is reached a signal will appear. The oven cooking will turn on the oven. Combi Modes Microwave Combi modes use microwave power with the possible temperature range for each mode is...
... the oven. Select Operating Modes . Select the desired mode. The oven heating, lighting and cooling fan will start. The microwave power level, cooking time, set a maximum duration of 2:00 hours. Select Start. Volume - The remaining time appears in the display. In the Combi modes, the maximum microwave power level is reached a signal will appear. The oven cooking will turn on the oven. Combi Modes Microwave Combi modes use microwave power with the possible temperature range for each mode is...
Product Manual
Page 94
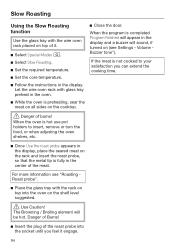
... tip is preheating, sear the meat on all sides on the cooktop. Close the door. For more information see Settings - When the program is not cooked to insert, remove or turn the food, or when adjusting the oven shelves, etc. Once Use the roast probe appears in the display. The Browning / Broiling element will sound, if turned on (see "Roasting Roast probe". Place the glass tray with the rack on...
... tip is preheating, sear the meat on all sides on the cooktop. Close the door. For more information see Settings - When the program is not cooked to insert, remove or turn the food, or when adjusting the oven shelves, etc. Once Use the roast probe appears in the display. The Browning / Broiling element will sound, if turned on (see "Roasting Roast probe". Place the glass tray with the rack on...
Product Manual
Page 110
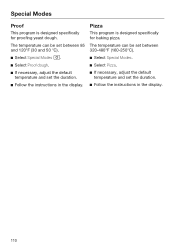
Pizza This program is designed specifically for baking pizza. The temperature can be set between 320-480°F (160-250°C). Select Special Modes. Select Pizza. If necessary, adjust the default temperature and set the duration. Follow the instructions in the display. 110 The temperature can be set between 85 and 120°F (30 and 50 °C). Select...
Pizza This program is designed specifically for baking pizza. The temperature can be set between 320-480°F (160-250°C). Select Special Modes. Select Pizza. If necessary, adjust the default temperature and set the duration. Follow the instructions in the display. 110 The temperature can be set between 85 and 120°F (30 and 50 °C). Select...
Product Manual
Page 122
... deactivate the lock, see "Settings - Program Canceled appears in the display. The Safety cut-out feature has been display. activated. Confirm with OK. A replacement roast probe can unlock the oven to use. Fault XX appears in the display. The system lock is now ready to start a cooking program by will turn off and then back on . If the door is not a fault. The power supply was operated for...
... deactivate the lock, see "Settings - Program Canceled appears in the display. The Safety cut-out feature has been display. activated. Confirm with OK. A replacement roast probe can unlock the oven to use. Fault XX appears in the display. The system lock is now ready to start a cooking program by will turn off and then back on . If the door is not a fault. The power supply was operated for...

Product Manual
Page 123
... turned on . The wire oven rack was covered with microwave. Baked goods are not cooked properly after a cooking program (see "Suitable containers for microwave use the glass tray for the recipe. The addition of time or after a cooking program has ended to save power. Turn the oven back on after following the times given in the oven during a program with microwave. Always use "). The oven turns off . Cooling fan"). When using metal dishes (see "Settings...
... turned on . The wire oven rack was covered with microwave. Baked goods are not cooked properly after a cooking program (see "Suitable containers for microwave use the glass tray for the recipe. The addition of time or after a cooking program has ended to save power. Turn the oven back on after following the times given in the oven during a program with microwave. Always use "). The oven turns off . Cooling fan"). When using metal dishes (see "Settings...

Product Manual
Page 125
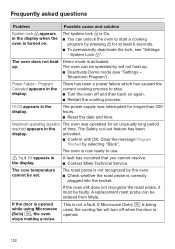
... Problem The oven lighting does not turn on the oven floor and open door to avoid damage. Disconnect the appliance from the power supply. Remove the screw to the lamp cover using a T20 Torx screwdriver, and take off and allowed to be replaced. Danger of burns! Possible cause and solution The halogen bulb needs to cool completely. Make sure the heating elements are turned...
... Problem The oven lighting does not turn on the oven floor and open door to avoid damage. Disconnect the appliance from the power supply. Remove the screw to the lamp cover using a T20 Torx screwdriver, and take off and allowed to be replaced. Danger of burns! Possible cause and solution The halogen bulb needs to cool completely. Make sure the heating elements are turned...
Product Manual
Page 128
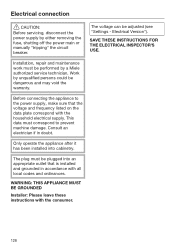
... electrical supply. SAVE THESE INSTRUCTIONS FOR THE ELECTRICAL INSPECTOR'S USE. Installation, repair and maintenance work must correspond to the power supply, make sure that is installed and grounded in doubt. Electrical Version"). Before connecting the appliance to prevent machine damage. The plug must be performed by either removing the fuse, shutting off the power main or manually "tripping" the circuit breaker. Electrical connection CAUTION: Before servicing, disconnect the power supply by a Miele authorized service...
... electrical supply. SAVE THESE INSTRUCTIONS FOR THE ELECTRICAL INSPECTOR'S USE. Installation, repair and maintenance work must correspond to the power supply, make sure that is installed and grounded in doubt. Electrical Version"). Before connecting the appliance to prevent machine damage. The plug must be performed by either removing the fuse, shutting off the power main or manually "tripping" the circuit breaker. Electrical connection CAUTION: Before servicing, disconnect the power supply by a Miele authorized service...
Product Manual
Page 129
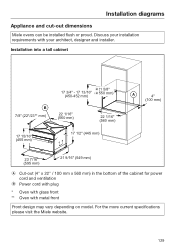
Discuss your installation requirements with metal front Front design may vary depending on model. Installation into a tall cabinet B 7/8" (22*/23** mm) 17 15/16" (455 mm) 21 5/8" 17 3/4" - 17 13/16" ( 550 mm)... Cut-out (4" x 22" / 100 mm x 560 mm) in the bottom of the cabinet for power cord and ventilation Power cord with plug * Oven with glass front ** Oven with your architect, designer and installer. For the more current specifications please visit the Miele website. 129 Installation diagrams Appliance and cut-out dimensions Miele ovens can be installed flush or ...
Discuss your installation requirements with metal front Front design may vary depending on model. Installation into a tall cabinet B 7/8" (22*/23** mm) 17 15/16" (455 mm) 21 5/8" 17 3/4" - 17 13/16" ( 550 mm)... Cut-out (4" x 22" / 100 mm x 560 mm) in the bottom of the cabinet for power cord and ventilation Power cord with plug * Oven with glass front ** Oven with your architect, designer and installer. For the more current specifications please visit the Miele website. 129 Installation diagrams Appliance and cut-out dimensions Miele ovens can be installed flush or ...
Product Manual
Page 130
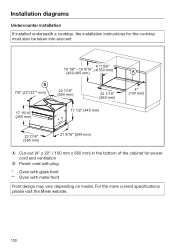
... mm) Cut-out (4" x 22" / 100 mm x 560 mm) in the bottom of the cabinet for the cooktop must also be taken into account. For the more current specifications please visit the Miele website. 130 Installation diagrams Undercounter installation If installed underneath a cooktop, the installation instructions for power cord and ventilation Power cord with plug * Oven with glass front ** Oven with metal front Front design may vary depending on model.
... mm) Cut-out (4" x 22" / 100 mm x 560 mm) in the bottom of the cabinet for the cooktop must also be taken into account. For the more current specifications please visit the Miele website. 130 Installation diagrams Undercounter installation If installed underneath a cooktop, the installation instructions for power cord and ventilation Power cord with plug * Oven with glass front ** Oven with metal front Front design may vary depending on model.

Product Manual
Page 131
For the more current specifications please visit the Miele website. 131 Installation diagrams Installation in a tall cabinet in combination with an oven 7/8" (22*/23** mm) 22 1/16" (560 mm) 17 15/16" (455 mm) 17 1/2" (445 mm) 17 3/4"-17 13/16" (450-452 mm) 20 7/8" ( 530 mm) A 4" ... (560 mm) 4" (100 mm) 23 7/16" (596 mm) 22 11/16" 20 1/16" (577 mm) (510 mm) 23 7/16" (595 mm) 21 1/2" (546 mm) Cut-out (4" x 22" / 100 mm x 560 mm) in the bottom of the cabinet for power cord and ventilation * Oven with glass front ** Oven with metal front Front design may vary depending on...
For the more current specifications please visit the Miele website. 131 Installation diagrams Installation in a tall cabinet in combination with an oven 7/8" (22*/23** mm) 22 1/16" (560 mm) 17 15/16" (455 mm) 17 1/2" (445 mm) 17 3/4"-17 13/16" (450-452 mm) 20 7/8" ( 530 mm) A 4" ... (560 mm) 4" (100 mm) 23 7/16" (596 mm) 22 11/16" 20 1/16" (577 mm) (510 mm) 23 7/16" (595 mm) 21 1/2" (546 mm) Cut-out (4" x 22" / 100 mm x 560 mm) in the bottom of the cabinet for power cord and ventilation * Oven with glass front ** Oven with metal front Front design may vary depending on...


