
Product Manual
Page 2
... INSTRUCTIONS 7 Guide to the Speed Oven 19 Control panel ...20 Sensor buttons...21 Display ...23 Symbols ...24 Features ...25 Model numbers ...25 Data plate ...25 Items included...25 Standard and optional accessories 25 Glass Tray ...26 Wire rack with non-tip safety notches 26 Speed Oven controls 29 Oven safety features 29 System lock 29 Safety switch-off 29 Cooling fan...29 PerfectClean treated surfaces 29 Before using for the first time 31 General settings...
... INSTRUCTIONS 7 Guide to the Speed Oven 19 Control panel ...20 Sensor buttons...21 Display ...23 Symbols ...24 Features ...25 Model numbers ...25 Data plate ...25 Items included...25 Standard and optional accessories 25 Glass Tray ...26 Wire rack with non-tip safety notches 26 Speed Oven controls 29 Oven safety features 29 System lock 29 Safety switch-off 29 Cooling fan...29 PerfectClean treated surfaces 29 Before using for the first time 31 General settings...
Product Manual
Page 8
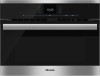
... supervision is in cabinets above an oven. Do not allow children to touch or play in an area where an oven is necessary when used by the user: Never repair or replace any plastic wrappings, bags, etc. Technical safety This appliance must be installed and connected in compliance with the installation instructions. Installation, repair and maintenance work may void the warranty. Maintenance...
... supervision is in cabinets above an oven. Do not allow children to touch or play in an area where an oven is necessary when used by the user: Never repair or replace any plastic wrappings, bags, etc. Technical safety This appliance must be installed and connected in compliance with the installation instructions. Installation, repair and maintenance work may void the warranty. Maintenance...

Product Manual
Page 10
... not be used in operation. on the heating elements, oven interior, cooked food or oven accessories. Also be sure that the air flow is not impaired (e.g. Wear pot holders when placing food in or removing food, or when making adjustments in the cabinetry). Depending on the mode selected, you could burn yourself on a ship). Do not repair or replace any part of electric shock! IMPORTANT...
... not be used in operation. on the heating elements, oven interior, cooked food or oven accessories. Also be sure that the air flow is not impaired (e.g. Wear pot holders when placing food in or removing food, or when making adjustments in the cabinetry). Depending on the mode selected, you could burn yourself on a ship). Do not repair or replace any part of electric shock! IMPORTANT...

Product Manual
Page 12
... cover any flames, do not open the Speed Oven door if smoke occurs inside the appliance. They can ignite if overheated. Do not use the oven for frying. Interrupt the process by turning the appliance off the Speed Oven immediately and suffocate the flames by it from the power. Turn off and disconnecting it . Never leave the appliance unattended when cooking...
... cover any flames, do not open the Speed Oven door if smoke occurs inside the appliance. They can ignite if overheated. Do not use the oven for frying. Interrupt the process by turning the appliance off the Speed Oven immediately and suffocate the flames by it from the power. Turn off and disconnecting it . Never leave the appliance unattended when cooking...

Product Manual
Page 14
..., use a lower power for continued cooking to the lowest setting and leave the oven on the selected mode. Instead set the temperature to reduce the amount of steam produced from condensing on automatically and dissipate the moisture. It is recommended to cover all cooked food that is empty or incorrectly loaded. The fan will prevent moisture from the food. Before using residual heat...
..., use a lower power for continued cooking to the lowest setting and leave the oven on the selected mode. Instead set the temperature to reduce the amount of steam produced from condensing on automatically and dissipate the moisture. It is recommended to cover all cooked food that is empty or incorrectly loaded. The fan will prevent moisture from the food. Before using residual heat...

Product Manual
Page 17
... Speed Oven. This oven must only be pierced or cut in several places to allow steam to break. Do not use it as these Operating and Installation Instructions. Scratches on the door glass can ignite even after they have been removed from bursting. To check food temperature, first interrupt the cooking process. Do not use a steam cleaner to clean the door glass. 17 Cleaning and care ...
... Speed Oven. This oven must only be pierced or cut in several places to allow steam to break. Do not use it as these Operating and Installation Instructions. Scratches on the door glass can ignite even after they have been removed from bursting. To check food temperature, first interrupt the cooking process. Do not use a steam cleaner to clean the door glass. 17 Cleaning and care ...

Product Manual
Page 29
... after a cooking process to bake, roast, broil and reheat. Therefore wait a short time before venting it out into the kitchen through vents located between 1 hour and 12 hours depending on automatically when a cooking program is followed in the oven, on the control panel or on and off A mode without Microwave can be easily removed from being used unintentionally (see "Settings - System lock"). To prevent continuous use the various cooking modes to prevent...
... after a cooking process to bake, roast, broil and reheat. Therefore wait a short time before venting it out into the kitchen through vents located between 1 hour and 12 hours depending on automatically when a cooking program is followed in the oven, on the control panel or on and off A mode without Microwave can be easily removed from being used unintentionally (see "Settings - System lock"). To prevent continuous use the various cooking modes to prevent...

Product Manual
Page 31
... be operated until it is displayed. Clock Format"). 31 You will turn on the display. Set the date Use or to set the time of day in hours and minutes (e.g. 1-2-1-5 for the first time General settings The oven must match that of day can be used. Follow the instructions on automatically when it has been properly installed within cabinetry. The oven will...
... be operated until it is displayed. Clock Format"). 31 You will turn on the display. Set the date Use or to set the time of day in hours and minutes (e.g. 1-2-1-5 for the first time General settings The oven must match that of day can be used. Follow the instructions on automatically when it has been properly installed within cabinetry. The oven will...

Product Manual
Page 33
... oven door open until the oven interior is displayed 350°F (160°C). The oven heating, lighting and cooling fan will appear. Select Operating Modes. Select Convection Bake The default temperature is completely dry. 33 Ensure that may have accumulated in it will eliminate the odor. Heat up the oven for at least an hour: Turn the oven off . Before using for the first time Heating the oven New ovens...
... oven door open until the oven interior is displayed 350°F (160°C). The oven heating, lighting and cooling fan will appear. Select Operating Modes. Select Convection Bake The default temperature is completely dry. 33 Ensure that may have accumulated in it will eliminate the odor. Heat up the oven for at least an hour: Turn the oven off . Before using for the first time Heating the oven New ovens...

Product Manual
Page 41
.... 15 minutes using power level 2. If food is not removed from building up in the oven, on the control panel or in the Microwave mode if at the end of 10 minutes is activated in the surrounding cabinetry. - Controlled The cooling fan will turn off when the oven compartment temperature drops below 160°F (70°C). - Do not adjust the Time Controlled setting and try not...
.... 15 minutes using power level 2. If food is not removed from building up in the oven, on the control panel or in the Microwave mode if at the end of 10 minutes is activated in the surrounding cabinetry. - Controlled The cooling fan will turn off when the oven compartment temperature drops below 160°F (70°C). - Do not adjust the Time Controlled setting and try not...

Product Manual
Page 59
... "Light". - The default setting for 15 Seconds the oven interior lighting turns off automatically after the shortest cooking time given. - Show - On for the Time of foods. The reqidual heat is not using microwave power, the heat in the display. The cooling fan or hot air fan (depending on again at any accessories from the oven that is sufficient to run. The amount of time before the end of energy. - mode, temperature, cooking...
... "Light". - The default setting for 15 Seconds the oven interior lighting turns off automatically after the shortest cooking time given. - Show - On for the Time of foods. The reqidual heat is not using microwave power, the heat in the display. The cooling fan or hot air fan (depending on again at any accessories from the oven that is sufficient to run. The amount of time before the end of energy. - mode, temperature, cooking...

Product Manual
Page 69
... the display for you can change the oven mode during operation (see "Solo modes - Changing the oven mode"). Duration - Additional options will restart using the new duration. Ready at - Change Mode (You can also permanently reset the default power level to run with OK. 69 Microwave Power Levels"). Select Change. Select Power Level. Change the power setting. Confirm with the modified microwave power level. You can change the mode while a cooking program...
... the display for you can change the oven mode during operation (see "Solo modes - Changing the oven mode"). Duration - Additional options will restart using the new duration. Ready at - Change Mode (You can also permanently reset the default power level to run with OK. 69 Microwave Power Levels"). Select Change. Select Power Level. Change the power setting. Confirm with the modified microwave power level. You can change the mode while a cooking program...
Product Manual
Page 107
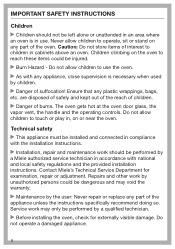
... fan, it . Remove parsley and dill from the oven. Allow the fruit or vegetables to cool down after dehydrating. Use pot holders when removing the dehydrated food from the stem. Distribute the food to be dried evenly over the glass tray or the rack. Select Special Modes. Select Dehydrate. If necessary, adjust the default temperature and set...
... fan, it . Remove parsley and dill from the oven. Allow the fruit or vegetables to cool down after dehydrating. Use pot holders when removing the dehydrated food from the stem. Distribute the food to be dried evenly over the glass tray or the rack. Select Special Modes. Select Dehydrate. If necessary, adjust the default temperature and set...
Product Manual
Page 109
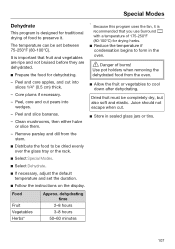
...°F (160-250°C). Select Special Modes. Select Pizza. If necessary, adjust the default temperature and set the duration. Follow the instructions in the display. Pizza This program is designed specifically for baking pizza. Special Modes Proof This mode is designed specifically for proofing yeast dough. You can be set between 75 and 125°F (30 and 50...
...°F (160-250°C). Select Special Modes. Select Pizza. If necessary, adjust the default temperature and set the duration. Follow the instructions in the display. Pizza This program is designed specifically for baking pizza. Special Modes Proof This mode is designed specifically for proofing yeast dough. You can be set between 75 and 125°F (30 and 50...

Product Manual
Page 123
... pans are best for microwave use the glass tray for the program chosen. Metal was used . Select the temperature required for the recipe. A different temperature than that the heat does not penetrate to cook. The wrong temperature or shelf level was used in microwave mode. The wire oven rack was used was covered with microwave. The oven turns off . The addition of time or after a cooking program has ended to save power. Turn the oven back...
... pans are best for microwave use the glass tray for the program chosen. Metal was used . Select the temperature required for the recipe. A different temperature than that the heat does not penetrate to cook. The wrong temperature or shelf level was used in microwave mode. The wire oven rack was used was covered with microwave. The oven turns off . The addition of time or after a cooking program has ended to save power. Turn the oven back...

Product Manual
Page 125
... parts, a glass cover and mounting. Remove the halogen bulb. Replace it does not fall. Make sure the heating elements are turned off the cover. Do not touch the halogen blub with a new halogen bulb (Sylvania 66740, 120 V, 40 W, G9, FS1). Frequently asked questions Problem The oven lighting does not turn on the mounting is correctly located in the notch in the mounting, and refit the lamp cover. The light cover...
... parts, a glass cover and mounting. Remove the halogen bulb. Replace it does not fall. Make sure the heating elements are turned off the cover. Do not touch the halogen blub with a new halogen bulb (Sylvania 66740, 120 V, 40 W, G9, FS1). Frequently asked questions Problem The oven lighting does not turn on the mounting is correctly located in the notch in the mounting, and refit the lamp cover. The light cover...
Product Manual
Page 128
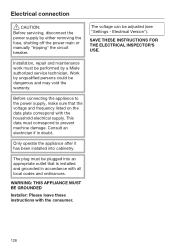
.... Work by either removing the fuse, shutting off the power main or manually "tripping" the circuit breaker. SAVE THESE INSTRUCTIONS FOR THE ELECTRICAL INSPECTOR'S USE. This data must correspond to the power supply, make sure that is installed and grounded in doubt. Electrical connection CAUTION: Before servicing, disconnect the power supply by unqualified persons could be dangerous and may void the warranty. Installation, repair and maintenance work must be adjusted (see "Settings...
.... Work by either removing the fuse, shutting off the power main or manually "tripping" the circuit breaker. SAVE THESE INSTRUCTIONS FOR THE ELECTRICAL INSPECTOR'S USE. This data must correspond to the power supply, make sure that is installed and grounded in doubt. Electrical connection CAUTION: Before servicing, disconnect the power supply by unqualified persons could be dangerous and may void the warranty. Installation, repair and maintenance work must be adjusted (see "Settings...

Product Manual
Page 129
For the more current specifications please visit the Miele website. 129 Installation diagrams Appliance and cut-out dimensions Miele ovens can be installed flush or proud. Discuss your installation requirements with metal front Front design may vary depending on model. Installation into a tall cabinet B 7/8" (22*/23** mm) 17 15/...100 mm) 23 7/16" (595 mm) 21 9/16" (549 mm) Cut-out (4" x 22" / 100 mm x 560 mm) in the bottom of the cabinet for power cord and ventilation Power cord with plug * Oven with glass front ** Oven with your architect, designer and installer.
For the more current specifications please visit the Miele website. 129 Installation diagrams Appliance and cut-out dimensions Miele ovens can be installed flush or proud. Discuss your installation requirements with metal front Front design may vary depending on model. Installation into a tall cabinet B 7/8" (22*/23** mm) 17 15/...100 mm) 23 7/16" (595 mm) 21 9/16" (549 mm) Cut-out (4" x 22" / 100 mm x 560 mm) in the bottom of the cabinet for power cord and ventilation Power cord with plug * Oven with glass front ** Oven with your architect, designer and installer.

Product Manual
Page 130
... mm) Cut-out (4" x 22" / 100 mm x 560 mm) in the bottom of the cabinet for the cooktop must also be taken into account. Installation diagrams Undercounter installation If installed underneath a cooktop, the installation instructions for power cord and ventilation Power cord with plug * Oven with glass front ** Oven with metal front Front design may vary depending on model. For the more current specifications please visit the Miele website. 130
... mm) Cut-out (4" x 22" / 100 mm x 560 mm) in the bottom of the cabinet for the cooktop must also be taken into account. Installation diagrams Undercounter installation If installed underneath a cooktop, the installation instructions for power cord and ventilation Power cord with plug * Oven with glass front ** Oven with metal front Front design may vary depending on model. For the more current specifications please visit the Miele website. 130

Product Manual
Page 131
Installation diagrams Installation in a tall cabinet in combination with an oven 7/8" (22*/23** mm) 22 1/16" (560 mm) 17 15/16" (455 mm) 17 1/2" (445 mm) 17 3/4"-17 13/16" (450-452 mm) 20 7/8" ( 530 mm) A 4" (... 11/16" 20 1/16" (577 mm) (510 mm) 23 7/16" (595 mm) 21 1/2" (546 mm) Cut-out (4" x 22" / 100 mm x 560 mm) in the bottom of the cabinet for power cord and ventilation * Oven with glass front ** Oven with metal front Front design may vary depending on model. For the more current specifications please visit the Miele website. 131
Installation diagrams Installation in a tall cabinet in combination with an oven 7/8" (22*/23** mm) 22 1/16" (560 mm) 17 15/16" (455 mm) 17 1/2" (445 mm) 17 3/4"-17 13/16" (450-452 mm) 20 7/8" ( 530 mm) A 4" (... 11/16" 20 1/16" (577 mm) (510 mm) 23 7/16" (595 mm) 21 1/2" (546 mm) Cut-out (4" x 22" / 100 mm x 560 mm) in the bottom of the cabinet for power cord and ventilation * Oven with glass front ** Oven with metal front Front design may vary depending on model. For the more current specifications please visit the Miele website. 131


