
Specs
Page 1
ContourLine Warming Drawers ESW 6380 FB ESW 6580 ESW 6780 Shown: ESW 6780 8mieleusa.com
ContourLine Warming Drawers ESW 6380 FB ESW 6580 ESW 6780 Shown: ESW 6780 8mieleusa.com

Specs
Page 2
...Warming Drawer ESW 6380 FB / ESW 6580 / ESW 6780 FOREVER BETTER ESW 6380 FB Features: • Accomodates custom front panel • Touch controls • Fan-assisted heating system • Time control, 4-hour timer • Temperature settings from 104ºF to 185ºF • Keeps food or plates and cups warm ... up to 12 people • Sabbath Program • Movable half rack insert allows food and dishware to be stored and warmed on two levels ESW 6580 Features: • Clean Touch Steel™ front with Comfort handle • Touch controls • Fan-assisted heating system ...
...Warming Drawer ESW 6380 FB / ESW 6580 / ESW 6780 FOREVER BETTER ESW 6380 FB Features: • Accomodates custom front panel • Touch controls • Fan-assisted heating system • Time control, 4-hour timer • Temperature settings from 104ºF to 185ºF • Keeps food or plates and cups warm ... up to 12 people • Sabbath Program • Movable half rack insert allows food and dishware to be stored and warmed on two levels ESW 6580 Features: • Clean Touch Steel™ front with Comfort handle • Touch controls • Fan-assisted heating system ...
Specs
Page 3
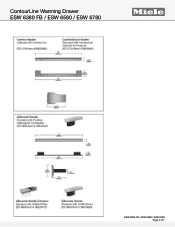
ContourLine Warming Drawer ESW 6380 FB / ESW 6580 / ESW 6780 FOREVER BETTER ESW 6380 FB / ESW 6580 / ESW 6780 Page 3 of 7
ContourLine Warming Drawer ESW 6380 FB / ESW 6580 / ESW 6780 FOREVER BETTER ESW 6380 FB / ESW 6580 / ESW 6780 Page 3 of 7
Specs
Page 4
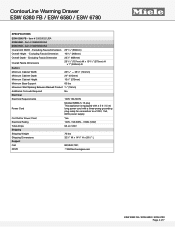
... Dimension 2515/16" (659mm) Overall Height - Cut Out for connection to a 120V, 15A, 60Hz power supply. Item # 30658052USA ESW 6780 - ContourLine Warming Drawer ESW 6380 FB / ESW 6580 / ESW 6780 SPECIFICATIONS ESW 6380 FB - Item # 30638052USA ESW 6580 - Excluding Fascia Dimension 237/8" (606mm) Overall Fascia Dimensions 2913/16" (757mm) W x 1013/16" (275mm) H x 1"... Support Call 20/20 327/8" W x 143/8" H x 297/8" L 800.843.7231 82020technologies.com FOREVER BETTER ESW 6380 FB / ESW 6580 / ESW 6780 Page 4 of 7 Excluding Fascia Dimension 109/16" (268mm) Overall Depth -
... Dimension 2515/16" (659mm) Overall Height - Cut Out for connection to a 120V, 15A, 60Hz power supply. Item # 30658052USA ESW 6780 - ContourLine Warming Drawer ESW 6380 FB / ESW 6580 / ESW 6780 SPECIFICATIONS ESW 6380 FB - Item # 30638052USA ESW 6580 - Excluding Fascia Dimension 237/8" (606mm) Overall Fascia Dimensions 2913/16" (757mm) W x 1013/16" (275mm) H x 1"... Support Call 20/20 327/8" W x 143/8" H x 297/8" L 800.843.7231 82020technologies.com FOREVER BETTER ESW 6380 FB / ESW 6580 / ESW 6780 Page 4 of 7 Excluding Fascia Dimension 109/16" (268mm) Overall Depth -
Specs
Page 5
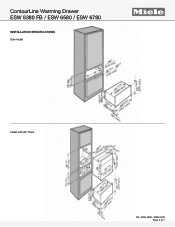
ContourLine Warming Drawer ESW 6380 FB / ESW 6580 / ESW 6780 INSTALLATION SPECIFICATIONS Solo Install FOREVER BETTER Install with 30" Oven ESW 6380 FB / ESW 6580 / ESW 6780 Page 5 of 7
ContourLine Warming Drawer ESW 6380 FB / ESW 6580 / ESW 6780 INSTALLATION SPECIFICATIONS Solo Install FOREVER BETTER Install with 30" Oven ESW 6380 FB / ESW 6580 / ESW 6780 Page 5 of 7
Specs
Page 6
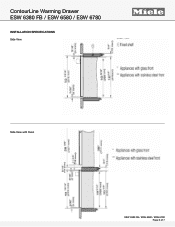
ContourLine Warming Drawer ESW 6380 FB / ESW 6580 / ESW 6780 INSTALLATION SPECIFICATIONS Side View FOREVER BETTER Side View with Oven ESW 6380 FB / ESW 6580 / ESW 6780 Page 6 of 7
ContourLine Warming Drawer ESW 6380 FB / ESW 6580 / ESW 6780 INSTALLATION SPECIFICATIONS Side View FOREVER BETTER Side View with Oven ESW 6380 FB / ESW 6580 / ESW 6780 Page 6 of 7
Specs
Page 7
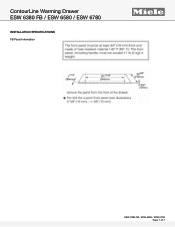
ContourLine Warming Drawer ESW 6380 FB / ESW 6580 / ESW 6780 INSTALLATION SPECIFICATIONS FB Panel Information FOREVER BETTER ESW 6380 FB / ESW 6580 / ESW 6780 Page 7 of 7
ContourLine Warming Drawer ESW 6380 FB / ESW 6580 / ESW 6780 INSTALLATION SPECIFICATIONS FB Panel Information FOREVER BETTER ESW 6380 FB / ESW 6580 / ESW 6780 Page 7 of 7

Product Manual
Page 1
US, CA M.-Nr. 09 800 170 Operating and Installation Instructions Warming Drawer To prevent accidents and machine damages, read these instructions before installation or use. en -
US, CA M.-Nr. 09 800 170 Operating and Installation Instructions Warming Drawer To prevent accidents and machine damages, read these instructions before installation or use. en -

Product Manual
Page 2
Contents IMPORTANT SAFETY INSTRUCTIONS 3 Guide to the appliance 6 Warming drawer 6 Control panel 7 Standard accessories 8 Before using for the first time 9 Operation 10 Operating modes 10 Temperature settings 11 Duration 12 Keeping food warm 13 Warming dishes 15 Capacity 16 Other uses 17 Sabbath mode 18 Cleaning and care 19 Frequently asked questions 20 Optional accessories 21 IMPORTANT SAFETY INSTRUCTIONS 24 Installation dimensions 25 Installation 27 Installing the front panel 28 Electrical connection 30 Technical Service 31 Help protect our environment 32 2
Contents IMPORTANT SAFETY INSTRUCTIONS 3 Guide to the appliance 6 Warming drawer 6 Control panel 7 Standard accessories 8 Before using for the first time 9 Operation 10 Operating modes 10 Temperature settings 11 Duration 12 Keeping food warm 13 Warming dishes 15 Capacity 16 Other uses 17 Sabbath mode 18 Cleaning and care 19 Frequently asked questions 20 Optional accessories 21 IMPORTANT SAFETY INSTRUCTIONS 24 Installation dimensions 25 Installation 27 Installing the front panel 28 Electrical connection 30 Technical Service 31 Help protect our environment 32 2
Product Manual
Page 3
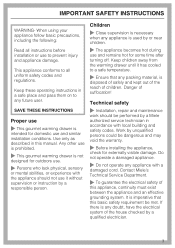
...Children ~ Close supervision is not designed for some time after turning off. Contact Miele's Technical Service Department. ~ To guarantee the electrical safety of suffocation! Keep children away from the warming drawer until it without supervision or instruction by unqualified persons could be performed by or... near children. ~ The appliance becomes hot during use and remains hot for outdoors use ~ This gourmet warming drawer is imperative that any future user. Work by a responsible person. SAVE THESE INSTRUCTIONS Proper use . ~ Persons who lack physical...
...Children ~ Close supervision is not designed for some time after turning off. Contact Miele's Technical Service Department. ~ To guarantee the electrical safety of suffocation! Keep children away from the warming drawer until it without supervision or instruction by unqualified persons could be performed by or... near children. ~ The appliance becomes hot during use and remains hot for outdoors use ~ This gourmet warming drawer is imperative that any future user. Work by a responsible person. SAVE THESE INSTRUCTIONS Proper use . ~ Persons who lack physical...
Product Manual
Page 4
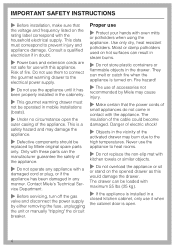
...only dry, heat resistant potholders. Danger of electric shock! ~ Objects in the vicinity of the activated drawer may damage the appliance. ~ Defective components should be replaced by Miele original spare parts only. IMPORTANT SAFETY INSTRUCTIONS ~ Before installation, make sure that the power cords of ...If the appliance is installed in the cabinetry. ~ This gourmet warming drawer must correspond to heat rooms. ~ Do not replace the non-slip mat with this would damage the drawer. Do not use them to connect the gourmet warming drawer to the electrical power supply. ~ Do not use it ...
...only dry, heat resistant potholders. Danger of electric shock! ~ Objects in the vicinity of the activated drawer may damage the appliance. ~ Defective components should be replaced by Miele original spare parts only. IMPORTANT SAFETY INSTRUCTIONS ~ Before installation, make sure that the power cords of ...If the appliance is installed in the cabinetry. ~ This gourmet warming drawer must correspond to heat rooms. ~ Do not replace the non-slip mat with this would damage the drawer. Do not use them to connect the gourmet warming drawer to the electrical power supply. ~ Do not use it ...

Product Manual
Page 5
... important when preparing food for opening and closing the appliance. ~ Do not use a steam cleaner to the warming drawer or injury. ~ Never warm undiluted alcohol in the warming drawer, this can build up causing an explosion that will damage the cooking compartment. The steam created could penetrate electrical... mode must be sure food is possible that the vents are not covered. Food and tableware may not warm evenly otherwise. ~ Do not leave the warming drawer unattended while in foods kept for too long the sugar may caramelize or ignite. ~ Be sure that some bacterial...
... important when preparing food for opening and closing the appliance. ~ Do not use a steam cleaner to the warming drawer or injury. ~ Never warm undiluted alcohol in the warming drawer, this can build up causing an explosion that will damage the cooking compartment. The steam created could penetrate electrical... mode must be sure food is possible that the vents are not covered. Food and tableware may not warm evenly otherwise. ~ Do not leave the warming drawer unattended while in foods kept for too long the sugar may caramelize or ignite. ~ Be sure that some bacterial...

Product Manual
Page 6
Guide to the appliance Warming drawer a Non-slip mat b Control panel c Vents d Rack 6
Guide to the appliance Warming drawer a Non-slip mat b Control panel c Vents d Rack 6
Product Manual
Page 7
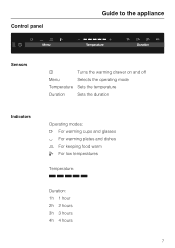
Control panel Guide to the appliance Sensors s Turns the warming drawer on and off Menu Selects the operating mode Temperature Sets the temperature Duration Sets the duration Indicators Operating modes: H For warming cups and glasses H For warming plates and dishes 2 For keeping food warm ¯ For low temperatures Temperature: Q Q Q Q Q Duration: 1h 1 hour 2h 2 hours 3h 3 hours 4h 4 hours 7
Control panel Guide to the appliance Sensors s Turns the warming drawer on and off Menu Selects the operating mode Temperature Sets the temperature Duration Sets the duration Indicators Operating modes: H For warming cups and glasses H For warming plates and dishes 2 For keeping food warm ¯ For low temperatures Temperature: Q Q Q Q Q Duration: 1h 1 hour 2h 2 hours 3h 3 hours 4h 4 hours 7

Product Manual
Page 9
...symbol is illuminated. ^ Tap "Temperature" until 2h is illuminated. ^ Close the drawer. Ensure proper ventilation of the appliance will turn off a slight odor the first time your appliance inside and outside with a sponge cloth, warm water and liquid dish soap. The smell will dissipate after two hours. Metal ... the ON/OFF sensor s to turn on the far right is illuminated. ^ Tap "Duration" until the LED on when the drawer is closed. Heat the empty drawer for the first time Clean and heat the appliance ^ Remove any protective wrapping. ^ Remove the non-slip mat and the rack,...
...symbol is illuminated. ^ Tap "Temperature" until 2h is illuminated. ^ Close the drawer. Ensure proper ventilation of the appliance will turn off a slight odor the first time your appliance inside and outside with a sponge cloth, warm water and liquid dish soap. The smell will dissipate after two hours. Metal ... the ON/OFF sensor s to turn on the far right is illuminated. ^ Tap "Duration" until the LED on when the drawer is closed. Heat the empty drawer for the first time Clean and heat the appliance ^ Remove any protective wrapping. ^ Remove the non-slip mat and the rack,...
Product Manual
Page 12
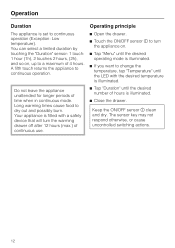
... the appliance on , up to a maximum of time when in continuous mode. Operation Duration The appliance is set to continuous operation. Long warming times cause food to turn the warming drawer off after 12 hours (max.) of hours is illuminated. ^ Tap "Duration" until the desired number of continuous use. Do not leave the...
... the appliance on , up to a maximum of time when in continuous mode. Operation Duration The appliance is set to continuous operation. Long warming times cause food to turn the warming drawer off after 12 hours (max.) of hours is illuminated. ^ Tap "Duration" until the desired number of continuous use. Do not leave the...

Product Manual
Page 20
... time to the heating element. This is no power to the warming drawer. Frequently asked questions ,Repairs should only be carried out by large plates or dishes. See "Warming times". Adjust the temperature setting. What if the food or dishes are not warm enough? The fan works in doubt contact an electrician. Unauthorized repairs... setting and make sure the food is the circulation fan which distributes the heated air. Check the temperature setting. This is not too close to warm. If in intervals during use. What if the drawer does not heat?
... time to the heating element. This is no power to the warming drawer. Frequently asked questions ,Repairs should only be carried out by large plates or dishes. See "Warming times". Adjust the temperature setting. What if the food or dishes are not warm enough? The fan works in doubt contact an electrician. Unauthorized repairs... setting and make sure the food is the circulation fan which distributes the heated air. Check the temperature setting. This is not too close to warm. If in intervals during use. What if the drawer does not heat?
Product Manual
Page 24
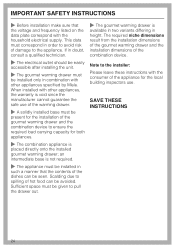
...is available in two variants differing in combination with the household electrical supply. Note to pull the drawer out. ~ The gourmet warming drawer is placed directly onto the installed gourmet warming drawer; This data must be installed in order to avoid risk of damage to spilling of hot food... can be avoided. Sufficient space must be given to the installer: Please leave these instructions with other appliances specified by Miele. SAVE THESE ...
...is available in two variants differing in combination with the household electrical supply. Note to pull the drawer out. ~ The gourmet warming drawer is placed directly onto the installed gourmet warming drawer; This data must be installed in order to avoid risk of damage to spilling of hot food... can be avoided. Sufficient space must be given to the installer: Please leave these instructions with other appliances specified by Miele. SAVE THESE ...

Product Manual
Page 27
When inserting the appliance, wear work gloves to the manual included with that the base of the warming drawer is clean and level. Only then will it . ^ Open the drawer, and use the 4 screws provided to secure the drawer to the side walls of the cabinet. ^ Install the combination appliance according to avoid injuries. ^ Push the drawer into the cabinet as far as the vapor strip, and align it function properly. Installation Check that appliance. 27
When inserting the appliance, wear work gloves to the manual included with that the base of the warming drawer is clean and level. Only then will it . ^ Open the drawer, and use the 4 screws provided to secure the drawer to the side walls of the cabinet. ^ Install the combination appliance according to avoid injuries. ^ Push the drawer into the cabinet as far as the vapor strip, and align it function properly. Installation Check that appliance. 27

Product Manual
Page 30
... the same circuit, operating both appliances at the same time may cause an overload. Further installation details are on the data plate correspond with the warming drawer to the power supply, make sure that the voltage and frequency listed on the wiring diagram. 30 Installation work and repairs should only be dangerous...
... the same circuit, operating both appliances at the same time may cause an overload. Further installation details are on the data plate correspond with the warming drawer to the power supply, make sure that the voltage and frequency listed on the wiring diagram. 30 Installation work and repairs should only be dangerous...

